rsync学习笔记
一、rsync介绍
1)rsync是什么?
rsync(remote synchronize),一款开源的远程数据备份的优秀工具
2)与SCP的比较:
SCP无法备份大量数据,类似Windows的复制
rsync:边复制,边统计,边比较
3)第一次同步时,rsync会复制全部内容,但在下一次只传输修过的文件
4)数据同步的两种方式:
push(推):rsync服务器主动推送数据给其他主机。服务器开销大,适合后端服务器少的情况
pull(拉):客户端主动向rsync服务器拉取数据
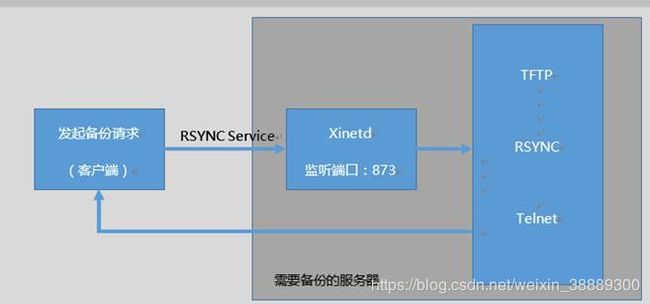
5)监听端口:873
[root@qll251 ~]# grep rsync /etc/services
rsync           873/tcp                         # rsync
rsync           873/udp                         # rsync
[root@qll251 ~]#
xinetd(extended internet daemon),新一代的网络守护进程服务程序,又叫超级Internet服务器。用来管理多种轻量级Internet服务,比如:TFTP、rsync、Telnet等
二、rsync安装
#  本次实验以CentOS7.7为例
[root@qll251 ~]# cat /etc/redhat-release
CentOS Linux release 7.7.1908 (Core)
[root@qll251 ~]#
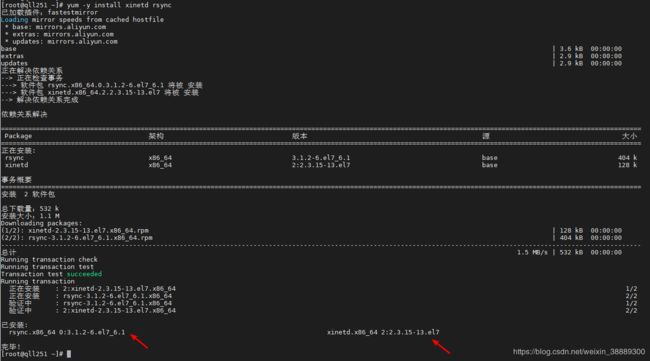
1)需要使用rsync传输数据的主机都需要安装rsync软件
[root@qll251 ~]# yum -y install xinetd rsync
 2)以守护进程方式启动rsync;查看rsync进程所使用的端口
[root@qll251 ~]# netstat -antup |grep rsync #由于此时未启动rsync,因此不会有任何回显
[root@qll251 ~]# rsync --daemon  #守护进程是指在后台运行不受终端控制的进程。
[root@qll251 ~]# netstat -antup |grep rsync
tcp        0      0 0.0.0.0:873             0.0.0.0:*               LISTEN      4176/rsync
tcp6       0      0 :::873                  :::*                    LISTEN      4176/rsync
[root@qll251 ~]#
三、使用rsync进行数据传输
两种传输方式:
1,使用系统用户传输
2,无需建立系统用户的传输(通过配置文件指定用户)
下面我们详细讨论下这两种方式
3.1 rsync使用系统用户同步数据
1)使用rsync的主机都需要创建用户,用于rsync数据同步
[root@qll251 ~]# useradd rsync_user
[root@qll251 ~]# echo 123 | passwd --stdin rsync_user
更改用户 rsync_user 的密码 。
passwd:所有的身份验证令牌已经成功更新。
[root@qll251 ~]#
2)rsync服务器创建共享目录,比如/rsync,并创建测试文件test.txt;并利用setfacl设置权限
[root@qll251 ~]# mkdir /rsync
[root@qll251 ~]# touch /rsync/test.txt
[root@qll251 ~]# ls /rsync/
test.txt
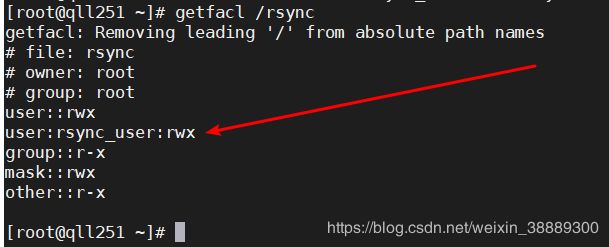
[root@qll251 ~]# setfacl -R -m user:rsync_user:rwx /rsync
			   ###将/rsync/* 赋予rsync_user可读可写可执行的权限
[root@qll251 rsync]#
3)客户端获取rsync服务器共享目录的两种方式
客户端 前提条件:
1.安装rsync软件
2.创建rsync_user用户
3.创建待存放的目录,并设置相应权限(允许rsync_user用户可读写)
[root@qll251 ~]# yum -y install xinetd rsync
[root@qll252 ~]# useradd rsync_user
[root@qll252 ~]# echo 123 | passwd --stdin rsync_user
更改用户 rsync_user 的密码 。
passwd:所有的身份验证令牌已经成功更新。
[root@qll252 /]# mkdir /shares
[root@qll252 /]# chown -R rsync_user:rsync_user /shares
[root@qll252 /]#
3.1 rsync服务器端向客户端推数据
## 语法: rsync -avz 共享路径 客户端用户@客户端IP:/目标路径
[root@qll251 ~]# rsync -avz /rsync/ [email protected]:/shares
##想明白为什么rsync客户端也需要创建rsync_user用户了吗?因为服务器通过该用户去访问客户端呀
上图所示,已完成数据的同步。我们在qll252主机上ls验证。
[root@qll252 ~]# ll /shares/
总用量 0
-rw-rwxr--. 1 rsync_user rsync_user 0 2月   5 12:10 test.txt
[root@qll252 ~]#
3.2 客户端向服务器端拉取数据(pull)
## 语法: rsync -avz 服务器端用户名@服务器端IP:/共享路径 /本地路径
[root@qll252 ~]# rsync -avz [email protected]:/rsync /shares
## qll252客户端验证数据同步情况
[root@qll252 ~]# ls /shares/
rsync
[root@qll252 ~]# ls /shares/rsync/
test.txt
[root@qll252 ~]#
以上便是采用系统用户方式同步rsync数据,接下来我们讨论不使用系统用户,如何完成rsync的数据同步?
3.2 非系统用户同步数据
1.使用系统配置文件/etc/rsyncd.conf来同步数据;
2.在配置文件中创建rsync账号[auth users = rsyncuser]
3.将rsync以daemon方式运行
1)编辑rsync配置文件:/etc/rsyncd.conf
## vim /etc/rsyncd.conf          //若文件不存在,需要自己创建
uid = root        #运行进程的身份
gid = root       #运行进程的组
address =192.168.1.252   #监听IP
port =873          #监听端口
hosts allow =192.168.1.0/24   #允许客户端的IP地址,可以是网段,或者用*表示所有
use chroot = yes     #若rsync被黑客入侵,则锁定家目录,黑客无法再rsync运行的家目录之外创建文件
max connections =5        #最大连接数
pid file =/var/run/rsyncd.pid       #进程PID,自动生成
lock file =/var/run/rsync.lock      #指max connectios参数的锁文件
log file =/var/log/rsyncd.log       #日志文件位置
motd file =/etc/rsyncd.motd #客户端登陆之后弹出的消息,需要创建
[image01]             #共享模块名称,可自定义
path =/mysql-bak   #本地服务器的路径
comment = used for mysql-data    #描述
read only = false     #设置服务端文件读写权限
list = yes            #是否允许查看模块信息
auth users = rsyncuser   #备份的用户,和系统用户无关
secrets file =/etc/rsync.passwd     #存放用户的密码文件,格式是  用户名:密码
2)启动服务
[root@qll252 ~]# systemctl start xinetd && systemctl enable xinetd #启动并设置xinetd进程开机自启
[root@qll252 ~]# systemctl start rsyncd && systemctl enable rsync
[root@qll252 ~]# rsync --daemon --config=/etc/rsyncd.conf #以守护进程方式运行rsync,且加载配置文件
[root@qll252 ~]# netstat -antup | grep rsync
tcp        0      0 0.0.0.0:873             0.0.0.0:*               LISTEN      1312/rsync
tcp6       0      0 :::873                  :::*                    LISTEN      1312/rsync
[root@qll252 ~]#
3)创建我们的共享目录,及测试文件
[root@qll252 ~]# mkdir /mysql-bak
[root@qll252 ~]# touch /mysql-bak/test{1..5}.txt
[root@qll252 ~]# ls /mysql-bak/
test1.txt  test2.txt  test3.txt  test4.txt  test5.txt
[root@qll252 ~]#
4)客户端向服务器端拉取数据(pull)
若提示:No route to hsot (113),则说明防火墙未关闭,我们关闭即可。

[root@qll252 ~]# systemctl stop firewalld && systemctl disable firewalld
再次执行,rsync同步命令:
还是报错,这次我们看下服务日志:tailf /var/log/rsyncd.log。看下图

好了,通过日志我们得知:客户端向服务器验证用户时,没有这个密码文件(未创建/etc/rsync.passwd)
## 根据日志提示,我们创建密码文件即可,格式 用户名:密码,且文本权限必须为600
[root@qll252 ~]# echo "rsyncuser:123123" >> /etc/rsync.passwd
[root@qll252 ~]# chmod 600 /etc/rsync.passwd
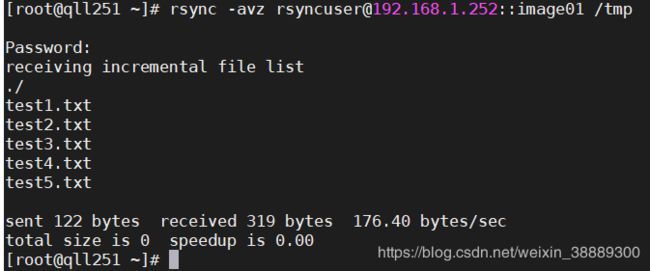
开始进行备份
[root@qll251 ~]# rsync -avz [email protected]::image01 /tmp
我们也可以在执行命令时,提前定义好密码:
# 本地创建密码文本,并设置600权限
echo "123123" > /etc/rsync.mypasswd && chmod 600  /etc/rsync.mypasswd
## 执行命令时,加上 --password-file=/etc/rsync.mypasswd 即可
###完整命令如下:
rsync -avz rsync -avz [email protected]::image01 /tmp --password-file=/etc/rsync.mypasswd
以上便是两种rsync同步方式,生产环境中多用于重要数据的定时备份。
我们可以通过写一个简单的shell脚本来完成这个定时任务。
## 新建一个定时备份脚本
vim /root/bak.sh
#!/bin/bash
rsync -avz rsync -avz [email protected]::image01 /tmp --password-file=/etc/rsync.mypasswd
chmod 755 /root/bak/sh
echo " 0 2 * * * sh /root/bak.sh " #设置每天凌晨两点执行该脚本


