idea+maven+ssm整合随手案例
话不多说.如下图显示,idea的结构
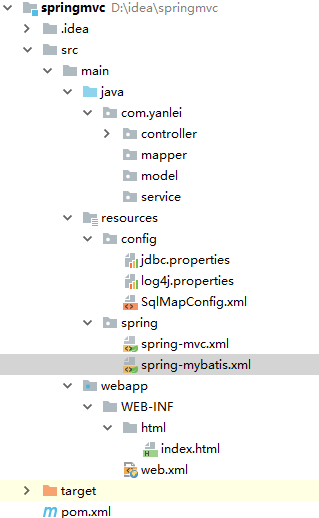
由上至下给大家分享一下SSM整合的一个流程,首先配置maven中的pom文件加载jar包
<project xmlns="http://maven.apache.org/POM/4.0.0" xmlns:xsi="http://www.w3.org/2001/XMLSchema-instance"
         xsi:schemaLocation="http://maven.apache.org/POM/4.0.0 http://maven.apache.org/maven-v4_0_0.xsd">
    <modelVersion>4.0.0modelVersion>
    <groupId>com.test.day18groupId>
    <artifactId>springmvcartifactId>
    <packaging>warpackaging>
    <version>1.0-SNAPSHOTversion>
    <name>springmvc Maven Webappname>
    <url>http://maven.apache.orgurl>
 <build>
        <finalName>springmvcfinalName>
    build>
project>
这里把注释打开即可使用
首先是配置文件jdbc.propertis
jdbc.driver=com.mysql.jdbc.Driver
jdbc.url=jdbc:mysql://localhost:3306/a?characterEncoding=utf-8   连接数据库改为自己的
jdbc.username=root
jdbc.password=root   这里密码改为自己的密码
接下来就是日志文件 log4j.properties,这里不需要做改动,直接copy即可
### set log levels ###
log4j.rootLogger = info , Console , D
#Console
log4j.appender.Console=org.apache.log4j.ConsoleAppender
log4j.appender.Console.layout=org.apache.log4j.PatternLayout
log4j.appender.Console.layout.ConversionPattern=%d [%t] %-5p [%c] - %m%n
log4j.logger.java.sql.ResultSet=INFO
log4j.logger.org.apache=INFO
log4j.logger.java.sql.Connection=INFO
log4j.logger.java.sql.Statement=INFO
log4j.logger.java.sql.PreparedStatement=INFO
#output2file
log4j.appender.D = org.apache.log4j.DailyRollingFileAppender
log4j.appender.D.File = D\:/logs/log.log
log4j.appender.D.Append = true
log4j.appender.D.Threshold = INFO \#\# \u00E8\u00BE\u0093\u00E5\u0087\u00BAinfo\u00E7\u00BA\u00A7\u00E5\u0088\u00A\
  B\u00E4\u00BB\u00A5\u00E4\u00B8\u008A\u00E7\u009A\u0084\u00E6\u0097\u00A5\u00E5\u00BF\u0097
log4j.appender.D.layout = org.apache.log4j.PatternLayout
log4j.appender.D.layout.ConversionPattern = %-d{yyyy-MM-dd HH\:mm\:ss} [ %t\:%r ] - [ %p ] %m%n
接下来是SqlMapConfig.xml这个文件,不整合前有用,整合之后里面也没东西了
xml version="1.0" encoding="UTF-8" ?>
 configuration
        PUBLIC "-//mybatis.org//DTD Config 3.0//EN"
        "http://mybatis.org/dtd/mybatis-3-config.dtd">
<configuration>

configuration>
接下来就是重点了spring和mbatis的整合spring-mybatis.xml
xml version="1.0" encoding="UTF-8"?>
<beans xmlns="http://www.springframework.org/schema/beans"
       xmlns:context="http://www.springframework.org/schema/context" xmlns:p="http://www.springframework.org/schema/p"
       xmlns:aop="http://www.springframework.org/schema/aop"
       xmlns:tx="http://www.springframework.org/schema/tx"
       xmlns:xsi="http://www.w3.org/2001/XMLSchema-instance"
       xsi:schemaLocation="http://www.springframework.org/schema/beans http://www.springframework.org/schema/beans/spring-beans-4.2.xsd
   http://www.springframework.org/schema/context http://www.springframework.org/schema/context/spring-context-4.2.xsd
   http://www.springframework.org/schema/aop http://www.springframework.org/schema/aop/spring-aop-4.2.xsd http://www.springframework.org/schema/tx http://www.springframework.org/schema/tx/spring-tx-4.2.xsd
   http://www.springframework.org/schema/util http://www.springframework.org/schema/util/spring-util-4.2.xsd">

    <context:property-placeholder location="classpath:config/jdbc.properties" />

    <bean id="dataSource" class="com.alibaba.druid.pool.DruidDataSource"
          destroy-method="close">
        <property name="url" value="${jdbc.url}" />
        <property name="username" value="${jdbc.username}" />
        <property name="password" value="${jdbc.password}" />
        <property name="driverClassName" value="${jdbc.driver}" />
        <property name="maxActive" value="10" />
        <property name="minIdle" value="5" />
    bean>

    <bean id="sqlSessionFactory" class="org.mybatis.spring.SqlSessionFactoryBean">

        <property name="dataSource" ref="dataSource" />

        <property name="configLocation" value="classpath:config/SqlMapConfig.xml" />
    bean>
    <bean class="org.mybatis.spring.mapper.MapperScannerConfigurer">
        <property name="basePackage" value="com.yanlei.mapper" />  改成自己的文件包名
    bean>


    <bean id="transactionManager"
          class="org.springframework.jdbc.datasource.DataSourceTransactionManager">
        <property name="dataSource" ref="dataSource">property>
    bean>


    <tx:annotation-driven transaction-manager="transactionManager" />

beans>
接下来是spring和mvc的整合 spring-mvc.xml
xml version="1.0" encoding="UTF-8"?>
<beans xmlns="http://www.springframework.org/schema/beans"
       xmlns:xsi="http://www.w3.org/2001/XMLSchema-instance" xmlns:p="http://www.springframework.org/schema/p"
       xmlns:context="http://www.springframework.org/schema/context"
       xmlns:mvc="http://www.springframework.org/schema/mvc"
       xsi:schemaLocation="http://www.springframework.org/schema/beans http://www.springframework.org/schema/beans/spring-beans-4.2.xsd
        http://www.springframework.org/schema/mvc http://www.springframework.org/schema/mvc/spring-mvc-4.2.xsd
        http://www.springframework.org/schema/context http://www.springframework.org/schema/context/spring-context-4.2.xsd">

    <context:component-scan base-package="com.yanlei.controller"/> 改成自己的文件包名

    <mvc:annotation-driven/>
    <mvc:default-servlet-handler />
    <bean class="org.springframework.web.servlet.view.InternalResourceViewResolver">
        <property name="prefix" value="/WEB-INF/html/"/>
        <property name="suffix" value=".html"/>
    bean>


    <bean id="multipartResolver" class="org.springframework.web.multipart.commons.CommonsMultipartResolver">

        <property name="defaultEncoding" value="UTF-8"/>

        <property name="maxUploadSize" value="32505856"/>

        <property name="maxInMemorySize" value="4096"/>
    bean>
beans>
接下来就是web.xml的配置加载,这里是配置文件的加载是有顺序的(注意!)
 web-app PUBLIC
        "-//Sun Microsystems, Inc.//DTD Web Application 2.3//EN"
        "http://java.sun.com/dtd/web-app_2_3.dtd" >

<web-app>
    <display-name>Archetype Created Web Applicationdisplay-name>


    <context-param>
        <param-name>contextConfigLocationparam-name>
        <param-value>classpath:spring/spring-mybatis.xmlparam-value>
    context-param>
    <context-param>
        <param-name>log4jConfigLocationparam-name>
        <param-value>classpath:/config/log4j.propertiesparam-value>
    context-param>


    <filter>
        <filter-name>encodingFilterfilter-name>
        <filter-class>org.springframework.web.filter.CharacterEncodingFilterfilter-class>
        <init-param>
            <param-name>encodingparam-name>
            <param-value>UTF-8param-value>
        init-param>
        <init-param>
            <param-name>forceEncodingparam-name>
            <param-value>trueparam-value>
        init-param>
    filter>
    <filter-mapping>
        <filter-name>encodingFilterfilter-name>
        <url-pattern>/*url-pattern>
    filter-mapping>


    <listener>
        <listener-class>org.springframework.web.context.ContextLoaderListenerlistener-class>
    listener>

    <servlet>
        <servlet-name>spring-mvcservlet-name>
        <servlet-class>org.springframework.web.servlet.DispatcherServletservlet-class>
        <init-param>
            <param-name>contextConfigLocationparam-name>
            <param-value>classpath:spring/spring-mvc.xmlparam-value>
        init-param>
        <load-on-startup>1load-on-startup>
    servlet>
    <servlet-mapping>
        <servlet-name>spring-mvcservlet-name>
        <url-pattern>/url-pattern>
    servlet-mapping>
web-app>
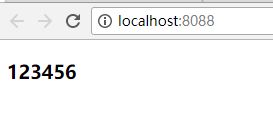
配置完了就到了测试阶段了
package com.yanlei.controller;

import org.springframework.stereotype.Controller;
import org.springframework.web.bind.annotation.RequestMapping;

@Controller
public class Test {

    @RequestMapping(value = "/")
    public String showIndex(){
        return "/index";
    }
}
HTML如下
html>
<html lang="en">
<head>
    <meta charset="UTF-8" />
    <title>Titletitle>
head>
<body>
<h3>123456h3>
body>
html>
测试结果如下图显示,完美结束.