Opencv 官方tutorial学习
图片是像素的
来源于Visual studio插件ImageWatch。
OpenCV官方Tutorialshttp://docs.opencv.org/doc/tutorials/tutorials.html
注意额外的参数
Mat image = imread( "/home/yake/Downloads/opencv-2.4.10/samples/c/lena.jpg",1 );  // CV_LOAD_IMAGE_UNCHANGED (<0) loads the image as is (including the alpha channel if present)
                                                                                    // CV_LOAD_IMAGE_GRAYSCALE (0) loads the image as an intensity one.
                                                                                    // Default: CV_LOAD_IMAGE_COLOR (>0) loads the image in the RGB format
下面是转化为灰度图(注意注释)
if(!image.data)
    {
        cout<<"file not fount"<
Mat is basically a class with two data parts: the matrix header (containing information such as the size of the matrix, the method used for storing, at which address is the matrix stored, and so on) and a pointer to the matrix containing the pixel values (taking any dimensionality depending on the method chosen for storing) . The matrix header size is constant, however the size of the matrix itself may vary from image to image and usually is larger by orders of magnitude.
2. Mat与Range
为了节省内存使用量,the copy operators will only copy the headers and the pointer to the large matrix, not the data itself.
Mat A, C;                                 // creates just the header parts
A = imread(argv[1], CV_LOAD_IMAGE_COLOR); // here we'll know the method used (allocate matrix)

Mat B(A);                                 // Use the copy constructor

C = A;
他们的Header不一样,但是指向的data是相同的,也可以创建指向data某一部分的header。如创建ROI(Region of Interes)感兴趣区域。
Mat D (A, Rect(10, 10, 4, 4) ); // using a rectangle
Mat E = A(Range::all(), Range(1,3)); // using row and column boundaries
官方的说明没给太详细,我仔细百度了一下。这里Mat D是彩色图BGR,三个通道,所以会有12列,实际的列数等于Mat.cols * channels。Range(a, b)相当于Matlab中的a:b,从a到b的列向量或行向量。如上图所示,在这里是取所有的行,Range(1, 3)表示[1, 3),所以这里只有两大列。
拷贝所有的数据
Mat F = A.clone();
Mat G;
A.copyTo(G);vector v;
v.push_back( (float)CV_PI); v.push_back(2); v.push_back(3.01f);
cout << "Vector of floats via Mat = " << Mat(v) << endl << endl; 3. Scan Images and get process time遍历图像并统计时间
double t = (double)getTickCount();
// do something ...
t = ((double)getTickCount() - t)/getTickFrequency();
cout << "Times passed in seconds: " << t << endl;
BGR instead of RGB. Because in many cases the memory is large enough to store the rows in a successive fashion the rows may follow one after another, creating a single long row. Because everything is in a single place following one after another this may help to speed up the scanning process. We can use the isContinuous() function to ask the matrix if this is the case.
可以用isContinuous()函数来检测Matrix是否是row相连的
CV_Assert(I.depth() != sizeof(uchar)); // 检测是否是char type 的matrix
int channels = I.channels();
Mat& ScanImageAndReduceC(Mat& I, const uchar* const table)
{
    // accept only char type matrices
    CV_Assert(I.depth() != sizeof(uchar));

    int channels = I.channels();

    int nRows = I.rows;
    int nCols = I.cols * channels;

    if (I.isContinuous())
    {
        nCols *= nRows;
        nRows = 1;
    }

    int i,j;
    uchar* p;
    for( i = 0; i < nRows; ++i)
    {
        p = I.ptr(i);
        for ( j = 0; j < nCols; ++j)
        {
            p[j] = table[p[j]];
        }
    }
    return I;
}
那句p = I.ptr
Mat& ScanImageAndReduceIterator(Mat& I, const uchar* const table)
{
    // accept only char type matrices
    CV_Assert(I.depth() != sizeof(uchar));

    const int channels = I.channels();
    switch(channels)
    {
    case 1:
        {
            MatIterator_ it, end;
            for( it = I.begin(), end = I.end(); it != end; ++it)
                *it = table[*it];
            break;
        }
    case 3:
        {
            MatIterator_ it, end;
            for( it = I.begin(), end = I.end(); it != end; ++it)
            {
                (*it)[0] = table[(*it)[0]];
                (*it)[1] = table[(*it)[1]];
                (*it)[2] = table[(*it)[2]];
            }
        }
    }

    return I;
}
对于彩色图像,每一大列会有三个item对应于B,G,R,它可以被认为是一个拥有uchar类型的vector,OpenCV给它起了个名字 Vec3b,即 vec
Mat lookUpTable(1, 256, CV_8U);
    uchar* p = lookUpTable.data;
    for( int i = 0; i < 256; ++i)
        p[i] = table[i];
 LUT(I, lookUpTable, J);
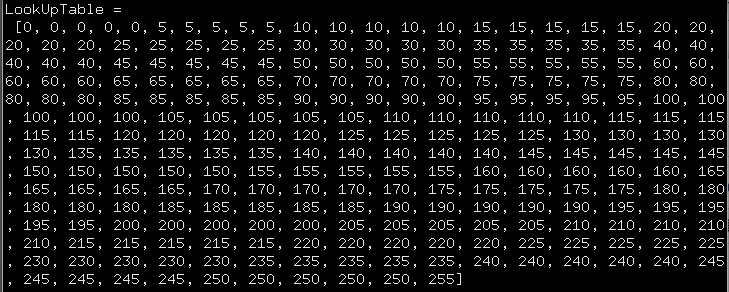
尽可能使用自带的函数。LUT函数的作用是利用原始图像I的每个像素值,查找Table中的对应项,将结果放在J 中。这里我的divide width给的是5,所以LookUpTable它每个阈值范围都是5个一组,这样就达到了减小。

