Windows10上使用Caffe的Python接口进行图像分类例程
本文将会介绍Caffe的Python接口的使用方法。编辑Python可以使用很多种方法,我们采用的是IPython交互式编辑环境。
1 Python的安装
如果你的Windows电脑还没有安装Python,请先自行搜索Python的安装方法,例如 http://jupyter.org/install.html,推荐使用Anaconda软件包安装方式,这样就自带IPython/Jupyter环境了。本文使用的是Python2.7。
2 Caffe的安装
Windows Caffe的安装请参照之前的一篇文章:
http://blog.csdn.net/zzlyw/article/details/66971669
3 详细操作
3.1 设置
(1)首先,设置Python、numpy、和matplotlib。
In [1]:
# set up Python environment: numpy for numerical routines, and matplotlib for plotting
import numpy as np
import matplotlib.pyplot as plt
# display plots in this notebook
get_ipython().magic(u'matplotlib inline')

# set display defaults
plt.rcParams['figure.figsize'] = (10, 10)        # large images
plt.rcParams['image.interpolation'] = 'nearest'  # don't interpolate: show square pixels
plt.rcParams['image.cmap'] = 'gray'  # use grayscale output rather than a (potentially misleading) color heatmap
(2)导入caffe
In [2]:
# The caffe module needs to be on the Python path;
#  we'll add it here explicitly.
import sys
caffe_root = 'F:\\Projects\\caffe\\'  # this file should be run from {caffe_root}/examples (otherwise change this line)
sys.path.insert(0, caffe_root + 'python')

import caffe
# If you get "No module named _caffe", either you have not built pycaffe or you have the wrong path.
(3)如果还没有自己训练好的模型,可以下载一个CaffeNet
In [3]:
import os
if os.path.isfile(caffe_root + 'models\\bvlc_reference_caffenet\\bvlc_reference_caffenet.caffemodel'):
    print 'CaffeNet found.'
else:
    print 'Downloading pre-trained CaffeNet model...'
    get_ipython().system(u'python F:\\Projects\\caffe\\scripts\\download_model_binary.py F:\\Projects\\caffe\\models\\bvlc_reference_caffenet')
Out:
CaffeNet found.
3.2 导入网络和输入预处理
(1)设置Caffe为CPU模式,从硬盘导入网络。
In [4]:caffe.set_mode_cpu()
model_def = caffe_root + 'models\\bvlc_reference_caffenet\\deploy.prototxt'
model_weights = caffe_root + 'models\\bvlc_reference_caffenet\\bvlc_reference_caffenet.caffemodel'
net = caffe.Net(model_def, # defines the structure of the model
model_weights, # contains the trained weights
caffe.TEST) # use test mode (e.g., don't perform dropout)
(2)设置输入预处理。我们使用Caffe的caffe.io.Transformer 来做这件事,它与caffe的其他部分是独立的,所以任何其他自定义的预处理代码都可以使用。
默认的CaffeNet使用图像为BGR格式。它们的灰度范围应该使用[0 , 255],于是可以使用ImageNet的图像像素均值作为要减去的数值。
Matplotlib会把导入的图像设定为[0, 1]范围的RGB格式,所以需要做一些转换。
In [5]:
# load the mean ImageNet image (as distributed with Caffe) for subtraction
mu = np.load(caffe_root + 'python/caffe/imagenet/ilsvrc_2012_mean.npy')
mu = mu.mean(1).mean(1)  # average over pixels to obtain the mean (BGR) pixel values
print 'mean-subtracted values:', zip('BGR', mu)

# create transformer for the input called 'data'
transformer = caffe.io.Transformer({'data': net.blobs['data'].data.shape})

transformer.set_transpose('data', (2,0,1))  # move image channels to outermost dimension
transformer.set_mean('data', mu)            # subtract the dataset-mean value in each channel
transformer.set_raw_scale('data', 255)      # rescale from [0, 1] to [0, 255]
transformer.set_channel_swap('data', (2,1,0))  # swap channels from RGB to BGR
Out:
3.3 CPU分类
(1)设置batch size为50
In [6]:
# set the size of the input (we can skip this if we're happy
#  with the default; we can also change it later, e.g., for different batch sizes)
net.blobs['data'].reshape(50,        # batch size
                          3,         # 3-channel (BGR) images
                          227, 227)  # image size is 227x227
(2)导入图像,执行预处理
In [7]:image = caffe.io.load_image(caffe_root + 'examples/images/cat.jpg')
transformed_image = transformer.preprocess('data', image)
plt.imshow(image)Out:

(3)执行分类
In [8]:# copy the image data into the memory allocated for the net
net.blobs['data'].data[...] = transformed_image
### perform classification
output = net.forward()
output_prob = output['prob'][0] # the output probability vector for the first image in the batch
print 'predicted class is:', output_prob.argmax()Out:
predicted class is: 281
(4)网络给出了一个概率向量,最可能的类别是编号281的类。我们需要找到Image的类别标签。下面的程序是检验有没有sysset_words.txt文件,如果没有则使用脚本从网上下载。由于脚本本来是在Linux shell中运行的,在Windows命令行中执行报错,所以我是先使用别的方法下载了这个文件,放到了该对应的路径下。你可以使用win10自带的Linux内核系统运行shell命令来下载,也可以从网上搜索这个文件。
In [9]:# load ImageNet labels
labels_file = caffe_root + 'data\\ilsvrc12\\synset_words.txt'
if not os.path.exists(labels_file):
get_ipython().system(u'F:\Projects\caffe\data\ilsvrc12\get_ilsvrc_aux.sh')
labels = np.loadtxt(labels_file, str, delimiter='\t')
print 'output label:', labels[output_prob.argmax()](5)查看全部分类结果列表
In [10]:# sort top five predictions from softmax output
top_inds = output_prob.argsort()[::-1][:5] # reverse sort and take five largest items
print 'probabilities and labels:'
zip(output_prob[top_inds], labels[top_inds])Out:
3.4 使用GPU模式
(1)先看下CPU模式下分类时间
In [11]:get_ipython().magic(u'timeit net.forward()')Out:
(2)改到GPU模式下看分类时间
In [12]:caffe.set_device(0) # if we have multiple GPUs, pick the first one
caffe.set_mode_gpu()
net.forward() # run once before timing to set up memory
get_ipython().magic(u'timeit net.forward()')10 loops, best of 3: 51.9 ms per loop
3.5 检查中间输出
网络并非是一个黑盒,让我们看看中间的参数信息。
In [13]:# for each layer, show the output shape
for layer_name, blob in net.blobs.iteritems():
print layer_name + '\t' + str(blob.data.shape)data (50L, 3L, 227L, 227L) conv1 (50L, 96L, 55L, 55L) pool1 (50L, 96L, 27L, 27L) norm1 (50L, 96L, 27L, 27L) conv2 (50L, 256L, 27L, 27L) pool2 (50L, 256L, 13L, 13L) norm2 (50L, 256L, 13L, 13L) conv3 (50L, 384L, 13L, 13L) conv4 (50L, 384L, 13L, 13L) conv5 (50L, 256L, 13L, 13L) pool5 (50L, 256L, 6L, 6L) fc6 (50L, 4096L) fc7 (50L, 4096L) fc8 (50L, 1000L) prob (50L, 1000L)
In [14]:
for layer_name, param in net.params.iteritems():
print layer_name + '\t' + str(param[0].data.shape), str(param[1].data.shape)conv1 (96L, 3L, 11L, 11L) (96L,) conv2 (256L, 48L, 5L, 5L) (256L,) conv3 (384L, 256L, 3L, 3L) (384L,) conv4 (384L, 192L, 3L, 3L) (384L,) conv5 (256L, 192L, 3L, 3L) (256L,) fc6 (4096L, 9216L) (4096L,) fc7 (4096L, 4096L) (4096L,) fc8 (1000L, 4096L) (1000L,)
def vis_square(data):
    """Take an array of shape (n, height, width) or (n, height, width, 3)
       and visualize each (height, width) thing in a grid of size approx. sqrt(n) by sqrt(n)"""

    # normalize data for display
    data = (data - data.min()) / (data.max() - data.min())

    # force the number of filters to be square
    n = int(np.ceil(np.sqrt(data.shape[0])))
    padding = (((0, n ** 2 - data.shape[0]),
               (0, 1), (0, 1))                 # add some space between filters
               + ((0, 0),) * (data.ndim - 3))  # don't pad the last dimension (if there is one)
    data = np.pad(data, padding, mode='constant', constant_values=1)  # pad with ones (white)

    # tile the filters into an image
    data = data.reshape((n, n) + data.shape[1:]).transpose((0, 2, 1, 3) + tuple(range(4, data.ndim + 1)))
    data = data.reshape((n * data.shape[1], n * data.shape[3]) + data.shape[4:])

    plt.imshow(data); plt.axis('off')
In [16]:
# the parameters are a list of [weights, biases]
filters = net.params['conv1'][0].data
vis_square(filters.transpose(0, 2, 3, 1))
Out:
In [17]:
feat = net.blobs['conv1'].data[0, :36]
vis_square(feat)In [18]:
feat = net.blobs['pool5'].data[0]
vis_square(feat)In [19]:
feat = net.blobs['fc6'].data[0]
plt.subplot(2, 1, 1)
plt.plot(feat.flat)
plt.subplot(2, 1, 2)
_ = plt.hist(feat.flat[feat.flat > 0], bins=100)In [20]:
feat = net.blobs['prob'].data[0]
plt.figure(figsize=(15, 3))
plt.plot(feat.flat)
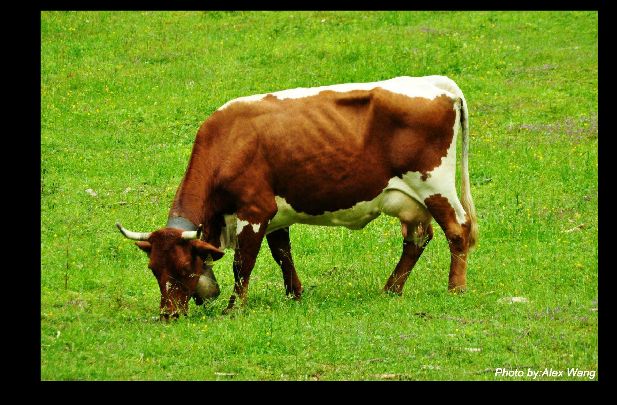
3.6 尝试自己的图像
In [21]:# download an image
#my_image_url = "https://timgsa.baidu.com/timg?image&quality=80&size=b9999_10000&sec=1491715902209&di=82ef5c02c812e21e2e0f44fce2a1d4b6&imgtype=0&src=http%3A%2F%2Fcyjctrip.qiniudn.com%2F56329%2F1374595566800p18064d9kk169p1j291j1l1u31k0lk.jpg" # paste your URL here
# for example:
# my_image_url = "https://upload.wikimedia.org/wikipedia/commons/b/be/Orang_Utan%2C_Semenggok_Forest_Reserve%2C_Sarawak%2C_Borneo%2C_Malaysia.JPG"
#!wget -O image.jpg $my_image_url
# transform it and copy it into the net
image = caffe.io.load_image('C:\\Users\\Bill\\Desktop\\image.jpg')
net.blobs['data'].data[...] = transformer.preprocess('data', image)
# perform classification
net.forward()
# obtain the output probabilities
output_prob = net.blobs['prob'].data[0]
# sort top five predictions from softmax output
top_inds = output_prob.argsort()[::-1][:5]
plt.imshow(image)
print 'probabilities and labels:'
zip(output_prob[top_inds], labels[top_inds])Out:
[(0.69523662, 'n02403003 ox'),
 (0.16318876, 'n02389026 sorrel'),
 (0.039488554, 'n02087394 Rhodesian ridgeback'),
 (0.029075578, 'n03967562 plow, plough'),
 (0.015077997, 'n02422106 hartebeest')]


