Linux:Nginx的负载均衡以及添加sticky模块
一·Nginx
Nginx (engine x)是一个高性能的HTTP和反向代理服务器,也是一个IMAP/POP3/SMTP服务器。Nginx是由伊戈尔·赛索耶夫为俄罗斯访问量第二的Rambler.ru站点(文:Рамблер)开发的,第一个公开版本0.1.0发布于2004年10月4日。其将源代码以类BSD许可证的形式发布,因它的稳定性、丰富的功能集、示例配置文件和低系统资源的消耗而闻名。2011年6月1日,nginx 1.0.4发布。
Nginx是一款轻量级的Web 服务器/反向代理服务器及电子邮件(IMAP/POP3)代理服务器,并在一个BSD-like 协议下发行。其特点是占有内存少,并发能力强,事实上nginx的并发能力确实在同类型的网页服务器中表现较好,中国大陆使用nginx网站用户有:百度、京东、新浪、网易、腾讯、淘宝等。
二·Nginx优点
Nginx 可以在大多数 UnixLinux OS 上编译运行,并有 Windows 移植版。 Nginx 的1.4.0稳定版已经于2013年4月24日发布,一般情况下,对于新建站点,建议使用最新稳定版作为生产版本,已有站点的升级急迫性不高。
Nginx 的源代码使用 2-clause BSD-like license。
Nginx 是一个很强大的高性能Web和反向代理服务器,它具有很多非常优越的特性:
在连接高并发的情况下,Nginx是Apache服务器不错的替代品:Nginx在美国是做虚拟主机生意的老板们经常选择的软件平台之一。能够支持高达 50,000 个并发连接数的响应,感谢Nginx为我们选择了 epoll and kqueue作为开发模型。
1.服务器
Nginx作为负载均衡服务器:Nginx 既可以在内部直接支持 Rails 和 PHP 程序对外进行服务,也可以支持作为HTTP代理服务器对外进行服务。
Nginx采用C进行编写,不论是系统资源开销还是CPU使用效率都比 Perlbal 要好很多。处理静态文件,索引文件以及自动索引;打开文件描述符缓冲。 无缓存的反向代理加速,简单的负载均衡和容错。
FastCGI,简单的负载均衡和容错。 模块化的结构。包括 gzipping, byte ranges, chunked responses,以及 SSI-filter 等 filter。如果由 FastCG或其它代理服务器处理单页中存在的多个SSI,则这项处理可以并行运行,而不需要相互等待。 支持 SSL 和 TLSSNI。
2.代码
Nginx代码完全用C语言从头写成,已经移植到许多体系结构和操作系统,包括:Linux、FreeBSD、Solaris、Mac OSX、AIX以及Microsoft Windows。Nginx有自己的函数库,并且除了zlib、PCRE和OpenSSL之外,标准模块只使用系统C库函数。而且,如果不需要或者考虑到潜在的授权冲突,可以不使用这些第三方库。
3.代理服务器
作为邮件代理服务器:Nginx 同时也是一个非常优秀的邮件代理服务器(最早开发这个产品的目的之一也是作为邮件代理服务器),Last.fm 描述了成功并且美妙的使用经验。 Nginx 是一个安装非常的简单、配置文件非常简洁(还能够支持perl语法)、Bug非常少的服务器。Nginx 启动特别容易,并且几乎可以做到7*24不间断运行,即使运行数个月也不需要重新启动。你还能够不间断服务的情况下进行软件版本的升级。
三·安装
模块依赖性:
(1)rewrite模块需要 pcre 库
(2)ssl 功能需要openssl库
安装包:
(1)nginx-1.14.0.tar.gz
(2)nginx-sticky-module-ng.tar.gz
(3)nginx-1.10.1.tar.gz
三·Nginx
1.nginx的配置
(1)安装以及修改配置文件
[root@server1 ~]# ls
nginx-1.14.0.tar.gz   ##安装包
[root@server1 ~]# tar zxf nginx-1.14.0.tar.gz   ##解压
[root@server1 ~]# ls
 nginx-1.14.0   ##解压后的目录
[root@server1 ~]# cd nginx-1.14.0
[root@server1 nginx-1.14.0]# cd src/
[root@server1 src]# cd core/
[root@server1 core]# vim nginx.h   ##编辑内容
[root@server1 core]# cd ..
[root@server1 src]# cd ..
[root@server1 nginx-1.14.0]# cd auto/
[root@server1 auto]# cd cc/
[root@server1 cc]# vim gcc   ##编辑文件
[root@server1 cc]# cd
[root@server1 ~]# cd nginx-1.14.0
[root@server1 nginx-1.14.0]# yum install gcc -y    ##安装gcc语言
[root@server1 nginx-1.14.0]# yum install openssl-devel -y   ##安装依赖性
[root@server1 nginx-1.14.0]# yum install pcre-devel -y ##安装依赖性(2)编译三部曲
[root@server1 nginx-1.14.0]# ./configure --prefix=/usr/local/nginx --with-http_ssl_module --with-http_stub_status_module --with-threads --with-file-aio    ##编译三部曲(./configure,make,make install)
[root@server1 nginx-1.14.0]# make
[root@server1 nginx-1.14.0]# make  install
[root@server1 nginx-1.14.0]# ll Makefile    ##编译三部曲的后读取的文件是Makefile
-rw-r--r-- 1 root root 376 Aug  1 15:59 Makefile
[root@server1 nginx-1.14.0]# cd /usr/local/nginx/
[root@server1 nginx]# du -sh   ##查看编译后nginx大小
980K    .
(3)制作软连接
[root@server1 nginx]# pwd
/usr/local/nginx
[root@server1 nginx]# cd sbin/
[root@server1 sbin]# pwd
/usr/local/nginx/sbin
[root@server1 sbin]# ln -s /usr/local/nginx/sbin/nginx /sbin/  ##制作软连接
[root@server1 sbin]# nginx -t   ##检测语法
[root@server1 sbin]# nginx   ##打开
[root@server1 sbin]# nginx -s stop   ##关闭
[root@server1 sbin]# nginx
[root@server1 sbin]# nginx -s reload ##刷新可以在文件中自己添加内容,再去测试:
root@server1 sbin]# cd /usr/local/nginx/
[root@server1 nginx]# cd html/
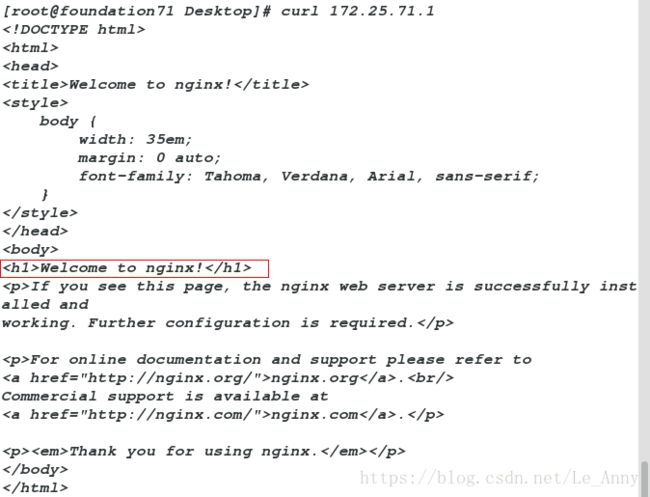
[root@server1 html]# vim nginx.html
[root@server1 html]# cat nginx.html
Welcome to nginx!
[root@server1 html]# nginx -t    ##检测语法
[root@server1 html]# nginx -s reload ##刷新四·Nginx的负载均衡
[root@server1 ~]# sysctl -a |grep file
fs.file-nr = 448    0   98864
fs.file-max = 98864    ##最大进程数
[root@server1 ~]# vim /etc/security/limits.conf    ##添加内容
[root@server1 ~]# cd /usr/local/nginx/
[root@server1 nginx]# cd conf/
[root@server1 conf]# lscpu   ##查看cpu
CPU(s):                1
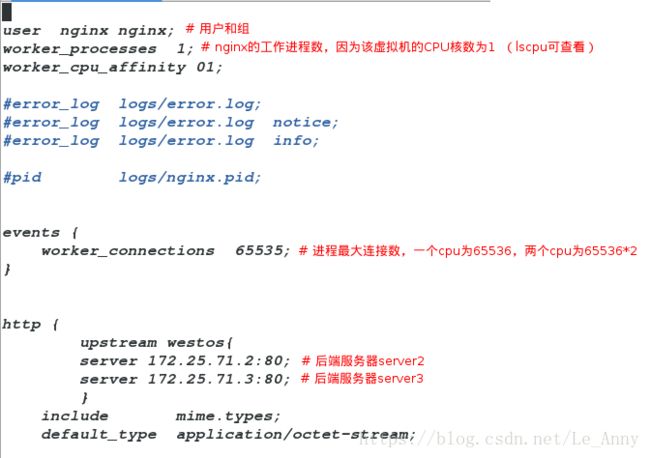
[root@server1 conf]# vim nginx.conf   ##修改内容
[root@server1 conf]# useradd -M -d /usr/local/nginx/ nginx    ##建立用户
[root@server1 conf]# id nginx
uid=500(nginx) gid=500(nginx) groups=500(nginx)
[root@server1 conf]# nginx -t
[root@server1 conf]# nginx -s reload
[root@server1 conf]# nginx -s reload
在/etc/security/limits.conf文件中

在nginx.conf文件中


需要把服务端server2和server3的httpd服务打开:
再次测试:


1.测试ip_hash(源地址不变后端地址不变)
[root@server1 conf]# vim nginx.conf
[root@server1 conf]# nginx -t
[root@server1 conf]# nginx -s reload2.权重weight
[root@server1 conf]# vim nginx.conf
[root@server1 conf]# nginx -t
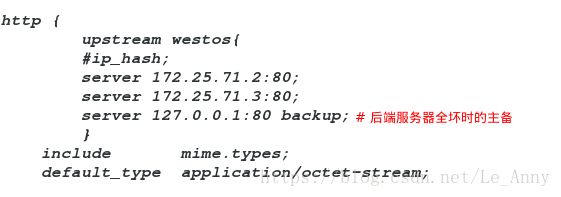
[root@server1 conf]# nginx -s reload3.Backup
[root@server1 conf]# vim nginx.conf
[root@server1 conf]# nginx -t
[root@server1 conf]# nginx -s reload五·添加新的模块(在nginx中静态添加模块sticky)
(添加额外的扩展模块)
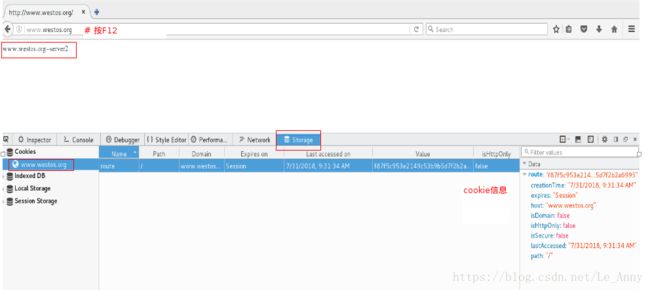
Sticky是nginx的一个模块,它是基于cookie的一种nginx的负载均衡解决方案,通过分发和识别cookie,来使同一个客户端的请求落在同一台服务器上,默认标识名为route
[root@server1 ~]# ls
nginx-sticky-module-ng.tar.gz
nginx-1.10.1.tar.gz
[root@server1 ~]# tar zxf nginx-1.10.1.tar.gz
[root@server1 ~]# tar zxf nginx-sticky-module-ng.tar.gz
[root@server1 ~]# ls
 nginx-1.14.0
 nginx-sticky-module-ng
[root@server1 ~]# cd nginx-1.10.1
[root@server1 nginx-1.10.1]# ls
[root@server1 nginx-1.10.1]# ./configure --prefix=/opt/nginx --with-http_ssl_module --with-http_stub_status_module --with-threads --with-file-aio --add-module=/root/nginx-sticky-module-ng
[root@server1 nginx-1.10.1]# make
[root@server1 nginx-1.10.1]# make install
[root@server1 nginx-1.10.1]# pwd
/root/nginx-1.10.1
[root@server1 nginx-1.10.1]# cd /opt/nginx/   ##新的nginx的配置文件
[root@server1 nginx]# cd conf/
[root@server1 conf]# cp /usr/local/nginx/conf/nginx.conf .
cp: overwrite `./nginx.conf'? y
[root@server1 conf]# vim nginx.conf
[root@server1 conf]# pwd
/opt/nginx/conf
[root@server1 conf]# /opt/nginx/sbin/nginx -t    ##绝对路径


