Cordova插件编写之调用service(jar打包的服务)
在使用cordova开发android中,有的功能需要实现为一个服务。即在app运行时,服务保持在后台运行。比如,蓝牙连接,网络连接,数据传输,或者耗时的任务,就不能只在接口调用的时候处理,而是需要在单独运行很长或整个app生命周期内运行,这个时候我们就需要把这部分功能作为一个Android服务。
上次介绍了开发一个简单的cordova插件,(开发简单cordova插件的地址如下:http://blog.csdn.net/robert_cysy/article/details/53608451)这个是简绍在cordova插件里面包含一个Android服务的方法,其中服务被放置在jar文件里。(服务打包成jar在我的另一篇文文章里有简绍地址如下:http://blog.csdn.net/robert_cysy/article/details/53790708)
这次是在之前的工程里添加新的功能与文件:当然本文依然会介绍每个细节。
一个插件包含三部分内容:
1 plugin.xml文件的编写
2 www目录下js接口文件的编写
3 src目录下对应平台实现代码的编写
一、首先介绍plugin.xml文件编写:
<plugin xmlns:android="http://schemas.android.com/apk/res/android" xmlns="http://apache.org/cordova/ns/plugins/1.0"version="0.0.1"id="com.haha.myEcho"><name>myEchoname><description>This plugin wraps the Cloud ServiceSDK.description><js-module src="www/myEcho.js" name="myEcho"><clobberstarget="Rayleigh.myEcho"/>js-module><platform name="android"><config-filetarget="res/xml/config.xml"parent="/*"><featurename="myEcho"><param name="android-package" value="com.haha.myEcho.myEcho"/>feature>config-file><config-file target="AndroidManifest.xml" parent="/manifest">
config-file><config-file target="AndroidManifest.xml" parent="/manifest/application"><serviceandroid:name="com.rayleigh.cloud.CloudService" android:process=":remote"><intent-filter><action android:name="com.rayleigh.cloud.CloudService"/>intent-filter>service>config-file><source-filesrc="src/android/myEcho.java"target-dir="src/com/haha/myEcho/myEcho"/><source-file src="src/android/CloudService.jar" target-dir="libs"/><source-file src="src/android/CloudServiceInterface.aidl" target-dir="src/com/rayleigh/aidl"/>platform>plugin>
其中需要注意的部分有:
1.部分
<js-modulesrc="www/myEcho.js"name="myEcho"><clobbers target="Rayleigh.myEcho"/>js-module>
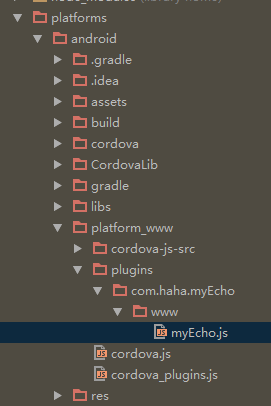
这个部分定义了接口js文件的存放位置,以及名字,将来添加本插件的项目平台会把这个文件添加到platform_www/plugins/目录下:
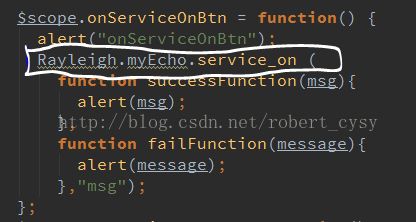
其中<clobberstarget="Rayleigh.myEcho"/>定义了,调用插件的时候使用的名称。以下是调用插件的时候所使用的方法。
2部分
定义了android平台下的内容:
3部分
这个部分制定了在生成的android平台项目代码中的res/xml/config.xml文件里的“/*“目录(跟目录)下添加”
4 部分
这个部分是用来给当前插件在目标项目中添加所需要的权限,权限当然是被添加到“AndroidManifest.xml”文件里,其中“parent=”/manifest””是指权限会被添加到manifest标签里面。
5 部分
android:name="com.rayleigh.cloud.CloudService" android:process=":remote" > android:name="com.rayleigh.cloud.CloudService"/> 这部分也是要添加到目标平台工程的AndroidManifest.xml文件里,用于声明一个服务。开发过android服务后就会对其中的内容相当熟悉,当然详细说明请看我之前专门讲服务的那一章。 在这里需要注意的是, 这个部分。本人就是对这里没有正确理解,照成好几天没有出效果,后来看了另一个开源项目的例子。才发现了这个问题。注意这里的parent="/manifest/application"在我之前出错的时候,这里我写的是“/*”照成 6部分 这个部分描述了要从插件目录复制到项目工程的文件内容。其中src描述了文件在插件的位置。Target-dir描述了,插入到目标的位置。在这个例子中, 1. 插入myEcho.java文件到目标工程的"src/com/haha/myEcho/myEcho"目录 2. 插入CloudService.jar到目标工程的"libs"目录 3. 插入CloudServiceInterface.aidl到目标工程的"src/com/rayleigh/aidl"目录 二、www目录下js接口文件的编写 接口文件用于完成js和java代码连接的功能。主要原理是使用了exec函数。 文件内容如下: var exec = require('cordova/exec'); 其中共有5个函数,并且这5个函数都被导出,以使得调用者通过js的方式调用这些函数。 对于exec函数的参数说明: 举例说明: success是执行成功回调函数 error,是执行失败回调函数 “myEcho”是插件类名 “myEchofunction”是插件类里面的具体被调用函数 [msg]是附加的json格式的参数, 这里送别说一下调用插件的方法: 本例子是在一个新建的ionic项目里调用的本插件。在一个界面里放置了4个按键,分别调用插件里的四个函数。这个四个函数是在“controllers.js”文件里定义了四个按键相应函数,其中相应函数调用了本插件提供的接口。以下是其中一个函数: 其中成功回调 和失败回调分别使用了隐式声明函数。 三、src目录下对应平台实现代码的编写 本文件夹下面的文件主要是是对应平台下功能实现的代码。在本例中使用的是啊androd平台下的实现。其中包括一个myEcho.java文件,文件里实现了对Android的服务的启动及调用。(服务被打包成一个jar文件),其中myEcho.java文件的内容如下: package com.haha.myEcho; import org.apache.cordova.CordovaPlugin; import org.apache.cordova.CallbackContext; import org.json.JSONArray; import org.json.JSONException; import org.json.JSONObject; import android.app.Activity; import android.content.ComponentName; import android.content.Context; import android.content.Intent; import android.content.ServiceConnection; import android.os.Bundle; import android.os.IBinder; import android.util.Log; import com.rayleigh.aidl.CloudServiceInterface; import com.rayleigh.cloud.CloudService; /** * This classechoes a string called from JavaScript. */ public class myEcho extends CordovaPlugin { @Override publicboolean execute(String action, JSONArray args, CallbackContext callbackContext)throws JSONException { if(action.equals("myEchofunction")) { String message = args.getString(0); this.myEcholocal(message, callbackContext); return true; } elseif (action.equals("service_on")) { connectionToService(); callbackContext.success("service_on_success"); return true; } elseif (action.equals("service_off")) { callbackContext.success("service_off_success"); return true; } elseif (action.equals("service_set")) { if(mService != null) { try { mService.setInfo(3); Log.e("mainactivity","set value success"); } catch (Exception e){ } }else { Log.e("mainactivity","mService is null"); } callbackContext.success("service_set_success"); return true; } elseif (action.equals("service_get")) { if(mService != null) { try { int a = mService.getInfo(); Log.e("mainactivity","getvalue is :"+ a); } catch (Exception e) { } }else { Log.e("mainactivity","mService is null"); } callbackContext.success("service_get_success"); return true; } returnfalse; } private voidmyEcholocal(String message, CallbackContext callbackContext) { if(message != null && message.length() > 0) { callbackContext.success(message); } else { callbackContext.error("Expected one non-empty stringargument."); } } CloudServiceInterface mService; privateServiceConnection serviceConnection = new ServiceConnection() { @Override public voidonServiceConnected(ComponentName componentName, IBinder iBinder) { Log.e("on","on serviceconnected"); mService =CloudServiceInterface.Stub.asInterface(iBinder); } @Override public void onServiceDisconnected(ComponentNamecomponentName) { Log.e("on","on servicedis connected"); mService = null; } }; privatevoid connectionToService() { Intent intent=new Intent(cordova.getActivity(), CloudService.class); cordova.getActivity().getApplicationContext().bindService(intent,serviceConnection, Context.BIND_AUTO_CREATE); } } 简单对此文件说明,其他请读代码。通过exec函数调用,最终都是被此文件的execute函数说处理,在这个函数中通过acrion来区别每个函数调用,并执行对应的代码。在本例中有,服务启动函数,和调用服务的两个函数分别做了写入数据到服务和从服务读取数据。 至于bingservice和Android原生函数启动服务一样。 本插件下载地址:http://download.csdn.net/detail/robert_cysy/9729709 插件调用工程下载地址:http://download.csdn.net/detail/robert_cysy/9729759 (本工程包括完完整整的ionic所以文件,只需你有ionic开发环境即可直接运行,不需要下载安全其它关于工程里的文件),当然ionic开发环境可以参考我的另一篇文章: http://blog.csdn.net/robert_cysy/article/details/53582953
module.exports.showToast=function(success, error, msg) {
    console.log("myEcho.js: showToast");
    exec(success, error, "myEcho", "myEchofunction", [msg]);
};

module.exports.service_on=function(success, error, msg) {
    console.log("myEcho.js: service_on");
    exec(success, error, "myEcho", "service_on", [msg]);
};

module.exports.service_off=function(success, error, msg) {
    console.log("myEcho.js: service_off");
    exec(success, error, "myEcho", "service_off", [msg]);
};

module.exports.service_set=function(success, error, msg) {
    console.log("myEcho.js: service_set");
    exec(success, error, "myEcho", "service_set", [msg]);
};

module.exports.service_get=function(success, error, msg) {
    console.log("myEcho.js: service_get");
    exec(success, error, "myEcho", "service_get", [msg]);
};
exec(success, error, "myEcho", "myEchofunction", [msg]);
$scope.onServiceOnBtn = function() {
  alert("onServiceOnBtn");
  Rayleigh.myEcho.service_on (
    function successFunction(msg){
      alert(msg);
    },
    function failFunction(message){
      alert(message);
    },"msg");
};

