我的springboot学习之springboot整合mysql完成CRUD简单操作
今天又get到了新技能,所以我又想写博客了
老规矩,小可爱还是springboot项目,用idea来写...
但是呢,注意下,小可爱这次添加的依赖不一样咯
第一步:创建项目,添加依赖
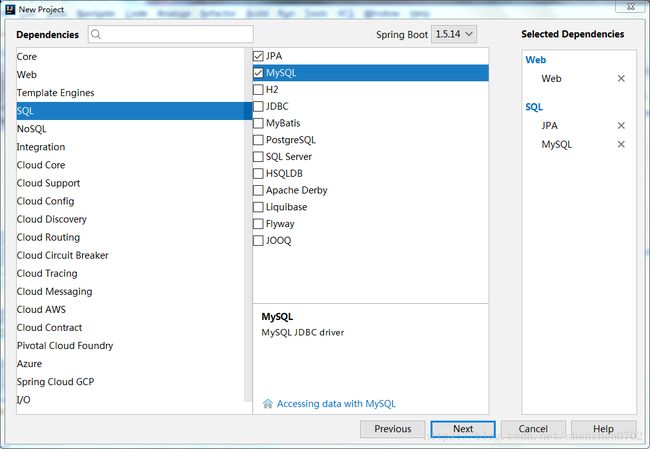
小可爱们,记得哦,是这三个依赖,别记错了哦
新建好项目之后,小可爱发现pom.xml不一样了,
原本是没注释的,是小可爱加的哦~
            org.springframework.boot
            spring-boot-starter-data-jpa


            org.springframework.boot
            spring-boot-starter-web


            mysql
            mysql-connector-java
            runtime


            org.springframework.boot
            spring-boot-starter-tomcat


            org.springframework.boot
            spring-boot-starter-test
            test
第二步:配置数据源以及JPA
application.yml配置:
spring:
  datasource:
    url: jdbc:mysql://127.0.0.1:3306/demo?characterEncoding=utf8
    driverClassName: com.mysql.jdbc.Driver
    username: root
    password: root
  jpa:
      database: MySQL
      show-sql: true
      hibernate:
      naming_strategy: org.hibernate.cfg.ImprovedNamingStrategy
第三步:创建实体
import javax.persistence.Id;
import javax.persistence.Entity;
import javax.persistence.Table;
import javax.persistence.GeneratedValue;
import javax.persistence.Column;
import java.io.Serializable;
/**
 * @author :shenshen
 * @version :1.0
 * @date :2018-07-27
 */
 @Id
    @GeneratedValue
    @Column(name = "id")
    private Long id;

    @Column(name = "name")
    private  String name;

    @Column(name = "age")
    private  int age;

    @Column(name = "score")
    private  int score;

    public Long getId() {
        return id;
    }

    public void setId(Long id) {
        this.id = id;
    }

    public String getName() {
        return name;
    }

    public void setName(String name) {
        this.name = name;
    }

    public int getAge() {
        return age;
    }

    public void setAge(int age) {
        this.age = age;
    }

    public int getScore() {
        return score;
    }

    public void setScore(int score) {
        this.score = score;
    }
}
小可爱记得哦,我们的实体类得继承序列化接口,
也就是Serializable
第四步:创建JPA
import com.example.demo.entity.Student;
import org.springframework.data.jpa.repository.JpaRepository;
import org.springframework.data.jpa.repository.JpaSpecificationExecutor;

import java.io.Serializable;
public interface StudentJPA extends
    JpaRepository,
    JpaSpecificationExecutor,
    Serializable{
}
小可爱写的StudentJPA继承了JpaRepository接口(SpringDataJPA提供的简单数据操作接口)、JpaSpecificationExecutor(SpringDataJPA提供的复杂查询接口)、Serializable(序列化接口),所以可以节省了很多的操作,哈哈哈...
第五步:编写方法
import org.springframework.web.bind.annotation.RequestMapping;
import org.springframework.web.bind.annotation.RequestMethod;
import org.springframework.web.bind.annotation.RestController;
import org.springframework.beans.factory.annotation.Autowired;
import com.example.demo.entity.Student;
import com.example.demo.jpa.StudentJPA;
import java.util.List;


@RestController
@RequestMapping(value = "/student")
public class HelloWorldController {

    @Autowired
    private StudentJPA studentJPA;

    /**
     * 查询学生列表方法
     * @return
     */
    @RequestMapping(value ="/list" ,method = RequestMethod.GET)
    public List list(){
        return studentJPA.findAll();
    }

    /**
     * 添加、更新学生方法
     * @return
     */
    @RequestMapping(value = "/save",method = RequestMethod.GET)
    public Student save(Student student)
    {
        return studentJPA.save(student);
    }

    /**
     * 删除学生方法
     * @param id 用户编号
     * @return
     */
    @RequestMapping(value = "/delete",method = RequestMethod.GET)
    public List delete(Long id)
    {
        studentJPA.delete(id);
        return studentJPA.findAll();
    }

}
小可爱注意一点哦,这里的Controller用的注解是@RestController
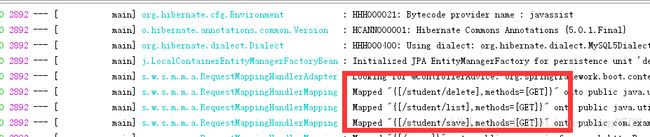
第六步:测试项目运行
输入网址,http://127.0.0.1:8080/student/list
噢耶,小可爱又运行出来了哦
因为数据是小可爱事先建表的时候,添加的数据哦,所以显示页面,一开始就有数据
小可爱事先没有数据的话,是看不到的

记得观察下控制台,就可以知道运行是否成功了~
当然,如果遇到下面这个情况的小可爱,咋办?
没事,只需要在数据库连接的url中添加useSSL=false
或者useSSL=true
原因:mysql版本过高
一般是MySQL 5.5.45+, 5.6.26+ and 5.7.6出现的问题

现在呢,小可爱试试别的功能...
因为我设置了id自增,所以,尝试添加功能的时候,我没有写id~
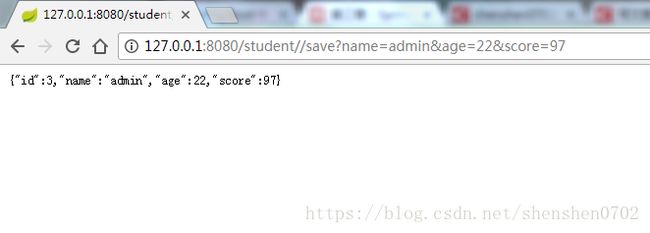
添加功能展示
http://127.0.0.1:8080/student//save?name=admin&age=22&score=97
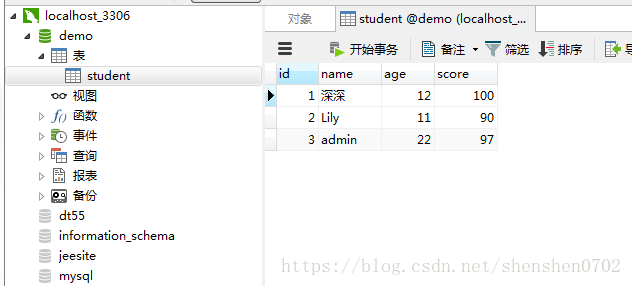
查看数据库,也发现成功添加了这一条数据,开心ლ(╹◡╹ლ)
更新功能展示
更新下刚刚创建的,主键编号为3的学生信息,
小可爱把name、age分别改成花花、54,再来看看效果
http://127.0.0.1:8080/student//save?id=3&name=花花&age=54&score=97
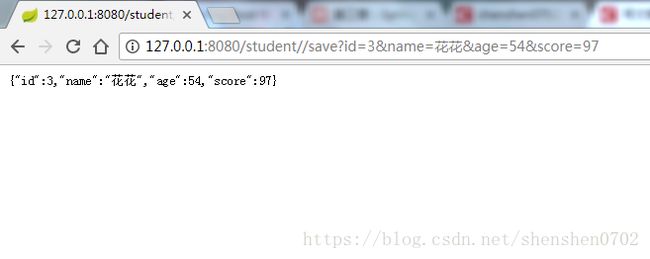
耶,页面显示修改成功,再看看数据库,刷新一下
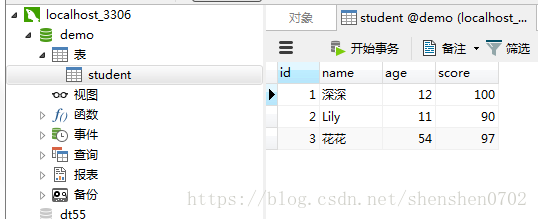
看,数据变化了,成功了,其他的也可以尝试下哦,小可爱~
不过小可爱要记住一点,修改的时候,要记得把值先传过来,再进行修改哦,别忘了~
删除功能展示:
刚刚添加的数据,我们不要了怎么办?
很简单,通过id删除它就可以了~
输入http://127.0.0.1:8080/student/delete?id=3
因为小可爱写的删除方法里,是删除了之后返回列表,所以我们看到的又是列表
仔细观察数据库,发现这条数据被我们删除了,成功了ヾ(*´▽‘*)ノ

为了方便小可爱尝试,小可爱把数据库也发上来,(๑・ิ-・ิ๑)
数据库名字为demo,数据表名为student~
SET FOREIGN_KEY_CHECKS=0;

-- ----------------------------
-- Table structure for student
-- ----------------------------
DROP TABLE IF EXISTS `student`;
CREATE TABLE `student` (
  `id` int(11) NOT NULL AUTO_INCREMENT,
  `name` varchar(255) DEFAULT NULL,
  `age` int(3) DEFAULT NULL,
  `score` int(11) DEFAULT NULL,
  PRIMARY KEY (`id`)
) ENGINE=InnoDB AUTO_INCREMENT=3 DEFAULT CHARSET=utf8;
希望小可爱注意一点
数据库里的id是int类型,我们写程序的时候是定义成long类型,别搞错了哦~
还有小可爱们,注意看 AUTO_INCREMENT的值,
它是设置表student的唯一自增字段id起始值从x开始~