PCI 标准是为了最大限度保护持卡人数据的一套标准。要求很多,可以看 PCI标准 站点了解。对于程序猿来说,要保证的是用户的任何支付信息,都不走自己的服务器,不保存在自己的数据库。
实现符合PCI标准的支付,有两种方式
加载Authorize.net的托管表单
使用AcceptJs
Authorize.net的托管表单,加载方便,安全性高,但是用户定制程度不高,只能稍微改改表单样式,AcceptJs可以使用自己设计的表单,调用AcceptJs做安全性校验和数据发送接收。
一. 前期准备工作
1.1 注册一个沙盒环境账号 (必须)
沙盒环境账号,可以用来在api文档页面直接调试各种接口,也可以在沙盒里面查看各种扣款记录。
如果项目要上线,请注册生产环境账号,这里全部使用沙盒环境。
1.2 下载Authorize.net SDK (非必须)
下载SDK到项目。
cd /your_php_project_path
composer require authorizenet/authorizenet
再在项目中引入即可(如何引入可以看上面地址的介绍,这里不再重复)。
该项目的GITHUB地址:AuthorizeNet/sdk-php 可以在上面搜索、提出你的issues
使用SDK的php案列:AuthorizeNet/sample-code-php
Authorizenet官方实现的一个符合PCI标准的案列AuthorizeNet/accept-sample-app (这个没有使用SDK)
1.3 不使用Authorize.net SDK (非必须)
因为Authorize.net SDK 要求 php: >=5.5 , 所以只能自己封装api请求了,具体如何封装个人自便,但要说明的一点是,Authorize.net 的api,如果选择的是json格式:
header("Content-type:text/json;charset=utf-8");
$curl = curl_init();
curl_setopt($curl, CURLOPT_URL, $this->authorizeUrl);
curl_setopt($curl, CURLOPT_RETURNTRANSFER, true);
curl_setopt($curl, CURLOPT_COOKIESESSION, true);
curl_setopt($curl, CURLOPT_HEADER, 0);
curl_setopt($curl, CURLOPT_POST, 1);
curl_setopt($curl, CURLOPT_POSTFIELDS, urldecode($data));
curl_setopt($curl, CURLOPT_SSL_VERIFYPEER, 0);
curl_setopt($curl, CURLOPT_SSL_VERIFYHOST, 2);
// curl_setopt($curl, CURLOPT_HTTPHEADER,     array('Content-Type: text/plain')); //xml request
curl_setopt($curl, CURLOPT_HTTPHEADER, array('Accept: application/json'));
$result    = curl_exec($curl);
$curlErrno = curl_errno($curl);
$curlError = curl_error($curl);
curl_close($curl);返回的数据也是JSON格式,but。。。。,这个返回的json数据,是无法用
json_decode($result,true)来解析的,需要
json_decode(substr($result, 3), true);来解析。究其原因,应该是它返回的数据带了BOM头,详细请移步 json-decode-returns-null
XML格式我没有去写代码测试,各位有兴趣可以自行测试,也可以在沙盒环境直接测试。
有个直接扣款的API,其中的ORDER参数要有顺序,要有顺序,要有顺序,如果遇到一些API,调试一直报错,但又没有特别的原因,请注意看是否是顺序问题。
1.4 各种环境地址
| 内容 | 测试环境 | 生产环境 |
|---|---|---|
| api请求地址 | apitest url | api url |
| Accept.js | Accept jstest url | Accept js url |
| 请求支付表单 | test payment/payment | accept payment/payment |
| Manage Profiles | Manage Profiles | Manage Profiles |
| Add Payment Profile | Add Payment Profile | Add Payment Profile |
| Add Shipping Profile | Add Shipping Profile | Add Shipping Profile |
| Edit Payment Profile | Edit Payment Profile | Edit Payment Profile |
| Edit Shipping Profile | Edit Shipping Profile | Edit Shipping Profile |
二. iframe 加载托管表单方式发起支付
1. 加载iframe托管表单创建用户的payment Info。
1.1 为用户申请创建CustomerProfileID
需要请求的API : createCustomerProfileRequest
API的详细文档地址:createCustomerProfileRequestCustomerProfile详细介绍:customer_profiles
该API可以在创建CustomerProfileId 的同时,也创建PaymentProfileId 。但是PaymentProfileId需要的参数都是涉及到用户敏感信息的,按照PCI标准,是不允许商户收集,所以需要使用Authorize.net的托管表单来创建。
所以这一步只简单的传递几个参数即可,使用SDK创建代码:
$customerProfile = new AnetAPI\CustomerProfileType();
$customerProfile->setDescription("Customer 2 Test PHP");
$customerProfile->setMerchantCustomerId('11211');
$customerProfile->setEmail($post['email']);
$request = new AnetAPI\CreateCustomerProfileRequest();
$request->setMerchantAuthentication($this->merchantAuthentication);
$request->setProfile($customerProfile);
$controller = new AnetController\CreateCustomerProfileController($request);
$response = $controller->executeWithApiResponse(\net\authorize\api\constants\ANetEnvironment::SANDBOX);
1.2 为添加PaymentInfo托管表单申请token
需要请求的API : getHostedProfilePageRequest
API的详细文档地址:getHostedProfilePageRequest
用上一步创建的CustomerProfileId $profileId = $response->getCustomerProfileId(); 来获取token
$setting = new AnetAPI\SettingType();
$setting->setSettingName("hostedProfileIFrameCommunicatorUrl");
$url = \Yii::$app->urlManager->createAbsoluteUrl(['authorizenet/special']);
$setting->setSettingValue($url);
$request = new AnetAPI\GetHostedProfilePageRequest();
$request->setMerchantAuthentication($this->merchantAuthentication);
$request->setCustomerProfileId($profileId);
$request->addToHostedProfileSettings($setting);
$controller = new AnetController\GetHostedProfilePageController($request);
$response = $controller->executeWithApiResponse(
\net\authorize\api\constants\ANetEnvironment::SANDBOX);
1.3 视图页面iframe使用token加载托管表单
此时该iframe里面还没有任何东西,需要提交这个form表单才能加载托管表单,这里给一个函数让他页面加载的时候自动提交以加载托管表单。
var button = document.getElementById('submit');
button.click();
1.4 捕获响应并处理
我们回到 1.2 申请表单这里,这个API支持设置托管表单的很多属性,比较有用的有 :
hostedProfileReturnUrl : 设置托管会话结束(用户点击SAVE)返回给用户的页面 (这里省略)hostedProfileIFrameCommunicatorUrl : 用来接受、处理Authorize.net响应的页面
上面设置的hostedProfileIFrameCommunicatorUrl的页面为authorizenet/special
function callParentFunction(str) {
    var referrer = document.referrer;
    var s = {qstr : str , parent : referrer};
    if(referrer == 'https://test.authorize.net/customer/addPayment'){
        switch(str){
            case 'action=successfulSave' :
                window.parent.parent.location.href="https://www.basic.com/authorizenet/payment";
                break;
        }
    }
}

function receiveMessage(event) {
    if (event && event.data) {
        callParentFunction(event.data);
    }
}

if (window.addEventListener) {
    window.addEventListener("message", receiveMessage, false);
} else if (window.attachEvent) {
    window.attachEvent("onmessage", receiveMessage);
}

if (window.location.hash && window.location.hash.length > 1) {
    callParentFunction(window.location.hash.substring(1));
}
这里设置成功保存paymentInfo 信息到Authorize.net之后就跳转到 payment 页面支付。action有不同的状态,可以根据action作相应的处理。resizeWindow : 托管表单加载successfulSave : 表单成功保存(CustomerProfile)cancel : 用户点击取消按钮transactResponse :支付成功(payment)
2. 加载iframe托管表单发起支付
1.1 通过上面的CustomerProfileId,获取用户填写的PaymentInfo,用来回填支付表单
需要请求的API : getCustomerProfileRequest
API的详细文档地址:getCustomerProfileRequest
$customer = $this->getCustomerProfile($profileId);
$billTo = end($customer->getProfile()->getPaymentProfiles())->getBillTo();因为一个CustomerProfi对应多个PaymentProfile ,这里获取最后一个PaymentProfile。
1.2 为添加Payment托管表单申请token
需要请求的API : getHostedPaymentPageRequest
API的详细文档地址:getHostedPaymentPageRequest
请求该URL,可以指定加载表单的样式等各种参数,具体参考:Accept Hosted feature details page
$transactionRequestType = new AnetAPI\TransactionRequestType();
$transactionRequestType->setTransactionType("authCaptureTransaction");
$transactionRequestType->setAmount("12.23");
$customer = $this->getCustomerProfile(\Yii::$app->session->get('profileId'));
$billTo = end($customer->getProfile()->getPaymentProfiles())->getBillTo();

$transactionRequestType->setBillTo($billTo);//回填账单地址
$customer = new AnetAPI\CustomerDataType();
$customer->setEmail(\Yii::$app->session->get('email'));
$customer->setId(\Yii::$app->session->get('user_id'));
$transactionRequestType->setCustomer($customer);

$request = new AnetAPI\GetHostedPaymentPageRequest();
$request->setMerchantAuthentication($this->merchantAuthentication);
$request->setTransactionRequest($transactionRequestType);
$setting3 = new AnetAPI\SettingType();
$setting3->setSettingName("hostedPaymentReturnOptions");
$setting3->setSettingValue("{\"url\": \"https://www.basic.com/index.php?r=authorizenet/receipt\", \"cancelUrl\": \"https://www.basic.com/index.php?r=authorizenet/cancel\", \"showReceipt\": false}");
$request->addToHostedPaymentSettings($setting3);

//设置托管表单显示email,且必填 (因为form表单没有禁止修改email参数,所以可以设置email但不显示在表单中,以防修改)
$setting4 = new AnetAPI\SettingType();
$setting4->setSettingName('hostedPaymentCustomerOptions');
$setting4->setSettingValue("{\"showEmail\": true, \"requiredEmail\":true}");
$request->addToHostedPaymentSettings($setting4);

$setting6 = new AnetAPI\SettingType();
$setting6->setSettingName('hostedPaymentIFrameCommunicatorUrl');
$url = \Yii::$app->urlManager->createAbsoluteUrl(['authorizenet/special']);
$setting6->setSettingValue("{\"url\": \"".$url."\"}");
$request->addToHostedPaymentSettings($setting6);
$controller = new AnetController\GetHostedPaymentPageController($request);
$response = $controller->executeWithApiResponse( \net\authorize\api\constants\ANetEnvironment::SANDBOX);

if (($response != null) && ($response->getMessages()->getResultCode() == "Ok") ) {
   return $response->getToken();
}
1.3 视图页面iframe使用token加载托管表单
1.4 捕获响应并处理。
同 二.1.14 一致,可以设置为同一个页面,通过referrer来判断是完善支付信息表单的响应,还是支付表单的响应
如:
if(referrer == 'https://test.authorize.net/customer/addPayment'){
    //your code
}else if(referrer == 'https://test.authorize.net/payment/payment'){
    //your code
}else if(other){
    //your code
}
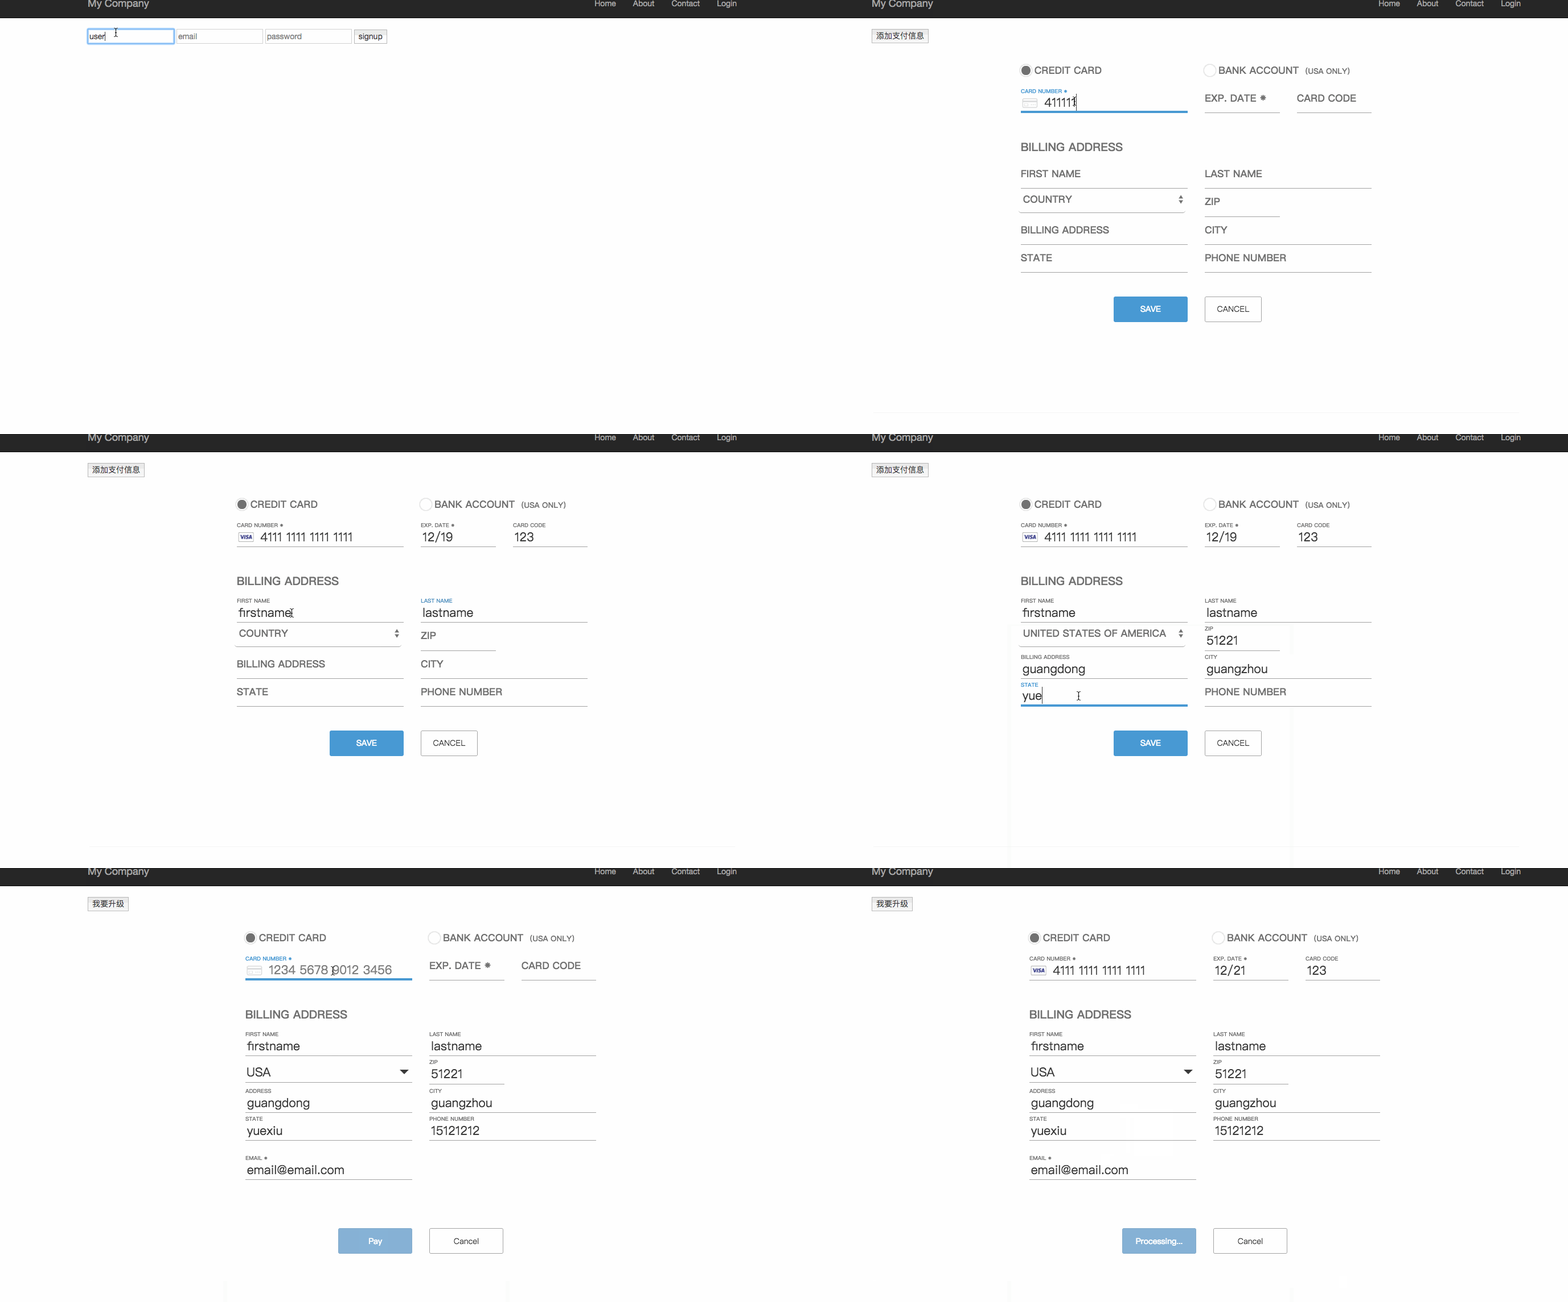
3. 最终效果图
(支付完成后的处理我没做,无非就是弹个窗之类的告诉用户支付成功,再处理后台逻辑之类的)
可以看到,这里只可以回填账单地址、客户电话和email之类的信息。信用卡、信用卡过期时间、信用卡安全码等都无法回填,需要用户再次输入,用户体验非常不好。
所以支付这一步我们可以不用托管表单,使用通过CustomerProfileID发起支付的API来完成
需要请求的API : createTransactionRequest
API的详细文档地址:createTransactionRequest
$paymentprofileid = $this->getCustomerProfile($profileid);
$profileToCharge = new AnetAPI\CustomerProfilePaymentType();
$profileToCharge->setCustomerProfileId($profileid);
$paymentProfile = new AnetAPI\PaymentProfileType();
$paymentProfile->setPaymentProfileId($paymentprofileid);
$profileToCharge->setPaymentProfile($paymentProfile);

$transactionRequestType = new AnetAPI\TransactionRequestType();
$transactionRequestType->setTransactionType( "authCaptureTransaction");
$transactionRequestType->setAmount(5);
$transactionRequestType->setProfile($profileToCharge);

$request = new AnetAPI\CreateTransactionRequest();
$request->setMerchantAuthentication($this->merchantAuthentication);
$request->setTransactionRequest( $transactionRequestType);
$controller = new AnetController\CreateTransactionController($request);
$response = $controller->executeWithApiResponse( \net\authorize\api\constants\ANetEnvironment::SANDBOX);
4. 结尾补充
托管表单要求你的程序挂载在HTTPS域名下
还可以通过CustomerProfileId、paymentProfileId发起ARB(Auto Recurring Billing)扣款
需要请求的API : ARBCreateSubscriptionRequest
API的详细文档地址:getHostedPaymentPageRequest
关于APB的详细介绍请看:recurring_billing
关于测试请看:testing_guide
可以填写不同的 Zip Code 和 Card Code 来模拟不同的错误返回
三. AccceptJs方式发起支付
(缺)
1. 加载AccpectJS
(缺)
2. 巴拉巴拉
(缺)
缺失的内容请自行参考官方demo。。。。。
