此知识点非原创,百度所得。只做自己收藏记录。
首先附上效果图
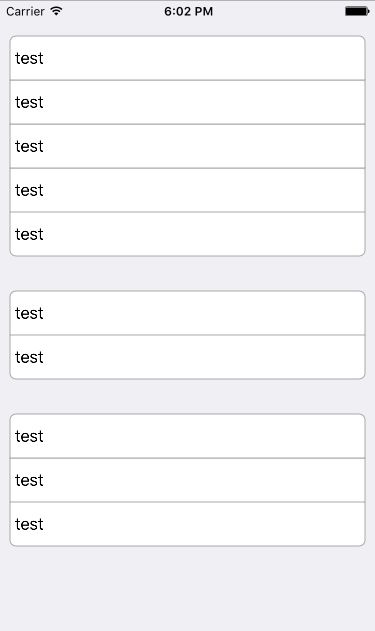
tableView的分区圆角边框
核心代码
- (void)tableView:(UITableView *)tableView willDisplayCell:(UITableViewCell *)cell forRowAtIndexPath:(NSIndexPath *)indexPath {
    // 圆角弧度半径
    CGFloat cornerRadius = 6.f;
    // 设置cell的背景色为透明,如果不设置这个的话,则原来的背景色不会被覆盖
    cell.backgroundColor = UIColor.clearColor;

    // 创建一个shapeLayer
    CAShapeLayer *layer = [[CAShapeLayer alloc] init];
    CAShapeLayer *backgroundLayer = [[CAShapeLayer alloc] init]; //显示选中
    // 创建一个可变的图像Path句柄,该路径用于保存绘图信息
    CGMutablePathRef pathRef = CGPathCreateMutable();
    // 获取cell的size
    // 第一个参数,是整个 cell 的 bounds, 第二个参数是距左右两端的距离,第三个参数是距上下两端的距离
    CGRect bounds = CGRectInset(cell.bounds, 10, 0);

    // CGRectGetMinY:返回对象顶点坐标
    // CGRectGetMaxY:返回对象底点坐标
    // CGRectGetMinX:返回对象左边缘坐标
    // CGRectGetMaxX:返回对象右边缘坐标
    // CGRectGetMidX: 返回对象中心点的X坐标
    // CGRectGetMidY: 返回对象中心点的Y坐标

    // 这里要判断分组列表中的第一行,每组section的第一行,每组section的中间行

    // CGPathAddRoundedRect(pathRef, nil, bounds, cornerRadius, cornerRadius);
    if (indexPath.row == 0) {
        // 初始起点为cell的左下角坐标
        CGPathMoveToPoint(pathRef, nil, CGRectGetMinX(bounds), CGRectGetMaxY(bounds));
        // 起始坐标为左下角,设为p,(CGRectGetMinX(bounds), CGRectGetMinY(bounds))为左上角的点,设为p1(x1,y1),(CGRectGetMidX(bounds), CGRectGetMinY(bounds))为顶部中点的点,设为p2(x2,y2)。然后连接p1和p2为一条直线l1,连接初始点p到p1成一条直线l,则在两条直线相交处绘制弧度为r的圆角。
        CGPathAddArcToPoint(pathRef, nil, CGRectGetMinX(bounds), CGRectGetMinY(bounds), CGRectGetMidX(bounds), CGRectGetMinY(bounds), cornerRadius);
        CGPathAddArcToPoint(pathRef, nil, CGRectGetMaxX(bounds), CGRectGetMinY(bounds), CGRectGetMaxX(bounds), CGRectGetMidY(bounds), cornerRadius);
        // 终点坐标为右下角坐标点,把绘图信息都放到路径中去,根据这些路径就构成了一块区域了
        CGPathAddLineToPoint(pathRef, nil, CGRectGetMaxX(bounds), CGRectGetMaxY(bounds));
        CGPathCloseSubpath(pathRef);

    } else if (indexPath.row == [tableView numberOfRowsInSection:indexPath.section]-1) {
        // 初始起点为cell的左上角坐标
        CGPathMoveToPoint(pathRef, nil, CGRectGetMinX(bounds), CGRectGetMinY(bounds));
        CGPathAddArcToPoint(pathRef, nil, CGRectGetMinX(bounds), CGRectGetMaxY(bounds), CGRectGetMidX(bounds), CGRectGetMaxY(bounds), cornerRadius);
        CGPathAddArcToPoint(pathRef, nil, CGRectGetMaxX(bounds), CGRectGetMaxY(bounds), CGRectGetMaxX(bounds), CGRectGetMidY(bounds), cornerRadius);
        // 添加一条直线,终点坐标为右下角坐标点并放到路径中去
        CGPathAddLineToPoint(pathRef, nil, CGRectGetMaxX(bounds), CGRectGetMinY(bounds));
    } else {
        // 添加cell的rectangle信息到path中(不包括圆角)
        CGPathAddRect(pathRef, nil, bounds);
    }
    // 把已经绘制好的可变图像路径赋值给图层,然后图层根据这图像path进行图像渲染render
    layer.path = pathRef;
    backgroundLayer.path = pathRef;
    // 注意:但凡通过Quartz2D中带有creat/copy/retain方法创建出来的值都必须要释放
    CFRelease(pathRef);
    // 按照shape layer的path填充颜色,类似于渲染render
//     layer.fillColor = [UIColor colorWithWhite:1.f alpha:0.8f].CGColor;
    layer.fillColor = [UIColor whiteColor].CGColor;
    layer.strokeColor = [UIColor lightGrayColor].CGColor;

    // view大小与cell一致
    UIView *roundView = [[UIView alloc] initWithFrame:bounds];
    // 添加自定义圆角后的图层到roundView中
    [roundView.layer insertSublayer:layer atIndex:0];
    roundView.backgroundColor = UIColor.clearColor;
    // cell的背景view
    cell.backgroundView = roundView;

    // 以上方法存在缺陷当点击cell时还是出现cell方形效果,因此还需要添加以下方法
    // 如果你 cell 已经取消选中状态的话,那以下方法是不需要的.
    UIView *selectedBackgroundView = [[UIView alloc] initWithFrame:bounds];
    backgroundLayer.fillColor = [UIColor cyanColor].CGColor;
    [selectedBackgroundView.layer insertSublayer:backgroundLayer atIndex:0];
    selectedBackgroundView.backgroundColor = UIColor.clearColor;
    cell.selectedBackgroundView = selectedBackgroundView;
}
注意点:在创建tableView的时候,最好设置:
_tableView.tableFooterView = [UIView new];
_tableView.separatorStyle = UITableViewCellSeparatorStyleNone;