机器学习(一)---KNN算法总结(手写体识别)
1、算法综述
Cover和Hart在1968年提出了最初的邻近算法,K-近邻算法(k-Nearest Neighbors)的本质计算未知数据集(测试样本)与训练集的各样本的距离,按从小到大取前k个距离排序,然后选择k个最相似数据中出现次数最多的分类作为新数据的分类。
(1)根据《机器学习》第10.1节,最近邻分类器虽然简单,但它的泛化错误率不超过贝叶斯最优分类器的错误率的两倍;
(2)对于二分类问题k值一般取奇数,便于分类;
(3)特征(属性)可以为多个,分类也可以是多个(比如考察约会对象的喜欢与否,特征为:玩游戏百分比、飞行里程、冰淇淋消耗;样本分为三类:1-特别喜欢,2-一般,3-不喜欢);
(4)距离一般选用欧氏距离或者曼哈顿距离;
(5)算法结果在很大程度上取决于k的取值以及距离公式选择。
2、评价
优点:精度高、对异常值不敏感、无数据输入假定(仅仅是把样本存起来,训练时间为0)。
缺点:计算复杂度高、空间复杂度高(关键是分类图片时,背景影响很大,这一点下面后说)。
适用数据范围:数值型和标称性。
3、工作原理
存在一个样本数据集合,也称作训练样本集,并且样本集中每个数据都存在标签,即我们知道样本集中每一个数据与所属分类的对应关系。输入没有标签的新数据后,将新数据的每个特征与样本集中数据对应的特征进行比较,然后算法提取样本集中特征最相似数据(最近邻)的分类标签。一般来说,我们只选择样本数据及中前k个最相似的数据,这就是k-近邻算法中k的出处,通常k选择不大于20的整数。最后,选择k个最相似数据中出现次数最多的分类,作为新数据的分类。
4、K-近邻算法的一般流程
(1)收集数据:可以使用任何方法
(2)准备数据:距离计算所需要的数值,最好是结构化的数据格式
(3)分析数据:可以使用任何方法
(4)训练算法:此步骤不适用k-邻近算法
(5)测试算法:计算错误率
(6)使用算法:首先需要输入样本数据和结构化的输出结果,然后运行k-近邻算法判定输入数据分别属于哪个分类,最后应用对计算出的分类执行后续的处理。
5、算法应用举例(Python和C++)
1、使用K-近邻算法分类爱情片和动作片
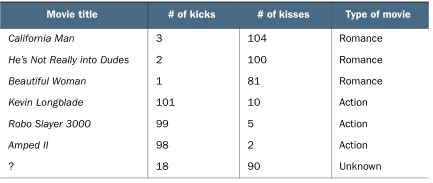
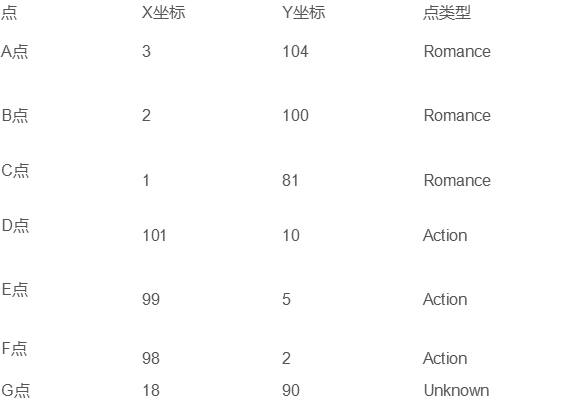
可以以打斗次数和接吻次数来作为二维图的x轴和y轴坐标:
首先计算出未知电影与样本集中其他电影的距离(距离的具体计算先不叙述)
按照距离递增排序,可以找到k个距离最近的电影,若k=3,则三个最靠近的电影依次是He’s Not Really into Dudes, Beautiful Woman, andCalifornia Man.这三部电影全部是爱情片,因此我们判定未知电影是爱情片。
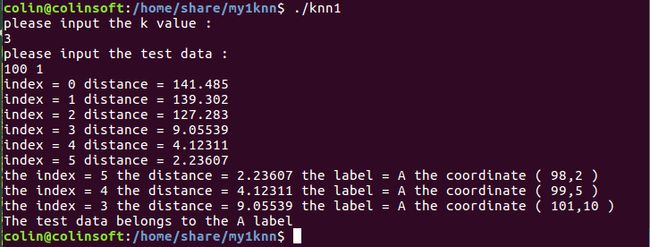
C++实现:
数据集
3 104 R
2 100 R
1 81 R
101 10 A
99 5 A
98 2 A
代码
#include
#include 运行结果:
2、Python实现手写体识别:
#coding=utf-8

from numpy import *
import operator
from os import listdir

#k近邻算法
def classify0(inX, dataSet, labels, k):
    dataSetSize = dataSet.shape[0]           #返回dataset这个array的行数
    diffMat = tile(inX, (dataSetSize,1)) - dataSet           #tile(A,reps)将A补成reps规格
    sqDiffMat = diffMat**2           #平方
    sqDistances = sqDiffMat.sum(axis=1)           #默认的axis=0 就是普通的相加 而当加入axis=1以后就是将一个矩阵的每一行向量相加
    distances = sqDistances**0.5           #开方
    sortedDistIndicies = distances.argsort()           #argsort其实是返回array排序后的下标(或索引)
    classCount={}         #新建一个字典
    for i in range(k):
        voteIlabel = labels[sortedDistIndicies[i]]
		#依次查询cclassCount中是否有该key,有则将取出value再+1,没有则返回添加该key并置value为0,再+1
        classCount[voteIlabel] = classCount.get(voteIlabel,0) + 1  #统计得到各个标签的个数

	#按classCount字典的第2个元素(即类别出现的次数)从大到小排序,即获得得票最高的标签
	sortedClassCount = sorted(classCount.iteritems(), key=operator.itemgetter(1), reverse=True)
    return sortedClassCount[0][0]


#从文本文件解析数据
def file2matrix(filename):
    fr = open(filename)
    numberOfLines = len(fr.readlines())         #get the number of lines in the file
    returnMat = zeros((numberOfLines,3))        #prepare matrix to return
    classLabelVector = []                       #prepare labels return
    fr = open(filename)
    index = 0
    for line in fr.readlines():
        line = line.strip()           #删除文本行line后的回车符
        listFromLine = line.split('\t')     #使用’\t’分割字符串str,返回一个列表
        returnMat[index,:] = listFromLine[0:3]
        classLabelVector.append(int(listFromLine[-1]))
        index += 1
    return returnMat,classLabelVector

#归一化特征值
def autoNorm(dataSet):
    minVals = dataSet.min(0)
    maxVals = dataSet.max(0)
    ranges = maxVals - minVals
    normDataSet = zeros(shape(dataSet))        #shape数组或矩阵的各个维的大小
    m = dataSet.shape[0]            #返回dataset这个array的行数
    normDataSet = dataSet - tile(minVals, (m,1))
    normDataSet = normDataSet/tile(ranges, (m,1))   #element wise divide
    return normDataSet, ranges, minVals

def datingClassTest():
    hoRatio = 0.10      #hold out 10%
    datingDataMat,datingLabels = file2matrix('datingTestSet2.txt')       #load data setfrom file
    normMat, ranges, minVals = autoNorm(datingDataMat)
    m = normMat.shape[0]
    numTestVecs = int(m*hoRatio)
    errorCount = 0.0
    for i in range(numTestVecs):
        classifierResult = classify0(normMat[i,:],normMat[numTestVecs:m,:],datingLabels[numTestVecs:m],3)
        print "the classifier came back with: %d, the real answer is: %d" % (classifierResult, datingLabels[i])
        if (classifierResult != datingLabels[i]): errorCount += 1.0
    print "the total error rate is: %f" % (errorCount/float(numTestVecs))
    print errorCount

#将图像转换为向量函数
def img2vector(filename):
    returnVect = zeros((1,1024))
    fr = open(filename)
    for i in range(32):
        lineStr = fr.readline()   #读取文件对象fr的当前行,返回字符串
        for j in range(32):
            returnVect[0,32*i+j] = int(lineStr[j])
    return returnVect

def handwritingClassTest():
    hwLabels = []
    trainingFileList = listdir('trainingDigits')           #load the training set
    m = len(trainingFileList)
    trainingMat = zeros((m,1024))
    for i in range(m):
        fileNameStr = trainingFileList[i]
        fileStr = fileNameStr.split('.')[0]     #take off .txt
        classNumStr = int(fileStr.split('_')[0])
        hwLabels.append(classNumStr)
        trainingMat[i,:] = img2vector('trainingDigits/%s' % fileNameStr)
    testFileList = listdir('testDigits')        #iterate through the test set
    errorCount = 0.0
    mTest = len(testFileList)
    for i in range(mTest):
        fileNameStr = testFileList[i]
        fileStr = fileNameStr.split('.')[0]     #take off .txt
        classNumStr = int(fileStr.split('_')[0])
        vectorUnderTest = img2vector('testDigits/%s' % fileNameStr)
        classifierResult = classify0(vectorUnderTest, trainingMat, hwLabels, 3)
        print "the classifier came back with: %d, the real answer is: %d" % (classifierResult, classNumStr)
        if (classifierResult != classNumStr): errorCount += 1.0
    print "\nthe total number of errors is: %d" % errorCount
    print "\nthe total error rate is: %f" % (errorCount/float(mTest))
def main():
	#datingClassTest()
	handwritingClassTest()

main()


# 函数名/属性					                    功能
# array()							创建一个数组
# shape								数组或矩阵的各个维的大小
# tile(A, reps)		   将数组A,根据数组reps沿各个维度重复多次,构成一个新的数组。reps的数字从后往前分别对应A的第N个维度的重复次数。
# sum(arr,axis=1)					    根据行列(轴),求和
# max(arr,axis=1)					   根据行列(轴),求最大值
# min(arr,axis=1)					   根据行列(轴),求最小值
# mean(arr,axis=1)					   根据行列(轴),求平均值
# argsort()						  得到矩阵中每个元素的排序序号
# dict.get(key,default)			    获取字典中,一个给定的key对应的值。若key不存在,则返回默认值default。
# sorted(iterable[, key][, reverse])	第一个参数是一个iterable,返回值是一个对iterable中元素进行排序后的列表(list)。
# open(filename)						返回一个文件对象
# fr.readlines()					读取文件对象fr中的所有行,返回数组
# fr.readline()						读取文件对象fr的当前行,返回字符串
# len(arr)							返回数组的长度
# zeros((n,m))					          创建一个n*m的矩阵,用0填充
# line.strip()						   删除文本行line后的回车符
# str.spit(‘\t’)					使用’\t’分割字符串str,返回一个列表
# list[-1]						     获取列表的最后一个元素
# vec.append(item)					在向量、列表vec后追加元素item
# mat[index, :]						获取矩阵/数组的第index行的所有元素
# list[m:n]						    获取列表索引m到n的元素的值
# plt.figure()						            创建画布?
# fig.add_subplot((m,n,x))			        把画布分割成m*n的区块,在第x块上绘图
# scatter()							     绘制散点
# print								    格式化输出
# raw_input(“prompt string”)			       显示提示字符串,将用户的输入转换成string
# input(“prompt string”)	     会根据用户输入变换相应的类型,而且如果要输入字符和字符串的时候必须要用引号包起来
# range()	range(1,5) 	#代表从1到5(不包含5); range(1,5,2) #代表从1到5,间隔2(不包含5); range(5) #代表从0到5(不包含5)
# listdir(‘folder’)	                  from os import listdir,获取给定文件夹下的文件名列表,不含文件路径
运行结果:
手写体识别的项目,代码和完整数据集可到https://download.csdn.net/download/hzqgangtiexia/10440405下载
手写体数据集采用txt文件0、1编码的方式来“模拟”手写体图像,所以利用KNN算法获得了很好的分类效果(98.7%),可是如果数据集是真实的图像时,图像的背景会对算法的效果影响很大,比如分类汽车和飞机,背景都是蓝色的天空,那么这时二者的KNN距离计算值差别就比较小,算法很容易把它们归为“一类”,不同的图像或者同一张图像的不同变换都有可能具有相同的欧式距离。


