深度Mybatis源码分析——SqlSessionFactoryBuilder(建造者模式),Mapper接口绑定原理(代理模式)
深度Mybatis源码分析——SqlSessionFactoryBuilder(建造者模式),Mapper接口绑定原理(代理模式
本章源码分析目标
1.mybatis SqlSessionFactoryBuilder源码分析 (建造者模式)
2.MybatisMapper接口绑定原理(代理设计模式)
源码分析流程图

为什么要使用Mybatis
MyBatis 是一款优秀的持久层框架,它支持定制化 SQL、存储过程以及高级映射。MyBatis 避免了几乎所有的 JDBC 代码和手动设置参数以及获取结果集。MyBatis 可以使用简单的 XML 或注解来配置和映射原生类型、接口和 Java 的 POJO(Plain Old Java Objects,普通老式 Java 对象)为数据库中的记录。
Mybatis环境快速入门
要使用 MyBatis, 只需将 mybatis-x.x.x.jar 文件置于 classpath 中即可。
如果使用 Maven 来构建项目,则需将下面的 dependency 代码置于 pom.xml 文件中:
1 2 3 4 5 |
|
三分钟带你快速搭建Mybatis
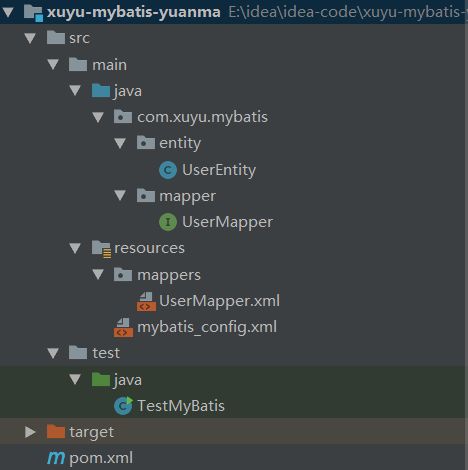
项目目录结构
maven依赖信息
1 2 3 4 5 6 7 8 9 10 11 12 13 14 15 16 17 18 19 20 21 |
|
创建mybatis配置文件 configuration——(mybatis_config.xml)
1 2 3 4 5 6 7 8 9 10 11 12 13 14 15 16 17 18 19 20 21 22 23 |
|
Mapper配置文件——(UserMapper.xml)
1 2 3 4 5 6 7 8 9 10 11 12 13 14 15 16 17 18 19 |
|
数据表结构
1 2 3 4 5 6 7 8 9 10 11 12 13 14 15 |
SET NAMES utf8mb4; SET FOREIGN_KEY_CHECKS = 0; -- ---------------------------- -- Table structure for users -- ---------------------------- DROP TABLE IF EXISTS `users`; CREATE TABLE `users` ( `id` int(11) NOT NULL AUTO_INCREMENT, `name` varchar(255) CHARACTER SET utf8 COLLATE utf8_general_ci NULL DEFAULT NULL, `age` int(11) NULL DEFAULT NULL, PRIMARY KEY (`id`) USING BTREE ) ENGINE = InnoDB AUTO_INCREMENT = 11 CHARACTER SET = utf8 COLLATE = utf8_general_ci ROW_FORMAT = Dynamic; SET FOREIGN_KEY_CHECKS = 1; |
其它代码
1 2 3 4 5 6 7 8 9 10 11 12 13 14 15 16 17 18 19 20 21 22 23 |
public class UserEntity {
    private Long id;
    private String name;
    private Integer age;
    public void setId(Long id) {
        this.id = id;
    }
    public void setName(String name) {
        this.name = name;
    }
    public void setAge(Integer age) {
        this.age = age;
    }
    public String getName() {
        return name;
    }
    public Integer getAge() {
        return age;
    }
    public Long getId() {
        return id;
    }
} |
1 2 3 |
public interface UserMapper {
    UserEntity getUser(int id);
} |
运行MyBatis代码
1 2 3 4 5 6 7 8 9 10 11 12 13 14 15 16 17 18 19 20 21 22 23 24 25 26 27 |
public class TestMyBatis {
    // 1.需要引入mybatisjar包
    // 2.配置核心mybatis文件 数据源、mapper接口映射
    // 3.需要sqlmapper文件 sql数据 orm
    // 4.通过mybatis操作../
    // 疑问:你们在mybatis整合springboot之后需要在每个mapper 需要加入注入spring容器注解 这是为什么呢?
    // 疑问:Mapper如何调用的呢
    public static void main(String[] args) {
        try {
            // 基本mybatis环境
            // 1.定义mybatis_config文件地址
            String resources = "mybatis_config.xml";
            // 2.获取InputStreamReaderIo流
            Reader reader = Resources.getResourceAsReader(resources);
            // 3.获取SqlSessionFactory
            SqlSessionFactory sqlSessionFactory = new SqlSessionFactoryBuilder().build(reader);
            // 4.获取Session
            SqlSession sqlSession = sqlSessionFactory.openSession();
            // 5.操作Mapper接口
            UserMapper mapper = sqlSession.getMapper(UserMapper.class);
            UserEntity user = mapper.getUser(2);
            System.out.println(user.getName());
        } catch (Exception e) {
            e.printStackTrace();
        }
    }
} |
,我们开始从TestMybatis测试类中进行debug源码分析
首先分析目标有两个
1.mybatis SqlSessionFactoryBuilder源码分析 (建造者模式)
2.MybatisMapper接口绑定原理(代理设计模式)
现在开始源码分析
目标一:mybatis SqlSessionFactoryBuilder源码分析 (建造者模式)
从 XML 中构建 SqlSessionFactory
每个基于 MyBatis 的应用都是以一个 SqlSessionFactory 的实例为核心的。SqlSessionFactory 的实例可以通过 SqlSessionFactoryBuilder 获得。而 SqlSessionFactoryBuilder 则可以从 XML 配置文件或一个预先定制的 Configuration 的实例构建出 SqlSessionFactory 的实例。
从 XML 文件中构建 SqlSessionFactory 的实例非常简单,建议使用类路径下的资源文件进行配置。 但是也可以使用任意的输入流(InputStream)实例,包括字符串形式的文件路径或者 file:// 的 URL 形式的文件路径来配置。MyBatis 包含一个名叫 Resources 的工具类,它包含一些实用方法,可使从 classpath 或其他位置加载资源文件更加容易。下面是代码示例:
1 2 3 4 5 6 |
// 1.定义mybatis_config文件地址 String resources = "mybatis_config.xml"; // 2.获取InputStreamReaderIo流 Reader reader = Resources.getResourceAsReader(resources); // 3.获取SqlSessionFactory SqlSessionFactory sqlSessionFactory = new SqlSessionFactoryBuilder().build(reader); |
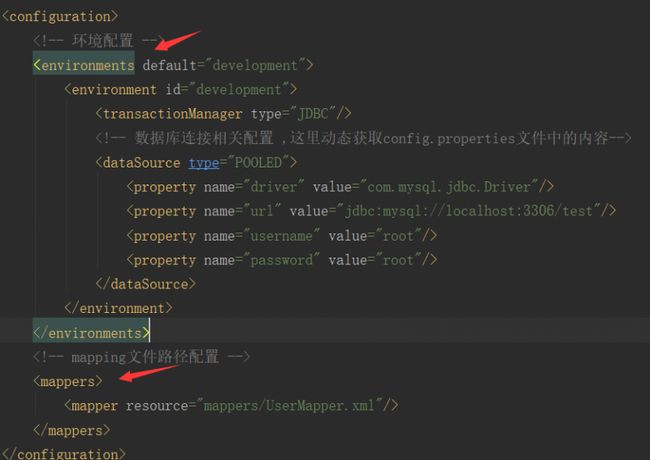
XML 配置文件中包含了对 MyBatis 系统的核心设置,包含获取数据库连接实例的数据源(DataSource)和决定事务作用域和控制方式的事务管理器(TransactionManager)。 XML 配置文件的详细内容后面再探讨,这里先给出一个简单的示例:
1 2 3 4 5 6 7 8 9 10 11 12 13 14 15 16 17 18 19 20 21 22 23 |
|
当然,还有很多可以在 XML 文件中进行配置,上面的示例指出的则是最关键的部分。 要注意 XML 头部的声明,它用来验证 XML 文档正确性。environment 元素体中包含了事务管理和连接池的配置。mappers 元素则是包含一组映射器(mapper),这些映射器的 XML 映射文件包含了 SQL 代码和映射定义信息。
Mybatis架构流程具体分析
1.读取resources获取对应的Reader对象。
reader = Resources.getResourceAsReader(resources);
进入getResourceAsReader(resources)源码片段
1 2 3 4 5 6 7 8 9 10 11 |
public static Reader getResourceAsReader(String resource) throws IOException {
    Reader reader;
    //判断编码
    if (charset == null) {
      //调用javaioAPI  读取resources配置文件,获取InputStreamReader
      reader = new InputStreamReader(getResourceAsStream(resource));
    } else {
      reader = new InputStreamReader(getResourceAsStream(resource), charset);
    }
    return reader;
} |
2.使用SqlSessionFactoryBuilder获取SqlSessionFactory源码分析
SqlSessionFactory sqlMapper = new SqlSessionFactoryBuilder().build(reader);
SqlSessionFactoryBuilder 去创建 SqlSessionFactory, 那么,我们就先从SqlSessionFactoryBuilder入手, 咱们先看看源码是怎么实现的:
进入SqlSessionFactoryBuilder()去看看无参构造函数做了什么事情,我们发现无参构造函数没有做什么事情,那么我们就点到build(reader)去看这个方法具体如何实现的,源码片段:
1 2 3 4 5 6 7 8 9 10 11 12 13 14 15 16 17 18 19 20 21 22 23 24 25 26 27 28 29 30 31 32 33 34 35 36 37 38 39 40 41 42 43 44 45 46 47 48 49 50 51 52 53 54 55 56 57 58 59 60 61 62 63 |
public class SqlSessionFactoryBuilder {
//第一步进入这个方法,Reader读取mybatis配置文件,传入构造方法
public SqlSessionFactory build(Reader reader) {
//调用重载的方法,我们点进去
return build(reader, null, null);
}
public SqlSessionFactory build(Reader reader, String environment) {
return build(reader, environment, null);
}
public SqlSessionFactory build(Reader reader, Properties properties) {
return build(reader, null, properties);
}
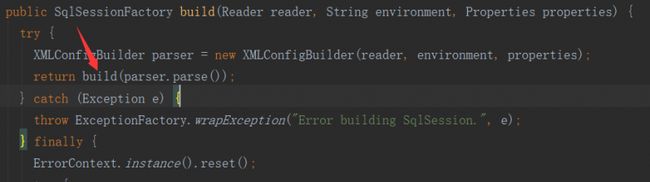
public SqlSessionFactory build(Reader reader, String environment, Properties properties) {
try {
XMLConfigBuilder parser = new XMLConfigBuilder(reader, environment, properties);
//源码分析完,最终回到build(..)
return build(parser.parse());
} catch (Exception e) {
throw ExceptionFactory.wrapException("Error building SqlSession.", e);
} finally {
ErrorContext.instance().reset();
try {
reader.close();
} catch (IOException e) {
// Intentionally ignore. Prefer previous error.
}
}
}
public SqlSessionFactory build(InputStream inputStream) {
return build(inputStream, null, null);
}
public SqlSessionFactory build(InputStream inputStream, String environment) {
return build(inputStream, environment, null);
}
public SqlSessionFactory build(InputStream inputStream, Properties properties) {
return build(inputStream, null, properties);
}
//第二步进入这个重载方法
public SqlSessionFactory build(InputStream inputStream, String environment, Properties properties) {
try {
//通过XMLConfigBuilder解析mybatis配置文件,源码分析
XMLConfigBuilder parser = new XMLConfigBuilder(inputStream, environment, properties);
//源码分析
return build(parser.parse());
} catch (Exception e) {
throw ExceptionFactory.wrapException("Error building SqlSession.", e);
} finally {
ErrorContext.instance().reset();
try {
inputStream.close();
} catch (IOException e) {
// Intentionally ignore. Prefer previous error.
}
}
} |
通过源码,我们可以看到SqlSessionFactoryBuilder 通过XMLConfigBuilder 去解析我们传入的mybatis的配置文件, 下面就接着看看 XMLConfigBuilder 部分源码:
1 2 3 4 5 6 7 8 9 10 11 12 13 14 15 16 17 18 19 20 21 22 23 24 25 26 27 28 29 30 31 32 33 34 35 36 37 38 39 40 41 |
public class XMLConfigBuilder extends BaseBuilder {

  private boolean parsed;
  private XPathParser parser;
  private String environment;
  private ReflectorFactory localReflectorFactory = new DefaultReflectorFactory();

  public XMLConfigBuilder(Reader reader) {
    this(reader, null, null);
  }

  public XMLConfigBuilder(Reader reader, String environment) {
    this(reader, environment, null);
  }
  //第一步进入到这个带参数的构造方法中
  public XMLConfigBuilder(Reader reader, String environment, Properties props) {
    //调用具体的执行逻辑方法,点进去
    this(new XPathParser(reader, true, props, new XMLMapperEntityResolver()), environment, props);
  }

  public XMLConfigBuilder(InputStream inputStream) {
    this(inputStream, null, null);
  }

  public XMLConfigBuilder(InputStream inputStream, String environment) {
    this(inputStream, environment, null);
  }

  public XMLConfigBuilder(InputStream inputStream, String environment, Properties props) {
    this(new XPathParser(inputStream, true, props, new XMLMapperEntityResolver()), environment, props);
  }
  //第二步
  private XMLConfigBuilder(XPathParser parser, String environment, Properties props) {
    super(new Configuration());
    ErrorContext.instance().resource("SQL Mapper Configuration");
    this.configuration.setVariables(props);
    //在构造函数设置了parsed 为fasle
    this.parsed = false;
    this.environment = environment;
    this.parser = parser;
} |
返回parser,调用 build(parser.parse())这个方法去解析配置文件内容,我们去看看parse()方法源码
1 2 3 4 5 6 7 8 9 10 11 |
public Configuration parse() {
    //因为在构造函数设置了parsed 为fasle,XMLConfigBuilder 只能被使用一次。
    if (parsed) {
      throw new BuilderException("Each XMLConfigBuilder can only be used once.");
    }
    //防止使用多次
    parsed = true;
    //源码分析
    parseConfiguration(parser.evalNode("/configuration"));
    return configuration;
} |
在上面这段代码调用了:parseConfiguration(parser.evalNode("/configuration")),我们点进源码看看具体怎么做的
1.首先点parseConfiguration(...)进去看看
1 2 3 4 5 6 7 8 9 10 11 12 13 14 15 16 17 18 19 20 21 |
//调用这个方法解析mybatis_config.xml配置文件
private void parseConfiguration(XNode root) {
    try {
      //issue #117 read properties first
      propertiesElement(root.evalNode("properties"));
      typeAliasesElement(root.evalNode("typeAliases"));
      pluginElement(root.evalNode("plugins"));
      objectFactoryElement(root.evalNode("objectFactory"));
      objectWrapperFactoryElement(root.evalNode("objectWrapperFactory"));
      reflectionFactoryElement(root.evalNode("reflectionFactory"));
      settingsElement(root.evalNode("settings"));
      // read it after objectFactory and objectWrapperFactory issue #631
      environmentsElement(root.evalNode("environments"));
      databaseIdProviderElement(root.evalNode("databaseIdProvider"));
      typeHandlerElement(root.evalNode("typeHandlers"));
      //这里源码分析
      mapperElement(root.evalNode("mappers"));
    } catch (Exception e) {
      throw new BuilderException("Error parsing SQL Mapper Configuration. Cause: " + e, e);
    }
} |
对应的mybatis_config.xml信息
通过以上源码,我们就能看出,在mybatis的配置文件中:
1. configuration节点为根节点。
2. 在configuration节点之下,我们可以配置10个子节点, 分别为:properties、typeAliases、plugins、objectFactory、objectWrapperFactory、settings、environments、databaseIdProvider、typeHandlers、mappers。
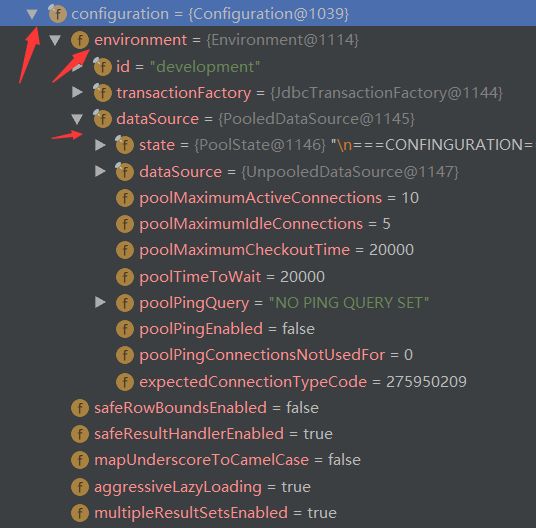
解析配置文件完成了之后,都会装配到configuration
Configuration作用:mybatis核心的配置文件内容 ,使用xml转换bean
我们debug到这个方法debug信息
下面我们来看下解析配置文件中配置的mappers: 进入这个方法源码看下如何解析的:mapperElement(root.evalNode("mappers"));
1 2 3 4 5 6 7 8 9 10 11 12 13 14 15 16 17 18 19 20 21 22 23 24 25 26 27 28 29 30 31 |
private void mapperElement(XNode parent) throws Exception {
    if (parent != null) {
      for (XNode child : parent.getChildren()) {
        if ("package".equals(child.getName())) {
          String mapperPackage = child.getStringAttribute("name");
          configuration.addMappers(mapperPackage);
        } else {
          String resource = child.getStringAttribute("resource");
          String url = child.getStringAttribute("url");
          String mapperClass = child.getStringAttribute("class");
          if (resource != null && url == null && mapperClass == null) {
            ErrorContext.instance().resource(resource);
            InputStream inputStream = Resources.getResourceAsStream(resource);
            XMLMapperBuilder mapperParser = new XMLMapperBuilder(inputStream, configuration, resource, configuration.getSqlFragments());
            mapperParser.parse();
          } else if (resource == null && url != null && mapperClass == null) {
            ErrorContext.instance().resource(url);
            InputStream inputStream = Resources.getUrlAsStream(url);
            XMLMapperBuilder mapperParser = new XMLMapperBuilder(inputStream, configuration, url, configuration.getSqlFragments());
            mapperParser.parse();
          } else if (resource == null && url == null && mapperClass != null) {
            Class mapperInterface = Resources.classForName(mapperClass);
            //这里源码分析,看看configuration怎么添加mappers
            configuration.addMapper(mapperInterface);
          } else {
            throw new BuilderException("A mapper element may only specify a url, resource or class, but not more than one.");
          }
        }
      }
    }
} |
源码分析
目标二:MybatisMapper接口绑定原理(代理设计模式)
下面我们进入:configuration.addMapper(mapperInterface);这个方法看看源码如何实现
1 2 3 4 |
public |
1.首先看看mapperRegistry是什么东西,点进去看看
1 |
protected MapperRegistry mapperRegistry = new MapperRegistry(this); |
2.原来是MapperRegistry 类,再点进去看看MapperRegistry 类里面怎么写的
1 2 3 4 5 |
public class MapperRegistry {
private final Configuration config;
//定义了一个map接口
private final Map |
我们现在还是不清楚,具体怎么实现的,所有,我们退出去,看看addMapper(type)怎么实现的
1 2 3 4 5 6 7 8 9 10 11 12 13 14 15 16 17 18 19 20 21 22 23 |
//Mybatis扫包方式有两种一种是 写package、和resource public |
通过上面的源码分析我们可以知道,使用map集合来装接口:再用configuration来接受配置文件所有信息
1 |
configuration.addMapper(mapperInterface); |
configuration完成后。回到build(..)
进入build(..)方法,来看源码
1 2 3 |
 public SqlSessionFactory build(Configuration config) {
    return new DefaultSqlSessionFactory(config);
} |
可以知道,最后通过sqlSession拿到Configuration对象
最后我们看看源码是如何获取mapper,入口代码如下
5.操作Mapper接口
1 |
UserMapper mapper = sqlSession.getMapper(UserMapper.class); |
点进getMapper(..)方法看源码如何实现的(ctrl+alt+B)选择DefaultSqlSession
1 2 3 4 |
public |
1 2 3 |
public |
上面源码分析了mapRegistry对象里面封装了一个map集合,用来存放mappers接口,我们点进去getMapper(..)看源码如何实现的
1 2 3 4 5 6 7 8 9 10 11 12 13 |
public |
点进newInstance(..)看源码
1 2 3 4 5 |
public T newInstance(SqlSession sqlSession) {
final MapperProxy |
1 2 3 |
protected T newInstance(MapperProxy |
通过上述源码分析,我们知道了Mapper接口绑定原理(代理设计模式)
总结:
1.获取本地InputStreamReader对象(mybatis配置文件)
2.调用SqlSessionFactoryBuilder
- 再使用XMLConfigBuilder解析mybatis配置文件,装配到Configuration中。
- 将配置文件中的Mapper添加到Configuration mapperRegistry实现注册。
备注:mapperRegistry存放当前所有的mapper文件。
3.使用configuration获取默认的DefaultSqlSessionFactory