springboot中使用thymeleaf
导读
- thymeleaf简介
- springboot中使用thymeleaf
- thymeleaf参考资料
- 注:这里示例主要展示在springboot框架下,thymeleaf的简单应用,故不做深入讨论。
最近在学习springboot框架,使用到了thymeleaf模板引擎,在此记录。一是分享一些小经验,二是如果自己忘了方便查阅。
一、thymeleaf简介
简单说, Thymeleaf 是一个跟 Velocity、FreeMarker 类似的模板引擎,它可以完全替代 JSP 。相较与其他的模板引擎,它有如下三个极吸引人的特点:
1、Thymeleaf 在有网络和无网络的环境下皆可运行,即它可以让美工在浏览器查看页面的静态效果,也可以让程序员在服务器查看带数据的动态页面效果。这是由于它支持 html 原型,然后在 html 标签里增加额外的属性来达到模板+数据的展示方式。浏览器解释 html 时会忽略未定义的标签属性,所以 thymeleaf 的模板可以静态地运行;当有数据返回到页面时,Thymeleaf 标签会动态地替换掉静态内容,使页面动态显示。
2、Thymeleaf 开箱即用的特性。它提供标准和spring标准两种方言,可以直接套用模板实现JSTL、 OGNL表达式效果,避免每天套模板、该jstl、改标签的困扰。同时开发人员也可以扩展和创建自定义的方言。
3、Thymeleaf 提供spring标准方言和一个与 SpringMVC 完美集成的可选模块,可以快速的实现表单绑定、属性编辑器、国际化等功能。
二、springboot中 thymeleaf的简单应用
IDE:IDEA
springboot版本:1.5.19
maven版本:3.3.4
thymeleaf的配置
1、这里使用maven来管理项目,首先在pom文件中引入相关依赖。
        1.8
            3.0.2.RELEASE


            2.1.1


            org.springframework.boot
            spring-boot-starter-thymeleaf
2、配置属性
其实完全可以直接使用,不用配置。但是Spring Boot官方文档建议在开发时将缓存关闭,那就在application.properties文件中加入下面这行就行了:
spring.thymeleaf.cache=false
一个简单的例子
1、编写User类
package com.javawangming.thymeleafdemo.bean;

public class User {

    private String name;
    private Integer age;
    private Boolean student;

    public User(String name, Integer age, Boolean student) {
        this.name = name;
        this.age = age;
        this.student = student;
    }

    public String getName() {
        return name;
    }

    public void setName(String name) {
        this.name = name;
    }

    public Integer getAge() {
        return age;
    }

    public void setAge(Integer age) {
        this.age = age;
    }

    public Boolean getStudent() {
        return student;
    }

    public void setStudent(Boolean student) {
        this.student = student;
    }
}
2、编写Controller类
package com.javawangming.thymeleafdemo.controller;

import com.javawangming.thymeleafdemo.bean.User;
import org.springframework.stereotype.Controller;
import org.springframework.ui.Model;
import org.springframework.web.bind.annotation.RequestMapping;

import java.util.ArrayList;
import java.util.List;

@Controller
public class UserController {

    @RequestMapping("/user/list")
    public String userList(Model model) throws Exception {
        model.addAttribute("title", "用户列表");
        model.addAttribute("hello", "Hello, Spring Boot!");
        List userList = new ArrayList<>();
        userList.add(new User("小明", 25, true));
        userList.add(new User("小红", 23, false));
        model.addAttribute("userList", userList);

        return "/user/list";
    }
}
3、创建thymeleaf模板文件
补充说明:
在使用前我们需要知道,关于在springboot中使用thymeleaf的一些原理。在IDEA中,Ctrl+N搜索ThymeleafProperties 这个类。代码如下:
@ConfigurationProperties(prefix = "spring.thymeleaf")
public class ThymeleafProperties {

	private static final Charset DEFAULT_ENCODING = Charset.forName("UTF-8");

	private static final MimeType DEFAULT_CONTENT_TYPE = MimeType.valueOf("text/html");

	public static final String DEFAULT_PREFIX = "classpath:/templates/";

	public static final String DEFAULT_SUFFIX = ".html";
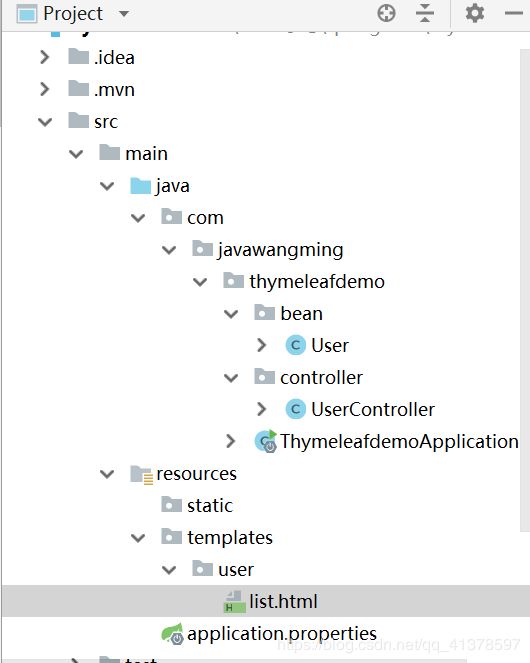
通过上面的springboot自动配置代码,可以得知thymeleaf在Spring Boot中默认的模板配置路径为:src/main/resources/templates,因此我们在resources文件夹下面创建一个templates文件夹,然后创建/user/list.html文件。
list.html:
标题
hello
姓名
年龄
学生
目录结构:
测试结果:
三、thmeyleaf参考资料
thymeleaf官方文档:https://www.thymeleaf.org/documentation.html

