SpringBoot 基于SpringFox Swagger REST API文档自动生成
SpringBoot 基于SpringFox Swagger REST API文档自动生成
一、maven 配置
二、初始化Swagger2的配置
三、Controller的配置
四、启动项目查看Swagger-UI
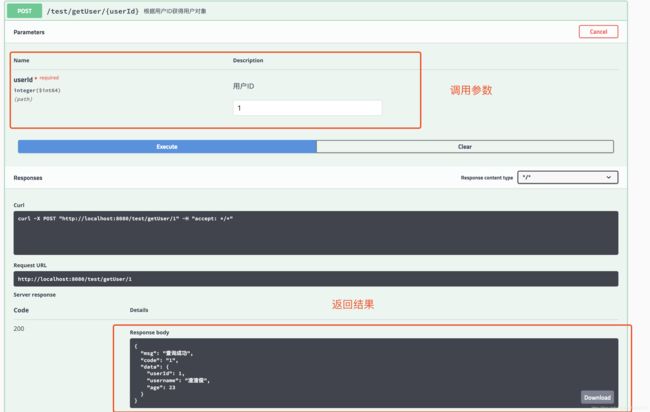
五、直接通过Swagger UI 调用接口
感觉有一阵子都没有写博客了,因为工作比较忙也有一段时间没有去更新了。希望过年休息这段时间能好好分享一下,这2018年发现了什么好东西,或者开发了什么好东西。
先热热身写个篇幅没有那么长的,相信很多平台现在已经前后端彻底分离了,少不免后台的开发同学还要天天写接口文档,本人是非常讨厌这种重复无趣的工作,所以我也写了很多去除反复工作的东西,例如映射深拷贝、无配置动态认证权限框架、动态错误消息参数校验框架、DDL Createor插件(PS:上一遍文章有体积,升级了几个版本也没有更新出来,我的错!!!)等。甚至通过python 写了一个通过第三方接口文档生成请求和返回的JAVA实体工具,所以自动生成API文档也在我在我的计划开发范围之内。但是巧了,Swagger 正是实现了这些,甚至实现的相当好(PS:不能定义模板去生成对应的文档格式,这个有时间可以扩展一下)。今天就来聊聊SpringFox-Swagger
首先贴出这个开源项目的地址:https://github.com/springfox/springfox
比较不幸的是,项目的主页打不开,看不到官网文档!!!http://springfox.github.io/springfox/
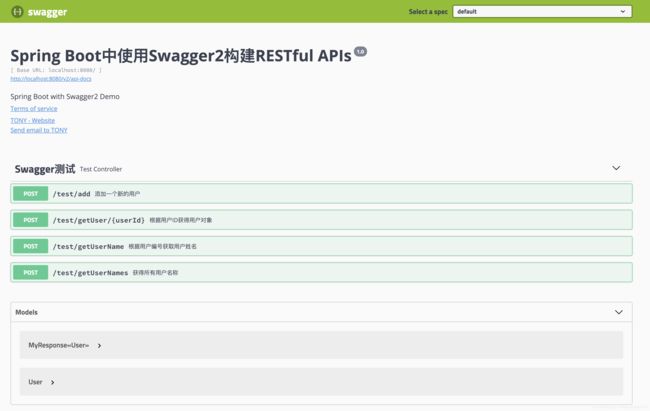
先看看使用之后生成的文档长啥样:
看到这里你应该觉得 ~嗯···· 可以起码能够表达接口功能的意义了
那就看看什么配置实现文档自动生成吧
一、maven 配置
            io.springfox
            springfox-swagger2
            2.9.2


            io.springfox
            springfox-swagger-ui
            2.9.2
这里我用了目前最新的了,界面比以前漂亮了一点点。
二、初始化Swagger2的配置
@SpringBootApplication
@EnableSwagger2     //启用Swagger2
public class SwaggerDemoApplication {

    public static void main(String[] args) {
        SpringApplication.run(SwaggerDemoApplication.class, args);
    }

    @Bean
    public Docket createRestApi() {
        return new Docket(DocumentationType.SWAGGER_2)
                .apiInfo(apiInfo())     //文档的Api基本信息
                .select()
                .apis(RequestHandlerSelectors.basePackage("com.example.swagger.demo.controller"))   //扫描的包
                .paths(PathSelectors.any())     //选择所有
                .build().pathMapping("/");  //pathMapping 需要写上项目路径 如:/order /user等
    }

    private ApiInfo apiInfo() {
        return new ApiInfoBuilder()
                .title("Spring Boot中使用Swagger2构建RESTful APIs")      //主页标题
                .description("Spring Boot with Swagger2 Demo")      //描述
                .termsOfServiceUrl("http://www.baidu.com")      //团队地址
                .contact(new Contact("TONY","http://wwww.baidu.com","[email protected]"))    //联系方式
                .version("1.0")     //版本号
                .build();       //其实就是个显示作用
    }


}
三、Controller的配置
这个有很多Swagger的配置项,我会一个个额外解释,先尽量看。。。
@RestController
@RequestMapping("/test")
@Api(value = " 测试 Swagger for SpringBoot ",tags = {"Swagger测试"})
public class TestController {


    @PostMapping("/getUserName")
    @ApiOperation(value = "根据用户编号获取用户姓名", notes = "目前只支持用户ID 1、2")
    @ApiImplicitParam(paramType = "query", name = "userId", value = "用户编号", required = true)
    public String test(@RequestParam Integer userId) {
        if (userId == 1) {
            return "TONY";
        }
        return "WING";
    }

    @ApiOperation(value = "根据用户ID获得用户对象")
    @ApiImplicitParam(paramType = "path", name = "userId", value = "用户ID", required = true, dataType = "Long")
    @PostMapping("/getUser/{userId}")
    public MyResponse getUser(@PathVariable("userId") Long userId) {
        MyResponse response = new MyResponse<>();
        User user = new User("渣渣俊", 23);
        user.setUserId(userId);
        response.setData(user);
        response.setCode("1");
        response.setMsg("查询成功");
        return response;
    }


    @PostMapping("/getUserNames")
    @ApiOperation(value = "获得所有用户名称", notes = "无参数")
    public List getNames() {
        List names = Arrays.asList(new User("TONY老师", 26), new User("渣渣俊老师", 23));
        return names;
    }


    @PostMapping("/add")
    @ApiOperation(value = "添加一个新的用户", notes = "JSON Body 格式参数")
    public MyResponse addUser(@RequestBody User user) {
        MyResponse response = new MyResponse<>();
        response.setData(user);
        response.setCode("1");
        response.setMsg("保存成功");
        return response;
    }

}
1、@Api
@Api(value = " 测试 Swagger for SpringBoot ",tags = {"Swagger测试"})
定义Controller value 定义这个Controller描述 tags 设定controller的Tag
2、@ApiOperation
@ApiOperation(value = "根据用户编号获取用户姓名", notes = "目前只支持用户ID 1、2")
定义接口的描述信息 value 定义接口名称,notes 定义接口提示
3、@ApiImplicitParam
@ApiImplicitParam(paramType = "query", name = "userId", value = "用户编号", required = true)
定义参数的信息
ParamType 定义参数类型 query、body、path 对应的就是RequestParam参数、RequestBody参数、PathVariable参数。
name 定义了参数的名称
value 定义参数的描述
required 定义了是否必填
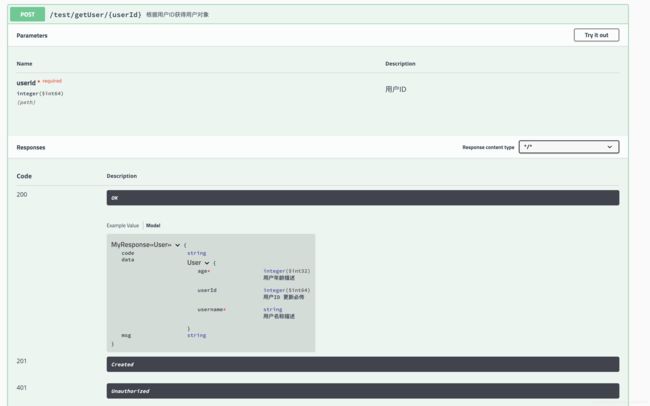
除此之外我还定义了,返回和请求的User实体。这个实体的描述也需要我们去定义方便理解字段意义
public class User {

    public User() {
    }

    public User(String username, Integer age) {
        this.userId = 0L;
        this.username = username;
        this.age = age;
    }

    @ApiModelProperty(name = "userId", value = "用户ID 更新必传", required = false)
    private Long userId;

    @ApiModelProperty(name = "username", value = "用户名称描述",required = true)
    private String username;

    @ApiModelProperty(name = "age", value = "用户年龄描述",required = true)
    private Integer age;

    //忽略GET SET

}
4、 @ApiModelProperty
@ApiModelProperty(name = "用户年龄", value = "用户年龄描述",required = true)
定义字段描述
name 参数名称
value 参数描述
required 是否必填
其余没有用到的有
@ApiModel:用对象来接收参数
@ApiResponse:HTTP响应其中1个描述
@ApiResponses:HTTP响应整体描述
四、启动项目查看Swagger-UI
http://localhost:8080/swagger-ui.html五、直接通过Swagger UI 调用接口


