1. 基本概念
Activity: 应用与用户交互的入口(活动界面).
Window: 表示一个窗口,不一定有屏幕那么大,可以很大也可以很小;
PhoneWindw: 是window的一个实现类,给view包裹一层DecorView.
DecorView: DecorView是整个ViewTree的最顶层View,它是一个FrameLayout布局,代表了整个应用的界面.
2.时序图
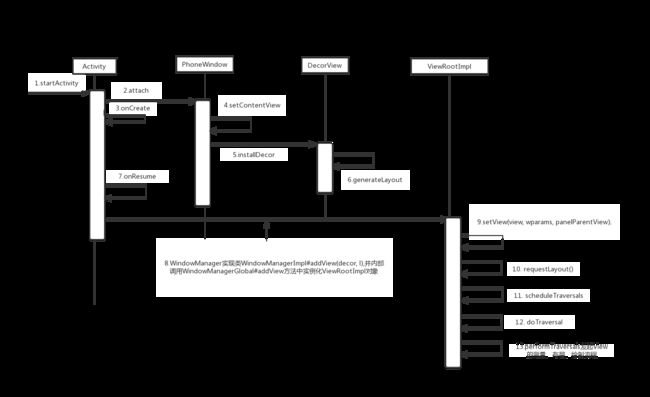
3.view添加到activity的流程
- Activity对象创建,并调用attach方法,创建PhoneWindw
final void attach(Context context, ActivityThread aThread,
            Instrumentation instr, IBinder token, int ident,
            Application application, Intent intent, ActivityInfo info,
            CharSequence title, Activity parent, String id,
            NonConfigurationInstances lastNonConfigurationInstances,
            Configuration config, String referrer, IVoiceInteractor voiceInteractor,
            Window window) {
        attachBaseContext(context);
        mFragments.attachHost(null /*parent*/);
        mWindow = new PhoneWindow(this, window);
        mWindow.setWindowControllerCallback(this);
        mWindow.setCallback(this);
        mWindow.setOnWindowDismissedCallback(this);
        mWindow.getLayoutInflater().setPrivateFactory(this);
        if (info.softInputMode != WindowManager.LayoutParams.SOFT_INPUT_STATE_UNSPECIFIED) {
            mWindow.setSoftInputMode(info.softInputMode);
        }
        if (info.uiOptions != 0) {
            mWindow.setUiOptions(info.uiOptions);
        }
       ........................
    }
Activity在attch后,Instrumentation对象回调activity的onCreate方法
    @Override
    protected void onCreate(Bundle savedInstanceState) {
        super.onCreate(savedInstanceState);
        setContentView(R.layout.activity_main);
    }
其实是PhoneWidow中的setContentView方法被调用
    getWinodw()的是PhoneWindow对象

    public void setContentView(@LayoutRes int layoutResID) {
        getWindow().setContentView(layoutResID);
        initWindowDecorActionBar();
    }
- PhoneWindow类中有两个和视图相关的成员变量,一个是DecorView mDecor,另一个是ViewGroup mContentParent。
  @Override
  public void setContentView(int layoutResID) {
    // Note: FEATURE_CONTENT_TRANSITIONS may be set in the process of installing the window
    // decor, when theme attributes and the like are crystalized. Do not check the feature
    // before this happens.
    if (mContentParent == null) { // 1
        installDecor();
    } else if (!hasFeature(FEATURE_CONTENT_TRANSITIONS)) {
        mContentParent.removeAllViews();
    }

    if (hasFeature(FEATURE_CONTENT_TRANSITIONS)) {
        final Scene newScene = Scene.getSceneForLayout(mContentParent, layoutResID,
                getContext());
        transitionTo(newScene);
    } else { //无转场动画
    //;可看到原来mContentParent是id="@android:id/content"的ViewGroup。再回到
        mLayoutInflater.inflate(layoutResID, mContentParent); // 2
    }
    final Callback cb = getCallback();
    if (cb != null && !isDestroyed()) {
        cb.onContentChanged();
    }
installDecor()方法初始化DecorView对象
private void installDecor() {
    if (mDecor == null) {
        mDecor = generateDecor();
        ...
    }
    if (mContentParent == null) {
        mContentParent = generateLayout(mDecor);
        ...
    }
}

protected DecorView generateDecor() {
    return new DecorView(getContext(), -1);

}
- DecorView是PhoneWindow类中定义的一个内部类,它继承了FrameLayout,用来作为整个PhoneWindow的根视图。
protected ViewGroup generateLayout(DecorView decor) {


     // Apply data from current theme.
    // 从主题文件中获取样式信息
    TypedArray a = getWindowStyle();

    ...

    if (a.getBoolean(R.styleable.Window_windowNoTitle, false)) {
            requestFeature(FEATURE_NO_TITLE);
    } else if (a.getBoolean(R.styleable.Window_windowActionBar, false)) {
     // Don't allow an action bar if there is no title.
         requestFeature(FEATURE_ACTION_BAR);
    }

    if(...){
            ...
    }

    //以下开始填充decor

    // Inflate the window decor.
    int layoutResource;    //这个是用来inflate的id

    ...    //这里省去,内容是根据Window的各种特性(feature)选择一个合适的视图id赋给layoutResource

    mDecor.startChanging();

    View in = mLayoutInflater.inflate(layoutResource, null); //将布局转换成view
    decor.addView(in, new ViewGroup.LayoutParams(MATCH_PARENT, MATCH_PARENT));//往DecorView中添加子View,即mContentParent

    ViewGroup contentParent = (ViewGroup)findViewById(ID_ANDROID_CONTENT); //找到contentView
    //注意这个地方
    if (contentParent == null) {
        throw new RuntimeException("Window couldn't find content container view");
    }

    ... //省去,内容是设置背景,设置ActionBar的一些属性。

    mDecor.finishChanging();

    return contentParent;
}
cotentView布局id
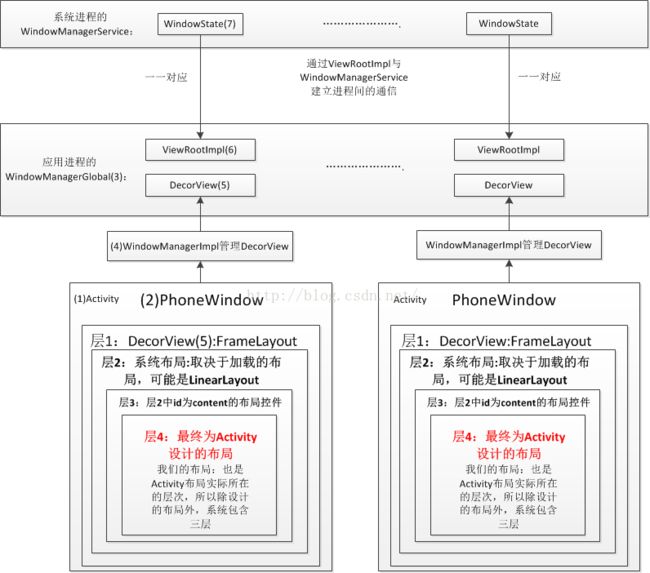
综合以上的探究,加上自己的一些思考和猜测。对PhoneWindow做一下小小的总结:
1.一个Activity对应着一个PhoneWindow对象,是一对一的关系,如果从Activity A启动到Activity B,那么Activity B会创建一个自己的PhoneWindow对象。
2.PhoneWindow管理着整个屏幕的内容,不包括屏幕最顶部的系统状态条。所以,PhoneWindow或者Window是与应用的一个页面所相关联。
3.PhoneWindow同时管理着ActionBar和下面的内容主题,setContentView()方法是用来设置内容主体的,而setTitle()等其他方法就是操作ActionBar的,Window中定义的requestFeature()等方法,有很多与ActionBar属性相关的设置。另外这些方法都是公有方法,显然是为了给客户端程序员调用的,也进一步佐证了这些操作的意义与作用。
4.PhoneWindow自己并不是一个视图(View),它的成员变量mDecor才是整个界面的视图,mDecor是在generateLayout()的时候被填充出来的,而actionBar和contentParent两个视图都是通过findViewById()直接从mDecor中获取出来的。
接下来是mContentParent.removeAllViews()。这个好理解,如果setContentView()被调用两次,第二次肯定要把里面的内容都给清空移除了。移除后就是添加,mContentParent.addView(view, params)。
- 将DecorView添加至Window
首先,在ActivityThread#handleLaunchActivity中启动Activity,在这里面会调用到Activity#onCreate方法,从而完成上面所述的DecorView创建动作,当onCreate()方法执行完毕.在handleLaunchActivity方法会继续调用到ActivityThread#handleResumeActivity方法,我们看看这个方法的源码:
final void handleResumeActivity(IBinder token, boolean clearHide, boolean isForward) {
    //...
    ActivityClientRecord r = performResumeActivity(token, clearHide); // 这里会调用到onResume()方法
    if (r != null) {
        final Activity a = r.activity;

        //...
        if (r.window == null && !a.mFinished && willBeVisible) {
            r.window = r.activity.getWindow(); // 获得window对象
            View decor = r.window.getDecorView(); // 获得DecorView对象
            decor.setVisibility(View.INVISIBLE);
            ViewManager wm = a.getWindowManager(); // 获得windowManager对象
            WindowManager.LayoutParams l = r.window.getAttributes();
            a.mDecor = decor;
            l.type = WindowManager.LayoutParams.TYPE_BASE_APPLICATION;
            l.softInputMode |= forwardBit;
            if (a.mVisibleFromClient) {
                a.mWindowAdded = true;
                wm.addView(decor, l); // WindowManagerImpl对象调用addView方法
            }
            //...
        }
    }
}
在该方法内部,获取该activity所关联的window对象,DecorView对象,以及windowManager对象,而WindowManager是抽象类,它的实现类是WindowManagerImpl,所以后面调用的是WindowManagerImpl#addView方法,我们看看源码:
public final class WindowManagerImpl implements WindowManager {
    private final WindowManagerGlobal mGlobal = WindowManagerGlobal.getInstance();
    ...
    @Override
    public void addView(View view, ViewGroup.LayoutParams params) {
        mGlobal.addView(view, params, mDisplay, mParentWindow);
    }
}
接着调用了mGlobal的成员函数,而mGlobal则是WindowManagerGlobal的一个实例,那么我们接着看WindowManagerGlobal#addView方法:
public void addView(View view, ViewGroup.LayoutParams params,
            Display display, Window parentWindow) {
        ...

        ViewRootImpl root;
        View panelParentView = null;

        synchronized (mLock) {
            ...

            root = new ViewRootImpl(view.getContext(), display); // 1

            view.setLayoutParams(wparams);

            mViews.add(view);
            mRoots.add(root);
            mParams.add(wparams);
        }

        // do this last because it fires off messages to start doing things
        try {
            root.setView(view, wparams, panelParentView); // 2
        } catch (RuntimeException e) {
            // BadTokenException or InvalidDisplayException, clean up.
            synchronized (mLock) {
                final int index = findViewLocked(view, false);
                if (index >= 0) {
                    removeViewLocked(index, true);
                }
            }
            throw e;
        }
    }
先看①号代码处,实例化了ViewRootImpl类,接着,在②号代码处,调用ViewRootImpl#setView方法,并把DecorView作为参数传递进去,在这个方法内部,会通过跨进程的方式向WMS(WindowManagerService)发起一个调用,从而将DecorView最终添加到Window上,在这个过程中,ViewRootImpl、DecorView和WMS会彼此关联,至于详细过程这里不展开来说了。
最后通过WMS调用ViewRootImpl#performTraversals方法开始View的测量、布局、绘制流程.
4. WindowManager和应用进程View绘制通信
5.参考资料
-http://blog.csdn.net/houliang120/article/details/51138087