1、加快与X-shell的连接
请参考https://www.cnblogs.com/elin989898/p/11361866.html
2、用户登录控制
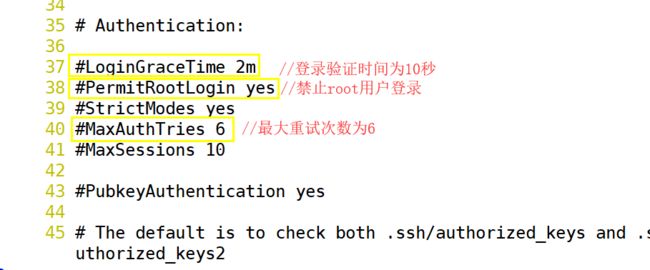
sshd服务默认允许root用户登录,但是在Internet中使用是非常不安全的。普遍的做法如下:先以普通用户远程登入,进入安全shell环境后,根据实际需要使用su命令切换为root 用户
[root@localhost ~]# vi /etc/ssh/sshd_config
[root@localhost ~]# systemctl reload sshd
[root@localhost ~]# useradd jll 创建用户
[root@localhost ~]# passwd -d jll //清空密码
测试空密码用户是否能够登录。
实验现象:
(1)超过系统设置的登陆时间,连接对话会直接断开
(2)连续输入3次错误密码时连接会话会直接断开
(3)通过root用户密码时反复提示输入密码
(4)测试用户空密码时不能登录系统的
3、OpenSSH 服务访问控制
AllowUsers 仅允许用户登录
DenyUsers 仅禁止用户登录
(1)AllowUsers 不要与 DenyUsers 同时使用
(2)当服务器在Internet时,控制包含的ip地址时是公司公网地址
4、登录验证方式
SSH服务支持两种验证方式
~密码验证
~密钥对验证
可以设置只使用其中一种方式,也可以两种方式都启用
密码验证:对服务器中本地系统用户的登录名称、密码进行验证。这种方式使用最为简单,但从客户端角度来看,正在连接的服务器有可能被假冒;从服务器角度来看,当遭遇穷举(暴力破解)攻击时防御能力比较弱。
密钥对验证:要求提供相匹配的密钥信息才能通过验证。通常先在客户端中创建一对密钥文件(公钥。私钥)然后将公钥文件放到服务器中指定位置,远程登录时,系统将使用公钥私钥进行加密/解密关联验证,大大增强了远程管理的安全性。该方式不易被假冒,且可以免交互登录,在shell中被广泛使用。
当密码验证密钥对验证都启用时, 服务器将优先使用密钥对验证。对于安全性要求的服务器,建议将密码验证方式禁用只允许启用密钥对验证方式:若没有特殊要求,则两种方式都可启用。
[root@localhost ~]# vi /etc/ssh/sshd_config
64 PasswordAuthentication yes //启用密码验证
47 AuthorizedKeysFile .ssh/authorized_keys //指定公钥库文件(用于保存多个客户端上传的公钥文本)
43 PubkeyAuthentication yes //启用密钥对验证 (#去不去没关系,默认是开的)
[root@localhost ~]# systemctl reload sshd //重启服务
5、使用SSH客户端程序
openssh 客户端由openssh-clients软件包提供,默认已安装。其中包括(ssh远程登录命令、scp远程复制命令、sftp远程文件传输命令等)sftp
[root@localhost ~]# rpm -q openssh-clients
openssh-clients-7.4p1-16.el7.x86_64
5.1命令程序:
(1) ssh命令(远程安全登录)
格式: ssh user@host (若客户机登录用户与主机用户名相同,可省去user@)注意:涉及到用户权限归属的文件一定指定用户名在进行上传。)
格式: ssh user@host command
端口选项 : -p 22
案例1:切换另一个操作系统,并创建文件,然后到另一台主机查看是否创建。
[root@localhost ~]# ssh [email protected] touch /tmp/ddd.txt
The authenticity of host '192.168.116.66 (192.168.116.66)' can't be established.
ECDSA key fingerprint is SHA256:UT/IZdaaQQzRkB/4C8NNxwBKG88Xj7OW/A0BfYi0qyQ.
ECDSA key fingerprint is MD5:1c:ba:de:c1:ec:8f:08:50:14:98:79:f4:e8:5c:56:b9.
Are you sure you want to continue connecting (yes/no)? yes
Warning: Permanently added '192.168.116.66' (ECDSA) to the list of known hosts.
[email protected]'s password:
案例2:将本机的文件复制到另一主机中。然后去对方主机查看
格式 :scp 源文件 目标位置 (两个主机可以互相传送)
[root@localhost ~]# scp 2.txt [email protected]:/22.txt
[email protected]'s password:
案例3 :切换到另一个主机
[root@localhost ~]# ssh [email protected]
(2) scp命令
通过scp 命令可以利用SSH安全连接和远程主机相互复制文件。 使用scp命令时,除了必须指定复制源。目标以外还应指定目标主机地址、登录用户、执行后根据提示输入验证密码即可。
格式:scp [-r] user@host:file1 file2 //将另一台主机的文件复制到本机上
scp [-r] file1 user@host:file2 //将文件复制到另一台主机上 -r 表示递归复制
特别注意的是:用户名代表了文件的所属权限问题
(3) rz -E 命令表示文件的上传和下载
(4)sftp 命令(安全FTP上传下载)
通过sftp命令可以利用SSH安全连接与远程主机上传,下载文件,采用了与FTP类似的登录过程和交互式环境,以便目录资源管理
格式:sftp user@host
案例1 在68主机上实现对66主机文件的上传与下载
68主机:
[root@localhost ~]# sftp [email protected]
[email protected]'s password:
Connected to 192.168.116.66.
sftp> put 2.txt
Uploading 2.txt to /root/2.txt
2.txt 100% 0 0.0KB/s 00:00
sftp> ls
2.txt anaconda-ks.cfg initial-setup-ks.cfg
下载 公共 图片
文档 桌面 模板
视频 音乐
sftp> ls
1.txt 2.txt anaconda-ks.cfg
initial-setup-ks.cfg 下载 公共
图片 文档 桌面
模板 视频 音乐
sftp> get 1.txt
Fetching /root/1.txt to 1.txt
sftp> quit
[root@localhost ~]# ls
1.txt 2.txt anaconda-ks.cfg
66主机
[root@localhost ~]# ls
2.txt initial-setup-ks.cfg 模板 图片 下载 桌面
anaconda-ks.cfg 公共 视频 文档 音乐
[root@localhost ~]# touch 1.txt
5.2 常见的远程访问工具: Xshell SecureCRT Putty Smanager (远程图形化界面)等
6、构建密钥对验证的SSH体系
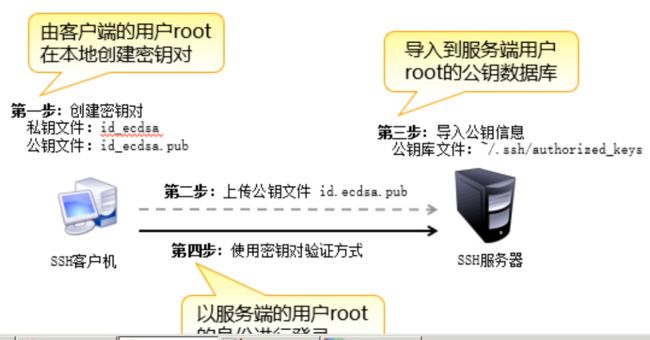
密钥对验证整个过程包括四步:
a: 首先要在SSH客户端以root用户身份创建密钥对
b: 客户端将创建的公钥文件上传至SSH服务端
c: 服务端将公钥信息导入用户root的公钥数据库文件中
d: 客户端以root用户身份连接服务器端root用户测试
6.1在客户端创建密钥对
在Linux客户端中通过ssh-keygen命令工具为当前登录用户创建密钥对文件,可用的加密算法:ECDSA、RSA、DSA ,通过 - t 选项指定
案例:将server与client两台主机之间进行密钥对连接 这里介绍两种方法分别将主机当作服务端和客户端,实现两台主机之间的互相免密登录
方法一:
(1)首先在client主机中执行以下操作,其中 root 身份 地址为192.168.116.66 root密码123456
[root@1111 ~]# ssh-keygen -t rsa //创建密钥对 rsa为算法
Generating public/private rsa key pair.
Enter file in which to save the key (/root/.ssh/id_rsa): //回车
Enter passphrase (empty for no passphrase): //回车
Enter same passphrase again: //回车
Your identification has been saved in /root/.ssh/id_rsa. 私钥存放位置
Your public key has been saved in /root/.ssh/id_rsa.pub. 公钥存放位置
The key fingerprint is:
SHA256:lXdbtLwpUd1jgh7/y+Rn2qUaNzVt9rzHqMoouL2+Dmo root@1111
The key's randomart image is:
+---[RSA 2048]----+
| . .+|
| + .o++|
| + +.+oo|
| . o o.o+|
| S .o+=|
| .Bo|
| .. . *o=|
| E..o. o o.BB|
| .. .+*+. o.ooo++|
+----[SHA256]-----+
[root@localhost ~]# ls .ssh //查看 .ssh 文件是否有两个文件 id_rsa 是私钥文件 id_rsa.pub 是公钥文件
id_rsa id_rsa.pub
[root@localhost ~]# scp .ssh/id_rsa.pub [email protected]:/tmp //将公钥复制到 服务器 的 192.168.116.68 的一个文件中
The authenticity of host '192.168.116.68 (192.168.116.68)' can't be established.
ECDSA key fingerprint is SHA256:nOug2TzzVJZysB+hBvgEnxvaOESr6XmI28kFoJIbfVc.
ECDSA key fingerprint is MD5:80:57:a3:0f:10:58:25:d9:94:4b:e8:ef:31:94:c8:9f.
Are you sure you want to continue connecting (yes/no)? yes
Warning: Permanently added '192.168.116.68' (ECDSA) to the list of known hosts.
[email protected]'s password: //输入IP为192.168.116.68 主机root身份的密码
id_rsa.pub 100% 408 266.2KB/s 00:00
(2) 在server主机中操作 root身份,密码123456 IP地址192.168.116.68
[root@client ~]# ls /tmp //查看公钥是否存在
id_rsa.pub
ks-script-YL7_Bo
systemd-private-6723e85d6a6a42d5bb417f690b0e993e-chronyd.service-E1cRvH
systemd-private-c6d528254e314241bb2b1dfb5ab308bc-chronyd.service-EHk4EK
vmware-root_5915-1991519414
vmware-root_6042-692291496
yum.log
[root@client ~]# mkdir .ssh //系统中可能没有 . ssh文件 可创建一个
[root@client ~]# ll /tmp/id_rsa.pub //查看公钥文件的权限
-rw-r--r-- 1 root root 408 8月 16 20:07 /tmp/id_rsa.pub
[root@client ~]# chmod 700 /tmp/id_rsa.pub //修改权限为700 可执行文件
[root@client ~]# cat /tmp/id_rsa.pub >> .ssh/authorized_keys //将公钥添加到 .ssh 中的authorized_keys(数据库)文件中, 可用" >> "符号,表示追加 , “>" 表示覆盖
[root@client ~]# cat .ssh/authorized_keys //查看公钥是否存在
ssh-rsa AAAAB3NzaC1yc2EAAAADAQABAAABAQDIfAvBJOniBlxKh7/4xYEvtgDl+uN0AkILFwMg4hlRqyx2Xp9DRFRlQXt1FeMVn1kM7oZpw330Nc/Nng5FlinPmQBWOKnEV0yNPxyrNsmwGp6bgq2ui0tFPZd1oeUoQYlkuhdQPLQcV0/v5a+NvcNxDTNiZauuZinvNUNrqx1lYHIy9/XIWPoqFPcfkk4z+zGXf1G0V+lKLajyxto+YeAtLWZi7NfWqadnmnZmPX6r8wHBfx9FvTcHQmOVlpJ2hK/miqDNrTQYS/Ac9myrD0oPrsxIAldNDR6Og4Ww/uCNKJPBniEFGT/bJtXtqLH0M/K/if2J2H0dHPE+wSYC2vkd [email protected] //看这个地方文件的名字
(3) 在client 操作
[root@localhost ~]# ssh [email protected] //在客户端登录服务器端
Last login: Fri Aug 16 20:05:16 2019 from 192.168.116.1
[root@client ~]# //登陆成功
这里可以查看以下 IP 使用ip a 命令
方法二
(1)在client 主机中 root身份 IP地址为192.168.116.68 密码123456
Generating public/private rsa key pair.
Enter file in which to save the key (/root/.ssh/id_rsa):
Enter passphrase (empty for no passphrase):
Enter same passphrase again:
Your identification has been saved in /root/.ssh/id_rsa.
Your public key has been saved in /root/.ssh/id_rsa.pub.
The key fingerprint is:
SHA256:qjK/9ThKB7qDHn03QXw32U9aJT19HUmddZ2A2uWWfhM root@client
The key's randomart image is:
+---[RSA 2048]----+
| ..++#|
| . .o. *X|
| o .o+o..oo|
| . .....+=E |
| . .S o. ..|
| .. . .. . o |
| o....+o . .|
|. =o.+oo. |
|...==o... |
+----[SHA256]-----+
[root@client ~]# ls .ssh
authorized_keys id_rsa id_rsa.pub
[root@client ~]# ssh-copy-id -i /root/.ssh/id_rsa.pub [email protected] // 使用ssh-copy-id -i 命令直接copy到目标主机的 .ssh/authorized_keys文件中
/usr/bin/ssh-copy-id: INFO: Source of key(s) to be installed: "/root/.ssh/id_rsa.pub"
The authenticity of host '192.168.116.66 (192.168.116.66)' can't be established.
ECDSA key fingerprint is SHA256:UT/IZdaaQQzRkB/4C8NNxwBKG88Xj7OW/A0BfYi0qyQ.
ECDSA key fingerprint is MD5:1c:ba:de:c1:ec:8f:08:50:14:98:79:f4:e8:5c:56:b9.
Are you sure you want to continue connecting (yes/no)? yes
/usr/bin/ssh-copy-id: INFO: attempting to log in with the new key(s), to filter out any that are already installed
/usr/bin/ssh-copy-id: INFO: 1 key(s) remain to be installed -- if you are prompted now it is to install the new keys
[email protected]'s password: //输入对方主机密码
and check to make sure that only the key(s) you wanted were added.
(2)在sever root身份 IP192.168.116.66 密码123456
[root@client ~]# ll .ssh/ //查看权限
总用量 16
-rw-r--r-- 1 root root 408 8月 16 20:12 authorized_keys
-rw------- 1 root root 1679 8月 16 20:21 id_rsa
-rw-r--r-- 1 root root 393 8月 16 20:21 id_rsa.pub
-rw-r--r-- 1 root root 176 8月 16 20:23 known_hosts
[root@client ~]# cat .ssh/authorized_keys //查看文件是否存在
ssh-rsa AAAAB3NzaC1yc2EAAAADAQABAAABAQDIfAvBJOniBlxKh7/4xYEvtgDl+uN0AkILFwMg4hlRqyx2Xp9DRFRlQXt1FeMVn1kM7oZpw330Nc/Nng5FlinPmQBWOKnEV0yNPxyrNsmwGp6bgq2ui0tFPZd1oeUoQYlkuhdQPLQcV0/v5a+NvcNxDTNiZauuZinvNUNrqx1lYHIy9/XIWPoqFPcfkk4z+zGXf1G0V+lKLajyxto+YeAtLWZi7NfWqadnmnZmPX6r8wHBfx9FvTcHQmOVlpJ2hK/miqDNrTQYS/Ac9myrD0oPrsxIAldNDR6Og4Ww/uCNKJPBniEFGT/bJtXtqLH0M/K/if2J2H0dHPE+wSYC2vkd [email protected]
(3) 在client端登录测试
[root@client ~]# ssh [email protected] //进行切换
Last login: Fri Aug 16 20:05:05 2019 from 192.168.116.1
[root@localhost ~]# //切换成功
//可用 ip a 进行检测


