SpringBoot2.x(八)整合Mybatis和事务讲解
持久化数据方式介绍
-
原始java访问数据库:开发流程麻烦
-
1、注册驱动/加载驱动:
Class.forName("com.mysql.jdbc.Driver") -
2、建立连接
Connection con = DriverManager.getConnection("jdbc:mysql://localhost:3306/dbname","root","root"); -
3、创建
Statement -
4、执行SQL语句
-
5、处理结果集
-
6、关闭连接,释放资源
-
-
apache dbutils框架:比上一步简单点- 官网
-
jpa框架spring-data-jpajpa在复杂查询的时候性能不是很好
-
Hiberante (ORM:对象关系映射Object Relational Mapping)
- 企业大都喜欢使用hibernate(OA、CRM)
-
Mybatis框架
- 互联网行业通常使用mybatis
- 不提供对象和关系模型的直接映射,半ORM
SpringBoot2.x整合Mybatis3.x
spring initializer-mybatis
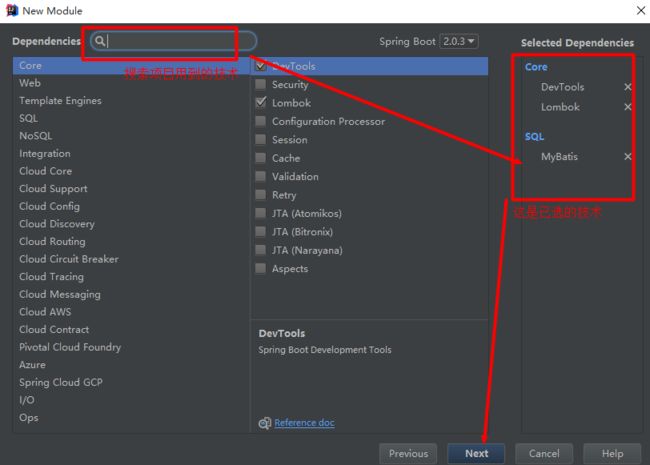
如果你使用的IDE是IDEA,那么你可以通过IDEA集成的 spring initializer来快速创建一个 mybatis项目:
接着填写 Group ID和 Artifact ID点击 Next。接着选择项目用到的技术
我这里选择了 mybatis、devtools、lombok(不熟悉请自行google)
如果你用的不是IDEA,那么也可以在创建一个maven项目后引入如下依赖:
    org.mybatis.spring.boot
    mybatis-spring-boot-starter
    1.3.2


    org.springframework.boot
    spring-boot-devtools
    runtime


    org.projectlombok
    lombok
    true


    org.springframework.boot
    spring-boot-starter-test
    test
引入mysql驱动和数据源
    mysql
    mysql-connector-java
    runtime


    com.alibaba
    druid
    1.1.6
添加springboot与mybatis的整合配置
在 resources下创建 application.properties并添加如下内容
#mybatis.type-aliases-package=top.zhenganwen.springboot-mybatis.domain
#数据库驱动,可以省略(springboot会自动检测)
#spring.datasource.driver-class-name =com.mysql.jdbc.Driver

spring.datasource.url=jdbc:mysql://localhost:3306/test?useUnicode=true&characterEncoding=utf-8
spring.datasource.username =root
spring.datasource.password =root
#如果不使用默认的数据源 (com.zaxxer.hikari.HikariDataSource)
spring.datasource.type =com.alibaba.druid.pool.DruidDataSource
建表
DROP TABLE IF EXISTS `user`;
CREATE TABLE `user` (
  `id` bigint(20) NOT NULL,
  `name` varchar(255) DEFAULT NULL,
  `age` int(11) DEFAULT NULL,
  `phone` varchar(255) DEFAULT NULL,
  `create_time` datetime DEFAULT NULL,
  PRIMARY KEY (`id`)
) ENGINE=InnoDB DEFAULT CHARSET=utf8;
domain
package top.zhenganwen.springbootmybatis.domain;

import lombok.Data;

import java.util.Date;

@Data
public class User {

    private Long id;
    private String name;
    private int age;
    private Date createTime;
    private String phone;
}
mapper
创建mapper接口对应实体类属性名称和数据库字段名称操作数据库
package top.zhenganwen.springbootmybatis.mapper;

import org.apache.ibatis.annotations.Insert;
import top.zhenganwen.springbootmybatis.domain.User;

public interface UserMapper {

    @Insert("insert into user " +
            "(id,name,age,phone,create_time) " +
            "values (#{id},#{name},#{age},#{phone},#{createTime})")
    int insert(User user);
}
值得注意的是
#可以用$代替。但两者作用不同:#表示占位,会作为?被预编译到sql语句中;而$表示拼接,相当于""+xxx+"",会导致sql不被预编译。建议尽量使用#替代$,因为$会引起 sql注入 的风险。
@MapperScan(value=xx)
在启动类上添加 @MapperScan注解,value 扫描指定包下的 mapper接口(生成代理类)
package top.zhenganwen.springbootmybatis;

import org.mybatis.spring.annotation.MapperScan;
import org.springframework.boot.SpringApplication;
import org.springframework.boot.autoconfigure.SpringBootApplication;

@SpringBootApplication
@MapperScan(value = "top.zhenganwen.springbootmybatis.mapper")
public class SpringbootMybatisApplication {

   public static void main(String[] args) {
      SpringApplication.run(SpringbootMybatisApplication.class, args);
   }
}
测试
package top.zhenganwen.springbootmybatis;

import org.junit.Test;
import org.junit.runner.RunWith;
import org.springframework.beans.factory.annotation.Autowired;
import org.springframework.boot.test.context.SpringBootTest;
import org.springframework.test.context.junit4.SpringRunner;
import top.zhenganwen.springbootmybatis.domain.User;
import top.zhenganwen.springbootmybatis.mapper.UserMapper;

import java.util.Date;

@RunWith(SpringRunner.class)
@SpringBootTest
public class SpringbootMybatisApplicationTests {

   @Autowired
   private UserMapper userMapper;

   @Test
   public void contextLoads() {
      User user = new User();
      user.setAge(18);
      user.setId(2018L);
      user.setCreateTime(new Date());
      user.setPhone("3456");
      user.setName("tony");
      userMapper.insert(user);
   }
}
单元测试禄条,查看 user表发现数据插入成功。
获取自增id
如果将主键 id设置为自增长型,我们可以通过添加@Options注解在插入记录后返回该记录的 id
public interface UserMapper {

    @Insert("insert into user " +
            "(id,name,age,phone,create_time) " +
            "values (#{id},#{name},#{age},#{phone},#{createTime})")
    @Options(useGeneratedKeys = true,keyProperty = "id",keyColumn = "id")
    int insert(User user);
}
再次测试:
@Test
public void contextLoads() {
    User user = new User();
    user.setAge(18);
    user.setCreateTime(new Date());
    user.setPhone("3456");
    user.setName("jack");
    userMapper.insert(user);
    System.out.println(user.getId());	//2019
}
useGeneratedKeys表示将自增生成的id设置到对象中keyProperty对应实体类的属性名称,自增生成的id将被复值给该属性keyColumn对应数据库表的主键名称
参考资料
- 开发mapper
- 参考语法
- 其他整合参考
- http://www.mybatis.org/spring-boot-starter/mybatis-spring-boot-autoconfigure/#Configuration
- https://github.com/mybatis/spring-boot-starter/tree/master/mybatis-spring-boot-samples
- 整合问题集合:
- https://my.oschina.net/hxflar1314520/blog/1800035
- https://blog.csdn.net/tingxuetage/article/details/80179772
增删改查和打印SQL语句
打印SQL语句
需要在 application.properties中增加如下配置:
#增加打印sql语句,一般用于本地开发测试
mybatis.configuration.log-impl=org.apache.ibatis.logging.stdout.StdOutImpl
这样每次 jdbc向 mysql发送的sql语句都会在控制台输出
JDBC Connection [com.mysql.jdbc.JDBC4Connection@1d2644e3] will not be managed by Spring
==>  Preparing: insert into user (id,name,age,phone,create_time) values (?,?,?,?,?)
==> Parameters: null, tom(String), 18(Integer), 3456(String), 2018-07-20 13:40:29.836(Timestamp)
<==    Updates: 1
Closing non transactional SqlSession [org.apache.ibatis.session.defaults.DefaultSqlSession@2aa27288]
CURD
select *
@Select("select * from user")
@Results({
    @Result(column = "create_time", property = "createTime")
})
List findAll();
@Result用来协调属性名称和表字段名不一致的问题。List中的泛型不可省。
@Test
public void testFindAll() {
    List userList = userMapper.findAll();
    System.out.println(userList);
}
[User(id=2018, name=tony, age=18, createTime=Fri Jul 20 11:59:29 CST 2018, phone=3456), User(id=2019, name=jack, age=18, createTime=Fri Jul 20 13:10:31 CST 2018, phone=3456)]where
 @Select("select * from user where id=#{id}")
@Results({
    @Result(column = "create_time", property = "createTime")
})
User findById(Long id);
@Test
public void testFindById() {
User user = userMapper.findById(2018L);
System.out.println(user);
}User(id=2018, name=tony, age=18, createTime=Fri Jul 20 11:59:29 CST 2018, phone=3456)
delete
@Delete("delete from user where id=#{id}")
void delbyId(Long id);
@Test
public void testDelById() {
userMapper.delbyId(2019L);
System.out.println(userMapper.findAll());
}[User(id=2018, name=tony, age=18, createTime=Fri Jul 20 11:59:29 CST 2018, phone=3456)]
update
@Update("update user set name=#{name},age=#{age} where id=#{id}")
void update(User user);
@Test
public void testUpdateById() {
User user = userMapper.findById(2018L);
user.setName("new name");
user.setAge(99);
userMapper.update(user);
System.out.println(userMapper.findById(2018L));
}User(id=2018, name=new name, age=99, createTime=Fri Jul 20 11:59:29 CST 2018, phone=3456)
事务介绍、常见的隔离级别、传播行为
事务
传统的单机事务
以转账为例,一次业务涉及数据库表的两次更改,为确保业务完整性需要求这两次更改要么都成功要么都失败。
分布式事务
以电商为例,用户支付订单费用之后需要更新位于三台不同主机上的数据库表(微服务),这时 mysql内置实现的单机事务机制已然无用。这时就用到了分布式事务解决方案,如:二次提交、最终一致性(消息中间件)
隔离级别
- Serializable: 最严格,串行处理,消耗资源大
- Repeatable Read:保证了一个事务不会修改已经由另一个事务读取但未提交(回滚)的数据
- Read Committed:大多数主流数据库的默认事务等级
- Read Uncommitted:保证了读取过程中不会读取到非法数据。
传播行为
PROPAGATION_REQUIRED--支持当前事务,如果当前没有事务,就新建一个事务,最常见的选择。PROPAGATION_SUPPORTS--支持当前事务,如果当前没有事务,就以非事务方式执行PROPAGATION_MANDATORY--支持当前事务,如果当前没有事务,就抛出异常。PROPAGATION_REQUIRES_NEW--新建事务,如果当前存在事务,把当前事务挂起, 两个事务之间没有关系,一个异常,一个提交,不会同时回滚PROPAGATION_NOT_SUPPORTED--以非事务方式执行操作,如果当前存在事务,就把当前事务挂起。PROPAGATION_NEVER--以非事务方式执行,如果当前存在事务,则抛出异常
SpringBoot2.x整合Mybatis之事务处理
数据准备
在上节创建的 user表中添加 account字段,并添加一条 id为 2019的记录,将 2018和 2019两个用户的 account设置为 100
改写 update方法:
@Update("update user set account=#{account} where id=#{id}")
void update(User user);
创建Service层
public interface UserService {
    void transferAccount();
}
@Service
public class UserServiceImpl implements UserService {
@Autowired
private UserMapper userMapper;
@Override
public void transferAccount() {
User a = userMapper.findById(2018L);
a.setAccount(a.getAccount() - 100);
userMapper.update(a);
int i = 1 / 0;
User b = userMapper.findById(2019L);
b.setAccount(b.getAccount() + 100);
userMapper.update(b);
}
}无事务测试
@Autowired
private UserService userService;
@Test
public void testTransferAccount() {
   userService.transferAccount();
}
查看表发现 2018的 account变成了 0,而 2019的仍为 100
添加事务
我们需要在需要事务的方法上添加 @Transactional注解,并通过 rollbackFor和 propagation指定回滚触发条件和事务机制
@Transactional(rollbackFor = Exception.class,propagation = Propagation.REQUIRED)
@Override
public void transferAccount() {
    User a = userMapper.findById(2018L);
    a.setAccount(a.getAccount() - 100);
    userMapper.update(a);
    int i = 1 / 0;
    User b = userMapper.findById(2019L);
    b.setAccount(b.getAccount() + 100);
    userMapper.update(b);
}
rollbackFor = Exception.class表示触发回滚的条件是抛出异常propagation = Propagation.REQUIRED是默认的事务机制,若当前有事务则支持当前事务,否则新建事务@Transactional也可以加在类上,则该类所有方法都遵循该注解配置
将 2018的 account改为 100并再次测试,发现转账时抛出异常,两人 account不变。
更多学习资料请到白玉搜一搜搜索下载


