YOLOV3配置过程遇到的种种问题和坑——艰辛路上的坑
YOLOV3配置过程遇到的种种问题和坑
将会持续更新,只要一发现新的错误
文章目录
- YOLOV3配置过程遇到的种种问题和坑
- 1.提示UserWarning: indexing with dtype torch.uint8 is now deprecated, please use a dtype torch.bool
- 2.AttributeError: module 'tensorflow' has no attribute 'Summary'
- 3.python管理器 pip及安装指定版本的包
- 4.报"ImportError: DLL load failed: 找不到指定的模块"
- 5.错误ImportError: No module named 'torchvision'
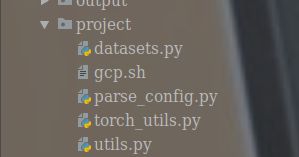
- 6.出现pycharm或者控制台报错在utils有关的类
- 7.tensorboard 远程服务器本地浏览器无法显示
- windows
- mac or linux
- 8.报错:RuntimeError: cuDNN error: CUDNN_STATUS_EXECUTION_FAILED
- 9.RuntimeError: Trying to resize storage that is not resizable at…
- 10.size mismatch for module_list.81.conv_81.weight:copying a param with shape torch.Size([30,1024,1,1]) from checkpoint
- 11.TypeError: unhashable type: 'numpy.ndarray'
- 12.数据加载的时候遇到TypeError: 'int' object is not callable
- 13.数据加载的时候遇到RuntimeError: DataLoader worker (pid(s) 18620, 45872) exited unexpectedly
- 14.RuntimeError: input.size(-1) must be equal to input_size. Expected 10, got 2000
- 15.AttributeError: module 'torch.utils.data' has no attribute 'random_split'。
- 16.ValueError: Sum of input lengths does not equal the length of the input dataset!
- 17.TypeError: can't convert CUDA tensor to numpy. Use Tensor.cpu() to copy the tens or to host memory first.
- 18.报错RuntimeError: Input and hidden tensors are not at the same device, found input t ensor at cuda:1 and hidden tensor at cuda:0
- 19.‘DataParallel’ object has no attribute ‘init_hidden’。
- 20.Assertioncur_target >= 0 && cur_target < n_classes’ failed.`。
- 21.RuntimeError: Attempting to deserialize object on a CUDA device but torch.cuda.is_available() is False. If you are running on a CPU-only machine, please use torch.load with map_location='cpu' to map your storages to the CPU.
- 22.size mismatch for word_embeddings.weight: copying a param with shape torch.Size([3403, 128]) from checkpoint, the shape in current model is torch.Size([12386, 128]).
- 23.RuntimeError: Expected hidden[0] size (2, 359, 256), got (2, 512, 256)。
- 24.在pytorch训练过程中出现loss=nan的情况。
- 25.RuntimeError: Trying to backward through the graph second time, but the buffers have already been freed. Please specify retain_variables=True when calling backward for the first time.
- 26.cv2.cvtColor报错:errorOpenCV(3.4.2)color.hpp253error(-215Assertion failed)
- 27.tensorflow遇到ImportError: Could not find 'cudart64_100.dll'错误解决
- 简答:
- 一. 错误类型原因
- 二. 搞清自己的tensorflow及CUDA版本
- 三. 匹配对应的cudnn对应cuda版本
- 28.AttributeError: module 'tensorflow._api.v1.train' has no attribute 'SummaryWriter'等
目前我所使用的环境:
Python 3.7.6
ubuntu 19.04
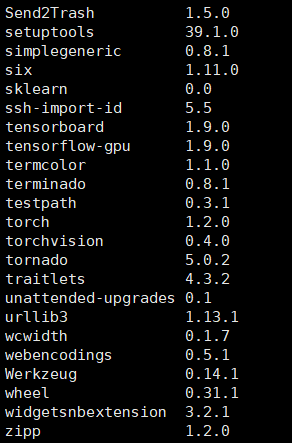
比较容易出问题的就是
tensorflow、tensorboard、torch、torchvision
几个比较好的网站:
https://pytorch.org/get-started/locally/
https://www.freesion.com/article/432370488/(PYTORCH | YOLOV3原理及代码详解(三))
https://blog.csdn.net/qq_24739717/article/details/92399359(Pytorch | yolov3原理及代码详解(一))
https://blog.csdn.net/qq_32761549/article/details/90402438(opencv调用yolov3模型进行目标检测,以实例进行代码详解)
https://blog.csdn.net/baidu_36669549/article/details/84346821(YOLO-V3训练中会遇到的问题)
https://blog.csdn.net/fengdu78/article/details/104667044/(干货:TensorFlow1.2~2.1各个GPU版本CUDA和cuDNN对应版本整理)
https://zhuanlan.zhihu.com/p/86844821?from_voters_page=true(性价比比较高的算力平台)
https://blog.csdn.net/jiaqi_ge/article/details/100125864(yolo论文中IOU/AP/MAP/NMS概念详解)
https://blog.csdn.net/litt1e/article/details/90313652(Pytorch实现yolov3(train)训练代码详解(二))
https://blog.csdn.net/litt1e/article/details/89362880(PyTorch实现yolov3代码详细解密(一))
https://blog.csdn.net/weixin_42419002/article/details/99232454(1 PyTorch版YOLOv3 代码中文注释 之 训练 train.py test.py detect.py)
https://blog.csdn.net/qq_34199326/article/details/84529661(史上最详细的Pytorch版yolov3代码中文注释详解(四))
https://blog.csdn.net/qq_41895190/article/details/90286082(WIN10 +pytorch版yolov3训练自己数据集)
https://blog.csdn.net/nclgsj1028/article/details/92397857(YOLO_V3 实验文档 (Pytorch版本) 训练自己的数据集)
https://blog.csdn.net/StrongerL/article/details/81023603(YOLOv3训练自己的模型)
https://blog.csdn.net/qq_24739717/article/details/96966371(Pytorch | yolov3原理及代码详解(三))
https://blog.csdn.net/qq_33869371/article/details/94894312(yolov–12–YOLOv3的原理深度剖析和关键点讲解)
https://blog.csdn.net/qq_33869371/article/details/87929419(Yolov–2--一文全面了解深度学习性能优化加速引擎—TensorRT)
https://blog.csdn.net/qq_30622831/article/details/80978118(pycharm导入本地py文件时,模块下方出现红色波浪线时如何解决)
https://blog.csdn.net/public669/article/details/98020800(Pytorch实现YOLOv3训练自己的数据集)
https://blog.csdn.net/public669/article/details/97610829(目标检测工具安装使用–labelImg)
https://blog.csdn.net/qq_21578849/article/details/84980298(超详细教程:YOLO_V3(yolov3)训练自己的数据)
https://blog.csdn.net/weixin_40805392/article/details/104663099?tdsourcetag=s_pctim_aiomsg(【水下目标检测】比赛记录)
https://github.com/eriklindernoren/PyTorch-YOLOv3(Github Pytorch版yolov3)
https://blog.csdn.net/qq_32761549/article/details/90402438(opencv调用yolov3模型进行目标检测,以实例进行代码详解)
https://blog.csdn.net/weixin_43838622/article/details/86682172(tensorboard 远程服务器本地浏览器无法显示)
https://blog.csdn.net/qq_30622831/article/details/81751159(Tensorflow报错“Could not find ‘cudart64_6.dll”)
https://blog.csdn.net/qq_38195197/article/details/81953494(tensorflow安装与测试)
问题如下
1.提示UserWarning: indexing with dtype torch.uint8 is now deprecated, please use a dtype torch.bool
原文:https://blog.csdn.net/c2250645962/article/details/104869015
这个是警告信息
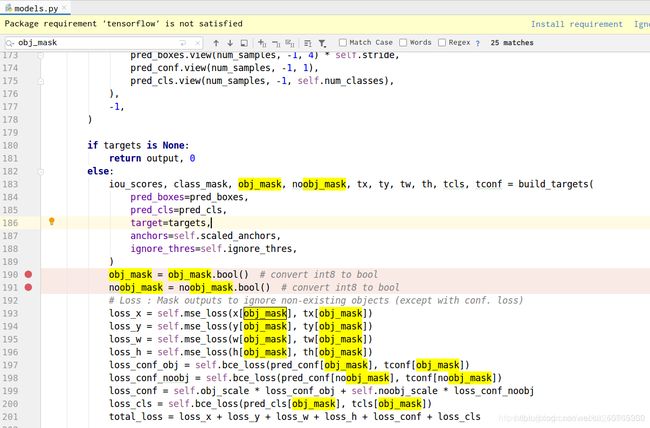
解决方法如下:
找到model.py
添加如下标记的两行代码
2.AttributeError: module ‘tensorflow’ has no attribute ‘Summary’
Traceback (most recent call last):
File "train.py", line 141, in
logger.list_of_scalars_summary(tensorboard_log, batches_done)
File "F:\StuPy\PyTorch-YOLOv3\utils\logger.py", line 17, in list_of_scalars_summary
summary = tf.Summary(value=[tf.Summary.Value(tag=tag, simple_value=value) for tag, value in tag_value_pairs])
AttributeError: module 'tensorflow' has no attribute 'Summary'
这个问题是因为tensorflow 2.x.x版本跟tensorflow 1.x.x 使用的函数和方法有很大的区别
⋆ \star ⋆如果是使用tensorflow2.x.x
请将logger.py里的代码替换成如下代码:
(这个是修改的代码)
github地址点我
import tensorflow as tf


# class Logger(object):
#     def __init__(self, log_dir):
#         """Create a summary writer logging to log_dir."""
#         self.writer = tf.summary.create_file_writer(log_dir)
#
#     def scalar_summary(self, tag, value, step):
#         """Log a scalar variable."""
#         summary = tf.Summary(value=[tf.Summary.Value(tag=tag, simple_value=value)])
#         self.writer.add_summary(summary, step)
#
#     def list_of_scalars_summary(self, tag_value_pairs, step):
#         """Log scalar variables."""
#         summary = tf.Summary(value=[tf.Summary.Value(tag=tag, simple_value=value) for tag, value in tag_value_pairs])
#         self.writer.add_summary(summary, step)

class Logger(object):
    def __init__(self, log_dir):

        """Create a summary writer logging to log_dir."""
        self.writer = tf.summary.create_file_writer(log_dir)


    def scalar_summary(self, tag, value, step):
        """Log a scalar variable."""
        with self.writer.as_default():
            tf.summary.scalar(tag, value, step=step)
            self.writer.flush()
        # summary = tf.Summary(value=[tf.Summary.Value(tag=tag, simple_value=value)])
        # self.writer.add_summary(summary, step)


    def list_of_scalars_summary(self, tag_value_pairs, step):
        """Log scalar variables."""
        with self.writer.as_default():
            for tag, value in tag_value_pairs:
                tf.summary.scalar(tag, value, step=step)
            self.writer.flush()
        # summary = tf.Summary(value=[tf.Summary.Value(tag=tag, simple_value=value) for tag, value in tag_value_pairs])
        # self.writer.add_summary(summary, step)
3.python管理器 pip及安装指定版本的包
https://blog.csdn.net/lvsehaiyang1993/article/details/80596513pip和pip3的区别
安装了python3之后,库里面既会有pip3也会有pip
1. 使用pip install XXX
新安装的库会放在这个目录下面
python2.7/site-packages
2. 使用pip3 install XXX
新安装的库会放在这个目录下面
python3.6/site-packages
如果使用python3执行程序,那么就不能import python2.7/site-packages中的库
那么问题来了,我没有py2.7啊
经过实践发现应该是这样的,应该是将包安装在路径里面第一个检索到的pip系列软件在的地方。
由图可以看到,我再一个没有pip的地方pip3了selenium包
所以,它自动检索,将包安装在了pip3第一次出现的地方。
 c:\users\challenger\appdata\local\programs\python\python36\lib\site-packages
而且你用pip show是看不到相关信息的,只有pip3 show才行。
而在使用 pip 安装后

这个是我想起c语言里面 include“”和inluce<>的区别,一个首先检索当前路径是否有相关文件,一个直接进path环境变量里的库检索文件。
而这里也是如此,如果环境里有相关函数则直接使用,没有则到path路径找第一个符合的函数。
如果你想安装指定版本的包可以用
国内源原文:https://blog.csdn.net/python_lc_nohtyp/article/details/103645236
pip install tensorflow-gpu==2.1.0 -i https://pypi.douban.com/simple --user
-i后面是国内的一个源,下包更快
pip install <module_name>==<version> -i https://pypi.douban.com/simple --user
4.报"ImportError: DLL load failed: 找不到指定的模块"
如果用pip install tensorflow-gpu,当我import keras 或者 import tensorflow的时候就会报错。这就说明我的问题是出现在安装tensorflow-gpu。
报错:
ImportError: DLL load failed: 找不到指定的模块。Failed to load the native TensorFlow runtime.
- 这个问题大多数就是
tensorflow的版本和你的cudnn和cuda和pytorch不兼容
(一般出现这种情况是因为可能包之间版本不兼容导致,这个时候一定要联想跟这个包一起安进来的包的版本问题)
下面给出一张版本对应表格
| TensorFlow版本 | CUDA版本 | cuDNN版本 |
|---|---|---|
| 1.2 | CUDA Toolkit 8.0 | cuDNN v5.1 |
| 1.3 | CUDA Toolkit 8.0 | cuDNN v6 or v6.1 |
| 1.4 | CUDA Toolkit 8.0 | cuDNN v6.1 |
| 1.5 | CUDA Toolkit 9.0 | cuDNN v7.0 |
| 1.6 | CUDA Toolkit 9.0 | cuDNN v7.0 |
| 1.7 | CUDA Toolkit 9.0 | cuDNN v7.0 |
| 1.8 | CUDA Toolkit 9.0 | cuDNN v7.0 |
| 1.9 | CUDA Toolkit 9.0 | cuDNN v7.0 |
| 1.10 | CUDA Toolkit 9.0 | cuDNN v7.1 |
| 1.11 | CUDA Toolkit 9.0 | cuDNN v7.1 |
| 1.12 | CUDA Toolkit 9.0 | cuDNN v7.3 |
| 1.13 | CUDA Toolkit 10.0 | cuDNN v7.3 |
| 1.14 | CUDA Toolkit 10.0 | cuDNN v7.4 |
| 1.15 | CUDA Toolkit 10.0 | cuDNN v7.5 |
| 2.0 | CUDA Toolkit 10.0 | cuDNN v7.6 |
| 2.1.0 | CUDA Toolkit 10.1 | cuDNN v7.6 |
-
Pytorch建议版本:
torch = 1.2.0 torchvision = 0.4.
Pytorch选版本也要选对应于cuda和cnDNN的版本,不能乱选,不然很容易会出错,如何选刚才上面也讲述了。
建议先安装tensorflow、cudnn、cuda再安装Pytorch -
还有可能的一个原因是
tensorboad跟tensorflow版本不兼容,这个时候要么找tensorboard对应的版本,要么就重新安装tensorflow。 -
还有一个可能是因为之前环境中的
tensorflow没有卸载干净,然后又安装了新的tensorflow,一般情况下是不会同时安装两个相同的包的,但,他就是这么神奇,一定要确保卸载干净tensorflow才能安装新的。
重要提醒:安装的包一定要么是GPU版的,要么是CPU版的,不能两者都有,也不能单独有gpu版的tf和cpu版的pytorch的情况
重要提醒:安装的包一定要么是GPU版的,要么是CPU版的,不能两者都有,也不能单独有gpu版的tf和cpu版的pytorch的情况
重要提醒:安装的包一定要么是GPU版的,要么是CPU版的,不能两者都有,也不能单独有gpu版的tf和cpu版的pytorch的情况
cuda下载地址:https://developer.nvidia.com/cuda-toolkit-archive
cudnn下载:https://developer.nvidia.com/rdp/cudnn-archive
5.错误ImportError: No module named ‘torchvision’
这个错误一般是因为torchvision和torch的版本不对应,相互之间不兼容,最好是能够在安装torch自动跟着torch一起安装。
https://blog.csdn.net/chengyq116/article/details/83792983
pip install torch===1.4.0 torchvision===0.5.0 -f https://download.pytorch.org/whl/torch_stable.html
6.出现pycharm或者控制台报错在utils有关的类
问题如图


(由于图片没保存下来,用了另一个例子,具体就是导入的py文件明明有但却有红色波浪线)
解决办法:
-
在当前项目程序目录右键单击,然后“Mark Directory as”为“Sources Root”。之后当前程序所在目录颜色会变化,表示已经完成标记。
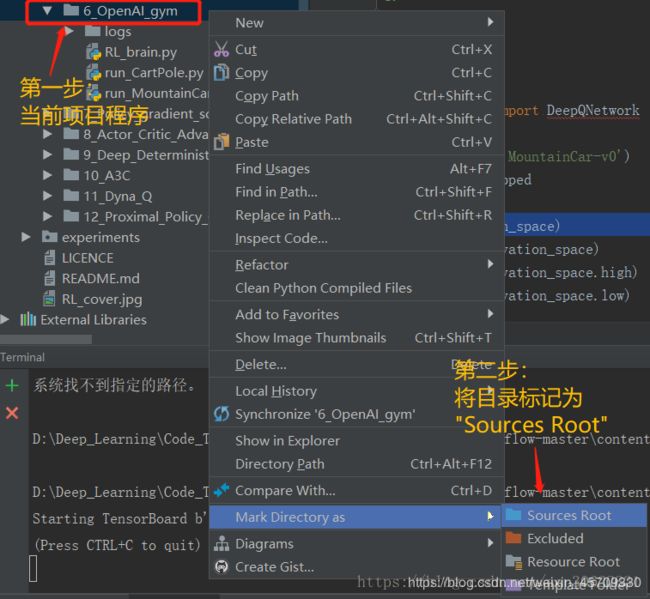

-
这个问题是由于本项目下有一个utils的文件目录,但是呢python本身就有一个utils;通常情况下我们是用import utils的方法导入的。解决这个问题我们只需将本项目的utils改一个名字即可,笔者是改为project的,同样也需要将相关文件进行修改,修改如下:
7.tensorboard 远程服务器本地浏览器无法显示
https://blog.csdn.net/weixin_43838622/article/details/86682172
在用xshell等ssh工具远程连接服务器时,我们常常在服务器上运行tensorflow代码,而且模型tf.summary保存文件在服务器上,这是直接采用tensorboard会有一些小问题。
直接用tensorboard --logdir=‘file’ --port=6006后,本地笔记本打开生成的url会无法显示,如下:
windows
利用Xshell最方便。首先 隧道 在Xshell > 文件 > 当前会话属性 > 连接 > SSH > 隧道
点添加,
之后 源主机和目标主机 都是 localhost不变,这里注意千万别改变这两个选项,都是localhost。
如图,端口号注意一致,简单起见,设为相同,注意和命令tensorboard --logdir=‘file’ --port=6006中一致,如果出现端口号占用,换一个
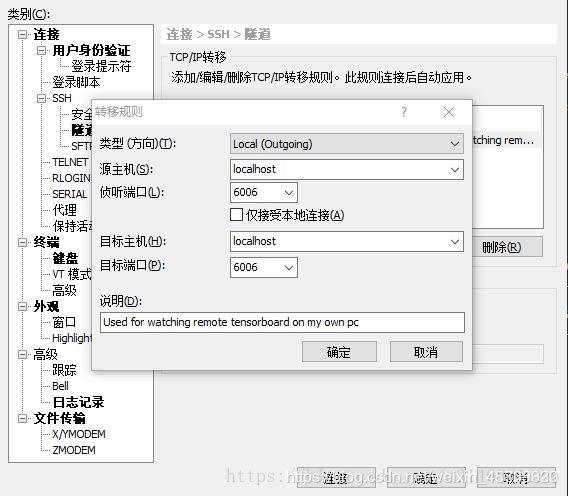
然后访问localhost:6006,就可以了
mac or linux
- 先用ssh工具重定向:
ssh -L 16006:127.0.0.1:6006 username@remote_server_ip
- 其中:16006:127.0.0.1代表自己机器上的16006号端口,6006是服务器上tensorboard使用的端口。
- 服务器启动tensorboard服务
tensorboard --logdir=xxx --port=6006 #服务器上启动服务
- 最后,本地浏览器输入:127.0.0.1:16006
8.报错:RuntimeError: cuDNN error: CUDNN_STATUS_EXECUTION_FAILED
原文:https://blog.csdn.net/yepeng_xinxian/article/details/95519152
最终环境:ubantu18.04,2080ti ,cuda10,cudnn7.5.0,python3.7.3,pytorch1.1.0
查看cuda版本(打开终端,输入):
nvcc -V
查看cudnn版本:
cat /usr/local/cuda/include/cudnn.h | grep CUDNN_MAJOR -A 2
查看python版本:
python
查看pytorch版本:
python
import torch
print(torch.__version__)
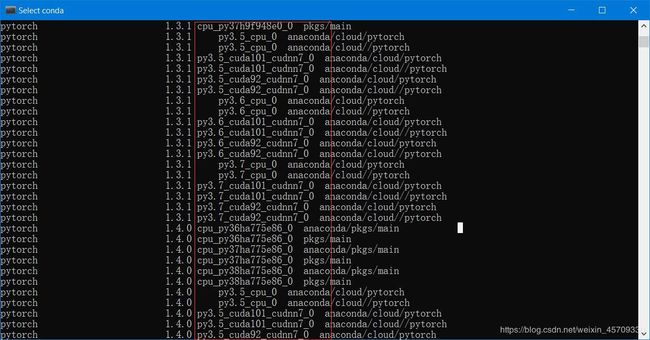
问题原因: 各部分的版本问题。对于rtx2080ti,仅适配cuda10。而某些版本的anaconda会默认安装适配cuda9的pytorch。所以你需要能够适配cuda10的pytorch和tensorflow版本
可以通过conda search 中的build来看自己的pytorch是不是适配cuda10版本的
(或者也可以用pip search )
例:
conda search <module_name>
Python = 3.7
gpu = RTX2080TI
Cuda = 10.0
CnDNN = 7.x.x
那么应该要选用build为:py3.7_cuda100_cudnn_7_0的包才能适配。
9.RuntimeError: Trying to resize storage that is not resizable at…
https://github.com/eriklindernoren/PyTorch-YOLOv3/issues/237
*Traceback (most recent call last):
File "train.py", line 99, in
for batch_i, (_, imgs, targets) in enumerate(dataloader):
File "C:\ProgramData\Anaconda3\lib\site-packages\torch\utils\data\dataloader.py", line 568, in next
return self._process_next_batch(batch)
File "C:\ProgramData\Anaconda3\lib\site-packages\torch\utils\data\dataloader.py", line 608, in _process_next_batch
raise batch.exc_type(batch.exc_msg)
RuntimeError: Traceback (most recent call last):
File "C:\ProgramData\Anaconda3\lib\site-packages\torch\utils\data_utils\worker.py", line 99, in _worker_loop
samples = collate_fn([dataset[i] for i in batch_indices])
File "C:\ProgramData\Anaconda3\lib\site-packages\torch\utils\data_utils\worker.py", line 99, in
samples = collate_fn([dataset[i] for i in batch_indices])
File "C:\Users\Administrator.SC-201907191055\Desktop\PyTorch-YOLOv3-master\utils\datasets.py", line 121, in getitem
boxes[:, 3] = w_factor / padded_w
RuntimeError: Trying to resize storage that is not resizable at ..\aten\src\TH\THStorageFunctions.cpp:76
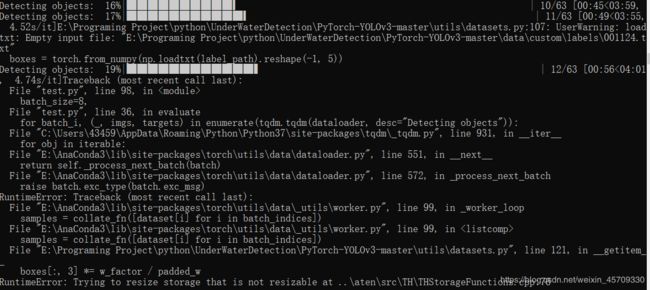
出现这个情况可能是因为是train中某个图像文件对应的标签文件为空,剔除掉后,问题就解决了.(for English speaker: I met the same “Runtime error” as you and have solved it.I fond that there were some image files for training get an empty labels files(.txt).After I deleted it from my train date sets,every thing goes right. )
经验
在获取数据集之后,要先把标签为空的标签剔除掉以及对应的图像
10.size mismatch for module_list.81.conv_81.weight:copying a param with shape torch.Size([30,1024,1,1]) from checkpoint

出现这种情况一般是训练和测试所用的图片大小不同才导致了什么参数不匹配,
- 一定要注意进行测试的测试集一大小要跟训练集相同
- 出现这个情况注意修改存放类别的文件 --class_path
11.TypeError: unhashable type: ‘numpy.ndarray’
原因:在将pytorch的longTensor转为numpy,并用于dict的key的时候,会出现这样的错误。其实程序输出已经是int了,但是还是会被认为是ndarray。
解决:在原来的基础上加上.item()
12.数据加载的时候遇到TypeError: ‘int’ object is not callable
原因:数据不是Tensor类型的而是np.array或其他类型的。
解决:
tensor = torch.LongTensor(data_x)
data_x = autograd.Variable(tensor)
tensor = torch.LongTensor(data_y)
data_y = autograd.Variable(tensor)
13.数据加载的时候遇到RuntimeError: DataLoader worker (pid(s) 18620, 45872) exited unexpectedly
解决:loader中令num_workers=0
14.RuntimeError: input.size(-1) must be equal to input_size. Expected 10, got 2000
原因: 使用view时维度指定错误,LSTM(input,(h0,c0)) 指定batch_first=True后,input就是(batch_size,seq_len,input_size)否则为input(seq_len, batch, input_size)
解决:
lstm_out, self.hidden = self.lstm(
        embeds.view(self.batch_size, 200, EMBEDDING_DIM), self.hidden)
15.AttributeError: module ‘torch.utils.data’ has no attribute ‘random_split’。
原因:pytorch1.1.0版本的random_split在torch.utils.data里,而0.4.0版本的random_split在torch.utils.data.dataset里。
解决:from torch.utils.data.dataset import random_split。
16.ValueError: Sum of input lengths does not equal the length of the input dataset!
解决:数据集问题
17.TypeError: can’t convert CUDA tensor to numpy. Use Tensor.cpu() to copy the tens or to host memory first.
解决:将准确率计算改为
acc1 = (pred_cls1 == val_y1).cpu().sum().numpy() / pred_cls1.size()[0]
18.报错RuntimeError: Input and hidden tensors are not at the same device, found input t ensor at cuda:1 and hidden tensor at cuda:0
原因:因为使用了
if torch.cuda.device_count() > 1:
	print("Let's use", torch.cuda.device_count(), "GPUs!")
	model = nn.DataParallel(model)
model.to(device)
而tensor没有指定卡的ID。
解决:两种方式。
- 先定义一个
device = torch.device('cuda:0' if torch.cuda.is_available() else 'cpu')(这里面已经定义了device在卡0上“cuda:0”),然后将model = torch.nn.DataParallel(model,devices_ids=[0, 1, 2])(假设有三张卡)。此后需要将tensor 也迁移到GPU上去。注意所有的tensor必须要在同一张GPU上面,即:tensor1 = tensor1.to(device), tensor2 = tensor2.to(device)等等。注意:一定不能仅仅是tensor1.to(device)而不赋值,这样只会创建副本。 - 直接用
tensor.cuda()的方法。即先model = torch.nn.DataParallel(model, device_ids=[0, 1, 2])(假设有三块卡, 卡的ID 为0, 1, 2),然后tensor1 = tensor1.cuda(0), tensor2=tensor2.cuda(0)等等。(我这里面把所有的tensor全放进ID 为 0 的卡里面,也可以将全部的tensor都放在ID 为1 的卡里面)
参考:https://zhuanlan.zhihu.com/p/61892329
19.‘DataParallel’ object has no attribute ‘init_hidden’。
原因:nn.DataParallel(m)这句返回的已经不是原始的m了,而是一个DataParallel,原始的m保存在DataParallel的module变量里面。
解决: 在DataParallel和to(device)之后如果需要修改model,则需要
if isinstance(model, nn.DataParallel):
    model = model.module
20.Assertioncur_target >= 0 && cur_target < n_classes’ failed.`。
原因:在分类训练中经常遇到这个问题,一般来说在网络中输出的种类数和label设置的种类数量不同的时候就会出现这个错误。Pytorch有个要求,在使用CrossEntropyLoss这个函数进行验证时label必须是以0开始的。
解决:
tags_ids = range(len(tags_set))   # 从0开始
tag2id = pd.Series(tags_ids, index=tags_set)
21.RuntimeError: Attempting to deserialize object on a CUDA device but torch.cuda.is_available() is False. If you are running on a CPU-only machine, please use torch.load with map_location=‘cpu’ to map your storages to the CPU.
原因:原本是GPU训练的模型要加载在CPU上。
解决:model = torch.load(model_path, map_location='cpu')
同理,如果原本4块GPU训练的,改为一块,则model = torch.load(model_path, map_location='cuda:0')
如果是4块到两块:就把map_location改为:map_location={'cuda:1': 'cuda:0'}。
22.size mismatch for word_embeddings.weight: copying a param with shape torch.Size([3403, 128]) from checkpoint, the shape in current model is torch.Size([12386, 128]).
原因:加载的模型的word_embedding层参数和当前model输入的参数不匹配。
解决:word2id、tag2id的长度要一致。
23.RuntimeError: Expected hidden[0] size (2, 359, 256), got (2, 512, 256)。
原因:使用了DataLoader加载数据,数据集中的训练实例数不能被batch_size整除,最后一个batch的大小不等于batch_size,而hidden_layer初始化的时候用固定的batch_size初始化:autograd.Variable(torch.zeros(self.num_layers * 2, self.batch_size, self.hidden_dim // 2))
解决:如果模型不能处理批量大小的在线更改,就应在torch.utils.data中设置drop_last=True,因此,在培训期间只处理整批数据。即testset_loader = DataLoader(test_db, batch_size=args.batch_size, shuffle=False, num_workers=1, pin_memory=True,drop_last=True)
24.在pytorch训练过程中出现loss=nan的情况。
原因:
- 学习率太高。学习率比较大的时候,参数可能over shoot了,结果就是找不到极小值点;
减小学习率可以让参数朝着极值点前进 - loss函数有问题。
- 对于回归问题,可能出现了除0 的计算,加一个很小的余项可能可以解决。
- 数据本身,是否存在Nan,可以用
numpy.any(numpy.isnan(x))检查一下input和target。 - target本身应该是能够被loss函数计算的,比如sigmoid激活函数的target应该大于0,同样的需要检查数据集。
解决:减小学习速率或者增大batch_size。
25.RuntimeError: Trying to backward through the graph second time, but the buffers have already been freed. Please specify retain_variables=True when calling backward for the first time.
原因:网络中存在多个sub-network,有2个甚至2个以上的loss需要分别对网络参数进行更新,比如两个需要分别执行loss1.backward() loss2.backward()。两个loss可能会有共同的部分,所以在执行第一次loss1.backward()完成之后,Pytorch会自动释放保存着的计算图,所以执行第二次loss2.backward()的时候就会出现计算图丢失的情况。
解决:
1 执行loss.backward(retain_graph=True)保留计算图,但这样很可能会出现内存溢出(CUDA out of memory)的情况。因为Pytorch的机制是每次调用.backward()都会free掉所有buffers,所以它提示,让retain_graph。然而当retain后,buffers就不会被free了,所以会OOM。参考网址:https://blog.csdn.net/Mundane_World/article/details/81038274
2 当不需要计算生成器的梯度,因此在使用生成数据计算辨别器时使用.detach()作为输入数据,这样就对当前图进行拆分,返回一个新的从当前图中分离的 Variable,返回的 Variable 永远不会需要梯度.参考网址:https://blog.csdn.net/u011276025/article/details/76997425
3 对于我的代码,如果retain_graph=True则内存溢出,又找不到需要.detach()的地方,最后发现是因为我的model每次训练的时候没有重新初始化隐藏层。需要在model.zero_grad()之后model.hidden = model.init_hidden()来清空 LSTM 的隐状态,将其从上个实例的历史中分离出来,避免受之前运行代码的干扰。如果不重新初始化,会有报错。
26.cv2.cvtColor报错:errorOpenCV(3.4.2)color.hpp253error(-215Assertion failed)
错误原因:
图片路径不对。
27.tensorflow遇到ImportError: Could not find 'cudart64_100.dll’错误解决
在安装tensorflow的时候,使用import tensorflow出现了找不到dll文件的错误,参考了很多博客和stackflow的解决方案,发现其中只说了版本号不匹配,但是没有具体说明什么样的版本才是适配正确的,因此手写此避坑指南。再次感谢Function兄的指导帮助。
笔者环境:
python 版本3.6
tensorflow版本1.14
ImportError: Could not find 'cudart64_100.dll'
简答:
-
仔细分析错误的类型、原因
-
搞清自己的tensorflow以及CUDA版本
-
换用对应版本进行解决,完成cuda与tf的适配,cudnn与cuda的适配,protobuf与tf的适配
一. 错误类型原因
问题是找不到cuda系的dll文件的模块,提示需要下载CUDA10.0,那么首先查看cuda的路径下是否存在该文件:
通过C:\Program Files\NVIDIA GPU Computing Toolkit\CUDA路径访问cuda,在其bin目录下查找是否有cudart64_100.dll模块
如果有,则查看环境变量是否添加;如果没有,可能就是cuda版本和tensorflow版本的匹配问题
二. 搞清自己的tensorflow及CUDA版本
进入命令行环境下,首先通过python --version确定自己的python版本是3.6
再通过pip list查看已经安装好的tensorflow版本,笔者本人的版本是1.14
通过nvcc --version查看cuda版本,笔者之前的cuda版本是V9.0.176;
通过Tesnsorflow官网查找对应版本信息如下:
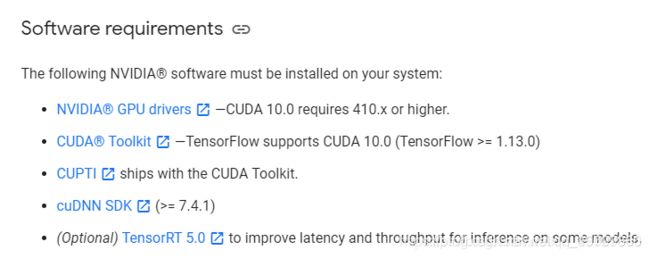
对应版本信息
可以看到当Tensorflow的版本>=1.13时,CUDA的版本需要是10.0,同时cudnn版本号需要大于7.4.1;
这里笔者选用了将cuda的版本卸载,以适用tensorflow版本
直接进入C:\Program Files\NVIDIA GPU Computing Toolkit\CUDA路径下将文件夹删除,并且将环境变量删除。
三. 匹配对应的cudnn对应cuda版本
将cuda版本安装后,再次打开jupyter运行import tensorflow,发现并没有成功,出现了找不到’cudnn64_7.dll’的错误:
ImportError: Could not find 'cudnn64_7.dll'
此提示表示缺少cudnn模块的dll文件,根据tensorflow文档,对应tensorflow1.13版本以上,cudnn需要是>7.4.1的版本,下载cudnn版本,cudnn的目录结构如下:
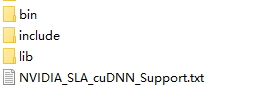
将cudnn目录下的文件对应放在cuda目录下即可
四. 匹配对应的protobuf对应tf版本
此时应该是没问题了吧,笔者继续运行import tensorflow, MMP, 并没有顺利运行,出现了提示’descriptor’的错误:
ImportError: cannot import name 'descriptor'
stackflow上的tf安装问题汇总
通过stackflow上查找,发现该错误出现的原因是因为protobuf和tf的版本不对应,因为tf和pro之间存在依赖关系,于是笔者首先uninstall pro, 接着uninstall tf,最后重新install tf ,tf会自动对依赖项pro进行安装。
中间出现了一点小插曲,笔者是用virtualenv的py虚拟环境,于是安装好了版本后,依然会出现’descriptor’的错误,于是自己在原生py环境中测试了下,发现可以导入tf。那么原因就是可能因为系统找不到py虚拟环境中的sitepackage,将虚拟环境的py-bin下的目录设置为环境变量,即可正常调用。
如果出现这个问题试着重装一下对应适配的版本,无论原来是否是匹配的
如果出现这个问题试着重装一下对应适配的版本,无论原来是否是匹配的
如果出现这个问题试着重装一下对应适配的版本,无论原来是否是匹配的
28.AttributeError: module ‘tensorflow._api.v1.train’ has no attribute 'SummaryWriter’等
TensorFlow报错:AttributeError: module ‘tensorflow._api.v1.train’ has no attribute 'SummaryWriter’等
分析:版本更新,方法调用方式改变
解决方式:
| 报错 | 原方法 | 更改后方法 |
|---|---|---|
| AttributeError: module ‘tensorflow._api.v1.train’ has no attribute ‘SummaryWriter’ | tf.train.SummaryWriter() | tf.summary.FileWriter() |
| AttributeError: module ‘tensorflow’ has no attribute ‘merge_all_summaries’ | tf.merge_all_summaries() | tf.summary.merge_all() |
| AttributeError: module ‘tensorflow’ has no attribute ‘histogram_summary’ | tf.histogram_summary() | tf.summary.histogram() |
| AttributeError: module ‘tensorflow’ has no attribute ‘scalar_summary’ | tf.scalar_summary() | tf.summary.scalar() |
| AttributeError: module ‘tensorflow’ has no attribute ‘image_summary’ | tf.image_summary() | tf.summary.image() |
| AttributeError: module ‘tensorflow’ has no attribute 'audio_summary | tf.audio_summary() | tf.summary.audio() |
| AttributeError: module ‘tensorflow’ has no attribute ‘merge_summary’ | tf.merge_summary() | tf.summary.merge() |
参考:
stackoverflow

