IOS Swift Https单向认证
前言
上一篇文章记录一下https相关概念,主要是一开始要做https请求的时候被概念弄得头疼,就把一些概念记录了一下,现在记录一下单向验证。
什么是单向认证
既然有单向认证,就存在双向认证,这一篇介绍了单向认证和双向认证。单向认证也是最常见的,大多数https基于这种方式,大致流程在上篇文章最后也有总结,大概提一下有个映像:
1.客户端请求服务器
2.服务端将证书、公钥等发给客户端
3.客户端首先向一个权威的服务器检查证书的合法性证书,成功则产生一个随机数作为对称加密算法的密钥,使用服务端公钥加密发送给服务端
4.服务端使用私钥解密,获取对称密匙(随机数)
5.后续客户端与服务端使用该随机数作为加密算法,对信息加密通信
配置tomcat
用tomcat来支持https请求,首先需要一个证书,就使用keytool生成自签名的方式做一个证书,这一步网上方法很多。
生成keystore文件
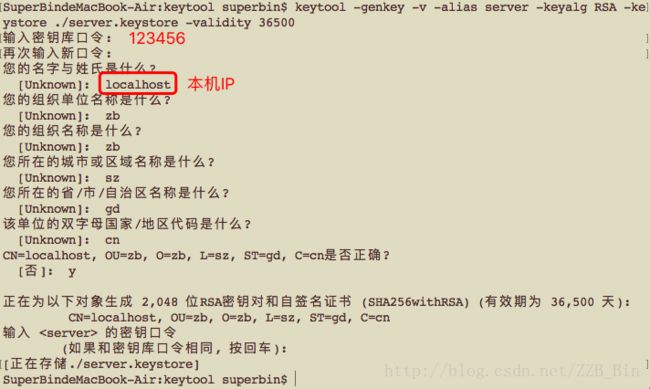
先用工具keytool在当前目录下生成一个服务器端的证书库keystore

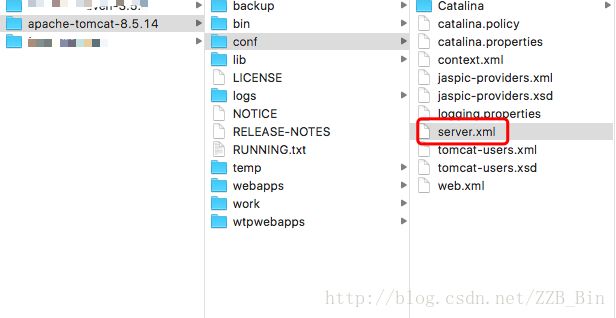
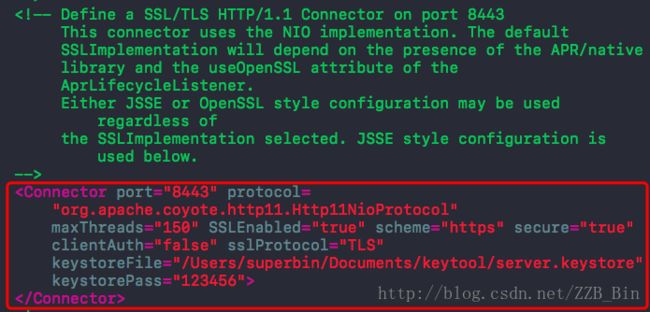
keytool -genkey -v -alias server -keyalg RSA -keystore ./server.keystore -validity 36500找到tomcat下的conf目录中的server.xml文件

<Connector port="8443" protocol="org.apache.coyote.http11.Http11NioProtocol"
        maxThreads="150" SSLEnabled="true" scheme="https" secure="true"clientAuth="false" sslProtocol="TLS"
keystoreFile="/Users/superbin/Documents/keytool/server.keystore"
keystorePass="123456">
Connector>
生成CER文件
这里就不生成CSR了,要向CA申请才需要,直接生成cer证书,为后面做准备。
keytool -export -alias server -keystore ./server.keystore -file ./server.cer -storepass 123456启动tomcat
启动tomcat,可以使用浏览器进行访问。
http://localhost:8080
https://localhost:8443
IOS使用原生网络对https进行访问
如果服务器端的证书是通过认证机构认证生成的,则IOS不需要做特别处理,可直接访问https请求(例如:https://www.baidu.com),但如果是使用自签名生成的证书,则需要自己对证书进行验证。
IOS进行网络请求,目前主要有URLConnection和URLSession。URLSession是iOS7中新的网络接口,使用URLSession作为网络请求对自签名证书进行验证。
首先是一个https的GET请求
func httpsGet(urlStr:String){
        //请求URL
        let url:URL! = URL(string: urlStr)
        let request:NSMutableURLRequest = NSMutableURLRequest(url: url)
        var paramDic = [String: String]()

        request.httpMethod = "GET"
        request.timeoutInterval = 20

        //默认session配置
        let config = URLSessionConfiguration.default
        let session = URLSession(configuration: config, delegate: self, delegateQueue: OperationQueue.main)
        //发起请求
        let dataTask = session.dataTask(with: request as URLRequest) {
            (data:Data?, response:URLResponse?, error:Error?) in
            if(data != nil ){
                var str = String.init(data: data!, encoding: String.Encoding.utf8)
                printLogTool(str)
            }else {
                printLogTool(error)
            }
        }
        //请求开始
        dataTask.resume()
    }
不导入证书认证
通过实现URLSessionDelegate委托,进行Https验证。
以下这种方式不需要导入证书,没有对证书进行验证,直接返回服务器确认通过,这种方式也能建立https连接,但不够安全。
extension HttpUtils:URLSessionDelegate{

    func urlSession(_ session: URLSession, didReceive challenge: URLAuthenticationChallenge, completionHandler: @escaping (URLSession.AuthChallengeDisposition, URLCredential?) -> Void) {
            if challenge.protectionSpace.authenticationMethod
            == (NSURLAuthenticationMethodServerTrust) {
            print("服务端证书认证!")

            let serverTrust:SecTrust = challenge.protectionSpace.serverTrust!
            let certificate = SecTrustGetCertificateAtIndex(serverTrust, 0)

            let credential = URLCredential(trust: serverTrust)
            challenge.sender!.continueWithoutCredential(for: challenge)
            challenge.sender?.use(credential, for: challenge)
            completionHandler(URLSession.AuthChallengeDisposition.useCredential,
                              URLCredential(trust: challenge.protectionSpace.serverTrust!))

        }
    }

}
导入证书认证
验证步骤:
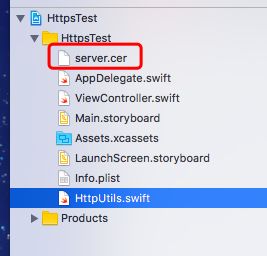
1.将上面生成server.cer导入工程

2.先获取需要验证的信任对象(Trust Object)
3.从信任对象中获取服务器证书,并转化成二进制数据
4.从本地导入的证书,并转化成二进制数据,与上一步的数据比较
5.成功,回调凭证,传递给服务器
4.假如验证失败,取消此次验证流程,拒绝连接请求
extension HttpUtils:URLSessionDelegate{
    /**

     Requests credentials from the delegate in response to a session-level authentication request from the remote server.
     从委托中获得请求证书 响应来自远程服务器的会话级身份验证请求
     */

    //URLAuthenticationChallenge: 授权质问
    //URLSession.AuthChallengeDisposition:响应身份验证
    func urlSession(_ session: URLSession, didReceive challenge: URLAuthenticationChallenge, completionHandler: @escaping (URLSession.AuthChallengeDisposition, URLCredential?) -> Void) {

        /**
         protectionSpace:从保护空间对象提供关于身份验证请求的附加信息,
         并告诉你身份验证方法 采用您提供用户的证书还是验证服务器提供的证书
         */
        if challenge.protectionSpace.authenticationMethod
            == (NSURLAuthenticationMethodServerTrust) {

            //SecTrust:security Trust 也叫信任对象Trust Object 包含关于信任管理的信息
            //从服务器信任的保护空间返回一个SecTrust
            let serverTrust:SecTrust = challenge.protectionSpace.serverTrust!
            //从信任管理链中获取第一个证书
            let certificate = SecTrustGetCertificateAtIndex(serverTrust, 0)

            //SecCertificateCopyData:返回一个DER 编码的 X.509 certificate
            //根据二进制内容提取证书信息
            let remoteCertificateData
                = CFBridgingRetain(SecCertificateCopyData(certificate!))!
            //本地加载证书
            let cerPath = Bundle.main.path(forResource: "server", ofType: "cer")!
            let cerUrl = URL(fileURLWithPath:cerPath)
            let localCertificateData = try! Data(contentsOf: cerUrl)

            // 证书校验:这里直接比较本地证书文件内容 和 服务器返回的证书文件内容
            if localCertificateData as Data == remoteCertificateData as! Data {
                let credential = URLCredential(trust: serverTrust)
                //尝试继续请求而不提供证书作为验证凭据
                challenge.sender!.continueWithoutCredential(for: challenge)
                //尝试使用证书作为验证凭据,建立连接
                challenge.sender?.use(credential, for: challenge)
                //回调给服务器,使用该凭证继续连接
                completionHandler(URLSession.AuthChallengeDisposition.useCredential,URLCredential(trust: challenge.protectionSpace.serverTrust!))
            }else {
                challenge.sender?.cancel(challenge)
                // 证书校验不通过
                completionHandler(URLSession.AuthChallengeDisposition.cancelAuthenticationChallenge, nil)
            }

        }
    }

}
参考文章:
http://www.cocoachina.com/ios/20151021/13722.html
http://www.cocoachina.com/ios/20150810/12947.html
http://blog.csdn.net/u011604049/article/details/52869824
双向认证可以参考:
http://www.hangge.com/blog/cache/detail_1053.html
http://www.cnblogs.com/beiyan/p/6248187.html

