Spring+SpringMVC+Mybatis(SSM)框架搭建教程(三)-配置文件详解
背景
上一篇《Spring+SpringMVC+Mybatis(SSM)框架搭建教程(二)-创建项目》已将框架依赖包导入、完成基础配置编写,本篇我们详细说明SSM框架关键的配置代码。
依赖配置
项目依赖配置主要填写框架依赖包,在上一节中已经全部讲述完成,此处略过。
web应用配置
web应用配置主要是web.xml,在上一节中将MVC控制转发DispatcherServlet配置好,基本可以完成功能。剩下的主要是拦截器、字符编码过滤器、异常控制等,此处先略过。
SpringMVC配置
SpringMVC配置主要针对请求过程中的交互处理,类似于Struts控制器。对应在框架中的配置文件是spring-mvc.xml。
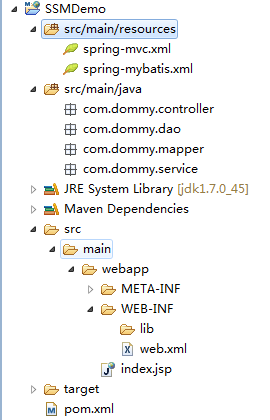
由于SSM框架中我们一般习惯使用注解,注解的扫描需要配置在spring-mvc.xml中,在此之前,我们先在项目的src/main/java目录下新建好各个层的基本包名。如下图:

先建四个包,包括交互、业务、数据接口、数据映射文件四个包:
- com.dommy.controller 交互处理包
- com.dommy.service 业务包
- com.dommy.dao 数据库接口包
- com.dommy.mapper 数据库sql映射包
接下来分解spring-mvc.xml配置:
1、外框架
xml声明和使用的schema,基本都是标准的内容,没什么要改的。
<beans xmlns="http://www.springframework.org/schema/beans"
    xmlns:xsi="http://www.w3.org/2001/XMLSchema-instance" xmlns:p="http://www.springframework.org/schema/p"
    xmlns:context="http://www.springframework.org/schema/context"
    xmlns:mvc="http://www.springframework.org/schema/mvc"
    xsi:schemaLocation="http://www.springframework.org/schema/beans
                        http://www.springframework.org/schema/beans/spring-beans-3.1.xsd
                        http://www.springframework.org/schema/context
                        http://www.springframework.org/schema/context/spring-context-3.1.xsd
                        http://www.springframework.org/schema/mvc
                        http://www.springframework.org/schema/mvc/spring-mvc-4.0.xsd">
beans>
2、注解扫描
指示SpringMVC应扫描对应包下的注解。
<context:component-scan base-package="com.dommy.controller" />
<context:component-scan base-package="com.dommy.service" />
3、请求映射配置
配置AnnotationMethodHandlerAdapter,实现请求路径映射、防止ajax的文本被当做文件来下载。
<bean id="mappingJackson2HttpMessageConverter"
    class="org.springframework.http.converter.json.MappingJackson2HttpMessageConverter">
    <property name="supportedMediaTypes">
        <list>
            <value>text/html;charset=UTF-8value>
        list>
    property>
bean>


<bean
    class="org.springframework.web.servlet.mvc.annotation.AnnotationMethodHandlerAdapter">
    <property name="messageConverters">
        <list>
            <ref bean="mappingJackson2HttpMessageConverter" />
        list>
    property>
bean>
4、注解驱动配置
填入mvc:annotation-driven,会自动注册RequestMappingHandlerMapping与RequestMappingHandlerAdapter两个Bean,这是Spring MVC为@Controller分发请求所必需的,并且提供了数据绑定支持。
<mvc:annotation-driven />5、静态资源路径
配置过静态资源路径后,在静态资源路劲下的资源SpringMVC将会放开管理权限,默认直接返回资源。我们在webapp目录下新建resources文件夹,后续的css和图片、js等都放在这里。
<mvc:resources mapping="/resources/**" location="/resources/" />6、视图配置
配置请求返回的页面路径,视图可以是jsp、ftl等,本框架中使用传统的jsp。我们在webapp目录下新建pages文件夹,后续的jsp都放置在这里。
<bean
    class="org.springframework.web.servlet.view.InternalResourceViewResolver">

    <property name="prefix" value="/pages/" />

    <property name="suffix" value=".jsp" />
bean>
视图的前后缀与视图名放在一起组成完整的文件访问路径,返回内容给用户。后续在示例中给出说明。
7、文件上传配置(可选)
如果有文件上传的话,还需要配置文件上传控制器。
<bean id="multipartResolver"
    class="org.springframework.web.multipart.commons.CommonsMultipartResolver">

    <property name="defaultEncoding" value="utf-8" />

    <property name="maxUploadSize" value="10485760000" />

    <property name="maxInMemorySize" value="1" />
bean>
Mybatis配置
Mybatis与Spring整合有现成的依赖包,上节中已经列出。现在只需要在spring-mybatis配置文件中做好配置就行了。
1、外框架
xml定义和schema声明。
<beans xmlns="http://www.springframework.org/schema/beans"
    xmlns:xsi="http://www.w3.org/2001/XMLSchema-instance" xmlns:p="http://www.springframework.org/schema/p"
    xmlns:context="http://www.springframework.org/schema/context"
    xmlns:mvc="http://www.springframework.org/schema/mvc"
    xsi:schemaLocation="http://www.springframework.org/schema/beans
                        http://www.springframework.org/schema/beans/spring-beans-3.1.xsd
                        http://www.springframework.org/schema/context
                        http://www.springframework.org/schema/context/spring-context-3.1.xsd
                        http://www.springframework.org/schema/mvc
                        http://www.springframework.org/schema/mvc/spring-mvc-4.0.xsd">
beans>
2、数据库连接配置文件
1)我们把数据库连接做为单独的配置文件jdbc.properties,这样比较方便维护(上线与测试等),具体情况看需要。
jdbc.properties文件内容:
driver=com.mysql.jdbc.Driver

#数据库连接配置
url=jdbc:mysql://localhost:3306/ssm_demo?useUnicode=true&characterEncoding=utf8&autoReconnect=true
username=uname
password=pwd

#定义初始连接数
initialSize=0
#定义最大连接数
maxTotal=20
#定义最大空闲
maxIdle=20
#定义最小空闲
minIdle=1
#定义最长等待时间
maxWaitMillis=60000
#空闲回收期运行周期(60秒)
timeBetweenEvictionRunsMillis=60000
2)将配置文件导入到spring-mybatis.xml中。
程序运行时自动将配置参数带入。
<bean id="propertyConfigurer"
    class="org.springframework.beans.factory.config.PropertyPlaceholderConfigurer">
    <property name="location" value="classpath:jdbc.properties" />
bean>
3、连接属性配置
<bean id="dataSource" class="org.apache.commons.dbcp2.BasicDataSource"
    destroy-method="close">
    <property name="driverClassName" value="${driver}" />

    <property name="initialSize" value="${initialSize}" />

    <property name="maxTotal" value="${maxTotal}" />

    <property name="maxIdle" value="${maxIdle}" />

    <property name="minIdle" value="${minIdle}" />

    <property name="maxWaitMillis" value="${maxWaitMillis}" />

    <property name="testWhileIdle" value="true" />

    <property name="timeBetweenEvictionRunsMillis" value="${timeBetweenEvictionRunsMillis}" />

    <property name="validationQuery" value="SELECT 1" />

    <property name="testOnBorrow" value="false" />

    <property name="url" value="${url}" />
    <property name="username" value="${username}" />
    <property name="password" value="${password}" />
bean>
3、注册SqlSessionFactory
Spring和Mybatis整合、注册dao层所在包、注册mapper文件位置等。
<bean id="sqlSessionFactory" class="org.mybatis.spring.SqlSessionFactoryBean">
    <property name="dataSource" ref="dataSource" />
    <property name="configLocation" value="classpath:sqlMapConfig.xml">property>

    <property name="mapperLocations" value="classpath:com/dommy/mapper/*.xml">property>
bean>


<bean class="org.mybatis.spring.mapper.MapperScannerConfigurer">
    <property name="basePackage" value="com.dommy.dao" />
    <property name="sqlSessionFactoryBeanName" value="sqlSessionFactory">property>
bean>
其中sqlMapConfig.xml主要是用来做别名映射的,也可以不加,文件内容:
<configuration>

    <settings>
        <setting name="logImpl" value="LOG4J"/>
    settings>


configuration>
4、配置事务管理类
数据连接事务管理配置。
<bean id="transactionManager"
    class="org.springframework.jdbc.datasource.DataSourceTransactionManager">
    <property name="dataSource" ref="dataSource" />
bean>
结语
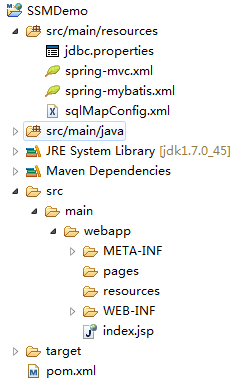
至此,关于SSM三大框架整合的配置文件基本讲解完毕,此时项目的目录如下:

下一篇将采用一个简单的应用实例讲解此框架下的应用功能开发方法。
源码下载
项目源码下载地址:
http://download.csdn.net/download/ahuyangdong/10262363
GitHub地址:
https://github.com/ahuyangdong/SSMDemo