前言
最近在一个webflux项目中使用spring-boot-actuator提供的健康检查端点时出了点问题,故对spring-boot-actuator的项目构造,工作原理进行了全面的梳理,标题之所以写明health的工作原理,是因为spring-boot-actuator着实是个大工程,除了提供health端点,还包含了env,log,dump等诸多功能,下面会侧重health健康检查部分,详细探索下。
actuator功能和集成分离
一般在spring boot中使用actuator的时候,会引入下面这个starter
    org.springframework.boot
    spring-boot-starter-actuator
在这个starter里面会包含两个依赖,一个是功能实现spring-boot-actuator
      org.springframework.boot
      spring-boot-actuator
      2.1.0.RELEASE
还有一个是和spring boot做集成的config配置,以及Bean自动装配的依赖,如下:
      org.springframework.boot
      spring-boot-actuator-autoconfigure
      2.1.0.RELEASE
actuator自动装载
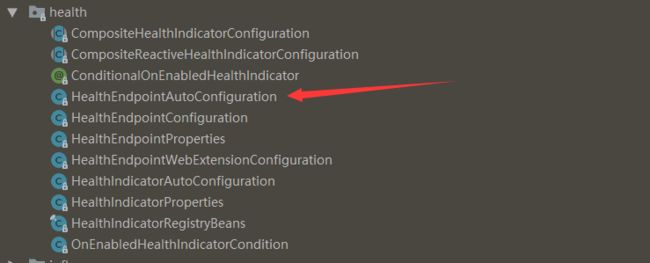
找到spring-boot-actuator-autoconfigure依赖,定位到org.springframework.boot.actuate.autoconfigure.health包下,有如下的结构:
如箭头所指向的HealthEndpointAutoConfiguration.java自动配置类就是actuator中health的启动入口,源码如下:
@Configuration
@EnableConfigurationProperties({ HealthEndpointProperties.class,
      HealthIndicatorProperties.class })
@AutoConfigureAfter(HealthIndicatorAutoConfiguration.class)
@Import({ HealthEndpointConfiguration.class,
      HealthEndpointWebExtensionConfiguration.class })
public class HealthEndpointAutoConfiguration {

}
阅读上面代码需要了解spring boot自动装载机制,这里简单解读下,首先@Configuration开启了配置特性,@EnableConfigurationProperties启用了健康检查端点、健康检查指示器的属性配置,@AutoConfigureAfter定义了健康检查自动装配要在HealthIndicatorAutoConfiguration之后,@Import包含了两个自动装载类,下面详解下三个主要的配置类:
健康检查指示器配置(HealthIndicatorAutoConfiguration)
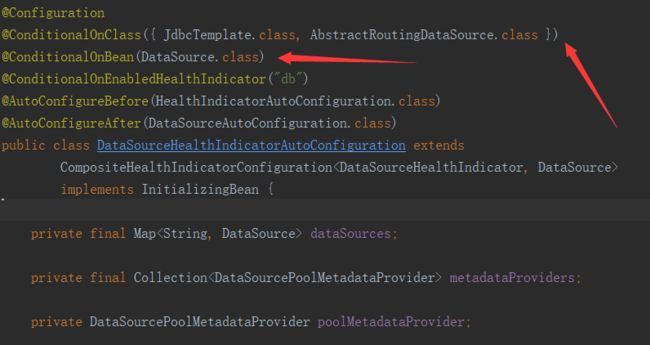
健康检查指示器定义了哪些组件需要被检测,常见的指示器有JDBC数据源(DataSourceHealthIndicator.java),磁盘健康指示器(DiskSpaceHealthIndicator.java)等。每个指示器对应了一个自动装配的类,根据Bean初始化条件去初始化,如JDBC数据源的初始化条件如下:
当上Spring上下文中包含DataSource实施,即开启JDBC健康检查指示器。这些指示器最终会被收集到指示器注册器中DefaultHealthIndicatorRegistry.java
健康检查指示器配置就是完成了指示器注册器的初始化动作,代码如:
	@Bean
	@ConditionalOnMissingBean(HealthIndicatorRegistry.class)
	public HealthIndicatorRegistry healthIndicatorRegistry(
			ApplicationContext applicationContext) {
		return HealthIndicatorRegistryBeans.get(applicationContext);
	}
    ——————————————————————————————————————————————————————————————————————————————————————————————
	public static HealthIndicatorRegistry get(ApplicationContext applicationContext) {
		Map indicators = new LinkedHashMap<>();
		indicators.putAll(applicationContext.getBeansOfType(HealthIndicator.class));
		if (ClassUtils.isPresent("reactor.core.publisher.Flux", null)) {
			new ReactiveHealthIndicators().get(applicationContext)
					.forEach(indicators::putIfAbsent);
		}
		HealthIndicatorRegistryFactory factory = new HealthIndicatorRegistryFactory();
		return factory.createHealthIndicatorRegistry(indicators);
	}
可以看到,就是去Spring 应用上下文ApplicationContext中找Bean类型是HealthIndicator.class的实例,如果项目中使用了webFlux,会额外注册Reactive相关的指示器
健康检查端点配置
端点配置比较简单,就是实例化一个HealthEndpoint.java,最终健康检查所有的功能入口都会被抽象汇聚到这个实例里,配置代码如下:
@Configuration
@ConditionalOnSingleCandidate(HealthIndicatorRegistry.class)
class HealthEndpointConfiguration {

	@Bean
	@ConditionalOnMissingBean
	@ConditionalOnEnabledEndpoint
	public HealthEndpoint healthEndpoint(HealthAggregator healthAggregator,
			HealthIndicatorRegistry registry) {
		return new HealthEndpoint(
				new CompositeHealthIndicator(healthAggregator, registry));
	}
}
可以看到前提条件是已经有一个健康指示注册器单例实例了
health健康检查实现
在spring-boot-actuator中,定义了@Endpoint注解,用以声明一个actuator端点,health端点也是一样,通过@Endpoint(id="health")暴露了/actuator/health接口。并通过@ReadOperation注解映射了三个方法,如下:
- Health health()
访问http://127.0.0.1:8080/actuator/health时会执行这个方法,调用所有的健康指示器实现,并返回结果
- Health healthForComponent(@Selector String component)
访问http://127.0.0.1:8080/actuator/health/${component}时会执行这个方法,会根据component的值,找到相关的指示器,并检查返回结果
- Health healthForComponentInstance(@Selector String component, @Selector String instance)
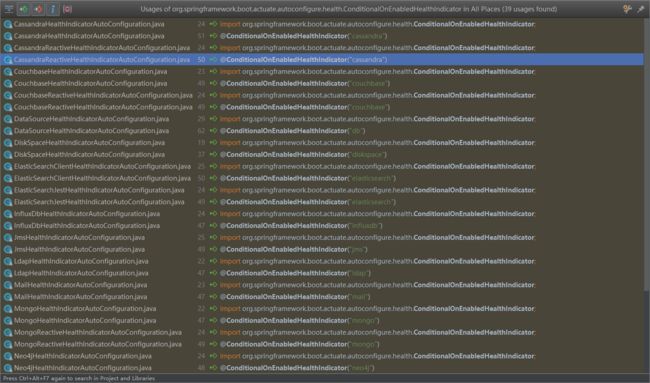
访问http://127.0.0.1:8080/actuator/health/${component}/${instance}时会执行这个方法,会根据component、instance的值,找到相关的指示器,并检查返回结果。其中component是组件的name,instance是组件实例的name值。component的name由执行器组件配置类上的注解@ConditionalOnEnabledHealthIndicator来指定,目前包含的指示器组件有如:
我们以redis的指示器RedisHealthIndicator.java来看下,最终指示器是怎么判断组件是否健康的,实现如:
public class RedisHealthIndicator extends AbstractHealthIndicator {

	static final String VERSION = "version";

	static final String REDIS_VERSION = "redis_version";

	private final RedisConnectionFactory redisConnectionFactory;

	public RedisHealthIndicator(RedisConnectionFactory connectionFactory) {
		super("Redis health check failed");
		Assert.notNull(connectionFactory, "ConnectionFactory must not be null");
		this.redisConnectionFactory = connectionFactory;
	}

	@Override
	protected void doHealthCheck(Health.Builder builder) throws Exception {
		RedisConnection connection = RedisConnectionUtils
				.getConnection(this.redisConnectionFactory);
		try {
			if (connection instanceof RedisClusterConnection) {
				ClusterInfo clusterInfo = ((RedisClusterConnection) connection)
						.clusterGetClusterInfo();
				builder.up().withDetail("cluster_size", clusterInfo.getClusterSize())
						.withDetail("slots_up", clusterInfo.getSlotsOk())
						.withDetail("slots_fail", clusterInfo.getSlotsFail());
			}
			else {
				Properties info = connection.info();
				builder.up().withDetail(VERSION, info.getProperty(REDIS_VERSION));
			}
		}
		finally {
			RedisConnectionUtils.releaseConnection(connection,
					this.redisConnectionFactory);
		}
	}

}
可以看到,首先判断了连接的类型时集群模式还是单机模式,然后分别调用了info指令,去拿redis的版本信息
自定义健康检查指示器
了解到这里,自定义实现一个组件的健康检查就容易了。首先自定义指示器继承AbstractHealthIndicator类,实现doHealthCheck方法,然后定义自定义指示器的配置类继承CompositeHealthIndicatorConfiguration就ok了,伪代码如下:
@ConditionalOnEnabledHealthIndicator("myDb")
@Configuration
public class MyHealthIndicatorAutoConfiguration extends CompositeHealthIndicatorConfiguration {

    @Bean
    @ConditionalOnMissingBean(name = "myDbHealthIndicator")
    public HealthIndicator dbHealthIndicator() {
        return new MyHealthIndicator();
    }
}
class MyHealthIndicator extends AbstractHealthIndicator{
    @Override
    protected void doHealthCheck(Health.Builder builder) {
        //这里定义组建健康的逻辑
        builder.up();
    }
}
health其他使用细节
除了上面提到的健康检查不只/actuator/health端点,还能指定组件检查外,还提供了很多可以通过配置控制的特性,如指示器的开关,什么时候显示健康检查详情等,具体如下:
management.endpoints.web.base-path=/actuator
management.endpoint.health.enabled=true
management.endpoint.health.show-details=never
management.endpoint.health.roles=admin
management.health.db.enabled=true
文末结语
本着用好每一个组件,不放过任何一个实现细节的原则,对spring-boot-actuator中的health实现原理剖析了下。不过actuator真的是个大家伙,光健康检查指示器就有18个实现,特别要说明下的是,针对health,在做健康检查指示器时,会区分web和webFlux。主要原因是在webFlux的环境下,相关的组件也会出Reactive的客户端,比如redis在webFlux下就可以使用Lettuce。
作者简介:
陈凯玲,2016年5月加入凯京科技。现任凯京科技研发中心架构组经理,救火队队长。独立博客KL博客(http://www.kailing.pub)博主。


