在工作中,很多时候会有读取系统通讯录的需求.尤其是一些IM相关的项目.
我们公司的几个项目都是IM相关的,所以自然免不了这块儿的内容.用到的地方多了,所以就自己简单地封装了一个工具类来读取.
首先,要实现的需求如下
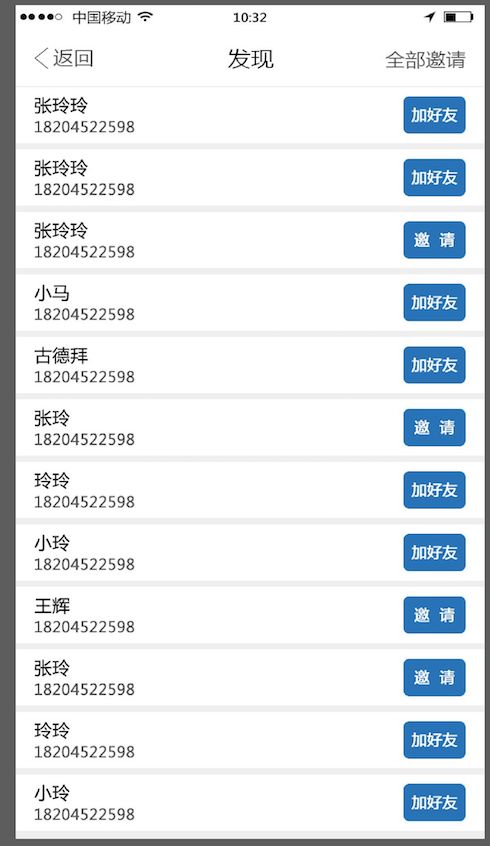
这个界面布局是很简单的.实现这个功能无非三步:
1.获取通讯录的联系人数据
2.将获取的联系人数据上传服务器(服务器要对每个联系人进行判断处理,以便实现 加好友 或 邀请下载APP的功能)
3.从服务器拉去联系人数据,根据拉去到的数据做显示操作
可以看出这三步中,2.3是相对简单的.比较复杂的就是第一步了,获取系统的通讯录联系人数据.那么,如何获取系统通讯录数据呢,接下来,就让我们来仔细梳理一下iOS中如何获取系统通讯录吧.
首先,读取系统通讯录要导入与通讯录相关的库.鉴于ios9之前和之后与通讯录相关的库发生了改变,同时如果要兼容ios8的话,就得同时导入这两个头文件:
//ios9之前
#import
//ios9之后
#import
接下来呢,我们知道苹果是非常注重用户隐私的,所以程序在试图访问通讯录时都得先经过用户的授权,而系统的授权只有一次.那么如何获取用户授权呢,直接上代码
#pragma mark---获取授权---
- (void)getAuthoriseWithSuccess:(void (^)(void))success failed:(void (^)(void))failed {

    if (TMiOS8) {

        [self getAuthoriseBeforeIos_9WithSuccess:success failed:failed];

    }else if(TMiOS9){

        [self getAuthoriseAfterIos_9WithSuccess:success failed:failed];
    }

}
#pragma mark---ios9之前获取授权---
- (void)getAuthoriseBeforeIos_9WithSuccess:(void (^)(void))success failed:(void (^)(void))failed {

    //获取授权状态
    ABAuthorizationStatus status = ABAddressBookGetAuthorizationStatus();

    if (status ==  kABAuthorizationStatusNotDetermined) {

        //The user has not yet made a choice regarding whether this app can access the data class.(用户尚未作出选择,关于此应用程序是否可以访问数据类。)

        ABAddressBookRef book =   ABAddressBookCreateWithOptions(NULL, NULL);
        ABAddressBookRequestAccessWithCompletion(book, ^(bool granted, CFErrorRef error) {

            if (granted) {

                TMLog(@"授权成功!");
                GCDMainBlock(success);

            }else{

                TMLog(@"授权失败!");
                CGDMainBack;
            }

        });
    }
    else if (status == kABAuthorizationStatusAuthorized) {

        //This application is authorized to access the data class. (此应用程序被授权访问数据类。)
        GCDMainBlock(success);

    }
    else if (status == kABAuthorizationStatusDenied) {

        //The user explicitly denied access to the data class for this application.(用户明确拒绝此应用程序访问数据类。)
        GCDMainBlock(failed);
    }
    else if (status == kABAuthorizationStatusRestricted) {

        //This application is not authorized to access the data class. The user cannot change this application’s status, possibly due to active restrictions such as parental controls being in place.(此应用程序未授权访问数据类。用户不能更改此应用程序的状态,可能是由于活动限制)
        GCDMainBlock(failed);
    }
}
#pragma mark---ios9之后获取通讯录授权---
- (void)getAuthoriseAfterIos_9WithSuccess:(void (^)(void))success failed:(void (^)(void))failed {

    //获取授权状态
    CNAuthorizationStatus status = [CNContactStore authorizationStatusForEntityType:CNEntityTypeContacts];

    if (status == CNAuthorizationStatusNotDetermined) {

        //The user has not yet made a choice regarding whether the application may access contact data.(还未对应用程序进行过获取联系人授权的选择) 请求系统授权(系统授权弹框仅有一次)
        CNContactStore *store = [[CNContactStore alloc] init];

        [store requestAccessForEntityType:CNEntityTypeContacts completionHandler:^(BOOL granted, NSError * _Nullable error) {
            if (granted) {

                TMLog(@"授权成功!");
                GCDMainBlock(success);

            }else{

                TMLog(@"授权失败!");
                CGDMainBack;
            }
        }];

    }else if (status == CNAuthorizationStatusAuthorized) {

        //The application is authorized to access contact data.(用户授权应用程序访问联系人数据)
        GCDMainBlock(success);

    }else if (status == CNAuthorizationStatusDenied) {

        //The user explicitly denied access to contact data for the application.(用户明确拒绝应用程序访问联系人数据。)
        GCDMainBlock(failed);

    }else if (status == CNAuthorizationStatusRestricted) {

        //The application is not authorized to access contact data.The user cannot change this application’s status, possibly due to active restrictions such as parental controls being in place.(应用程序没有权限访问联系人数据.并且用户无法更改应用程序的权限状态,可能是由于某种活动限制)
        GCDMainBlock(failed);
    }
}
两个block参数分别是判断系统授权成功与否的回调.当判断授权成功时调用success,授权失败时调用faild.
这里有个问题,可以发现我在调用block的时候,套用了事先用宏定义的方法,为什么呢?是因为在程序调试过程中我发现明明已经授权成功了,但是却迟迟不能完成界面跳转,后来找来公司同事帮忙找bug,发现获取授权是新开了异步线程,而授权成功之后迟迟没有响应则是因为新开的异步线程还未销毁,所以这里就手动调用方法让它回到主线程(我也不知道这样说对不对,有哪里不对的地方还请指正~手动比心)
#pragma mark - GCD Block
#define GCDBlock(block) dispatch_async(dispatch_get_global_queue(DISPATCH_QUEUE_PRIORITY_DEFAULT, 0), block)
#define GCDMainBlock(block) dispatch_async(dispatch_get_main_queue(),block)
#define CGDMainBack GCDMainBlock(^(){})
完成这一步之后,关于系统通讯录的授权部分我们就已经可以实现了.只要用该封装好的单例类调用获取授权的方法就好了.
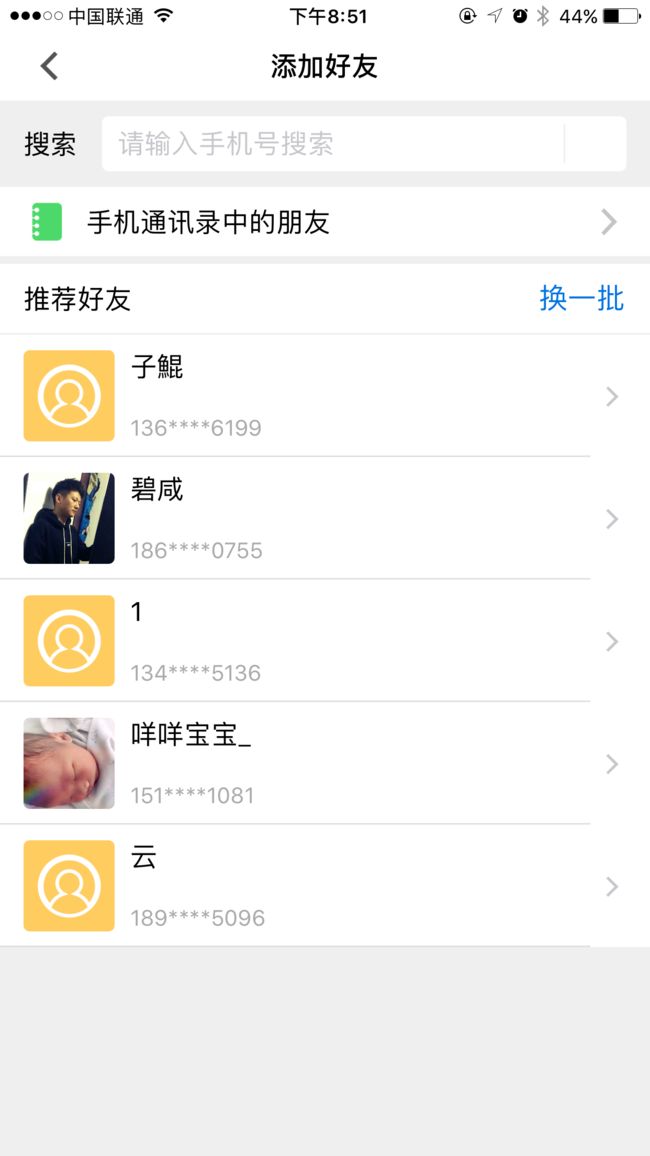
在以上添加好友界面点击"手机通讯录中的朋友"时写如下代码即可
[[TMAddressBookTool shareTool] getAuthoriseWithSuccess:^{
//授权成功
//跳转界面
[self openViewControllerByPush:[[SFAddressBookTableVC alloc] init]];
} failed:^{
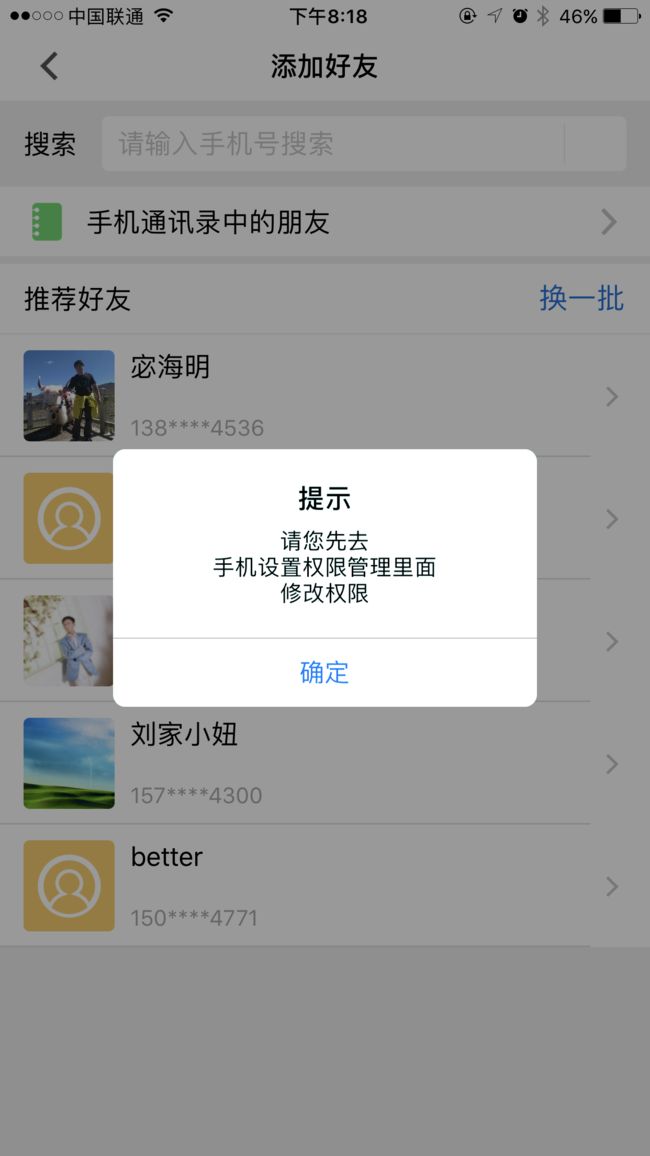
//授权失败 提示授权失败 同时跳转到设置界面更改权限
[self showAlertWithTitle:@"提示" message:@"请您先去\n手机设置权限管理里面\n修改权限" confirmTitle:@"确定" isCancel:NO queding:^{
[[UIApplication sharedApplication] openURL:[NSURL URLWithString:UIApplicationOpenSettingsURLString]];
} cancel:nil];
}];
如果是第一次授权,那么会弹出如下弹框
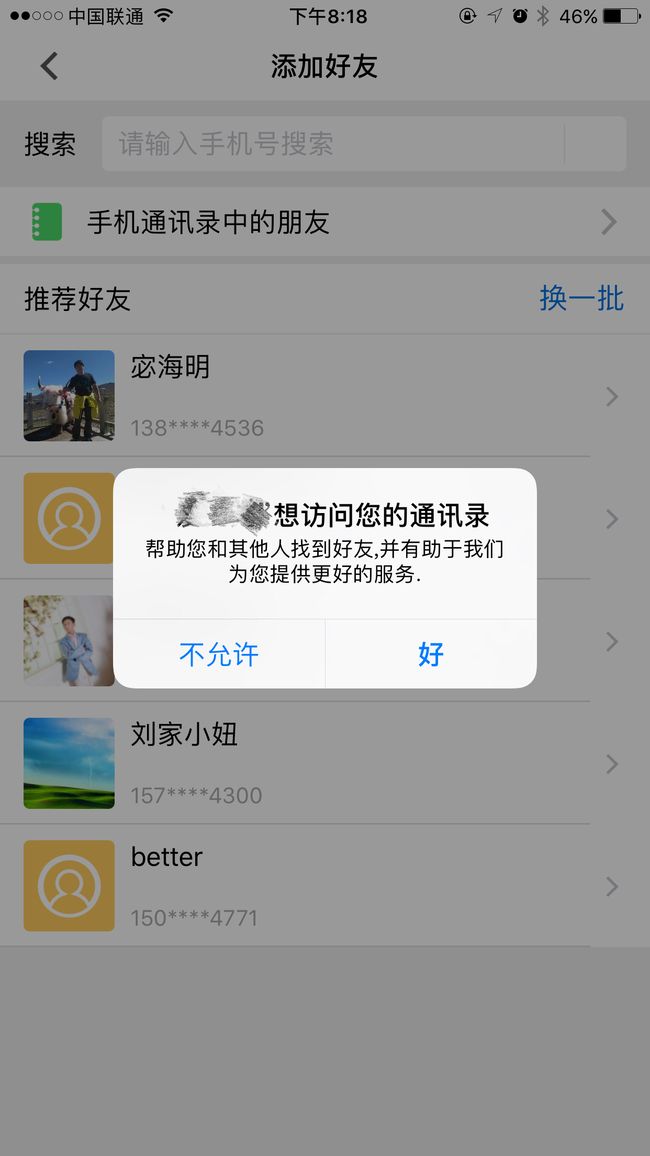
点击"不允许"时弹框消失,不再有后续反应.此时如若再次点击"手机通讯录中的朋友",就会走失败回调,给用户比较友好的提示,如下图所示,我们公司的需求是点击弹框中的"确定"按钮后跳转到设置界面以便让用户更改授权状态.
点击"好"之后会回调授权成功的block,进行页面跳转.
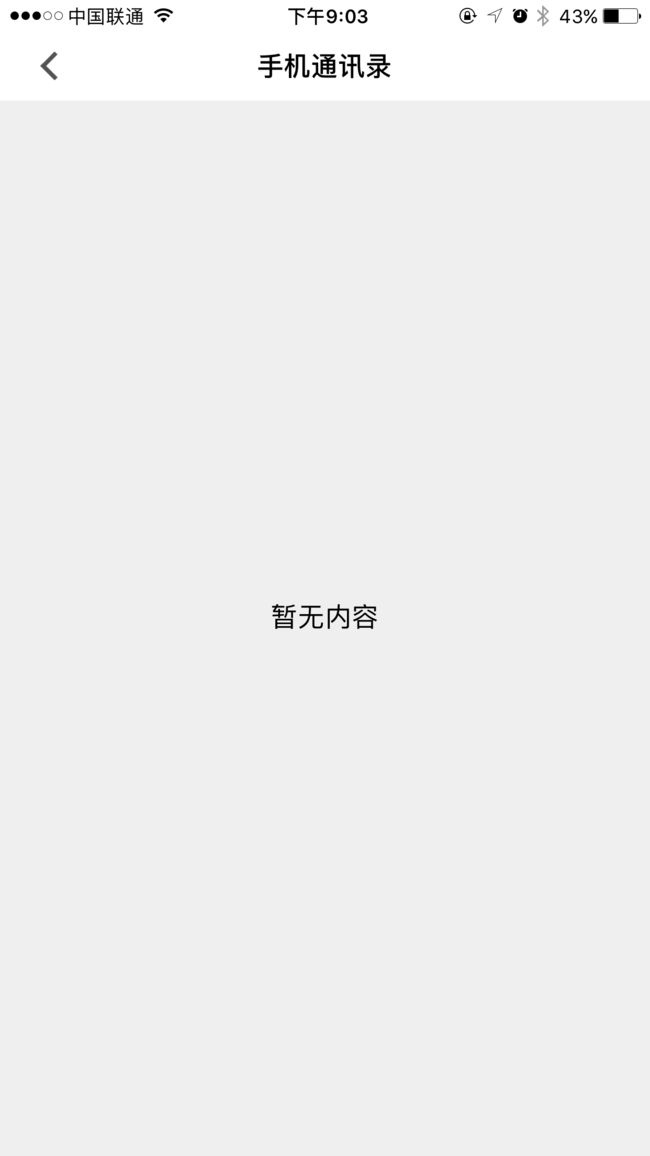
哈哈哈哈,我刚换了手机,通讯录什么的没导进来,也就是说我的手机通讯录里面什么都没有哈.接下来我们谈谈在这个界面要做哪些操作呢.其实这个界面要做的在文章一开始就已经说过了.
1.获取通讯录的联系人数据
2.将获取的联系人数据上传服务器(服务器要对每个联系人进行判断处理,以便实现 加好友 或 邀请下载APP的功能)
3.从服务器拉去联系人数据,根据拉去到的数据做显示操作
我们重点来说第一点,之前写的那一堆内容都是第一点的铺垫.下面开始介绍如何获取通讯录的联系人数据.
#pragma mark---读取通讯录---
//返回联系人数组 并将联系人数组转化为json字符串
- (NSString *)readAddressBook {

    NSArray *addressBook = [NSArray array];
    if (TMiOS8) {

        addressBook = [self readAddressBookBeforeIos_9];

    }else if(TMiOS9) {

        addressBook = [self readAddressBookAfterIos_9];

    }
    //将通讯录跟本地记录做比较并且保存
    return [self getJsonStr:addressBook.copy];

}
#pragma mark---读取通讯录 ios9之前---
- (NSArray *)readAddressBookBeforeIos_9 {

    NSMutableArray *addressBook = [[NSMutableArray alloc] init];

    //创建一个通讯录实例
    ABAddressBookRef book =   ABAddressBookCreateWithOptions(NULL, NULL);

    //获取联系人总数
    CFArrayRef  allpeople =  ABAddressBookCopyArrayOfAllPeople(book);
    CFIndex count =  CFArrayGetCount(allpeople);

    //遍历
    for (CFIndex i = 0; i  0 && name.length == 0) {

        name = phone;
    }
    //当电话不为空时 将当前电话号码添加到电话数组中
    if (phone.length > 0) {

        [phoneArray addObject:phone];
    }
}
#pragma mark---当电话数组不为空时,以字典形式包装联系人名称和电话数组,同时将字典添加到预先创建的可变数组中---
- (void)judgePhoneArray:(NSMutableArray *)phoneArray contactsArray:(NSMutableArray *)contactsArray name:(NSString *)name {

    if (phoneArray.count > 0) {

        //(我们跟后台定好的字段是"memo"/"mobile",这里具体按你们自己的字段为准)
        NSDictionary *contactInfo =  @{@"mobile": phoneArray,@"memo": name};
        [contactsArray addObject:contactInfo];
    }
}
#pragma mark---将联系人数组转换成json字符串---
- (NSString *)getJsonStr:(NSArray *)contacts {

    NSData *data = [NSJSONSerialization dataWithJSONObject:contacts options:NSJSONWritingPrettyPrinted error:nil];
    NSString *jsonStr = [[NSString alloc] initWithData:data encoding:NSUTF8StringEncoding];
    jsonStr = [jsonStr stringByReplacingOccurrencesOfString:@"\n" withString:@""];
    jsonStr = [jsonStr stringByReplacingOccurrencesOfString:@" " withString:@""];

    return jsonStr;
}

#pragma mark---处理电话号码---
- (NSString *)getStandardPhoneNum: (NSString *)phoneStr {

    phoneStr = [phoneStr stringByReplacingOccurrencesOfString:@"-" withString:@""];
    phoneStr = [phoneStr stringByReplacingOccurrencesOfString:@"(" withString:@""];
    phoneStr = [phoneStr stringByReplacingOccurrencesOfString:@")" withString:@""];
    phoneStr = [phoneStr stringByReplacingOccurrencesOfString:@" " withString:@""];
    phoneStr = [phoneStr stringByReplacingOccurrencesOfString:@"+" withString:@""];

    return phoneStr;
}
也就是说在"手机通讯录"界面写如下代码就可以拿到你的通讯录的所有联系人了
//这里你拿到的addressBookStr就是通讯录的所有联系人的json字符串
NSString *addressBookStr = [[SFAddressBookTool shareTool] readAddressBook];
下一步就可以上传通讯录了,上传成功之后再调用获取通讯录的接口,这样就能从后台拿到关于你的手机通讯录中的某个人是否注册过该应用以便于做对应的显示.