使用 Kotlin 开发 Android 应用 | 8 个最优秀的 Android Studio 插件 Kotlin Android 素材...
butterknife
http://jakewharton.github.io/butterknife/
Annotate fields with @BindView and a view ID for Butter Knife to find and automatically cast the corresponding view in your layout.
class ExampleActivity extends Activity {
@BindView(R.id.title) TextView title;
@BindView(R.id.subtitle) TextView subtitle;
@BindView(R.id.footer) TextView footer;
@Override public void onCreate(Bundle savedInstanceState) {
super.onCreate(savedInstanceState);
setContentView(R.layout.simple_activity);
ButterKnife.bind(this);
// TODO Use fields...
}
}
Instead of slow reflection, code is generated to perform the view look-ups. Calling bind delegates to this generated code that you can see and debug.
The generated code for the above example is roughly equivalent to the following:
public void bind(ExampleActivity activity) {
activity.subtitle = (android.widget.TextView) activity.findViewById(2130968578);
activity.footer = (android.widget.TextView) activity.findViewById(2130968579);
activity.title = (android.widget.TextView) activity.findViewById(2130968577);
}
RESOURCE BINDING
Bind pre-defined resources with @BindBool, @BindColor, @BindDimen, @BindDrawable, @BindInt, @BindString, which binds an R.bool ID (or your specified type) to its corresponding field.
class ExampleActivity extends Activity {
@BindString(R.string.title) String title;
@BindDrawable(R.drawable.graphic) Drawable graphic;
@BindColor(R.color.red) int red; // int or ColorStateList field
@BindDimen(R.dimen.spacer) Float spacer; // int (for pixel size) or float (for exact value) field
// ...
}
NON-ACTIVITY BINDING
You can also perform binding on arbitrary objects by supplying your own view root.
public class FancyFragment extends Fragment {
@BindView(R.id.button1) Button button1;
@BindView(R.id.button2) Button button2;
@Override public View onCreateView(LayoutInflater inflater, ViewGroup container, Bundle savedInstanceState) {
View view = inflater.inflate(R.layout.fancy_fragment, container, false);
ButterKnife.bind(this, view);
// TODO Use fields...
return view;
}
}
Another use is simplifying the view holder pattern inside of a list adapter.
public class MyAdapter extends BaseAdapter {
@Override public View getView(int position, View view, ViewGroup parent) {
ViewHolder holder;
if (view != null) {
holder = (ViewHolder) view.getTag();
} else {
view = inflater.inflate(R.layout.whatever, parent, false);
holder = new ViewHolder(view);
view.setTag(holder);
}
holder.name.setText("John Doe");
// etc...

return view;
}
static class ViewHolder {
@BindView(R.id.title) TextView name;
@BindView(R.id.job_title) TextView jobTitle;
public ViewHolder(View view) {
  ButterKnife.bind(this, view);
}
}
}
You can see this implementation in action in the provided sample.
Calls to ButterKnife.bind can be made anywhere you would otherwise put findViewById calls.
Other provided binding APIs:
Bind arbitrary objects using an activity as the view root. If you use a pattern like MVC you can bind the controller using its activity with ButterKnife.bind(this, activity).
Bind a view's children into fields using ButterKnife.bind(this). If you use
VIEW LISTS
You can group multiple views into a List or array.
@BindViews({ R.id.first_name, R.id.middle_name, R.id.last_name })
List
The apply method allows you to act on all the views in a list at once.
ButterKnife.apply(nameViews, DISABLE);
ButterKnife.apply(nameViews, ENABLED, false);
Action and Setter interfaces allow specifying simple behavior.
static final ButterKnife.Action
@Override public void apply(View view, int index) {
view.setEnabled(false);
}
};
static final ButterKnife.Setter
@Override public void set(View view, Boolean value, int index) {
view.setEnabled(value);
}
};
An Android Property can also be used with the apply method.
ButterKnife.apply(nameViews, View.ALPHA, 0.0f);
LISTENER BINDING
Listeners can also automatically be configured onto methods.
@OnClick(R.id.submit)
public void submit(View view) {
// TODO submit data to server...
}
All arguments to the listener method are optional.
@OnClick(R.id.submit)
public void submit() {
// TODO submit data to server...
}
Define a specific type and it will automatically be cast.
@OnClick(R.id.submit)
public void sayHi(Button button) {
button.setText("Hello!");
}
Specify multiple IDs in a single binding for common event handling.
@OnClick({ R.id.door1, R.id.door2, R.id.door3 })
public void pickDoor(DoorView door) {
if (door.hasPrizeBehind()) {
Toast.makeText(this, "You win!", LENGTH_SHORT).show();
} else {
Toast.makeText(this, "Try again", LENGTH_SHORT).show();
}
}
Custom views can bind to their own listeners by not specifying an ID.
public class FancyButton extends Button {
@OnClick
public void onClick() {
// TODO do something!
}
}
BINDING RESET
Fragments have a different view lifecycle than activities. When binding a fragment in onCreateView, set the views to null in onDestroyView. Butter Knife returns an Unbinder instance when you call bind to do this for you. Call its unbind method in the appropriate lifecycle callback.
public class FancyFragment extends Fragment {
@BindView(R.id.button1) Button button1;
@BindView(R.id.button2) Button button2;
private Unbinder unbinder;
@Override public View onCreateView(LayoutInflater inflater, ViewGroup container, Bundle savedInstanceState) {
View view = inflater.inflate(R.layout.fancy_fragment, container, false);
unbinder = ButterKnife.bind(this, view);
// TODO Use fields...
return view;
}
@Override public void onDestroyView() {
super.onDestroyView();
unbinder.unbind();
}
}
OPTIONAL BINDINGS
By default, both @Bind and listener bindings are required. An exception will be thrown if the target view cannot be found.
To suppress this behavior and create an optional binding, add a @Nullable annotation to fields or the @Optional annotation to methods.
Note: Any annotation named @Nullable can be used for fields. It is encouraged to use the @Nullable annotation from Android's "support-annotations" library.
@Nullable @BindView(R.id.might_not_be_there) TextView mightNotBeThere;
@Optional @OnClick(R.id.maybe_missing) void onMaybeMissingClicked() {
// TODO ...
}
MULTI-METHOD LISTENERS
Method annotations whose corresponding listener has multiple callbacks can be used to bind to any one of them. Each annotation has a default callback that it binds to. Specify an alternate using the callback parameter.
@OnItemSelected(R.id.list_view)
void onItemSelected(int position) {
// TODO ...
}
@OnItemSelected(value = R.id.maybe_missing, callback = NOTHING_SELECTED)
void onNothingSelected() {
// TODO ...
}
BONUS
Also included are findById methods which simplify code that still has to find views on a View, Activity, or Dialog. It uses generics to infer the return type and automatically performs the cast.
View view = LayoutInflater.from(context).inflate(R.layout.thing, null);
TextView firstName = ButterKnife.findById(view, R.id.first_name);
TextView lastName = ButterKnife.findById(view, R.id.last_name);
ImageView photo = ButterKnife.findById(view, R.id.photo);
Add a static import for ButterKnife.findById and enjoy even more fun.
Download
GRADLE
compile 'com.jakewharton:butterknife:(insert latest version)'
annotationProcessor 'com.jakewharton:butterknife-compiler:(insert latest version)'
License
Copyright 2013 Jake Wharton
Licensed under the Apache License, Version 2.0 (the "License");
you may not use this file except in compliance with the License.
You may obtain a copy of the License at
http://www.apache.org/licenses/LICENSE-2.0
Unless required by applicable law or agreed to in writing, software
distributed under the License is distributed on an "AS IS" BASIS,
WITHOUT WARRANTIES OR CONDITIONS OF ANY KIND, either express or implied.
See the License for the specific language governing permissions and
limitations under the License.
8 个最优秀的 Android Studio 插件
Android Studio是目前Google官方设计的用于原生Android应用程序开发的IDE。基于JetBrains的IntelliJ IDEA,这是Google I/O 2013第一个宣布的作为Eclipse的继承者,深受广大Android社区的欢迎。在经过漫长的测试阶段后,最终版本于去年12月发布。
Android Studio是一个功能全面的开发环境,装备了为各种设备——从智能手表到汽车——开发Android应用程序所需要的所有功能。不但总是有改进的余地,Android Studio还提供了对第三方插件的支持,下面本文将列出一些最有用的插件。
- H.A.X.M(硬件加速执行管理器)
如果你想使用Android模拟器更快地执行应用程序,那么H.A.X.M是你的最佳选择。H.A.X.M提供Android SDK模拟器在英特尔系统中的硬件加速。我认为H.A.X.M是最有用的插件,因为它能让Android开发人员尽快地在模拟器上运行最新的Android版本。
安装H.A.X.M
打开Android SDK管理器,选择“Intel x86 Emulator Accelerator (HAXM installer)”,接受许可并安装软件包。
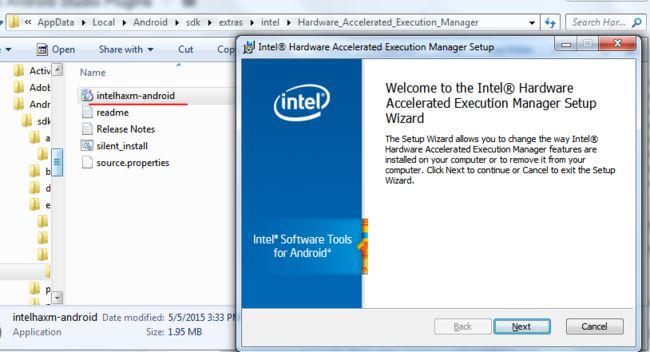
这个进程只是下载软件包,还没有安装。为了完成安装到图片所示的SDK路径C:\Users\Administrator\AppData\Local\Android\sdk
(安装在Windows机器上)并找到下载的文件夹。我的是:C:\Users\Administrator\AppData\Local\Android\sdk\extras\intel
. 打开安装文件Hardware_Accelerated_Execution_Manager,单击可执行的intelhaxm-android,继续安装。完成此安装后,你就可以使用该模拟器了。
- genymotion
Genymotion是测试Android应用程序,使你能够运行Android定制版本的旗舰工具。它是为了VirtualBox内部的执行而创建的,并配备了一整套与虚拟Android环境交互所需的传感器和功能。使用Genymotion能让你在多种虚拟开发设备上测试Android应用程序,并且它的模拟器比默认模拟器要快很多。
如果你想要确保你开发的应用程序能够在所有支持的设备上流畅地运行,但在特定设备上排除错误有困难时,那就应该好好利用这款伟大的插件。
想要安装Genymotion,可以参见以前发布过的教程。 - Android Drawable Importer
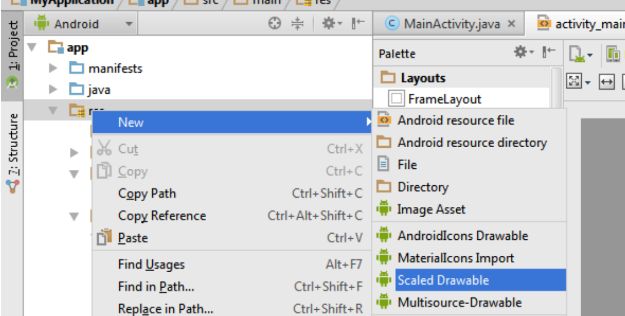
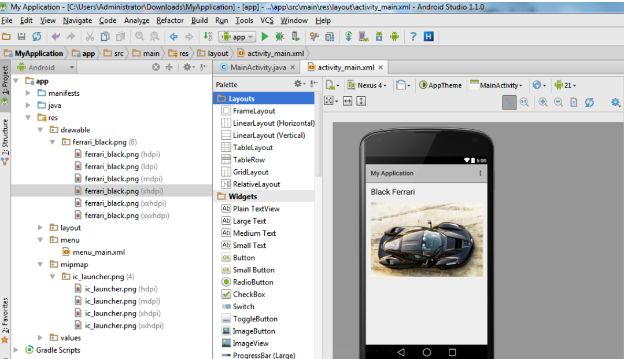
为了适应所有Android屏幕的大小和密度,每个Android项目都会包含drawable文件夹。任何具备Android开发经验的开发人员都知道,为了支持所有的屏幕尺寸,你必须给每个屏幕类型导入不同的画板。Android Drawable Importer插件能让这项工作变得更容易。它可以减少导入缩放图像到Android项目所需的工作量。Android Drawable Importer添加了一个在不同分辨率导入画板或缩放指定图像到定义分辨率的选项。这个插件加速了开发人员的画板工作。
安装Android Drawable Importer
- Android ButterKnife Zelezny
Android ButterKnife是一个“Android视图注入库”。它提供了一个更好的代码视图,使之更具可读性。 ButterKnife能让你专注于逻辑,而不是胶合代码用于查找视图或增加侦听器。用ButterKnife编程,你必须对任意对象进行注入,注入形式是这样的:
@InjectView(R.id.title) TextView title;
Android ButterKnife Zelezny是一款Android Studio插件,用于在活动、片段和适配器中,从所选的XML布局文件生成ButterKnife注入。该插件提供了生成XML对象注入的最快方式。如果只是一两个注入,那么这样写是没有问题的,但如果你有很多要写,那就需要参考所有的注入,将它们编写到源文件中。
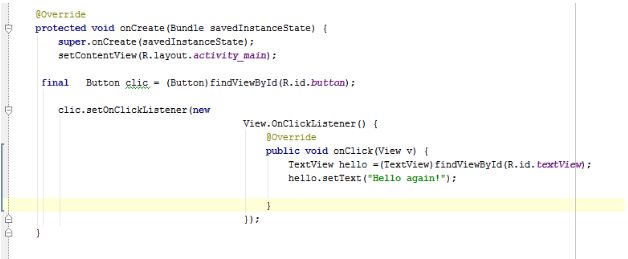
下面是一个代码在使用Android ButterKnife之前的样子的例子:
以及使用之后:
安装ButterKnife Zelezny:
- Android Holo Colors Generator
开发Android应用程序需要伟大的设计和布局。Android Holo Colors Generator则是定制符合喜好的Android应用程序的最简单方法。Android Holo Colors Generator是一个允许你为你的应用程序随心所欲地创建Android布局组件的插件。此插件会生成所有必要的可在项目中使用的相关的XML画板和样式资源。
安装 Holo Colors Generator:
- Robotium Recorder
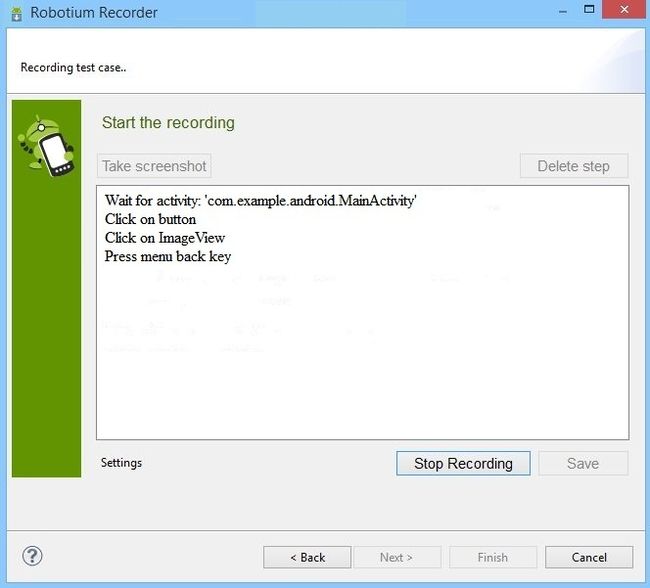
Robotium Recorder是一个自动化测试框架,用于测试在模拟器和Android设备上原生的和混合的移动应用程序。Robotium Recorder可以让你记录测试案例和用户操作。你也可以查看不同Android活动时的系统功能和用户测试场景。
Robotium Recorder能让你看到当你的应用程序运行在设备上时,它是否能按预期工作,或者是否能对用户动作做出正确的回应。如果你想要开发稳定的Android应用程序,那么此插件对于进行彻底的测试很有帮助。
下面是一个例子,是我的应用程序使用Robotium Recorder时的样子:
想要安装Robotium Recorder,请登录它的官方页面,并根据你的操作系统的版本在安装区域选择Robotium Recorder。
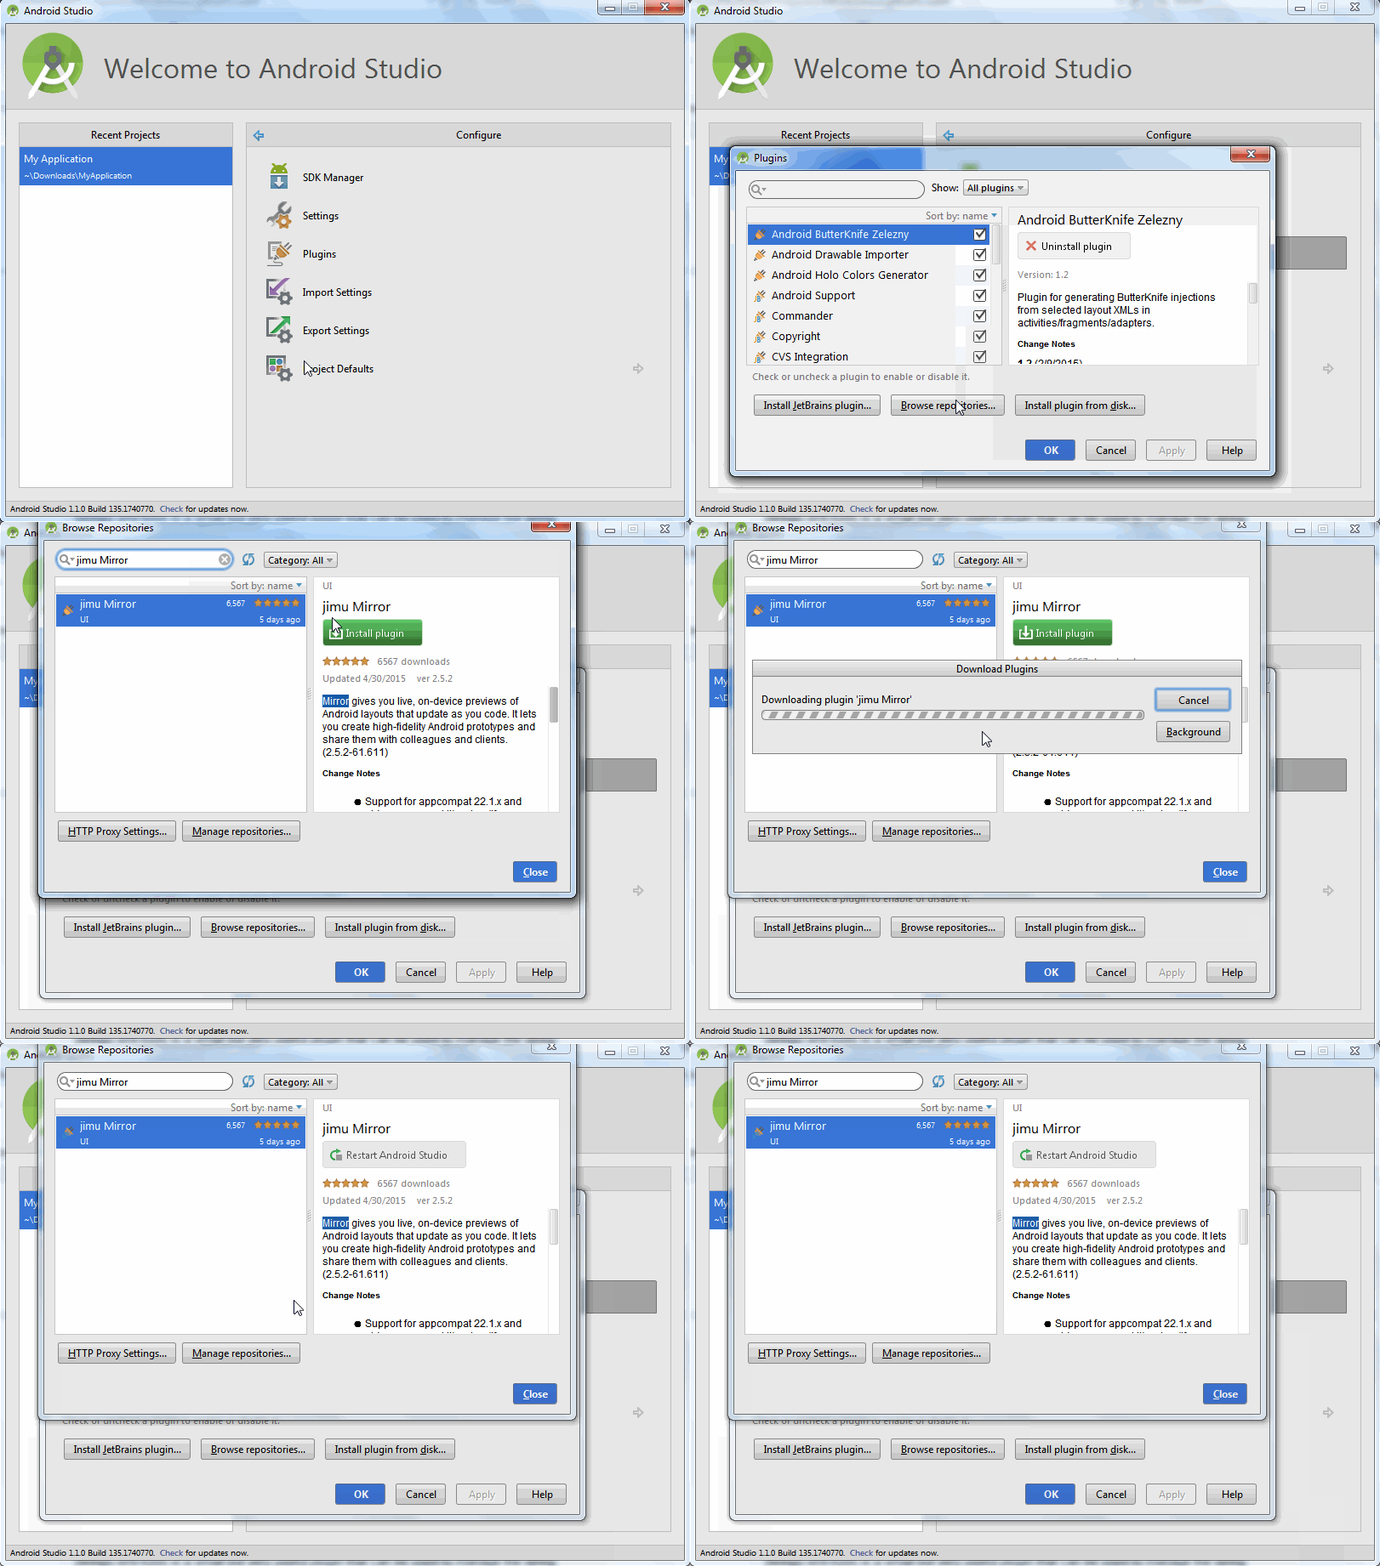
7.jimu Mirror
Android Studio配备了一个可视化的布局编辑器。但是一个静态的布局预览有时候对于开发人员而言可能还不够,因为静态预览不能预览动画、颜色和触摸区域,所以jimu Mirror来了,这是一个可以让你在真实的设备上迅速测试布局的插件。jimu Mirror允许在设备上预览随同编码更新的Android布局。
安装jimu Mirror:
8.Strings-xml-tools
Strings-xml-tools是一个虽小但很有用的插件,可以用来管理Android项目中的字符串资源。它提供了排序Android本地文件和添加缺少的字符串的基本操作。虽然这个插件是有限制的,但如果应用程序有大量的字符串资源,那这个插件就非常有用了。
安装Android Strings.xml tools:
您有更优秀的Android Studio插件吗,欢迎在留言中告诉我们。
译文链接:http://www.codeceo.com/article/8-android-studio-plugins.html英文原文:The Top 8 Plugins for Android Studio
https://jitpack.io/
一、简介:
Kotlin 是一个基于 JVM 的新的编程语言,由 JetBrains 开发。JetBrains,作为目前广受欢迎的 Java IDE IntelliJ 的提供商,在 Apache 许可下已经开源其Kotlin 编程语言。
可以理解为类似于iOS的Swift。
二、特性:
轻量级:这一点对于Android来说非常重要。项目所需要的库应该尽可能的小。Android对于方法数量有严格的限制,Kotlin只额外增加了大约6000个方法。
互操作:Kotlin可与Java语言无缝通信。这意味着我们可以在Kotlin代码中使用任何已有的Java库;因此,即便这门语言还很年轻,但却已经可以使用成百上千的库了。除此之外,Kotlin代码还可以为Java代码所用,这意味着我们可以使用这两种语言来构建软件。你可以使用 Kotlin开发新特性,同时使用Java实现代码基的其他部分。
强类型:我们很少需要在代码中指定类型,因为编译器可以在绝大多数情况下推断出变量或是函数返回值的类型。这样就能获得两个好处:简洁与安全。
Null安全:Java最大的一个问题就是null。如果没有对变量或是参数进行null判断,那么程序当中就有可能抛出大量的 NullPointerException,然而在编码时这些又是难以检测到的。Kotlin使用了显式的null,这会强制我们在必要时进行null检查。
三、Android Studio中的配置
注意:
Android Studio是Intellij IDEA的插件实现,Intellij IDEA是由JetBrains开发,Kotlin 就是JetBrains创造的。所以,要想使用Kotlin,你必须先使用起来Android Stduio。
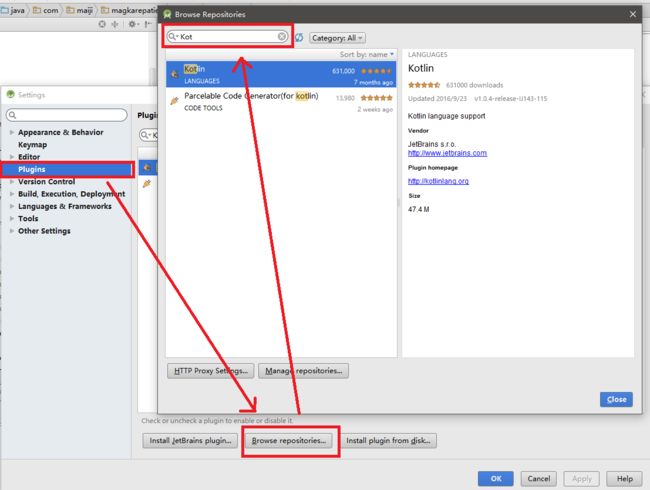
1、安装插件 选择这里的Kotlin相关的插件安装,有些文档中介绍有2个插件,其实目前这一个包含另一个了,所以安装一个就行,安装完之后会要求你重新打开Android Studio。
2、重启完Android Studio之后在任意一个包下右键New , 会发现多了一个"Kotlin File/Class" 和 "Kotlin Activity"
3、"Kotlin File/Class"即 Kotlin类或者文件
"Kotlin Activity"即 Kotlin的Activity类
4、试着建一个"Kotlin File/Class" 文件
发现右上角有一个配置选项“Configure” , 默认第一次使用都需要配置一下
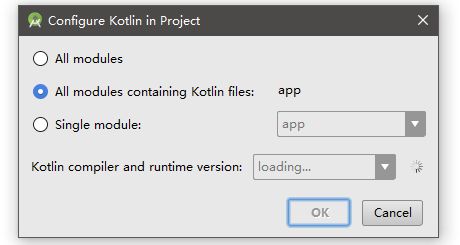
选择对所有modules配置还是对指定的配置
选择OK后,会跳到build.gradle文件下,你会发现app下的build.gradle和根目录下的build.gradle文件都会出现变化
注意黄色背景部分,没有的自己手动添加上去。
根目录下的build.gradle:
buildscript { ext.kotlin_version = '1.1.2-4' ext.support_version = '23.1.1' ext.anko_version = '0.8.2' repositories { jcenter() } dependencies { classpath 'com.android.tools.build:gradle:2.1.0' classpath "org.jetbrains.kotlin:kotlin-gradle-plugin:$kotlin_version" // NOTE: Do not place your application dependencies here; they belong // in the individual module build.gradle files }}allprojects { repositories { jcenter() }}task clean(type: Delete) { delete rootProject.buildDir}
app目录下的build.gradle:
apply plugin: 'com.android.application'apply plugin: 'kotlin-android'apply plugin: 'kotlin-android-extensions'android { compileSdkVersion 25 buildToolsVersion "25.0.3" defaultConfig { applicationId "com.xqx.xautoviewgroup" minSdkVersion 15 targetSdkVersion 23 versionCode 1 versionName "1.0" } lintOptions { abortOnError false } buildTypes { debug { // 显示Log buildConfigField "boolean", "LOG_DEBUG", "true" versionNameSuffix "-debug" minifyEnabled false zipAlignEnabled false shrinkResources false signingConfig signingConfigs.debug } release { // 不显示Log buildConfigField "boolean", "LOG_DEBUG", "false" //混淆 minifyEnabled true //Zipalign优化 zipAlignEnabled true // 移除无用的resource文件 shrinkResources true //前一部分代表系统默认的android程序的混淆文件,该文件已经包含了基本的混淆声明,后一个文件是自己的定义混淆文件 proguardFiles getDefaultProguardFile('proguard-android.txt'), 'proguard-rules.pro' } } sourceSets { main.java.srcDirs += 'src/main/kotlin' }}dependencies { compile fileTree(dir: 'libs', include: ['*.jar']) testCompile 'junit:junit:4.12' compile 'com.android.support:appcompat-v7:25.3.1' compile 'com.android.support:design:25.3.1' compile 'com.android.support:support-v4:25.3.1' compile 'com.github.bumptech.glide:glide:3.6.1' compile 'com.jph.takephoto:takephoto_library:4.0.3' compile "org.jetbrains.kotlin:kotlin-stdlib:$kotlin_version" compile "org.jetbrains.anko:anko-common:$anko_version"}repositories { mavenCentral()}
接下来就可以进行Kotlin的编码实战了。
浅谈Kotlin(一):简介及Android Studio中配置
浅谈Kotlin(二):基本类型、基本语法、代码风格
使用Kotlin&Anko, 扔掉XML开发Android应用
尝鲜使用Kotlin写了一段时间Android。说大幅度的减少了Java代码一点不夸张。用Java的时候动不动就new一个OnClickListener()匿名类,动不动就类型转换的地方都可以省下很多。更不用说特殊的地方使用data class更是少些不知道多少代码。
Jetbrains给Android带来的不仅是Kotlin,还有Anko。从Anko的官方说明来看这是一个雄心勃勃的要代替XML写Layout的新的开发方式。Anko最重要的一点是引入了DSL(Domain Specific Language)的方式开发Android界面布局。当然,本质是代码实现布局。不过使用Anko完全不用经历Java纯代码写Android的痛苦。因为本身是来自Kotlin的,所以自然的使用这种方式开发就具有了:
类型安全,不再需要那么多的findById()之后的类型转换。
null安全,Kotlin里,如果一个变量用?表示为可空,并且使用?之后再调用的时候,即使变量为空也不会引发异常。
无需设备解析XML,因为Anko本质是代码实现的界面和布局,所以省去了这些麻烦。
代码复用,可以通过继承AnkoComponent的方式实现代码复用。XML布局是每一个Activity,每一个View各自专属一个,
代码复用比较少。
来一个列子看一下。为了不太墨迹,一些不必要的xml声明此处略去。
relativeLayout {
val textView = textView("Sample text view") {
textSize = 25f
}.lparams {
width = matchParent
alignParentTop()
}
    button("Sample button").lparams {
        width = matchParent
        below(textView)
    }
}
准备工作
首先,安装一个Kotlin的插件是必须的。有了这个插件才可以使用Kotlin,然后才可以使用Anko。安装这个插件和Android Studio里安装别的插件市一样的。只需要使用Kotlin查找就可以找到,之后安装即可。
在build.gradle里添加下面的代码:
dependencies {
compile 'org.jetbrains.anko:anko-sdk15:0.8.3' // sdk19, sdk21, sdk23 are also available
compile 'org.jetbrains.anko:anko-support-v4:0.8.3' // In case you need support-v4 bindings
compile 'org.jetbrains.anko:anko-appcompat-v7:0.8.3' // For appcompat-v7 bindings
}
然后sync一把。配置的问题解决。
写一个ListView热身
首先创建一个ListView的item点击之后跳转的activity。这里叫做TabDemo1。
现在就创建这个listview,并在listview的item点击之后调转到相应的activity去。
这个listview非常简单,只在一个竖直的布局中放置,并且宽度和高度都是填满竖直
布局。
// 1
verticalLayout {
    padding = dip(16)
    // 2
    val list = listView() {
        // 3
        adapter = ArrayAdapter(this@MainActivity, android.R.layout.simple_list_item_1, items)
        // 4
        onItemClickListener = object : AdapterView.OnItemClickListener {
            override fun onItemClick(parent: AdapterView<*>?, v: View?, position: Int, id: Long) {
                when (position) {
                    0 -> {
                        // 5
                        startActivity()
                    }
                }
            }
        }
    }.lparams(width = matchParent) { // 6
        height = matchParent
    }
}
分别解释:
竖直布局。本质是LinearLayout,并且orientation的值为vertical。但是
水平方向的就没有vetialLayout这种可以直接使用的了,需要自己写明orientation。
创建一个listview。
给这个listview添加adapter。这里简单实用ArrayAdapter
添加OnItemClickListener。object : AdapterView.OnItemClickListener用来
创建实现某个接口的匿名类。
startActivity
可以直接简化为startActivity
在lparams中设置layout params相关的内容。默认的都是wrap content。这个设置为
宽、高都为match parent。
用Fragment写一个Tab布局
热身结束。我们来开始真正的开发阶段。
下面要开发的是一个日记App。一共有三个tab,第一个是日记列表,第二个tab是写日记,第三个tab可以设置一些字体大小等(这里只用来占位,不做实现)。
每一个tab都用一个Fragment来展示内容。这三个tab分别HomeListFragment, DetailFragment,DiarySettingsFragment。这个三个fragment都在一个叫做TabDemo1的托管Activity里。
现在就从这个托管activity:TabDemo1开始。这里我们不使用默认的ActionBar,而是用完全自定义的方式来写一个我们自己的action bar。所以需要把界面设定为全屏模式。设置全屏的模式的方法有很多,我们用设置style的方式来实现。
之后把这个style应用在activity在AndroidManifest.xml配置中。
这个时候这个托管activity的界面布局就是一个完全的白板了。这个白板现在要分为上中下三部分。上部为我们自定义的action bar,最下面的是tab bar,剩下的部分就是每个tab的内容的fragment。
我们来看一下这个布局应该怎么写:
// 1
relativeLayout {
    id = ID_RELATIVELAYOUT

    backgroundColor = Color.LTGRAY

    // 2
    linearLayout {
        id = ID_TOP_BAR
        backgroundColor = ContextCompat.getColor(ctx, R.color.colorPrimary)
        orientation = LinearLayout.HORIZONTAL

        titleTextView = textView {
            text = "Some Title"
            textSize = 16f
            textColor = Color.WHITE
            gravity = Gravity.CENTER_HORIZONTAL or Gravity.CENTER_VERTICAL
        }.lparams {
            width = dip(0)
            height = matchParent
            weight = 1f
        }
    }.lparams {
        width = matchParent
        height = dip(50)
        alignParentTop()
    }

    // 3
    linearLayout {
        id = ID_BOTTOM_TAB_BAR
        orientation = LinearLayout.HORIZONTAL
        backgroundColor = Color.WHITE

        // 4
        homeListTab = weightTextView {
            text = "List"
            normalDrawable = resources.getDrawable(R.mipmap.tab_my_normal)
            selectedDrawable = resources.getDrawable(R.mipmap.tab_my_pressed)
            onClick { tabClick(0) }
        }

        detailTab = weightTextView {
            text = "Detail"
            normalDrawable = resources.getDrawable(R.mipmap.tab_channel_normal)
            selectedDrawable = resources.getDrawable(R.mipmap.tab_channel_pressed)
            onClick { tabClick(1) }
        }

        settingsTab = weightTextView {
            text = "Settings"
            normalDrawable = resources.getDrawable(R.mipmap.tab_better_normal)
            selectedDrawable = resources.getDrawable(R.mipmap.tab_better_pressed)
            onClick { tabClick(2) }
        }

    }.style { // 5
        view ->
        when (view) {
            is TextView -> {
                view.padding = dip(5)
                view.compoundDrawablePadding = dip(3)
                view.textSize = 10f
                view.gravity = Gravity.CENTER
            }
            else -> {
            }
        }
    }.lparams {
        height = dip(50)
        width = matchParent
        alignParentBottom()
    }

    // 6
    fragmentContainer = frameLayout {
        id = ID_FRAMELAYOUT
        backgroundColor = Color.GREEN
    }.lparams {
        below(ID_TOP_BAR)
        above(ID_BOTTOM_TAB_BAR)
        width = matchParent
        height = matchParent
    }
}
前文的例子用了一个verticalLayout, 这里用的是relativeLayout的布局。
这里是自定义action bar。使用换一个linearLayout。如前所述,要横向布局linear layout
就需要单独的指定orientation:orientation =LinearLayout.HORIZONTAL。这里比较简单,只有一个显示title的text view。
这里需要注意gravity = Gravity.CENTER_HORIZONTAL or Gravity.CENTER_VERTICAL
可以直接写成gravity = Gravity.CENTER。这里是为了突出or的用法。Kotlin里的or
就是java的|操作符的作用。
这部分的布局是tab bar。
这里用的是weightTextView而不是textView。后面会详细的讲解这一部分。
给tab bar添加style。此style不是彼style。这个style,会遍历tab bar的linear layout内部的全部的view,然后根据when表达式匹配对应的规则,之后给对应于规则的view设置相应的属性。比如,这里会用when语句查看view是否为textView,如果是的话就给这个view设置padding、drawable padding、text size以及gravity属性。tab bar的linear layout有三个text view,所以他们都会被设置这些属性。
每一个tab的内容展示用fragment就是这里了。准确的说是fragment的container。
这个container是一个framelayout。在action bar之下,在tab bar之上。在布局的时候有below(ID_TOP_BAR), above(ID_BOTTOM_TAB_BAR)。ID_TOP_BAR和ID_BOTTOM_TAB_BAR就分别是action bar和tab bar的id值。这些id值自由设定。
另外,在java写的时候常用的findViewById()方法在Kotlin和Anko中可以改为的find
上文第4点用到了weightTextView。这是一个自定义的view。在Anko布局中,可以根据自己的需要自定义各种各样的view。但是,需要经过一个小小的处理之后才可以使用到Anko的布局中。这个小小的处理就叫做扩展。下面看看如何给Anko添加weightTextView扩展的。
首先自定义一个view:WeightTextView。
class WeightTextView(context: Context) : TextView(context) {
var normalDrawable: Drawable? = null
var selectedDrawable: Drawable? = null
    init {
        var layoutParams = LinearLayout.LayoutParams(dip(50),
                LinearLayout.LayoutParams.MATCH_PARENT, 1f)
        layoutParams.weight = 1f
        this.layoutParams = layoutParams
    }

    override fun setSelected(selected: Boolean) {
        super.setSelected(selected)

        if (selected) {
            this.backgroundColor = ContextCompat.getColor(context, R.color.textGray)
            this.textColor = ContextCompat.getColor(context, R.color.textYellow)

            if (selectedDrawable != null) {
                this.setCompoundDrawablesWithIntrinsicBounds(null, selectedDrawable, null, null)
            }
        } else {
            this.backgroundColor = ContextCompat.getColor(context, android.R.color.transparent)
            this.textColor = ContextCompat.getColor(context, R.color.textGray)
            if (normalDrawable != null) {
                this.setCompoundDrawablesWithIntrinsicBounds(null, normalDrawable, null, null)
            }
        }
    }
}
附加解释:
方法setSelected()是被迫添加的。在使用Anko,相当于使用代码开发Android布局的时候selector不起作用。只好把点击后的高亮效果写在自定义的text view里。
下面看看如何扩展Anko,来使用我们上面的自定义view。
public inline fun ViewManager.weightTextView() = weightTextView {}
public inline fun ViewManager.weightTextView(init: WeightTextView.() -> Unit) = ankoView({ WeightTextView(it) }, init)
这部分涉及到的语法内容可以参考官网。
这里简单介绍一下。拿官网的例子说一下:
class HTML {
fun body() { ... }
}
现在有这么一个HTML类,那么调用的时候可以这样:
html {
body()
}
在这么一个lambda表达式里就可以直接这样调用HTML类的方法了,中间的过程是怎么样的呢
fun html(init: HTML.() -> Unit): HTML {
val html = HTML() // create the receiver object
html.init()
return html
}
其实灰常的简单呢。在方法html()里,参数是一个HTML类的扩展方法,并且此方法无参,返回Unit(java的void)。
在方法执行的过程中,首先初始化了HTML。之后调用了这个作为参数传入的扩展方法。在具体调用html()方法的时候,可以只简单写一个lambda表达式作为传入的HTML扩展方法。既然是一个类的扩展方法,那当然可以调用这个类内部的方法了。
为了帮助理解,这里给出一个参数是方法的方法:
fun main(args: Array
calling("yo") { p ->
println("method called $p")
}
calling("yoyo", ::called)
}
fun calling(param: String, func: (String) -> Unit) {
func(param)
}
fun called(p: String) {
println("output string $p")
}
第一个是用lambda表达式作为传入方法,第二个是已经定义好的一个方法作为传入方法。
Fragment的处理
本文中的重点在于使用Anko做布局,具体的逻辑处理java写和Kotlin写没有什么区别。这里只简单介绍一下。
为了保证兼容,这里使用Support v4来处理Fragment的显示等操作。在activity的一开始就把需要的fragemnt都加载进来。
fun prepareTabFragments() {
    val fm = supportFragmentManager
    homeListFragment = HomeListFragment.newInstance()
    fm.beginTransaction()
            .add(ID_FRAMELAYOUT, homeListFragment)
            .commit()
    detailFragment = DetailFragment.newInstance(null)
    detailFragment?.modelChangeListener = homeListFragment
    fm.beginTransaction()
            .add(ID_FRAMELAYOUT, detailFragment)
            .commit()
    settingsFragment = DiarySettingsFragment.newInstance()
    fm.beginTransaction()
            .add(ID_FRAMELAYOUT, settingsFragment)
            .commit()
}
每一个tab项被点击的时候的处理:
fun tabClick(index: Int) {
    info("index is $index")
    val ft = supportFragmentManager.beginTransaction()
    ft.hide(homeListFragment)
    ft.hide(detailFragment)
    ft.hide(settingsFragment)

    // unselect all textviews
    homeListTab?.isSelected = false
    detailTab?.isSelected = false
    settingsTab?.isSelected = false

    when (index) {
        0 -> {
            homeListTab?.isSelected = true
            ft.show(homeListFragment)
        }
        1 -> {
            detailTab?.isSelected = true
            ft.show(detailFragment)
        }
        2 -> {
            settingsTab?.isSelected = true
            ft.show(settingsFragment)
        }
        else -> {

        }
    }

    ft.commit()
}
分别开始每一个Fragment
在开始之前需要考虑一个很严重的事情:数据存在什么地方。本来应该是SQLite或者存在云上的。存在云裳就可以实现同一个账号登录在任何地方都可以同步到同样的内容。这里只简单模拟,存放在app的内存里。存放在Application派生类AnkoApplication的
静态属性diaryDataSource里。diaryDataSource是一个ArrayList一样的列表。
class AnkoApplication : Application() {
override fun onCreate() {
    super.onCreate()
}

companion object {
    var diaryDataSource = mutableListOf()
}
}
第一个tab,HomeListFragment
HomeListFragment类作为第一个tab内容展示fragment,用来显示全部的日记列表的布局就非常简单了,和我们前面的例子没有什么太大的差别。就是在一个verticalLayout里放一个list view。这个list view的data source只需要一个列表。
// 1
var view = with(ctx) {
    verticalLayout {
        backgroundColor = Color.WHITE

        listView = listView {
            adapter = ArrayAdapter(ctx,
                    android.R.layout.simple_list_item_1,
                    AnkoApplication.diaryDataSource)

            onItemClick { adapterView, view, i, l ->
                toast("clicked index: $i, content: ${AnkoApplication.diaryDataSource[i].toString()}")
            }
        }

        // 2
        emptyTextView = textView {
            text = resources.getString(R.string.list_view_empty)
            textSize = 30f
            gravity = Gravity.CENTER
        }.lparams {
            width = matchParent
            height = matchParent
        }
    }
}
// 3
listView?.emptyView = emptyTextView

return view
在activity里的布局可以直接写vertical{},但是在fragment里不可以这样。直接写vertical{}就已经把这个layout添加到父view上了,这fragment里是不行的。在fragment里需要创建一个单独的view,并返回。用with语句来创建这样一个单独的view。
在vertial layout里添加了一个textview。
上面一步创建的textview作为list view没有数据的时候显示的empty view来使用。
第二个tab,DetailFragment
日记的内容包括,日记title,日记本身的内容还有日记的日期。
所以布局上就包括日记的title、内容输入用的EditText以及为了说明用的text view,还有edit text里的hint。最后还有一个选择
日期的控件。
return with(ctx) {
    verticalLayout {
        padding = dip(10)
        backgroundColor = Color.WHITE
        textView("TITLE") {

        }.lparams(width = matchParent)

        titleEditText = editText {
            hint = currentDateString()
            lines = 1
        }.lparams(width = matchParent) {
            topMargin = dip(5)
        }

        textView("CONTENT") {

        }.lparams(width = matchParent) {
            topMargin = dip(15)
        }

        contentEditText = editText {
            hint = "what's going on..."
            setHorizontallyScrolling(false)
        }.lparams(width = matchParent) {
            //                    height = matchParent
            topMargin = dip(5)
        }

        button(R.string.button_select_time) {
            gravity = Gravity.CENTER
            onClick {
                val fm = activity.supportFragmentManager
                var datePicker = DatePickerFragment.newInstance(diaryModel?.date)
                datePicker.setTargetFragment(this@DetailFragment, DetailFragment.REQUEST_DATE)
                datePicker.show(fm, "date")
            }
        }
        // *
        button(R.string.button_detail_ok) {
            onClick {
                v ->
                println("ok button clicked")
                try {
                    var model = diaryModel!!
                    model.title = titleEditText?.text.toString()
                    model.content = contentEditText?.text.toString()
                    AnkoApplication.diaryDataSource.add(model)

                    modelChangeListener?.modelChanged()

                    toast(R.string.model_saved_ok)
                } catch(e: Exception) {
                    Log.d("##DetailFragment", "error: ${e.toString()}")
                    toast(R.string.model_save_error)
                }
            }
        }.lparams {
            topMargin = dip(10)
            width = matchParent
        }
    }.style {
        view ->
        when (view) {
            is Button -> {
                view.gravity = Gravity.CENTER
            }
            is TextView -> {
                view.gravity = Gravity.LEFT
                view.textSize = 20f
                view.textColor = Color.DKGRAY
            }
        }
    }
}
需要注意打星号的地方。按钮在点击之后会弹出一个dialog fragment来显示日期view。用户可以在这个日期view里选择相应的日期。但是,如何从日期dialog fragment传递选择的日期给DetailFragment呢?这里就涉及到两个fragment之间传递数据的问题。
选择日期的dialog fragment是DatePickerFragment。
var pickerView = DatePicker(activity)
pickerView.calendarViewShown = false
pickerView.layoutParams = ViewGroup.LayoutParams(ViewGroup.LayoutParams.WRAP_CONTENT,
        ViewGroup.LayoutParams.WRAP_CONTENT)
pickerView.init(year, month, day) {
    view, year, month, day ->
    mDate = GregorianCalendar(year, month, day).time

    arguments.putSerializable(EXTRA_DATE, mDate)
}

return AlertDialog.Builder(activity)
        .setView(pickerView)
        .setTitle(R.string.date_picker_title)
        .setPositiveButton(R.string.picker_button_ok) { dialog, which ->
            toast("hello world!")
            sendResult(Activity.RESULT_OK)
        }.create()
首先DatePickerFragment要继承DialogFragment之后override方法onCreateDialog(savedInstanceState: Bundle)。在这个方法里使用上面代码创建一个包含日期选择器的dialog。
在选择日期的时候,会触发DatePicker的OnDateChangedListener接口的onDateChanged方法。我们在这个方法里记录选择好的日期数据,在dialog的positive按钮点击之后把这个数据发送给DetailFragment。
那么怎么发送呢?使用target fargment方法。在detail fragment弹出dialog fragment的时候,把detail fragment设置为target fragment。
button(R.string.button_select_time) {
gravity = Gravity.CENTER
onClick {
val fm = activity.supportFragmentManager
var datePicker = DatePickerFragment.newInstance(diaryModel?.date)
// *
datePicker.setTargetFragment(this@DetailFragment, DetailFragment.REQUEST_DATE)
datePicker.show(fm, "date")
}
}
在标星下面的一行代码中。datePicker.setTargetFragment(this@DetailFragment,DetailFragment.REQUEST_DATE)将DetailFragment设定为target fragment,并且指定REQUEST_DATE这code,为以后取出数据使用。
companion object Factory {
    val REQUEST_DATE = 0`
}
在positive按钮点击之后执行方法sendResult回传数据
private fun sendResult(resultCode: Int) {
    if (targetFragment == null)
        return

    var i = Intent()
    i.putExtra(EXTRA_DATE, mDate)
    // *
    targetFragment.onActivityResult(targetRequestCode, resultCode, i)
}
调用targetFragment的onActivityResult()方法来回传日期数据。
在DetailFragment中通过override方法onActivityResult()来接收数据。
override fun onActivityResult(requestCode: Int, resultCode: Int, data: Intent?) {
    if (resultCode != Activity.RESULT_OK) {
        return
    }

    if (requestCode != REQUEST_DATE) {
        return
    }

    var date = data?.getSerializableExtra(DatePickerFragment.EXTRA_DATE) as Date
    diaryModel?.date = date
}
日期数据传输这部分到这里结束。
全文也可以在这里画上一个句点了。以上还有很多关于Anko没有使用的地方。Anko也是可以实现代码界面分离的。继承AnkoComponent可以写出独立的布局文件,并且可以用anko preview插件来预览界面效果。就拿setting这个tab的fragment来举例:
首先定义一个独立的布局文件:
class SettingsUI
override fun createView(ui: AnkoContext
verticalLayout {
backgroundColor = ContextCompat.getColor(ctx, R.color.SnowWhite)
textView { text = resources.getString(R.string.settings_title) }
        button("activity with the same `AnkoComponent`") {
            id = ID_BUTTON
        }
    }
}

companion object Factory {
    public val ID_BUTTON = 101
}
}
把这个布局文件用在DiarySettingsFragment上:
override fun onCreateView(inflater: LayoutInflater?, container: ViewGroup?,
    val view = SettingsUI().createView(AnkoContext.create(ctx, DiarySettingsFragment()))

    return view
}
然后这个布局还可以用在我们刚刚创建的TempActivity上:
override fun onCreate(savedInstanceState: Bundle?) {
super.onCreate(savedInstanceState)
SettingsUI().setContentView(this)
val button = find Activity上使用就简单很多了,只需要这么一句SettingsUI
代码在这里。除了布局Anko还有其他的一些语法糖糖也很是不错,不过这里就不多说了。有更多想了解的,请移步官网。
对于 Android 开发者而言,Kotlin 有很多优点。最明显的是它的类型系统和对空类型的处理,这迫使你在编码时指明哪些变量可为空,并在使用的时候遵循这个约定,之后编译器就会介入并确保对变量的赋值都是有效的。空指针异常[3]是我在 Android 应用程序中处理的最常见的异常类型。Kotlin 有助于公平的竞争环境。
Kotlin 另外一个显著的优点是具备扩展函数[4]的能力,通过给 Context,Activity 和 Date 类添加扩展函数,使得我的代码简洁了很多,同时变得更加易于阅读。
使用Kotlin开发Android
Kotlin非常适合开发Android应用程序,因为它在没有引入任何新的约束的情况下,将现代语言语言的所有优点带到Android平台上:
兼容性:Kotlin完全兼容JDK 6,可以顺利地确保Kotlin应用可以运行在更老的设备上。Kotlin工具在Android Studio中完全支持,且与Android构建系统兼容。
性能:由于两者非常相近得字节码结构,Kotlin应用程序可以运行得和Java一样快。随着Kotlin对内联函数的支持,相同的代码逻辑使用Lambads表达式比使用java的运行的更快。
互用性:Kotlin 100%可以和java互操作,这就允许Kotlin应用可以使用现有的Android库。同时它还引入了注解处理,这样数据绑定和Dagger也可以使用啦。
内存消耗:Kotlin有一个非常简洁的运行库,它会进一步地减少ProGuard的使用。在 实际项目中,Kotlin程序的运行只不过是添加了数百个方法和少于100k的apk文件的大小。
编译时间:Kotlin支持高效的增量编译(incremental compilation),因此在清理构建方面还需要额外的开销,增量版本通常与Java一样快或更快
学习曲线:对于Java开发者而言,上手Kotlin非常容易。内置的Kotlin插件可以自动地完成从Java到Kotlin的转换工作。另外,. Kotlin Koans 用一系列的可交互的练习,为我们掌握Kotlin语言的关键特征提供了指导。

