CollectionView 相关内容:
1. iOS 自定义图片选择器 3 - 相册列表的实现
2. UICollectionView自定义布局基础
3. UICollectionView自定义拖动重排
4. iOS13 中的 CompositionalLayout 与 DiffableDataSource
5. iOS14 中的UICollectionViewListCell、UIContentConfiguration 以及 UIConfigurationState
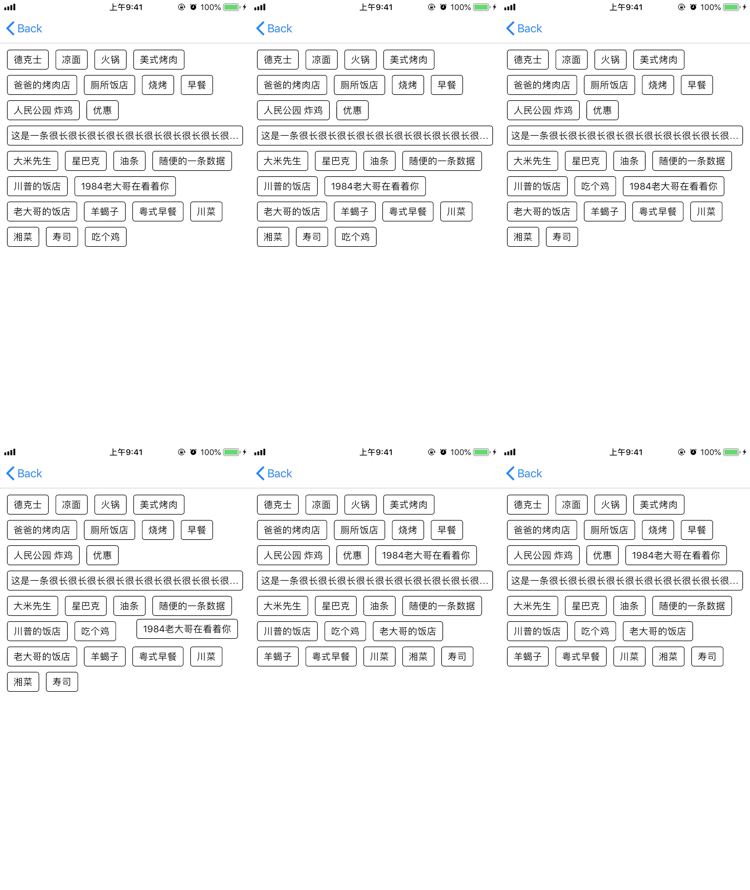
在使用UICollectionView的过程中,有时候会有拖动排序这样的需求,本篇主要针对自定义布局的拖动重排,效果如下:
若对UICollectionView和其自定义布局不是很了解的朋友可以看看之前的两篇内容
1. 自定义图片选择器 3 - 相册列表的实现(UICollectionView)
2. UICollectionViewLayout 自定义布局基础
在上一篇中我们对UICollectionView的自定义布局有了基础的认识,本篇将在其基础上进行“拖动重排”的探索。
说起拖动重排,苹果爸爸在 iOS9 加入了响应的方法予以支持,可很多项目都还得支持iOS8,我们还是得先自己实现下拖动重排,加深下理解。iOS9的相关方法放在文末介绍。
iOS8
拖动重排,首先联想到了 UITableView,苹果已经实现了其拖动重排的功能,只需要我们进行相应的设置即可。那么更加自由的UICollectionView则需要自己实现,且在iOS9之前都没有较便利的功能支持。
这就需要我们自己实现了。
拖动重排 可以分为“拖动”和“重排”两个部分,前者主要涉及到手势的状态监听,后者主要涉及到布局的更新。
我们就先从拖动开始,给CollectionView添加一个长按手势(UILongPressGestureRecognizer),并在合适的地方初始化它。
为了更好的理解,笔者没有进行封装,选择在prepareLayout中初始化,在init中初始化要考虑到此时的collectionView可能还并未被创建,我们给视图添加手势的动作就可能失效。
- (void)prepareLayout {
    [super prepareLayout];
    //因prepareLayout会多次调用,这里需要判断是否已经创建,避免多次重复添加导致占用过多资源影响性能。
    //更好的方法是给整个Layout设置一个拖动重排的开关来控制手势是否生效
    if (!_longPress) {
        _longPress = [[UILongPressGestureRecognizer alloc] initWithTarget:self
                                                                   action:@selector(longPress:)];
        _longPress.minimumPressDuration = 0.3;
        [self.collectionView addGestureRecognizer:_longPress];

    }
    /*
        其他
    */
}
这时候,我们的CollectionView就有了长按手势,且有一个方法(longPress:)接收手势。
拖动的动作可以分解成“开始”-“移动”-“结束”
我们的longPress就成了下面这样:
- (void)longPress:(UILongPressGestureRecognizer *)sender {
    CGPoint point = [sender locationInView:sender.view];
    switch (sender.state) {
        case UIGestureRecognizerStateBegan:
            //有了拖动手势,就自然加入了一个辨识当前拖动状态的参数
            _isItemDragging = YES;
            [self beginLongPress:point];
            break;
        case UIGestureRecognizerStateChanged:
            _isItemDragging = YES;
            [self updateLongPress:point];
            break;
        default:
            _isItemDragging = NO;
            [self endLongPress:point];
            break;
    }
}
添加了手势相关的部分,我们还需要一个临时的拖动视图,这个拖动视图也就是用户所选中并拖动的那个item,需要它是为了让用户知道自己的拖动的状态,有个良好的交互反馈。
这个拖动视图在监听手势的三个方法里进行“初始化”-“更新状态”-"消失移除"
- (void)beginLongPress:(CGPoint)point {
    NSIndexPath * indexPath = [self.collectionView indexPathForItemAtPoint:point];
    if (nil == indexPath) {
        return;
    }
    UICollectionViewCell * cell = [self.collectionView cellForItemAtIndexPath:indexPath];
    self.dragSnapView = [cell snapshotViewAfterScreenUpdates:YES];
    self.dragSnapView.frame = cell.frame;
    self.dragSnapView.alpha = 0.8;
    self.dragSnapView.transform = CGAffineTransformMakeScale(1.2, 1.2);
    self.dragOffset = CGPointMake(self.dragSnapView.center.x - point.x, self.dragSnapView.center.y - point.y);

    [self.collectionView addSubview:self.dragSnapView];
}

- (void)updateLongPress:(CGPoint)point {
    //根据手势的移动长度来决定拖动视图的位置
    CGPoint center = CGPointMake(point.x + self.dragOffset.x, point.y + self.dragOffset.y);
    self.dragSnapView.center = center;
    /*
        此处有重排的关键部分代码
    */
}

- (void)endLongPress:(CGPoint)point {
    /*
        这里有一段向最终位置靠拢的动画
    */
    [wself.dragSnapView removeFromSuperview];
}
到这里,我们关于单纯的拖动部分就完成了,运行后会发现有个拖动视图跟着我们的手指。
那么现在我们就可以着手实现重排了。实现重排前我们要分析下,重排需要注意的有哪些点?
- 拖动的过程中,重排仅仅是CollectionView的每个元素的位置变化,而在拖动结束时,需要将拖动的结果反馈给数据源进行更新。
- 鉴于第1点,当我们在拖动的过程中检测到需要更新布局时我们需要重新计算所有item的布局
- 重新计算完布局的信息后,就调用 invalidateLayout 来更新布局。
- 这里有个坑,我们在一次拖动的过程内,发生更新布局后,后续的拖动中再检测是否需要更新时要特别注意,我们的检测方法需使用的是本次拖动中最新的布局信息,否则会造成一个边界判断的Bug。
分析完就该动手了
将手势的三个方法更新一下:
- (void)beginLongPress:(CGPoint)point {
    //获取当前拖动item
    NSIndexPath * indexPath = [self.collectionView indexPathForItemAtPoint:point];
    if (nil == indexPath) {
        return;
    }

    // 当前itemd是否支持拖动
    if (!_moveBeganBlock(indexPath)) {
        return;
    }

    // 初始化拖动相关数据
    _startDragIndexPath = indexPath;
    _currentDragIndexPath = indexPath;

    // 初始化拖动视图
    UICollectionViewCell * cell = [self.collectionView cellForItemAtIndexPath:indexPath];
    self.dragSnapView = [cell snapshotViewAfterScreenUpdates:YES];
    self.dragSnapView.frame = cell.frame;
    self.dragSnapView.alpha = 0.8;
    self.dragSnapView.transform = CGAffineTransformMakeScale(1.2, 1.2);
    self.dragOffset = CGPointMake(self.dragSnapView.center.x - point.x, self.dragSnapView.center.y - point.y);
    [self.collectionView addSubview:self.dragSnapView];
}

- (void)updateLongPress:(CGPoint)point {
    //更新拖动视图
    CGPoint center = CGPointMake(point.x + self.dragOffset.x, point.y + self.dragOffset.y);
    self.dragSnapView.center = center;

    //检测是否需要更新布局
    NSIndexPath * indexPath = [self getIndexPathWithPosition:point];
    if (indexPath) {
        if ((_currentDragIndexPath.row != indexPath.row) || (_currentDragIndexPath.section != indexPath.section)) {
            [self reloadLayoutItemWithPreviousIndexPath:_currentDragIndexPath targetIndexPath:indexPath exchange:NO];
            [self invalidateLayout];
            _currentDragIndexPath = indexPath;
        }
    }
}

- (void)endLongPress:(CGPoint)point {
    CGPoint center = CGPointMake(point.x + self.dragOffset.x, point.y + self.dragOffset.y);
    _dragOffset = CGPointMake(0, 0);
    NSIndexPath * indexPath = [self getIndexPathWithPosition:center];
    if (indexPath) {
        //交换indexPath
        if ((_startDragIndexPath.row != indexPath.row) || (_startDragIndexPath.section != indexPath.section)) {
            [self reloadLayoutItemWithPreviousIndexPath:_startDragIndexPath targetIndexPath:indexPath exchange:YES];
        }
        _currentDragIndexPath = indexPath;
    } else {
        _currentDragIndexPath = _startDragIndexPath;
    }

    //移除拖动视图
    [_dragSnapView removeFromSuperview];
    _dragSnapView = nil;

    //调用回调将拖动结束的数据回传给调用者
    if (_moveEndBlock) {
        _moveEndBlock(_startDragIndexPath, _currentDragIndexPath);
        UICollectionViewLayoutAttributes * attributes = [self layoutAttributesForItemAtIndexPath:_currentDragIndexPath];
        attributes.hidden = NO;
    }
    [self invalidateLayout];
    _currentDragIndexPath = nil;
    _startDragIndexPath = nil;
}
由上代码可以看出我们在三个函数中分别做了哪些事情:
- beginLongPress: 我们记录了初始化本次手势的起点位置。
- updateLongPress:我们检测了当前的拖动的位置,在需要重排时重新计算布局并重新布局所有的item,这也是我们重排功能最重要的核心。
- endLongPress:获取到最终的拖动位置,并通过DataSource传输给代理方,是否要改变数据的判定交由代理方去处理。隐藏并移除创建的拖动视图。
重新计算布局
在 updateLongPress 方法中,我们重新计算布局的方法 reloadLayoutItemWithPreviousIndexPath中该如何实现?需要注意哪些细节,以及相关的影响有哪些?
什么时候需要重新计算布局?
在拖动的过程中,我们并不需要时时刻刻都去重新布局,仅仅是在会发生item交换时才需要。而交换只会发生在我们的拖动手势进入到其他item区域时,所以只需要检测手势是否进入到其他item的区域就可以了。
在 updateLongPress中,可以看到我们添加了是否需要重新计算布局的判断。
布局的重新计算
当判断需要重新布局时,我们就重新计算一遍布局信息,本文Demo重新布局方法如下:
- (void)reloadLayoutItemWithPreviousIndexPath:(NSIndexPath *)previousIndexPath targetIndexPath:(NSIndexPath *)targetIndexPath exchange:(BOOL)exchange {
    // 此处的交替位置,仅用于计算frame的顺序,新创建了 dataArray 方便理解。
    // 并未更改indexPath, 要注意绘制Cell的时候是以indexPath的先后来的,与attrubutesd的顺序无关
    NSMutableArray * dataArray = [_attrubutesArray mutableCopy];
    UICollectionViewLayoutAttributes * temp = _attrubutesArray[previousIndexPath.row];
    [dataArray removeObjectAtIndex:previousIndexPath.row];
    [dataArray insertObject:temp atIndex:targetIndexPath.row];

    //开始重置所有Item的坐标大小,以及位置标识(indexPath)
    CGFloat y = _sectionInsets.top;
    CGFloat x = _sectionInsets.left;

    NSMutableArray * tempArray = [NSMutableArray array];
    for (NSInteger index = 0; index < dataArray.count; index += 1) {
        UICollectionViewLayoutAttributes * temp = dataArray[index];
        BOOL isDragItem = targetIndexPath.row == index;
        temp.alpha = isDragItem ? 0 : 1;
        //配置临时变量用于计算
        CGRect frame;
        frame.size = temp.frame.size;

        //***重置坐标以及indexPath
        if (x + frame.size.width > [[UIApplication sharedApplication].delegate window].bounds.size.width) {
            x = _sectionInsets.left;
            y += (_itemHeight + _lineSpace);
        }
        frame.origin = CGPointMake(x, y);
        temp.frame = frame;
        if (exchange) {
            temp.indexPath = [NSIndexPath indexPathForRow:index inSection:0];
        }
        [tempArray addObject:temp];

        //偏移当前坐标至尾部
        x += frame.size.width + _itemSpace;
    }
    _attrubutesArray = [tempArray mutableCopy];
}
该方法的核心功能是计算出在拖动过程中,计算出临时的布局信息。笔者在一开始替换了布局信息的初始顺序,只是为了在for循环中不再加入额外的判断。
小结:
至此,一个简易的拖动重排就已经实现了,实际项目中可能会涉及到一些动画等其他细节上的需求,在实现过程中只要注意好拖动重排的各部分机制就不会发生问题。iOS9之前因为要自己实现,所以我们使用了自定义的手势,并根据其处理相关的事件,
那么在iOS9开始,我们应该怎么做呢?
iOS9+
在 iOS9 之前我们需要自己实现拖动重排的功能,若交互动效更加复杂,我们的工作难度将会很艰巨。好消息是从iOS9开始,系统有提供部分方法以支持拖动重排,减少底层逻辑的工作量。
当然,手势,还是要添加的,只是这一次我们触发手势后调用的就是系统提供的方法了:
- (BOOL)beginInteractiveMovementForItemAtIndexPath:(NSIndexPath *)indexPath NS_AVAILABLE_IOS(9_0); // returns NO if reordering was prevented from beginning - otherwise YES
- (void)updateInteractiveMovementTargetPosition:(CGPoint)targetPosition NS_AVAILABLE_IOS(9_0);
- (void)endInteractiveMovement NS_AVAILABLE_IOS(9_0);
- (void)cancelInteractiveMovement NS_AVAILABLE_IOS(9_0);
添加到手势的方法里如下:
- (void)longPress:(UILongPressGestureRecognizer *)sender {
    CGPoint point = [sender locationInView:sender.view];
    switch (sender.state) {
        case UIGestureRecognizerStateBegan:
        {
            NSIndexPath * indexPath = [self.collectionView indexPathForItemAtPoint:point];
            if (!indexPath) {
                return;
            }
            _isItemDragging = YES;
            _dragAttribute = _attrubutesArray[indexPath.row];
            [self.collectionView beginInteractiveMovementForItemAtIndexPath:indexPath];
        }
            break;
        case UIGestureRecognizerStateChanged:
            _isItemDragging = YES;
            [self.collectionView updateInteractiveMovementTargetPosition:point];
            break;
        case UIGestureRecognizerStateEnded:
            _isItemDragging = NO;
            [self.collectionView endInteractiveMovement];
            break;
        default:
            _isItemDragging = NO;
            [self.collectionView cancelInteractiveMovement];
            break;
    }
}
上面的 _isItemDragging 和 dragAttribute 都是临时变量用于拖动过程中的判断,与自己实现的拖动重排逻辑一样。
然后就要注意拖动中的几个方法了,系统提供如下:
- (NSIndexPath *)targetIndexPathForInteractivelyMovingItem:(NSIndexPath *)previousIndexPath withPosition:(CGPoint)position NS_AVAILABLE_IOS(9_0);
- (UICollectionViewLayoutAttributes *)layoutAttributesForInteractivelyMovingItemAtIndexPath:(NSIndexPath *)indexPath withTargetPosition:(CGPoint)position NS_AVAILABLE_IOS(9_0);

- (UICollectionViewLayoutInvalidationContext *)invalidationContextForInteractivelyMovingItems:(NSArray *)targetIndexPaths withTargetPosition:(CGPoint)targetPosition previousIndexPaths:(NSArray *)previousIndexPaths previousPosition:(CGPoint)previousPosition NS_AVAILABLE_IOS(9_0);
- (UICollectionViewLayoutInvalidationContext *)invalidationContextForEndingInteractiveMovementOfItemsToFinalIndexPaths:(NSArray *)indexPaths previousIndexPaths:(NSArray *)previousIndexPaths movementCancelled:(BOOL)movementCancelled NS_AVAILABLE_IOS(9_0);
我们这里只用到前两个方法,前者是拖动到别的item区域时会触发的回调,我们在这里进行布局的重排更新,而第二个方法(layoutAttributesForInteractivelyMovingItemAtIndexPath)是在拖动中,被拖动的item属性的一个回调。
因为这两个方法都是系统提供,且只在触发时回调,与我们自己实现的方法相比,节省了实现“被拖动视图”一系列功能,以及拖动中的各种判断。我们的代码也相较于手动实现简洁了不少:
- (UICollectionViewLayoutAttributes *)layoutAttributesForInteractivelyMovingItemAtIndexPath:(NSIndexPath *)indexPath withTargetPosition:(CGPoint)position {
    //1
    //我们将拖动的视图跟随手势的位置,并将视图大小缩放1.2倍
    UICollectionViewLayoutAttributes * temp = [UICollectionViewLayoutAttributes layoutAttributesForCellWithIndexPath:indexPath];
    CGSize size = _dragAttribute.frame.size;
    [temp setFrame:CGRectMake(position.x - size.width / 2,
                              position.y - size.height / 2,
                              size.width,
                              size.height)];
    temp.transform = CGAffineTransformMakeScale(1.2, 1.2);
    return temp;
}

- (NSIndexPath *)targetIndexPathForInteractivelyMovingItem:(NSIndexPath *)previousIndexPath withPosition:(CGPoint)position {
    //2
    NSIndexPath * indexPath = [self getIndexPathWithPosition:position];
    if (indexPath) {
        if ((previousIndexPath.row != indexPath.row) || (previousIndexPath.section != indexPath.section)) {
            // 此处必须重置所有Item的属性,尤其是indexPath属性,简单的交换是不会起任何作用的
            [self reloadLayoutItemWithPreviousIndexPath:previousIndexPath targetIndexPath:indexPath];
        }
    }
    return indexPath;
}
至此,已经实现了简易的iOS9的拖动重排,为简化程序表述逻辑,笔者的示例为最简单的一个section数据源。针对多section的数据源,需要添加相关的逻辑。
总结:
1.拖动重排的过程中要对拖动时各个 item 的状态有明确的认识.
2.不同的自定义布局会有不同的边界情况,要针对这些情况做特定处理才能使自己的拖动重排更加自然。
3.拖动重排的过程中涉及到对会影响数据源的操作,都回调给调用者,并对调用者的反馈做出响应。
