将表情字符串转化成对应的emoji表情图片
有时候我们得到表情字符串想让它对应的显示表情,那这样的话该怎么做呢?前段时间就遇到了这方面的需求,在请求数据的时候,后台返回的字符串中包含 :sad: 这类型的表情字符串,如果直接将内容放到Label上显示,那么显示的也是 :sad: 这样的形式,而:sad:其实对应的表情是![]() 这样的。
这样的。
找了很多资料,发现都得用图文混排的方式去处理,其中很多的表情字符串是[大哭]这样的形式,然后对于:sad:这样的形式就又有点懵逼了,后来用正则的方式去处理了,发现确实好用,同时也处理了tableviewCell的自适应高度问题。接下来和大家分享一下。
采用的是三方MLLabel,在pod file中添加pod’MLLabel’ ,用终端 pod install,将三方导入自己的工程中。
准备工作做好后,开始进行编码
1.在ViewController中导入
#import 创建全局属性
@property (nonatomic, strong) NSMutableArray *expressionData;
@property(nonatomic, strong)NSMutableArray *contentArray;
@property(nonatomic, strong)UITableView *tableview;
- (void)viewDidLoad {
_contentArray = [NSMutableArray arrayWithObjects:@"对待好东西一定不能犹豫,早起抢了张秒杀票 :twisted: :twisted:",@"终于又等到北京的大课,好激动 :mrgreen: :mrgreen: :mrgreen: 这次和公司小伙伴准备买成团票~ :smile: :smile:",@"昨天下午部门临时开了一个紧急的小会,老总说:听说起点学院在北京又开总监课程呢!上次因为公司在赶项目没有办法 :cry: ,这次一定要报名,我们竟然想做大做好,就一定要有学习的精神,明天大家定好闹铃,抢票N",@":razz: :roll: :roll: 报名走一个,修炼,修炼,我就要究极变化了~~比卡~比卡~比卡丘",@"看到同事了哈哈哈 :lol:",@"我是得加他们微信才能发图片吧?申请加好友也没人回复啊?这是为什么呢? :arrow:",@"回复Uncle Wang :什么时候可以加上呢 :arrow:", @"回复lisa991 :小助手宝宝的微信已经被加爆了,请稍安勿躁,摸摸大 :lol:",@"居然没人搭理~严重打击了用户的信任~哼 :mad: :mad: :mad: :mad: :mad: :mad:",@"终于等到你~ :razz: :razz: :razz:",@"还好有直播,要不然就要遗憾惨了~好开心~~~ :mrgreen: :mrgreen: :mrgreen:",@"哦啦啦,这次抢到票啦,去高逼格的现场,啦啦啦,好开心 :grin: :grin:", @"特么周六上班 :mad:",@"从技术架构角度看,传统垂直架构的特点是本地API接口调用,不存在业务的拆分和互相调用,使用到什么功能就本地开发,非常方便,不需要过度依赖于其它功能模块;从考核角度来看,共享很难推行。开发只需要对自己开发的模块交付质量负责,没有义务为他人提供并维护公共类库,这个非常耗费成本; 时间依赖很难把控:对于公共类库的使用者而言,依赖别人提供此功能,但是功能提供者可能有更重要的事情在做,提供时间无法满足使用者。与其坐等别人提供,还不如自己开发效率高;",nil];
//用正则表达式匹配表情字符串
MLExpression *exp = [MLExpression expressionWithRegex:@"\\:[a-zA-Z0-9\\u4e00-\\u9fa5\\?\\!]+\\:" plistName:@"Expression" bundleName:@"Emotion"];
[MLExpressionManager expressionAttributedStringsWithStrings:_contentArray expression:exp callback:^(NSArray *result) {
self.expressionData = [NSMutableArray arrayWithArray:result];
[_tableview reloadData];
}];
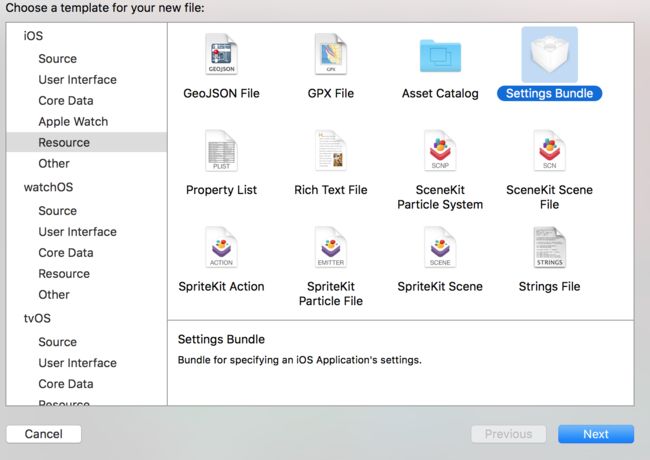
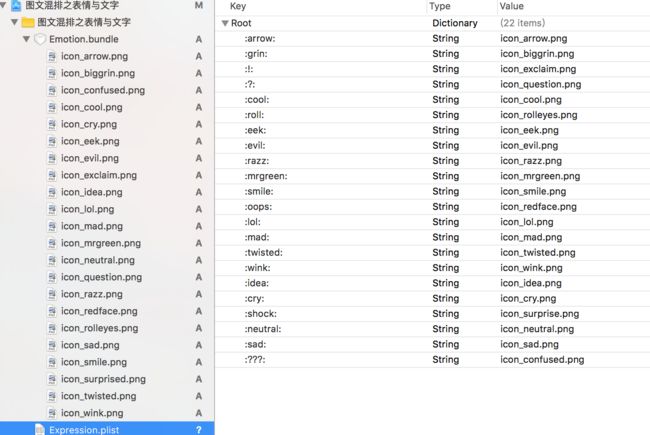
}匹配方法中plistName和bundleName是你创建的两个文件。表情字符串是和本地的表情图片相对应的,所以应该先把本地的表情图片放到bundle中,然后再写个plist文件,将表情字符串和表情图片对应上。bundle和plist文件的创建,是在iOS->Resource中。如图:

创建好的两个文件如图:

我们用tableview去显示相应的内容,首先,自定义tableviewcell。
#import ContentCell.m的相关实现
#import "ContentCell.h"

@implementation ContentCell
-(instancetype)initWithStyle:(UITableViewCellStyle)style reuseIdentifier:(NSString *)reuseIdentifier{
    self = [super initWithStyle:style reuseIdentifier:reuseIdentifier];
    if (self) {

        [self.contentView addSubview:self.textlabel];


    }
    return self;
}

-(void)layoutSubviews{
    [super layoutSubviews];

    self.textlabel.frame = CGRectMake(13, 0, self.contentView.frame.size.width - 26, self.contentView.frame.size.height);

}


#pragma mark - getter
- (MLLinkLabel *)textlabel
{
    if (!_textlabel) {
        _textlabel = [MLLinkLabel new];
        _textlabel.textColor = [UIColor colorWithRed:0.51 green:0.51 blue:0.51 alpha:1];;
        //        _textlabel.backgroundColor = [UIColor colorWithRed:0.137 green:0.780 blue:0.118 alpha:1.000];

        _textlabel.font = [UIFont systemFontOfSize:14.0f];

        _textlabel.numberOfLines = 0;
        _textlabel.lineSpacing = 2.0f;//行间距
        //_textlabel.linkTextAttributes = @{NSForegroundColorAttributeName:[UIColor colorWithRed:0.51 green:0.51 blue:0.51 alpha:1]};//带链接时链接的颜色

    }
    return _textlabel;
}

#pragma mark - height
static MLLinkLabel * kProtypeLabel() {
    static MLLinkLabel *_protypeLabel = nil;
    static dispatch_once_t onceToken;
    dispatch_once(&onceToken, ^{
        _protypeLabel = [MLLinkLabel new];
        _protypeLabel.font = [UIFont systemFontOfSize:14.0f];

        _protypeLabel.numberOfLines = 0;
        //        _protypeLabel.textInsets = UIEdgeInsetsMake(10, 10, 10, 10);
        //        _protypeLabel.lineHeightMultiple = 1.1f;
        _protypeLabel.lineSpacing = 2.0f;
    });
    return _protypeLabel;
}


+ (CGFloat)heightForExpressionText:(NSAttributedString*)expressionText width:(CGFloat)width
{

    width-=13.0f;

    MLLinkLabel *label = kProtypeLabel();
    label.attributedText = expressionText;
    return [label preferredSizeWithMaxWidth:width].height + 5.0f*2; //上下间距
}


@end
//创建tableview,实现相应的代理方法
-(void)loadView{
[super loadView];
_tableview = [[UITableView alloc] initWithFrame:CGRectMake(0, 24, self.view.frame.size.width, self.view.frame.size.height - 24) style:UITableViewStylePlain];
_tableview.delegate = self;
_tableview.tableFooterView = [[UIView alloc] init];
_tableview.dataSource = self;
[self.view addSubview:_tableview];
[_tableview setSeparatorInset:UIEdgeInsetsMake(0, 13, 0, 13)];
}
-(NSInteger)tableView:(UITableView *)tableView numberOfRowsInSection:(NSInteger)section{
return _contentArray.count;
}
-(CGFloat)tableView:(UITableView *)tableView heightForRowAtIndexPath:(NSIndexPath *)indexPath{
if (_expressionData.count == 0) {
return 0;
}else{
CGFloat height = [ContentCell heightForExpressionText:self.expressionData[indexPath.row] width:self.view.frame.size.width-26];
return height;
}
}
-(UITableViewCell *)tableView:(UITableView *)tableView cellForRowAtIndexPath:(NSIndexPath *)indexPath{
static NSString *identifier = @"cell";
ContentCell *cell = [tableView dequeueReusableCellWithIdentifier:identifier];
if (!cell) {
cell = [[ContentCell alloc] initWithStyle:UITableViewCellStyleDefault reuseIdentifier:identifier];
}
if (_expressionData.count != 0) {
cell.textlabel.attributedText = self.expressionData[indexPath.row];
}
cell.selectionStyle = UITableViewCellSelectionStyleNone;
return cell;
}
这样,就可以把表情字符串转换成对应的表情图片了,同时也可以做到tableviewcell的自适应高度。结果如图

如果有任何问题,欢迎指出或留言。