小程序蓝牙(二)蓝牙的具体操作步骤(搜索-连接-读写)
1、第一步 初始化小程序蓝牙模块
初始化模块有可能会出现失败,没有开启手机蓝牙或者其他因素时,失败会有对应的失败编码,这个具体详情看官方文档
  // 第一步 初始化蓝牙模块
  openBluetoothAdapter() {
    wx.openBluetoothAdapter({
      success: (res) => {
        console.log('第一步、蓝牙初始化成功', res)
        // 开始搜索附近蓝牙
        this.startBluetoothDevicesDiscovery()
      },
      fail: (res) => {
        console.log("第一步、蓝牙初始化失败", res);
        wx.showToast({ title: '蓝牙初始化失败', icon: 'none' })
      }
    })
  },
2、第二步 开始搜索附近的蓝牙设备
allowDuplicatesKey 为设置是否重复上报搜索到的设备,需要其他参数请看看官方文档api
  // 第二步 开始搜索附近的蓝牙设备
  startBluetoothDevicesDiscovery() {
    wx.startBluetoothDevicesDiscovery({
      allowDuplicatesKey: false,
      success: (res) => {
        console.log('开始搜索附近的蓝牙设备', res)
        this.onBluetoothDeviceFound()
      },
    })
  },
3、第三步 获取附近的蓝牙设备
提示 在开始发现附近的蓝牙设备后,有两种方式去获取搜索的蓝牙
(1) 监听附近搜索到的设备
这里的监听是实时的,一发现就会上报出来,这里上报设备的时间间隔,是否重复上报同一设备是在开启搜索时设置的。
   // 第三步 监听发现附近的蓝牙设备
  onBluetoothDeviceFound() {
    wx.onBluetoothDeviceFound((res) => {
      res.devices.forEach(device => {
        if (!device.name && !device.localName) { return }
        console.log("发现的蓝牙设备", device)
        this.data.devices.push(device)
        this.setData({ devices: this.data.devices })
      })
    })
  },
(2) 获取在蓝牙模块生效期间所有已发现的蓝牙设备
这块的话需要递归调用或者循环调用,如果处理不好的话容易造成多次循环,造成小程序卡顿。所以这个函数根据项目需求去使用。
wx.getBluetoothDevices(Object object)
4、第四步 连接蓝牙
deviceId 是对应蓝牙设备信息的deviceId,系统是根据这个蓝牙的deviceId,去找到这个蓝牙并建立连接。
在前面第三步中获取的是所有搜索到蓝牙设备列表,这个是对应的某一蓝牙设备的deviceId
注意: 一个蓝牙有多个服务,一个服务有多个特征值
提示 : 如果我们想对蓝牙进行写、读操作,那么我们至少需要3个参数
1、蓝牙的deviceId
2、蓝牙的某一服务的 uuid
3、蓝牙某一服务下的某一特征值的uuid
我们至少需要这3个,才能对蓝牙的某一个功能进行操作
  // 第四步、 建立连接
  createBLEConnection(deviceId) {
    wx.createBLEConnection({
      deviceId: deviceId,
      success: (res) => {
        wx.showToast({ title: '蓝牙连接成功', icon: 'none' })
        this.getBLEDeviceServices(deviceId)
      },
      fail(res) { wx.showToast({ title: '蓝牙连接失败', icon: 'none' }) }
    })
  },
5、第五步 获取蓝牙的服务
蓝牙的服务是由对应蓝牙设备设定的,这个是属于硬件的设置。一个蓝牙可以开启多个服务,我们根据对应的服务操作相对应的功能。
开启主服务isPrimary的值为true,主服务是为了与其他服务区分开来
注意: 我们这里是用对应的服务uuid去区分服务的
  // 第五步、获取蓝牙设备所有服务(service)。
  getBLEDeviceServices(deviceId) {
    wx.getBLEDeviceServices({
      deviceId: deviceId,
      success: (res) => {
        console.log('蓝牙设备所有服务', res)
        for (var i = 0; i < res.services.length; i++) {
          if (res.services[i].isPrimary) {
            this.getBLEDeviceCharacteristics(deviceId, res.services[i].uuid);
            return;
          }
        }
      },
      fail(res) { console.log('蓝牙设备所有服务失败', res) }
    })
  },
6、第六步 获取蓝牙对应服务的特征值
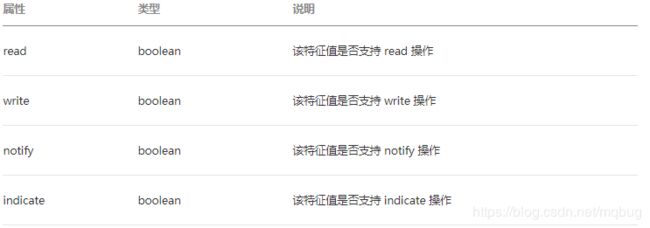
每一个不同的蓝牙服务,对应的特征值也不同,当该服务的特征值为true时,我们才与之进行对应的操作,一般我们通过判断 read 属性是否为真,便可以知道能不能通过该服务读取到蓝牙的值,当write为真时,我们便可以对蓝牙设备进行写数据操作
  // 第六步、 获取蓝牙设备某个服务中所有特征值(characteristic)
  getBLEDeviceCharacteristics(deviceId, serviceId) {
    wx.getBLEDeviceCharacteristics({
      deviceId, serviceId,
      success: (res) => {
        for (let i = 0; i < res.characteristics.length; i++) {
          let item = res.characteristics[i]

          if (item.properties.write) {
            this._deviceId = deviceId
            this._serviceId = serviceId
            this._characteristicId = item.uuid
          }
          if (item.properties.notify) {
            this._readDeviceId = deviceId
            this._readServiceId = serviceId
            this._readCharacteristicId = item.uuid
          }
        }
      }
    })
  },
7、第七步 获取蓝牙的返回数据
我们在与蓝牙进行数据交互时,蓝牙也常常需要对我们传过去的参数进行相对应的回参,也就是对我们传过去的信息进行回复,这样我们才知道写数据操作有没有成功
我们需要 启用低功耗蓝牙设备特征值变化时的 notify 功能,用来监听数据的返回
  // 第七步、获取蓝牙的返回信息
  onBLEValue() {
    wx.onBLECharacteristicValueChange(function (res) {
      var value = ab2Str(res.value); console.log("第七步,读取蓝牙的值", value);
    })
    wx.notifyBLECharacteristicValueChange({
      state: true, // 启用 notify 功能
      deviceId: this._readDeviceId,
      serviceId: this._readServiceId,
      characteristicId: this._readCharacteristicId,
      success(res) { console.log('第七步,启用notify成功', res.errMsg) }
    })
  }
8、第八步 向蓝牙发送数据
注意: 小程序只能向蓝牙发送二进制数据,这里的例子是官方给出的,如果我们需要发送16进制 或者 字符格式 的数据需要将对应的数据转成二进制再发送,但是机器下位机接收到的数据其实也是16进制或字符格式的数据。只是我们发送时要转成二进制格式而已,下位机机器那边不需要接收后再转一遍格式。
  //第八步、 向蓝牙设备发送数据
  writeBLECharacteristicValue() {
  // 向蓝牙设备发送一个0x00的16进制数据
    let buffer = new ArrayBuffer(1)
    let dataView = new DataView(buffer)
    dataView.setUint8(0, Math.random() * 255 | 0)
    wx.writeBLECharacteristicValue({
      deviceId: this._deviceId,
      serviceId: this._deviceId,
      characteristicId: this._characteristicId,
      value: buffer,
    })
  },
整体的流程就是这样,具体的例子代码有空再发出来,有问题可以在下方留言提问,写的不对的欢迎指认出来,共同进步!
