sysbench,HammerDB 安装、使用和测试
sysbench
sysbench是一个开源的、模块化的、跨平台的多线程性能测试工具,可以用来进行CPU、内存、磁盘I/O、线程、数据库的性能测试。目前支持的数据库有MySQL、Oracle和PostgreSQL。当前功能允许测试的系统参数有:
sysbench 安装
tar zxvf sysbench-0.4.12.tar.gz
进入解压目录,并且创建安装目录:
root@m2:/home/zhoujy# cd sysbench-0.4.12/
 root@m2:/home/zhoujy/sysbench-0.4.12# mkdir /usr/sysbench/
root@m2:/home/zhoujy/sysbench-0.4.12# mkdir /usr/sysbench/
准备编译
root@m2:/home/zhoujy/sysbench-0.4.12# apt-get install automake
root@m2:/home/zhoujy/sysbench-0.4.12#apt-get install libtool
root@m2:/home/zhoujy/sysbench-0.4.12# ./autogen.sh
要是出现:perl: warning: Falling back to the standard locale ("C")。则需要设置locale:
echo "export LC_ALL=C" >> /root/.bashrc
source /root/.bashrc
要是没有安装开发包,即/usr/include/ 目录下面没有mysql文件夹。则需要执行安装(版本为12.04):
sudo apt-get install libmysqlclient-dev
sudo apt-get install libmysqld-dev
sudo apt-get install libmysqld-pic
执行configure操作:
./configure --prefix=/usr/sysbench/ --with-mysql-includes=/usr/include/mysql/ --with-mysql-libs=/usr/lib/mysql/ --with-mysql说明:
--prefix=/usr/sysbench/ :指定sysbench的安装目录。
--with-mysql-includes=/usr/include/mysql/ :指定安装mysql时候的includes目录。
--with-mysql-libs=/usr/lib/mysql/ :指定装mysql时候的lib目录。
--with-mysql :sysbench默认支持mysql,如果需要测试oracle或者pgsql则需要制定–with-oracle或者–with-pgsql。在这里需要先执行:
cp /usr/bin/libtool /home/zhoujy/sysbench-0.4.12/libtool再make和make install。否者会出现 libtool 报出的 Xsysbench: command not found 错误,则表示编译文件包的libtool版本太低,需要替换。
安装完成后,将编译的包sysbench-1.0.12保存下,以后在其他机器上可以直接用,无需再重新安装和编译
安装完成后,执行测试 prepare,run,cleanup
mkdir -p /workspace/perf-tools/tools/
cd /workspace/perf-tools/tools/sysbench-1.0.12/bin
./sysbench --test=/workspace/perf-tools/tools/sysbench-1.0.12/tests/db/oltp.lua  --db-driver=mysql --mysql-host=10.154.196.181
--mysql-table-engine=innodb --mysql-db=tpcc_shxsh --oltp-table-size=500000 --oltp_tables_count=3 --rand-init=on --mysql-user=root --mysql-password=Gauss@123  prepare
./sysbench --test=/workspace/perf-tools/tools/sysbench-1.0.12/tests/db/oltp.lua --db-driver=mysql --mysql-host=10.154.196.181 --mysql-table-engine=innodb --mysql-db=tpcc_shxsh --oltp-table-size=500000 --oltp_tables_count=3 --rand-init=on --mysql-user=root --mysql-password=Gauss@123 run
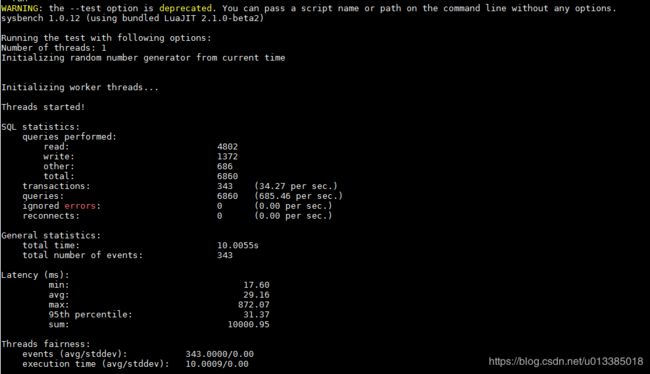
./sysbench --test=/workspace/perf-tools/tools/sysbench-1.0.12/tests/db/oltp.lua --db-driver=mysql --mysql-host=10.154.196.181 --mysql-table-engine=innodb --mysql-db=tpcc_shxsh --oltp-table-size=500000 --oltp_tables_count=3 --rand-init=on --mysql-user=root --mysql-password=Gauss@123 cleanup

HammerDB安装
- 进入HammerDB网址进行下载:http://www.hammerdb.com/
- 点击Downloads---->Release 2.23 for Windows 64-bit->下载并默认安装
注释:windows界面 Release 3.0 for Windows 64-bit Installer 好像有点问题
- 本文采用的默认路径为:C:\Program Files\HammerDB-2.23
打开路径点击:hammerdb.bat文件如下图2,启动hammerdb。

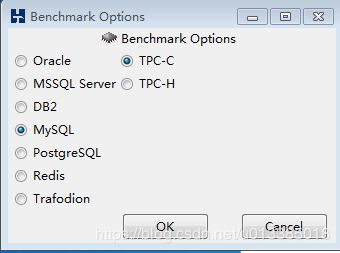
- 本文将以mysql为例进行相关演示。点击mysql,然后出现图3点击OK即可,之后出现图4与图5继续OK。

图4 TPC-C测试用例
- 点击途中TPC-C,然后点击Schema Build 点击该目录下的Options。操作步骤如下图。
图 6 配置用例操作步骤
- 在option界面如图7进行配置,修改host、Passord、database。选择warehouse个数为29,user为2,请记住图7中的相关配置,后续会讲解会用到,同时也会在liunx中使用到。
注释:其中database最好进行修改,有时候一直有这样的错误,在liunx版本中每次使用的数据库都一样的话,会报错,所以建议修改。
其中warehouse值必须大于user,同时不能过大,避免创建用例时间过长。其中用户user个数和cpu个数一致,但是本文选择2个,为了更好地跑完实例。
图 7 配置选项
图8 测试用例确认
- 在界面等待时间过长,当出现如下界面如图是表示还没有完成,当可以看出Virtual user 用户有3个,由图7可只我们只创建了两个虚拟用户,其中Virtual user1 为系统管理用户。
图 9 进行schema设置
- 一般经过半个小时左右的等待出现如下界面则表示数据加载完毕,需要摧毁用户。
图10 确保数据加载成功
- 再次点击 Mysql > Driver Script >Options 如图所示。 修改链接数为10000。可以加快测试速度。
图11 修改驱动
10、选中 mysql > driver script 双击load如图12所示。
图12 加载数据
11、配置和创建虚拟用户,点击 mysql > TPC-C > Virtual User,双击Options进行配置,修改用户数如图13,点击ok后进入如图14。
图13 虚拟用户配置
图14 虚拟用户配置界面
12、选择“Virtual User”,双击“Run”,直到出现稳定TPM峰值,如图15。
图15 结果并数据分析
使用HammerDB 对数据库进行性能测试(windows下)
http://3ms.huawei.com/km/blogs/details/5586263
如何使用HammerDB进行MySQL基准测试
https://cloud.tencent.com/developer/article/1072939
总结其中操作步骤包括如下:
- 创建mysql数据库选择TPC-C方式;
- 配置option选项,对登入mysql、创建虚拟用户与仓库等操作
- 销毁虚拟用户;
- 修改驱动相关参数
- 加载
- 创建虚拟用户
- 开始测试输出结果
- 摧毁用户、清除数据等操作。
上述步骤为HarmmerDB测试的基本步骤对其适用的所有数据库都适用。
参考文档:
http://3ms.huawei.com/km/blogs/details/5586263