Eric6与pyqt5学习笔记 3【水平,垂直,网格,窗体四大类布局】
ummm,这段博主时间比较忙,准备下周的比赛还有一个app的开发(即将放到github,欢迎提出意见~),所以学习了好几天才更新第三篇笔记~
上篇学习笔记提到了从最基本的setGeometry()设置窗口,也提到了居中,利用QDesktopWidget类来解决这个问题,但是,按钮大小和位置也还是固定设置的,这里,带大家继续学习,如何布局~
1.布局常用类
常用到的布局类有QHBoxLayout,QVBoxLayout,QGridLayout ,QFormLayout4种,分别水平排列布局,垂直排列布局,表格排列布局,以及。布局中最常用的方法有addWidget()和addLayout(),addWidget()方法用于在布局中插入控件,addLayout()用于在布局中插入子布局。
水平布局管理器(QHBoxLayout)可以把添加的控件以水平的顺序依次排开;
垂直布局管理器(QVBoxLayout)可以把添加的控件以垂直的顺序依次排开;
网格布局管理器(QGridLayout)可以以网格的形式,把添加的控件以一定矩阵排列;
窗体布局管理器(QFormLayout)可以以两列的形式排列所添加的控件
a).水平(垂直)布局管理:
QHBoxLayout,按照从左到右的顺序进行添加控件。
QVBoxLayout,按照从上到下的顺序进行添加控件。
常用方法:
addLayout(…)
QBoxLayout.addLayout(QLayout)
在box的底部添加布局,其中默认的拉伸因子为0
addWidget(…)
QBoxLayout.addWidget(QWidget)
为布局中添加控件,stretch(拉伸因子)只适用与QBoxLayout,widget和box会随着stretch的变大而增大;alignment指定对齐的方式
addStretch(...)
设置拉伸因子
addSpacing(…)
QBoxLayout.addSpacing(int)
通过该方法增加额外的space。
b).网格布局管理器:
将窗体分隔成行和列的网格来进行排列(可以认为是二维的数据排布)。通常可以使用函数addWidget()或者addLayout()来将被管理的widget或者layout添加到窗格中。也可以通过重载的函数addWidget()或者addLayout()的行和列跨度实现占据多个窗格。
添加组件
addWidget(…)
QGridLayout.addWidget(QWidget)
QGridLayout.addWidget(QWidget * widget, int row, int column, Qt.Alignment alignment = 0 )
QWidget:为所添加的组件
row:为组件要添加的行数,默认从0开始
column:为组件要添加到的列数,默认从0开始
alignment:对齐的方式
QGridLayout.addWidget(QWidget * widget, int fromRow, int fromColumn, int rowSpan, int columnSpan, Qt.Alignment alignment = 0)
当添加的组件跨越很多行或者列的时候,使用该方法。
QWidget:为所添加的组件
fromRow:为组件起始的行数
fromColumn:为组件起始的列数
rowSpan:为组件跨越的行数
columnSpan:为组件跨越的列数
alignment:对齐的方式
addLayout(…)
QGridLayout.addLayout(QLayout, int, int, Qt.Alignment alignment=0)
QGridLayout.addLayout(QLayout, int, int, int, int, Qt.Alignment alignment=0)
其中参数说明同addWidget.
c).窗体布局管理器:
在窗口中按照两列的形式排列控件
addRow(…)
QFormLayout.addRow(QWidget, QWidget)
QFormLayout.addRow(QWidget, QLayout)
QFormLayout.addRow(str, QWidget)
QFormLayout.addRow(str, QLayout)
QFormLayout.addRow(QWidget)
QFormLayout.addRow(QLayout)
2.几种窗口布局的说明:
a).水平(垂直)布局
# -*- coding:utf-8 -*-
'''
 @Author:      GETF
 @Email:       [email protected]
 @DateTime:    2017-11-01 16:07:44
 @Description: Description
'''


# Form implementation generated from reading ui file 'F:\pythonexe\hello\hello.ui'
#
# Created by: PyQt5 UI code generator 5.6
#
# WARNING! All changes made in this file will be lost!


import sys
from PyQt5.QtWidgets import QWidget, QPushButton,QHBoxLayout, QVBoxLayout, QApplication
from PyQt5.QtWidgets import QDesktopWidget
import os
from PyQt5.QtGui import QIcon


class Hello(QWidget):

    def __init__(self):
        super().__init__()

        self.initUI()

    def center(self):
        qr = self.frameGeometry()
        cp = QDesktopWidget().availableGeometry().center()
        qr.moveCenter(cp)
        self.move(qr.topLeft())

    def initUI(self):

        okButton = QPushButton("确定")
        cancelButton = QPushButton("取消")

        test1Button = QPushButton("确")
        test2Button = QPushButton("取")

        hbox = QHBoxLayout()#水平布局1
        hbox.addStretch(1)#设置下一个布局拉伸因子为1
        hbox.addWidget(okButton)
        hbox.addStretch(1)
        hbox.addWidget(cancelButton)


        hbox2 = QHBoxLayout()#水平布局2
        hbox2.addStretch(2)
        hbox2.addWidget(test1Button)
        hbox2.addWidget(test2Button)#没设置拉伸因子,默认为0

        vbox = QVBoxLayout()#竖直布局
        vbox.addStretch(1)
        vbox.addLayout(hbox)#在底部增加box
        vbox.addStretch(2)
        vbox.addLayout(hbox2)#在底部增加box

        self.setLayout(vbox)

        self.center()#移至屏幕中央
        self.resize(300, 300)#设置窗口大小
        dir_path = os.path.abspath(os.path.dirname(__file__))+'\image\\favicon.ico'
        self.setWindowIcon(QIcon(dir_path))
        self.setWindowTitle('Hello')
        self.show()


if __name__ == '__main__':

    app = QApplication(sys.argv)
    ex = Hello()
    sys.exit(app.exec_())
从上述效果图,可以很明显看到拉伸因子的作用,ummm,言语讲不太清楚了,大家自己修改设置布局拉伸因子的数值去感受一下吧
b).网格布局管理器:
代码放在下面了~
# -*- coding:utf-8 -*-
'''
 @Author:      GETF
 @Email:       [email protected]
 @DateTime:    2017-11-01 23:58:45
 @Description: Description
'''


# Form implementation generated from reading ui file 'F:\pythonexe\hello\hello.ui'
#
# Created by: PyQt5 UI code generator 5.6
#
# WARNING! All changes made in this file will be lost!


import sys
from PyQt5.QtWidgets import QWidget, QGridLayout, QPushButton, QApplication,QDesktopWidget
import os
from PyQt5.QtGui import QIcon

class Example(QWidget):

    def __init__(self):
        super().__init__()
        self.initUI()


    def center(self):
        qr = self.frameGeometry()
        cp = QDesktopWidget().availableGeometry().center()
        qr.moveCenter(cp)
        self.move(qr.topLeft())


    def initUI(self):
        grid = QGridLayout()#创建一个表格布局
        self.setLayout(grid)

        names = ['清空', '删除', '', '启动',
                 '7', '8', '9', '/',
                '4', '5', '6', '*',
                 '1', '2', '3', '-',
                '0', '.', '=', '+']

        positions = [(i,j) for i in range(5) for j in range(4)]#五行四列

        for position, name in zip(positions, names):#利用一个循环来创建按钮
            if name == '':
                continue
            button = QPushButton(name)
            grid.addWidget(button, *position)#利用zip性质传参

        '''
        zip()是Python的一个内建函数,它接受一系列可迭代的对象作为参数,
        将对象中对应的元素打包成一个个tuple(元组),然后返回由这些tuples组成的list(列表)。
        若传入参数的长度不等,则返回list的长度和参数中长度最短的对象相同。利用*号操作符,
        可以将list unzip(解压)。


        关于*position的测试如下:
        测试一:
        names = ['test1', 'test2', '', 'test3',
         '7', '8', '9', '/',
        '4', '5', '6', '*',
         '1', '2', '3', '-',
        '0', '.', '=', '+']

        positions = [(i,j) for i in range(5) for j in range(4)]#五行四列

        for position, name in zip(positions, names):#利用一个循环来创建按钮
            if name == '':
                continue
            print(position)
            print(*position)
            print(name)


        (0, 0)
        0 0
        test1
        (0, 1)
        0 1
        test2
        (0, 3)
        0 3
        test3


        测试二:
        names = ['test1', 'test2', '', 'test3',
         '7', '8', '9', '/',
        '4', '5', '6', '*',
         '1', '2', '3', '-',
        '0', '.', '=', '+']

        positions = [(i,j) for i in range(5) for j in range(4)]#五行四列

        for name in zip(positions, names):#利用一个循环来创建按钮
            print(name)

        ((0, 0), 'test1')
        ((0, 1), 'test2')
        ((0, 2), '')
        ((0, 3), 'test3')


        测试三:
        names = ['test1', 'test2', '', 'test3',
         '7', '8', '9', '/',
        '4', '5', '6', '*',
         '1', '2', '3', '-',
        '0', '.', '=', '+']

        positions = [(i,j) for i in range(5) for j in range(4)]#五行四列

        for name in zip(positions):#利用一个循环来创建按钮
            print(name)
            print(*name[0])

        ((0, 0),)
        0 0
        ((0, 1),)
        0 1
        ((0, 2),)
        0 2
        ((0, 3),)


        注释:测试结果只显示部分,表明输出来的格式


        '''
        self.center()
        self.setWindowTitle('计算器')
        dir_path = os.path.abspath(os.path.dirname(__file__))+'\image\\favicon.ico'
        self.setWindowIcon(QIcon(dir_path))
        self.show()


if __name__ == '__main__':

    app = QApplication(sys.argv)
    ex = Example()
    sys.exit(app.exec_())
效果图如下:
哈哈哈,很像一个计算器啊,明天有时间就试试把这个空壳写成一个完整的计算器吧~
之后补代码
c).窗体布局管理器:
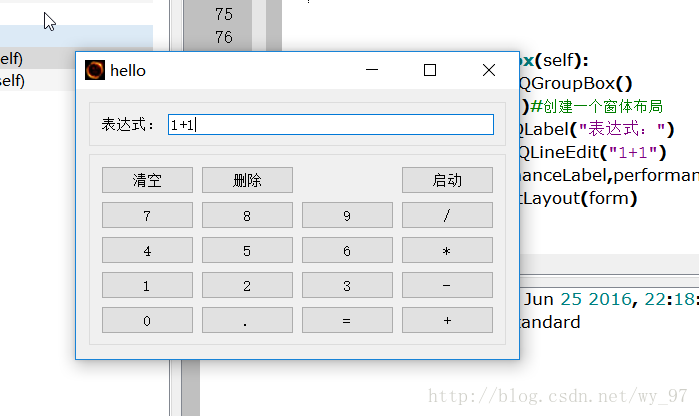
这里综合上面的计算器(界面)和第一个提到的竖直水平窗体完成了一个嵌套窗体,代码如下:
# -*- coding:utf-8 -*-
'''
 @Author:      GETF
 @Email:       [email protected]
 @DateTime:    2017-11-01 23:58:45
 @Description: Description
'''


# Form implementation generated from reading ui file 'F:\pythonexe\hello\hello.ui'
#
# Created by: PyQt5 UI code generator 5.6
#
# WARNING! All changes made in this file will be lost!


import sys
from PyQt5.QtWidgets import (QWidget, QFormLayout, QPushButton, QApplication,QDesktopWidget,
    QVBoxLayout,QGridLayout,QGroupBox,QLabel,QLineEdit)
import os
from PyQt5.QtGui import QIcon

class Example(QWidget):

    def __init__(self):
        super().__init__()
        self.initUI()


    def center(self):#居中
        qr = self.frameGeometry()
        cp = QDesktopWidget().availableGeometry().center()
        qr.moveCenter(cp)
        self.move(qr.topLeft())


    def initUI(self):
        self.createGridGroupBox()
        self.creatFormGroupBox()
        vbox = QVBoxLayout()#创建一个竖直布局
        vbox.addWidget(self.formGroupBox)
        vbox.addWidget(self.gridGroupBox)
        self.setLayout(vbox)
        #上面先创建了一个竖直布局,然后在该布局中塞入两个布局,分别是窗体布局和表格布局
        #self.createGridGroupBox(),self.creatFormGroupBox()这两个自定义来管理窗体布局和表格布局
        self.center()
        self.setWindowTitle('hello')
        dir_path = os.path.abspath(os.path.dirname(__file__))+'\image\\favicon.ico'
        self.setWindowIcon(QIcon(dir_path))
        self.show()

    def createGridGroupBox(self):
        self.gridGroupBox = QGroupBox()#这几个类的父类
        grid = QGridLayout()#创建一个表格布局
        names = ['清空', '删除', '', '启动',
                 '7', '8', '9', '/',
                '4', '5', '6', '*',
                 '1', '2', '3', '-',
                '0', '.', '=', '+']

        positions = [(i,j) for i in range(5) for j in range(4)]#五行四列

        for position, name in zip(positions, names):#利用一个循环来创建按钮
            if name == '':
                continue
            button = QPushButton(name)
            grid.addWidget(button, *position)#利用zip性质传参


        self.gridGroupBox.setLayout(grid)#将布局设置过去


    def creatFormGroupBox(self):
        self.formGroupBox = QGroupBox()
        form = QFormLayout()#创建一个窗体布局
        performanceLabel = QLabel("表达式:")#设置不可修改文字
        performanceEditor = QLineEdit("1+1")#设置可被修改文字
        form.addRow(performanceLabel,performanceEditor)
        self.formGroupBox.setLayout(form)


if __name__ == '__main__':

    app = QApplication(sys.argv)
    ex = Example()
    sys.exit(app.exec_())
效果图如下:
~有问题欢迎交流


