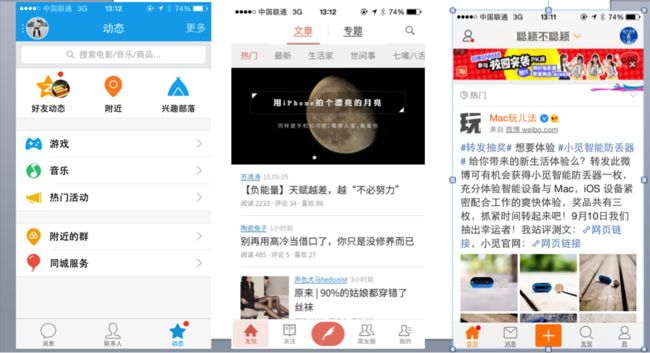
- 在许多我们日常使用的应用中,我们会发现,他们的界面骨架(或者说样子)基本相同
-
像QQ,,微博等
-
- 他们有一个相似的基本界面骨架是这样子的:
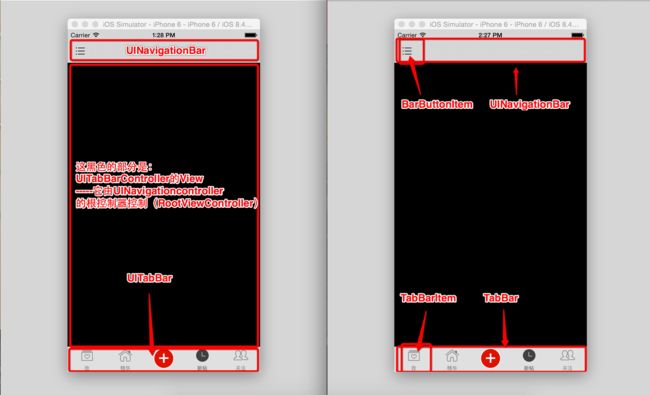
- 首先,界面有一些什么组成
TabBar上切换不同的导航控制器(界面),NavigationBar上点击BarButtonItem跳转(push)到下一个界面
那么这样的基本界面骨架,我们如何去搭建呢?
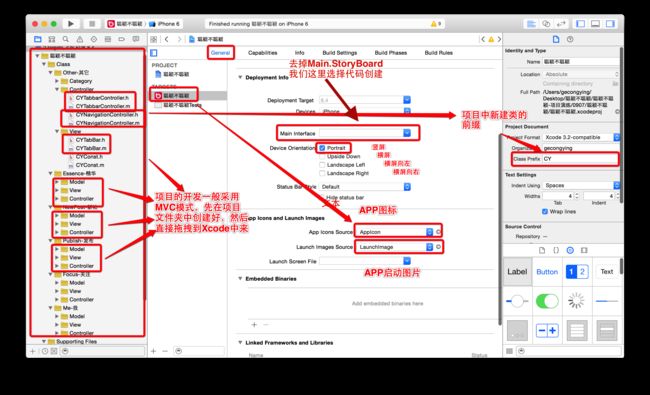
iPhone项目开始时候要处理注意的地方
-
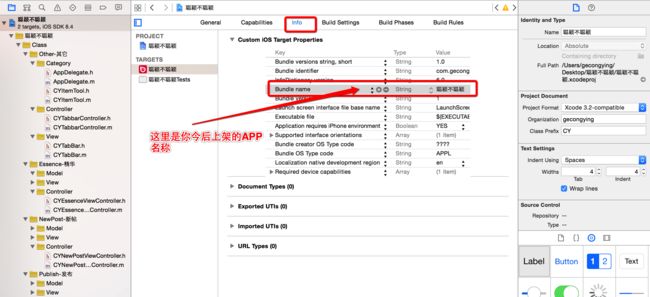
APP的名称设置
搭建流程思考
-
1.自定义TabBarController
- 添加四个子控制器
- 设置好四个子控制器的相关属性(TabBarItem内部图片和文字的设置)
-
2.自定义NavigationController(重写push:方法,封装返回键)
- 这里的返回键的封装(设置)是很有用也很常见的,也很方便,掌握了,今后直接在项目中拿出来用就可以了
- 但这里是先搭建基本骨架。有关总结在我的另外一篇文章《项目开发中封装一个返回键--很实用》《项目开发中封装一个BarButtonItem类别-很实用》
我们这里界面的搭建可以选择storyboard搭建,但这种情况一般是界面比较少的情况下选用。
当我们的界面很多,到时候要各种进行界面间跳转的时候,我们仍然使用storyboard搭建的话,要是几十个控制器之间的跳转,眼睛都看花你的。
所以界面多得时候,我们选择代码创建
这里我将选择代码创建,让大家知道一个大概的思路
- 在AppDelegate.m文件中重新创建,而不会使用Main.storyboard.
- 先创建根控制器
- (BOOL)application:(UIApplication *)application didFinishLaunchingWithOptions:(NSDictionary *)launchOptions {
    // 1.创建窗口
    self.window = [[UIWindow alloc] init];
    self.window.frame = [UIScreen mainScreen].bounds;

    // 2.设置窗口的根控制器
    self.window.rootViewController = [[CYTabbarController alloc] init];

    // 3.显示窗口
    [self.window makeKeyAndVisible];

    return YES;
}
- 新建一个(自定义)TabBarController
#import "CYTabbarController.h"

@interface CYTabbarController ()

@end

@implementation CYTabbarController

- (void)viewDidLoad {
    [super viewDidLoad];

    // UIControlStateNormal情况下的文字属性
    NSMutableDictionary *normalAtrrs = [NSMutableDictionary dictionary];
    // 文字颜色
    normalAtrrs[NSForegroundColorAttributeName] = [UIColor grayColor];

    // UIControlStateSelected情况的文字属性
    NSMutableDictionary *selectedAtrrs = [NSMutableDictionary dictionary];
    // 文字颜色
    selectedAtrrs[NSForegroundColorAttributeName] = [UIColor darkGrayColor];


    UITabBarItem *item = [UITabBarItem appearance];
    [item setTitleTextAttributes:normalAtrrs forState:UIControlStateNormal];
    [item setTitleTextAttributes:selectedAtrrs forState:UIControlStateSelected];

    // 添加四个子控制器
    UIViewController *vc1 = [[UIViewController alloc] init];
    vc1.tabBarItem.title = @"精华";
    vc1.tabBarItem.image = [UIImage imageNamed:@"tabBar_essence_icon"];
    vc1.tabBarItem.selectedImage = [UIImage imageNamed:@"tabBar_essence_click_icon"];
    vc1.view.backgroundColor = [UIColor greenColor];
    [self addChildViewController:vc1];

    UIViewController *vc2 = [[UIViewController alloc] init];
    vc2.tabBarItem.title = @"新帖";
    vc2.tabBarItem.image = [UIImage imageNamed:@"tabBar_new_icon"];
    vc2.tabBarItem.selectedImage = [UIImage imageNamed:@"tabBar_new_click_icon"];
    vc2.view.backgroundColor = [UIColor grayColor];
    [self addChildViewController:vc2];

    UIViewController *vc3 = [[UIViewController alloc] init];
    vc3.tabBarItem.title = @"关注";
    vc3.tabBarItem.image = [UIImage imageNamed:@"tabBar_friendTrends_icon"];
    vc3.tabBarItem.selectedImage = [UIImage imageNamed:@"tabBar_friendTrends_click_icon"];
    vc3.view.backgroundColor = [UIColor blueColor];
    [self addChildViewController:vc3];

    UIViewController *vc4 = [[UIViewController alloc] init];
    vc4.tabBarItem.title = @"我";
    vc4.tabBarItem.image = [UIImage imageNamed:@"tabBar_me_icon"];
    vc4.tabBarItem.selectedImage = [UIImage imageNamed:@"tabBar_me_click_icon"];
    vc4.view.backgroundColor = [UIColor yellowColor];
    [self addChildViewController:vc4];
}


@end
- 这样就创建成功了,你说快不快!
- 当然不可能代码这么多,下面我会进行抽取
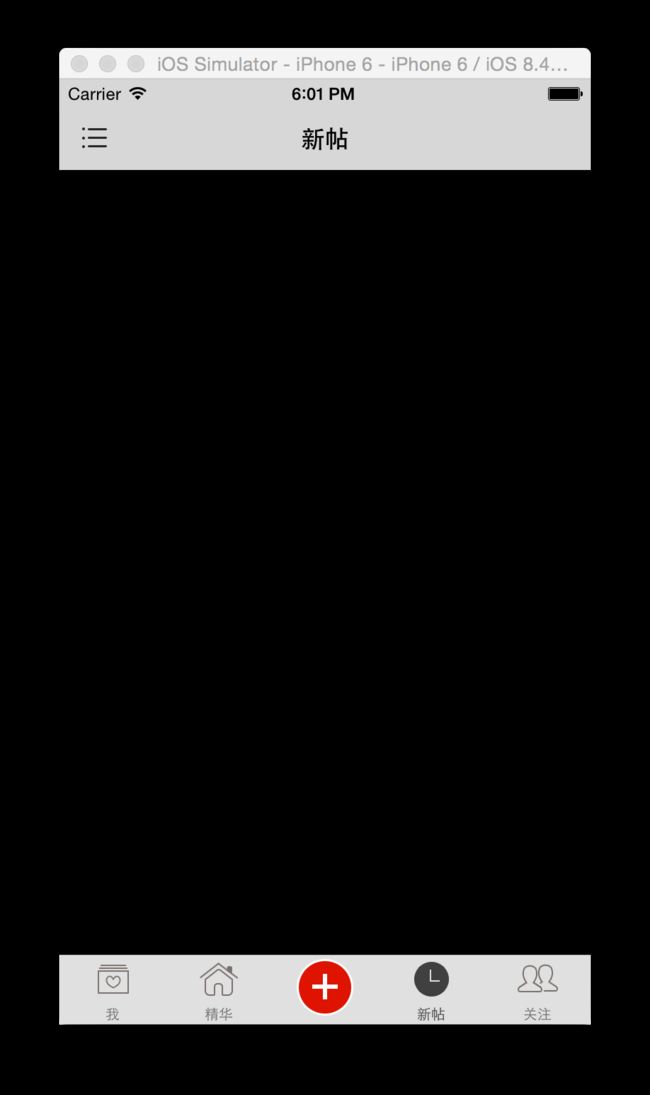
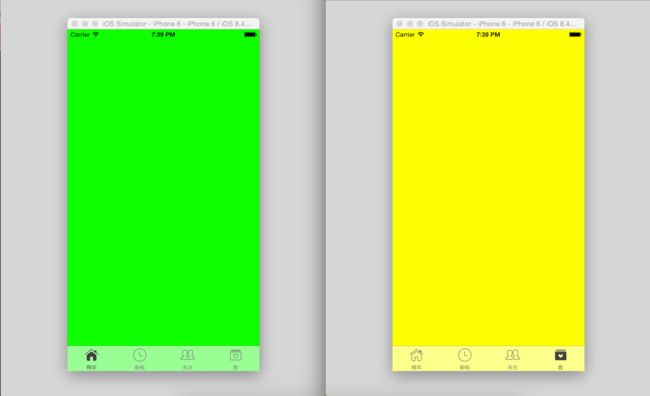
- 运行式样:
代码的抽取
#import "CYTabbarController.h"

@interface CYTabbarController ()

@end

@implementation CYTabbarController

- (void)viewDidLoad {
    [super viewDidLoad];

    // 开始抽取代码了:
    [self setUpItem];
    [self setUpChildVc];


/**
 *  设置Item的属性
 */
- (void)setUpItem
{
    // UIControlStateNormal情况下的文字属性
    NSMutableDictionary *normalAtrrs = [NSMutableDictionary dictionary];
    // 文字颜色
    normalAtrrs[NSForegroundColorAttributeName] = [UIColor grayColor];

    // UIControlStateSelected情况的文字属性
    NSMutableDictionary *selectedAtrrs = [NSMutableDictionary dictionary];
    // 文字颜色
    selectedAtrrs[NSForegroundColorAttributeName] = [UIColor darkGrayColor];

    // 统一给所有的UITabBatItem设置文字属性
    // 只有后面带有UI_APPEARANCE_SELECTOR方法的才可以通过appearance来设置
    UITabBarItem *item = [UITabBarItem appearance];
    [item setTitleTextAttributes:normalAtrrs forState:UIControlStateNormal];
    [item setTitleTextAttributes:selectedAtrrs forState:UIControlStateSelected];
}

/**
 *  设置setUpChildVc的属性,添加所有的子控件
 */
- (void)setUpChildVc
{
    [self setUpChildVc:[UIViewController class]  title:@"精华" image:@"tabBar_essence_icon" selectedImage:@"tabBar_essence_click_icon"];
    [self setUpChildVc:[UIViewController class]  title:@"新帖" image:@"tabBar_new_icon" selectedImage:@"tabBar_new_click_icon"];
    [self setUpChildVc:[UIViewController class]  title:@"关注" image:@"tabBar_friendTrends_icon" selectedImage:@"tabBar_friendTrends_click_icon"];
    [self setUpChildVc:[UIViewController class]  title:@"我" image:@"tabBar_me_icon" selectedImage:@"tabBar_me_click_icon"];
//    // 添加四个子控制器
//    UIViewController *vc1 = [[UIViewController alloc] init];
//    vc1.tabBarItem.title = @"精华";
//    vc1.tabBarItem.image = [UIImage imageNamed:@"tabBar_essence_icon"];
//    vc1.tabBarItem.selectedImage = [UIImage imageNamed:@"tabBar_essence_click_icon"];
//    vc1.view.backgroundColor = [UIColor greenColor];
//    [self addChildViewController:vc1];
//
//    UIViewController *vc2 = [[UIViewController alloc] init];
//    vc2.tabBarItem.title = @"新帖";
//    vc2.tabBarItem.image = [UIImage imageNamed:@"tabBar_new_icon"];
//    vc2.tabBarItem.selectedImage = [UIImage imageNamed:@"tabBar_new_click_icon"];
//    vc2.view.backgroundColor = [UIColor grayColor];
//    [self addChildViewController:vc2];
//
//    UIViewController *vc3 = [[UIViewController alloc] init];
//    vc3.tabBarItem.title = @"关注";
//    vc3.tabBarItem.image = [UIImage imageNamed:@"tabBar_friendTrends_icon"];
//    vc3.tabBarItem.selectedImage = [UIImage imageNamed:@"tabBar_friendTrends_click_icon"];
//    vc3.view.backgroundColor = [UIColor blueColor];
//    [self addChildViewController:vc3];
//
//    UIViewController *vc4 = [[UIViewController alloc] init];
//    vc4.tabBarItem.title = @"我";
//    vc4.tabBarItem.image = [UIImage imageNamed:@"tabBar_me_icon"];
//    vc4.tabBarItem.selectedImage = [UIImage imageNamed:@"tabBar_me_click_icon"];
//    vc4.view.backgroundColor = [UIColor yellowColor];
//    [self addChildViewController:vc4];
}

- (void)setUpChildVc:(Class)vcClass title:(NSString *)title image:(NSString *)image selectedImage:(NSString *)selectedImage
{
    UIViewController *vc = [[UIViewController alloc] init];
    vc.tabBarItem.title = title;
    vc.tabBarItem.image = [UIImage imageNamed:image];
    vc.tabBarItem.selectedImage = [UIImage imageNamed:selectedImage];
    // 创建一个随机色
    vc.view.backgroundColor = [UIColor colorWithRed:arc4random_uniform(100)/100.0 green:arc4random_uniform(100)/100.0 blue:arc4random_uniform(100)/100.0 alpha:1.0];
    [self addChildViewController:vc];
}
@end
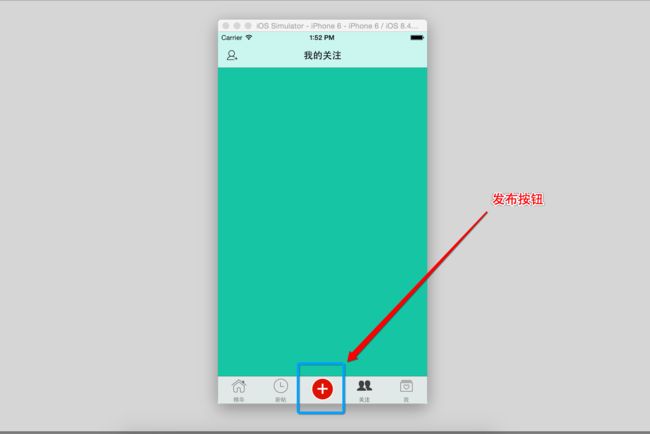
- 在微博和APP中在TabBar中间有一个加号按钮,用于发布或者别的功能
- 那么这么重要的一个按钮,我们如何实现呢?
- 首先,上面系统的TabBar是满足不了我们了,所以我们只能自定义一个TabBar
- 自定义TabBar后,就要开始在上面进行子控件的布局,修改他们的位置了
- 重写initWithFrame:方法以及LayoutSubViews:方法,布局子控件
- 在自定义的CYTabBarController中
//
//  CYTabbarController.m
//  聪颖不聪颖
//  Copyright (c) 2015年 congying. All rights reserved.
//

#import "CYTabbarController.h"
#import "CYEssenceViewController.h"
#import "CYFocusViewController.h"
#import "CYPublishViewController.h"
#import "CYNewPostViewController.h"
#import "CYMeViewController.h"
#import "CYTabBar.h"
#import "CYNavigationController.h"

@interface CYTabbarController ()

@end

@implementation CYTabbarController

- (void)viewDidLoad {
    [super viewDidLoad];
    // 开始抽取代码了:

    // 抽取Item属性
    [self setUpItem];

    // 布局子控件
    [self setUpChildVc];

    // 处理tabBar
    [self setUpTabBar];

}
/**
 *  处理tabBar
 */
- (void)setUpTabBar
{
    [self setValue:[[CYTabBar alloc] init] forKey:@"tabBar"];
}

/**
 *  设置Item的属性
 */
- (void)setUpItem
{
    // UIControlStateNormal情况下的文字属性
    NSMutableDictionary *normalAtrrs = [NSMutableDictionary dictionary];
    // 文字颜色
    normalAtrrs[NSForegroundColorAttributeName] = [UIColor grayColor];

    // UIControlStateSelected情况的文字属性
    NSMutableDictionary *selectedAtrrs = [NSMutableDictionary dictionary];
    // 文字颜色
    selectedAtrrs[NSForegroundColorAttributeName] = [UIColor darkGrayColor];

    // 统一给所有的UITabBatItem设置文字属性
    // 只有后面带有UI_APPEARANCE_SELECTOR方法的才可以通过appearance来设置
    UITabBarItem *item = [UITabBarItem appearance];
    [item setTitleTextAttributes:normalAtrrs forState:UIControlStateNormal];
    [item setTitleTextAttributes:selectedAtrrs forState:UIControlStateSelected];
}

/**
 *  设置setUpChildVc的属性,添加所有的子控件
 */
- (void)setUpChildVc
{
    [self setUpChildVc:[[CYEssenceViewController alloc] init] title:@"精华" image:@"tabBar_essence_icon" selectedImage:@"tabBar_essence_click_icon"];
    [self setUpChildVc:[[CYNewPostViewController alloc] init] title:@"新帖" image:@"tabBar_new_icon" selectedImage:@"tabBar_new_click_icon"];
    [self setUpChildVc:[[CYFocusViewController alloc] init] title:@"关注" image:@"tabBar_friendTrends_icon" selectedImage:@"tabBar_friendTrends_click_icon"];
    [self setUpChildVc:[[CYMeViewController alloc] init] title:@"我" image:@"tabBar_me_icon" selectedImage:@"tabBar_me_click_icon"];
}

- (void)setUpChildVc:(UIViewController *)vc title:(NSString *)title image:(NSString *)image selectedImage:(NSString *)selectedImage
{
    // 包装一个导航控制器
    CYNavigationController *nav = [[CYNavigationController alloc] initWithRootViewController:vc];
    [self addChildViewController:nav];

    // 设置子控制器的tabBarItem
    nav.tabBarItem.title = title;
    nav.tabBarItem.image = [UIImage imageNamed:image];
    nav.tabBarItem.selectedImage = [UIImage imageNamed:selectedImage];
    nav.view.backgroundColor = [UIColor colorWithRed:arc4random_uniform(100)/100.0 green:arc4random_uniform(100)/100.0 blue:arc4random_uniform(100)/100.0 alpha:1.0];
}


@end
- 自定义一个TabBar
#import "CYTabBar.h"

@interface CYTabBar()
/** 增加发布按钮*/
@property (nonatomic, weak) UIButton *publishButton;
@end

@implementation CYTabBar


- (instancetype) initWithFrame:(CGRect)frame
{
    if (self = [super initWithFrame:frame]) {
        // 设置背景图片
        self.backgroundImage = [UIImage imageNamed:@"tabbar-light"];

        UIButton *publishButton = [UIButton buttonWithType:UIButtonTypeCustom];
        [publishButton setBackgroundImage:[UIImage imageNamed:@"tabBar_publish_icon"] forState:UIControlStateNormal];
        [publishButton setBackgroundImage:[UIImage imageNamed:@"tabBar_publish_click_icon"] forState:UIControlStateHighlighted];
        [publishButton sizeToFit];
        // 监听按钮点击(发布按钮)
        [publishButton addTarget:self action:@selector(publishClick) forControlEvents:UIControlEventTouchUpInside];
        //        publishButton.center = CGPointMake(self.frame.size.width * 0.5, self.frame.size.height * 0.5);
        [self addSubview:publishButton];
        self.publishButton = publishButton;

    }
    return self;
}
- (void)publishClick
{
    NSLog(@"%s",__func__);
}


/**
 *  重写layoutSubviews方法,布局子控件
 */
- (void)layoutSubviews
{
    [super layoutSubviews];

    // TabBar的尺寸
    CGFloat width = self.frame.size.width;
    CGFloat height = self.frame.size.height;
    // 设置发布按钮的位置
    self.publishButton.center = CGPointMake(width * 0.5, height * 0.5);

    // 设置索引
    int index = 0;
    // 按钮的尺寸
    CGFloat tabBarButtonW = self.frame.size.width / 5;
    CGFloat tabBarButtonH = self.frame.size.height;
    CGFloat tabBarButtonY = 0;

    // 设置四个TabBarButton的frame
    for (UIView *tabBarButton in self.subviews) {
        if (![NSStringFromClass(tabBarButton.class) isEqualToString:@"UITabBarButton"]) continue;

        // 计算按钮X的值
        CGFloat tabBarButtonX = index * tabBarButtonW;

        if (index >= 2) {
            tabBarButtonX += tabBarButtonW; // 给后面2个button增加一个宽度的X值
        }
        tabBarButton.frame = CGRectMake(tabBarButtonX, tabBarButtonY, tabBarButtonW, tabBarButtonH);
        index++;

    }
}
一些细节方面的注意处理以及一些补充:
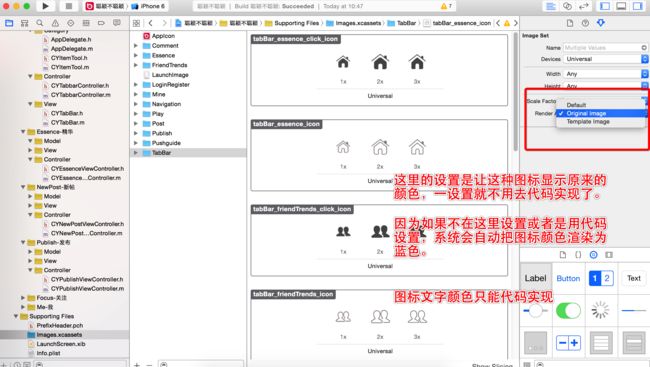
- TabBarItem内部图片和文字的设置
- 为什么要设置呢:
- 因为不设置的话,苹果就会自动将它渲染成蓝色,而不是我们(客户)想要的样式
- 图标高亮和正常状态是如何设置它本身的颜色
- Xcode中设置,一劳永逸
- 代码实现方式(了解一下,知道的办法多一点毕竟不是坏事):
    //    UIImage *tempImage = [UIImage imageNamed:@"tabBar_essence_click_icon"];
    //    UIImage *selectedImage = [tempImage imageWithRenderingMode:UIImageRenderingModeAlwaysOriginal];
    //    vc1.tabBarItem.selectedImage = selectedImage;
    vc1.tabBarItem.selectedImage = [[UIImage imageNamed:@"tabBar_essence_click_icon" ]imageWithRenderingMode:UIImageRenderingModeAlwaysOriginal];
    // 这里的设置可以不让系统给图片渲染成蓝色
- 如何设置TabBarItem的文字颜色呢?只能代码了
// UIControlStateNormal情况下的文字属性
    NSMutableDictionary *normalAtrrs = [NSMutableDictionary dictionary];
    // 文字颜色
    normalAtrrs[NSForegroundColorAttributeName] = [UIColor grayColor];

    // UIControlStateSelected情况的文字属性
    NSMutableDictionary *selectedAtrrs = [NSMutableDictionary dictionary];
    // 文字颜色
    selectedAtrrs[NSForegroundColorAttributeName] = [UIColor darkGrayColor];


    UITabBarItem *item = [UITabBarItem appearance];
    [item setTitleTextAttributes:normalAtrrs forState:UIControlStateNormal];
    [item setTitleTextAttributes:selectedAtrrs forState:UIControlStateSelected];
换肤
- 通过设置appearance来进行换肤,一设置,全部控件都跟着变
- 但是有条件:
    // 统一给所有的UITabBatItem设置文字属性
    // 只有后面带有UI_APPEARANCE_SELECTOR方法的才可以通过appearance来设置
    UITabBarItem *item = [UITabBarItem appearance];
    [item setTitleTextAttributes:normalAtrrs forState:UIControlStateNormal];
    [item setTitleTextAttributes:selectedAtrrs forState:UIControlStateSelected];
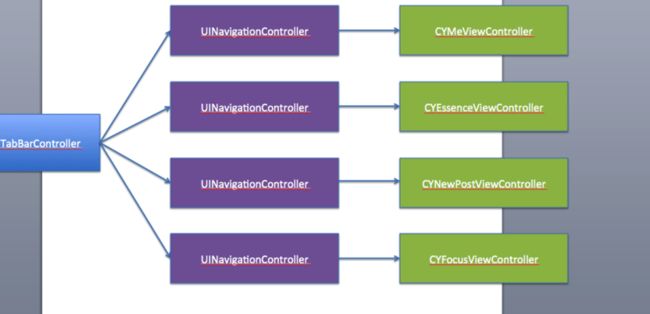
- 控制器之间的关系
- 由上图的关系可以知道下面注释的代码与没注释的代码效果是一样的
    // 包装一个导航控制器
    UINavigationController *nav = [[UINavigationController alloc] initWithRootViewController:vc];
    [self addChildViewController:nav];

    nav.tabBarItem.title = title;
    nav.tabBarItem.image = [UIImage imageNamed:image];
    nav.tabBarItem.selectedImage = [UIImage imageNamed:selectedImage];
    nav.view.backgroundColor = [UIColor colorWithRed:arc4random_uniform(100)/100.0 green:arc4random_uniform(100)/100.0 blue:arc4random_uniform(100)/100.0 alpha:1.0];

//    vc.tabBarItem.title = title;
//    vc.tabBarItem.image = [UIImage imageNamed:image];
//    vc.tabBarItem.selectedImage = [UIImage imageNamed:selectedImage];
//    vc.view.backgroundColor = [UIColor
colorWithRed:arc4random_uniform(100)/100.0 green:arc4random_uniform(100)/100.0 blue:arc4random_uniform(100)/100.0 alpha:1.0];
- 代码抽取里的代码严谨点替换成下面的代码
/**
 *  设置setUpChildVc的属性,添加所有的子控件
 */
- (void)setupChildVc:(UIViewController *)vc title:(NSString *)title image:(NSString *)image selectedImage:(NSString *)selectedImage
{
    [self setUpChildVc:[[CYEssenceViewController alloc] init]  title:@"精华" image:@"tabBar_essence_icon" selectedImage:@"tabBar_essence_click_icon"];
    [self setUpChildVc:[[CYNewPostViewController alloc] init]  title:@"新帖" image:@"tabBar_new_icon" selectedImage:@"tabBar_new_click_icon"];
    [self setUpChildVc:[[CYFocusViewController  alloc] init]  title:@"关注" image:@"tabBar_friendTrends_icon" selectedImage:@"tabBar_friendTrends_click_icon"];
    [self setUpChildVc:[CYMeViewController alloc]  title:@"我" image:@"tabBar_me_icon" selectedImage:@"tabBar_me_click_icon"];
}

    // 包装一个导航控制器
    UINavigationController *nav = [[UINavigationController alloc] initWithRootViewController:vc];
    [self addChildViewController:nav];

    nav.tabBarItem.title = title;
    nav.tabBarItem.image = [UIImage imageNamed:image];
    nav.tabBarItem.selectedImage = [UIImage imageNamed:selectedImage];
    nav.view.backgroundColor = [UIColor colorWithRed:arc4random_uniform(100)/100.0 green:arc4random_uniform(100)/100.0 blue:arc4random_uniform(100)/100.0 alpha:1.0];
}
- 下面两种方法都可以传图片
    // 这样传图片,它传的图片尺寸和原始尺寸一样
    self.navigationItem.titleView = [[UIImageView alloc] initWithImage:[UIImage imageNamed:@"MainTitle"]];
    // 这两种方法所实现的效果是一样的,但是很明显用上面的
//    UIImageView *titleView = [[UIImageView alloc] init];
//    titleView.image = [UIImage imageNamed:@"MainTitle"];
//    [titleView sizeToFit];
//    self.navigationItem.titleView = titleView;
- 打印(获取)window的三种方法:
NSLog(@"%@ %@ %@", self.view.superview, self.view.window, [UIApplication sharedApplication].keyWindow);
- 创建一个随机色
nav.view.backgroundColor = [UIColor colorWithRed:arc4random_uniform(100)/100.0 green:arc4random_uniform(100)/100.0 blue:arc4random_uniform(100)/100.0 alpha:1.0];
- 小小注意点:
    self.title =@"我的关注";
    相当于下面两句
    self.navigationItem.title = @"我的关注";
    self.tabBarItem.title = @"我的关注";
一般在公司项目开始开发时候,你在公司会给你下面相关文档
API\接口文档
-
作用
- 跟服务器进行交互的文档
-
格式
- HTML网页
- word文档
-
开发进度文档
- 任务\进度
-
需求文档
- 有哪些模块
- 有哪些功能
- 大致的界面
-
原型图
- 详细的界面描述
- 界面的跳转关系
- 源码地址:https://github.com/Tuberose621/-APP-
- 界面之间跳转后的返回键如何巧妙的设置呢?
- 已经封装好了,在另外的文章中有--《项目开发中封装一个返回键--很实用》《项目开发中封装一个BarButtonItem类别-很实用》
