CentOS7.3编译安装LNMP之(三)PHP-7.2.18安装
友情推荐
CentOS7.3编译安装LNMP之(一)Nginx-1.16.0安装
CentOS7.3编译安装LNMP之(二)MySQL-5.7.26安装
1、下载
# cd /mydata/
# wget https://www.php.net/distributions/php-7.2.18.tar.gz

最后出现:‘php-7.2.18.tar.gz.3’ saved [19704090]  下载完整
2、安装依赖
# yum -y install libxml2 libxml2-devel openssl openssl-devel bzip2 bzip2-devel libcurl libcurl-devel libjpeg libjpeg-devel libpng libpng-devel freetype freetype-devel gmp gmp-devel libmcrypt libmcrypt-devel readline readline-devel libxslt libxslt-devel3、编辑配置项生成安装文件 Makefile
# tar -zxvf php-7.2.18.tar.gz
# cd php-7.2.18/
# 编辑PHP的配置项
# ./configure --prefix=/usr/local/php --with-config-file-path=/etc --enable-fpm --with-fpm-user=nginx --with-fpm-group=nginx --enable-inline-optimization --disable-debug --disable-rpath --enable-shared --enable-soap --with-libxml-dir --with-xmlrpc --with-openssl --with-mhash --with-pcre-regex --with-sqlite3 --with-zlib --enable-bcmath --with-iconv --with-bz2 --enable-calendar --with-curl --with-cdb --enable-dom --enable-exif --enable-fileinfo --enable-filter --with-pcre-dir --enable-ftp --with-gd --with-openssl-dir --with-jpeg-dir --with-png-dir --with-zlib-dir --with-freetype-dir  --enable-gd-jis-conv --with-gettext --with-gmp --with-mhash --enable-json --enable-mbstring --enable-mbregex --enable-mbregex-backtrack --with-libmbfl --with-onig --enable-pdo --with-mysqli=mysqlnd --with-pdo-mysql=mysqlnd --with-zlib-dir --with-pdo-sqlite --with-readline --enable-session --enable-shmop --enable-simplexml --enable-sockets --enable-sysvmsg --enable-sysvsem --enable-sysvshm --enable-wddx --with-libxml-dir --with-xsl --enable-zip --enable-mysqlnd-compression-support --with-pear --enable-opcache --disable-fileinfo
几个重点配置项:
./configure
--prefix=/usr/local/php //定义PHP安装目录
-with-config-file-path=/etc //指定php.ini文件的放置路径
--enable-fpm //开启php-fpm 必须,
--with-fpm-user=nginx //PHP的用户为nginx
--with-fpm-group=nginx PHP的用户组为nginx
--disable-fileinfo //当服务器内存为1G时,此项很有必要
注意PHP的用户为nginx、用户组为nginx 。和上面安装的nginx的用户、用户组一定要相同。
如果出现如下报错:configure: WARNING: unrecognized options: --with-mcrypt, --enable-gd-native-ttf
说明此版本不再支持 --with-mcrypt, --enable-gd-native-ttf 这两个选项, 直接删除,重新编辑即可。
最后出现
4、make && make install
# make
最新出现
make: *** [ext/fileinfo/libmagic/apprentice.lo] Error 1
是因为服务器内存不足1G。只需要在配置命令中添加 --disable-fileinfo即可。
再次执行
# ./configure .....  --disable-fileinfo

再次执行
# make

。。。
整个make 过程大约需要20-30分钟,最后出现
invertedregexiterator.inc
pharcommand.inc
directorytreeiterator.inc
directorygraphiterator.inc
clicommand.inc
phar.inc

Build complete.
Don't forget to run 'make test'.

继续:

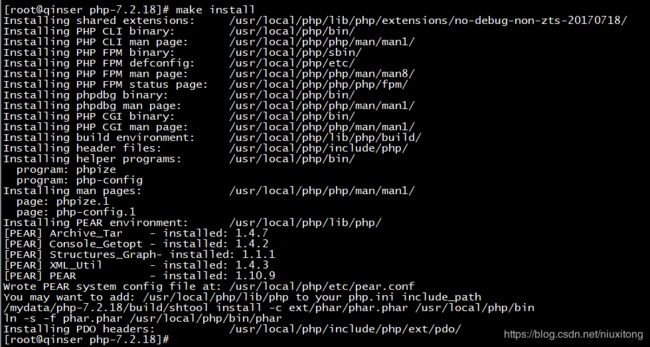
# make install
安装成功!
5、添加环境变量到PHP中
# vim /etc/profile

在此文件的最后添加如下两行
PATH=$PATH:/usr/local/php/bin
export PATH

# source /etc/profile  使配置立即生效
再次检查:# php -v
# echo $PATH
/usr/local/sbin:/usr/local/bin:/usr/sbin:/usr/bin:/usr/local/nginx/sbin:/usr/local/mysql/bin:/usr/local/php/bin:/root/bin
OK 已经配置成功
6、配置PHP-fpm 并设置开启重启
进入php的安装包(注意是解压出来的那个安装包,而不是安装目录)
# cd /mydata/php-7.2.17/
# ls -al
可以找到两个 php.ini-development(测试配置文件) php.ini-production生产环境配置文件
复制以下四个文件。
# cp php.ini-production /etc/php.ini      //设置PHP启动文件
# cp sapi/fpm/init.d.php-fpm /etc/init.d/php-fpm  //把php-fpm放入系统管理配置项中
# chmod +x /etc/init.d/php-fpm    //为其添加可执行权限

# cp /usr/local/php/etc/php-fpm.conf.default /usr/local/php/etc/php-fpm.conf
# cp /usr/local/php/etc/php-fpm.d/www.conf.default /usr/local/php/etc/php-fpm.d/www.conf

添加到环境系统启动项
# chkconfig --add php-fpm             //添加到开机重启
# chkconfig php-fpm on

查看是否添加成功
# chkconfig --list
......
mysqld          0:off   1:off   2:on    3:on    4:on    5:on    6:off
netconsole      0:off   1:off   2:off   3:off   4:off   5:off   6:off
network         0:off   1:off   2:on    3:on    4:on    5:on    6:off
nginx           0:off   1:off   2:on    3:on    4:on    5:on    6:off
php-fpm         0:off   1:off   2:on    3:on    4:on    5:on    6:off  --- php-fpm 添加成功


启动 php-fpm
# chkconfig php-fpm on            //启动php-fpm
# /etc/init.d/php-fpm start
出现 Starting php-fpm  done
# /etc/init.d/php-fpm  status     //查看PHP(也就是php-fpm)运行状态
php-fpm (pid 2306) is running...   运行成功
7、常用命令(启动PHP 也就是 php-fpm)
/etc/init.d/php-fpm  start    开启服务
/etc/init.d/php-fpm  stop    停止服务
/etc/init.d/php-fpm  status    查看状态
/etc/init.d/php-fpm  restart    重启服务
/etc/init.d/php-fpm  reload    平滑重启

加入系统服务以后可以使用
service php-fpm  start/stop/status/restart/reload
8、PHP安装路径
# netstat -ntpl     查看9000端口是否开启(PHP使用的是9000端口)
/etc/init.d/php-fpm    php启动文件
/usr/local/php    PHP安装目录
/usr/local/php/bin/  可执行目录
/etc/php.ini      PHP配置文件
9、让nginx支持php
(1)在默认站点目录下创建 index.php
# vim /usr/local/nginx/html/index.php
内容如下:
phpinfo();
?>
(2)修改默认站点的配置文件
# vim /usr/local/nginx/conf/nginx.conf
修改如下两处![]()
Nginx中的PHP是以fastcgi扩展的方式结合起来的,也可以理解为Nginx代理了php的fastcgi,因此还需要开放下面的配置,(把前面的#号去掉)
![]()
(3)重启nginx
访问:http://106.12.2.195/index.php
OK PHP可以正常在nginx服务器运行了
10、让PHP支持Mysql
(1)把phpmyadmin.tar.gz 上传到默认站点 /usr/local/nginx/html/ 并解压 # tar -zxvf phpinfomyadmin.tar.gz
(2)http://106.12.2.195/phpmyadmin/index.php 输入用户名root 密码niu123456 登录,出现如下:![]()
现在报错 mysqli_real_connect(): (HY000/2002): No such file or directory,错误原因默认php中配置的mysqli没有与实际的mysql.sock对应正确;
首先找我们配置的/etc/my.cnf 文件找到mysql.sock的正确路径:
# vim /etc/my.cnf 大约8行: socket对应的路径为: /usr/local/mysql/mysql.sock
#vim /etc/php.ini
大约1040行
![]()
大约1186行
![]()
重启php
# /etc/init.d/php-fpm restart;
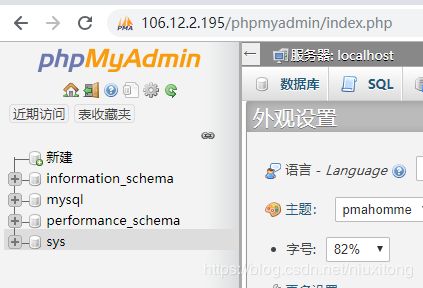
再次登录 http://106.12.2.195/phpmyadmin/index.php
OK 成功
看到下面有这个提示
chmod -R 777 ./tmp 就OK了
到此, 整个LNMP 全部安装配置完成!!


