1、Cocoapods安装
官方文档
通过RubyGems安装CocoaPods。
打开Terminal,执行以下步骤:
$ sudo gem install cocoapods
执行完这句如果报告以下错误:
ERROR: Could not find a valid gem 'cocoapods' (>= 0), here is why:Unable to download data from https://rubygems.org/ - Errno::ETIMEDOUT: Operation timed out - connect(2)(https://rubygems.org/latest_specs.4.8.gz)ERROR: Possible alternatives: cocoa pods
原因是:ruby的软件源rubygems.org使用亚马逊的云服务,被屏蔽了,需要更新一下ruby的源:
查看当前ruby来源.
$ gem sources -l
$ gem sources --remove https://rubygems.org/
$ gem sources -a https://ruby.taobao.org/
$ gem sources -l
如果gem太老,可以尝试升级gem:
$ sudo gem update --system
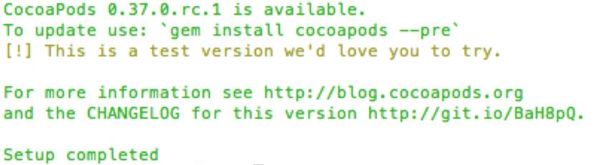
升级成功会有以下提示:
RubyGems system software updated
执行安装命令:
$ sudo gem install cocoapods
或安装制定版本
$ sudo gem install cocoapods -v 0.39.0
- 若出现以下错误:
ERROR: While executing gem ... (Errno::EPERM)
Operation not permitted - /usr/bin/pod
可尝试以下命令安装:
sudo gem install -n /usr/local/bin cocoapods
- 若提示以下错误:
ERROR: Error installing cocoapods:activesupport requires Ruby version >= 2.2.2.
说明ruby版本过低,需要升级:
使用 ruby -v 查看当前版本
并通过rvm升级ruby
- 安装 RVM
参考:Mac上更新Ruby
$ curl -L get.rvm.io | bash -s stable
$ source ~/.bashrc
$ source ~/.bash_profile
测试:rvm -v
- 用RVM升级Ruby
RubyGems 镜像
$ ruby -v ## 查看当前ruby版本
$ rvm list known  ## 列出版本
$ rvm install 1.9.3  ## 安装ruby 1.9.3
若报以下错误

则更新brew:brew update
$ brew outdated (查看哪些软件可以升级)
$ brew upgrade (升级可升级软件)
$ brew cleanup (清理无用安装包)
重新执行: $ rvm install 1.9.3
重新执行:$ sudo gem install cocoapods
$ pod setup ## 安装
到此cocoapods安装完成
- 使用pod创建项目
pod lib create ProjectName - 查找三方库:
pod search AFNetworking
若提示:Unable to find a pod with name, author, summary, or descriptionmatching 。。
则需要清理以下缓存:rm ~/Library/Caches/CocoaPods/search_index.json
注册pod账户,上传自制库
- 查看当前账户:
pod trunk me
若提示:[!]You need to register a session first.
说明没有注册cocoapods,需要进行注册:pod trunk register [email protected] 'Orta Therox' --description='macbook air'- 再次查看
pod trunk me
- 添加新成员(可更改、上传pod库):
pod trunk add-owner ARAnalytics [email protected] - 移除成员:
pod trunk remove-owner 邮箱地址
2. Cocoapods制作
具体可参考文章1:http://blog.csdn.net/hytzxd/article/details/46652173
github上传可参考我的这篇文章2:如何mac客户端上传github
官方文档:公开pod Making a CocoaPod
私有pod Private Pods
① 创建github工程,拷贝文件库
② 添加podspec文件
③ 提交git库
④ 验证spec文件,推送到pod的主干
⑤ 更新本地pod文件
① 在github自己账号下,创建工程并clone到本地,将库文件拷贝至工程

② 添加podspec文件
podspec语法。
创建podspec文件,文件名跟工程名称相同
$ pod spec create EGMonitor ## 无需加后缀
spec配置文件解释:
#
#  Be sure to run `pod spec lint EGMonitor.podspec' to ensure this is a
#  valid spec and to remove all comments including this before submitting the spec.
#
#  To learn more about Podspec attributes see http://docs.cocoapods.org/specification.html
#  To see working Podspecs in the CocoaPods repo see https://github.com/CocoaPods/Specs/
#

Pod::Spec.new do |s|

  # ―――  Spec Metadata  ―――  #
  # sepc文件的名字
  s.name         = "EGMonitor"

  # pod对应版本
  s.version      = "1.0.0"

  #简单的介绍 会显示到pod search中
  s.summary      = "EGMonitor 第二次修改文件."

  # This description is used to generate tags and improve search results.
  #   * Think: What does it do? Why did you write it? What is the focus?
  #   * Try to keep it short, snappy and to the point.
  #   * Write the description between the DESC delimiters below.
  #   * Finally, don't worry about the indent, CocoaPods strips it!
  #s.description  = <<-DESC
  #                DESC

  # 主页
  s.homepage     = "https://github.com/ShaochongDu/EGMonitor"
  # s.screenshots  = "www.example.com/screenshots_1.gif", "www.example.com/screenshots_2.gif"

  # ―――  Spec License  ―――#
  # 开源协议
  s.license      = "MIT"
  # s.license      = { :type => "MIT", :file => "FILE_LICENSE" }

  # ―――  作者信息  ―――#
  # 作者及邮箱
  s.author             = { "Running Du" => "[email protected]" }
  # Or just: s.author    = "Running Du"
  # s.authors            = { "Running Du" => "[email protected]" }
  # s.social_media_url   = "http://twitter.com/Running Du"

  # ―――  平台信息  ―――#
  # 平台及使用版本
  # s.platform     = :ios
  s.platform     = :ios, "7.0"

  #  When using multiple platforms
  # s.ios.deployment_target = "5.0"
  # s.osx.deployment_target = "10.7"
  # s.watchos.deployment_target = "2.0"
  # s.tvos.deployment_target = "9.0"

  # ―――  资源信息  ―――#
  # 资源位置,注意后边的tag ,其实就是他的版本,pods是以git为基础管理的。版本就是tag值了
  s.source       = { :git => "https://github.com/ShaochongDu/EGMonitor.git", :tag => s.version }
   # 若tag带有前缀 "v" 则tag定义为:
  s.source       = { :git => "https://github.com/ShaochongDu/EGMonitor.git", :tag => "v#{s.version}" }

  # ―――  源代码  ―――#
  # 源代码位置,pod会以这个地址下载需要的文件构建pods
  s.source_files  = "EGMonitor/**/*.{h,m}"

  # 不包含资源
  #s.exclude_files = "Classes/Exclude"

  #公共的头文件地址
  # s.public_header_files = "AFNetworking/*.h" #静态库时必须有

  # ―――  资源信息  ―――#
  # s.resource  = "icon.png"
  # s.resources = "Resources/*.png"

  # s.preserve_paths = "FilesToSave", "MoreFilesToSave"

  # ―――  工程链接库  ―――#
  # 引用系统公有framework:’(.ios).framework’. 用”,”分割. 去掉尾部的”.framework”
  # s.framework  = "SomeFramework"
  # s.frameworks = "UIKit", "AnotherFramework"

  # 引用系统静态库:’(.ios).library’。去掉头尾的lib,用”,”分割
  s.library   = "z"
  # s.libraries = "iconv", "xml2"

  # 引用自己生成的framework:’(.ios).vendored_frameworks’。用”,”分割
  # 路径写从.podspec所在目录为根目录的相对路径 ps:这个不要省略.framework
  # s.vendored_frameworks = 'AnalysysSDK/IDFA/*.framework'

  # 引用自己生成的.a静态库(必须以lib打头)
  s.vendored_libraries = "libEGMonitor/libEGMonitor.a"

  # ――― 工程配置 ――― #
  # 是否是arc模式
  s.requires_arc = true

  # s.xcconfig = { "HEADER_SEARCH_PATHS" => "$(SDKROOT)/usr/include/libxml2" }

  # 依赖的第三方类库
  # s.dependency "JSONKit", "~> 1.4"

  # ――― 类库依赖 ――― #
  #  组件化中经常用到,将每个功能拆分为一个库,参考[subspec说明](https://www.jianshu.com/p/85c97dc9ab83),如 afnetworking
  s.subspec 'Serialization' do |ss|
    ss.source_files = 'AFNetworking/AFURL{Request,Response}Serialization.{h,m}'
    ss.public_header_files = 'AFNetworking/AFURL{Request,Response}Serialization.h'
    ss.watchos.frameworks = 'MobileCoreServices', 'CoreGraphics'
    ss.ios.frameworks = 'MobileCoreServices', 'CoreGraphics'
    ss.osx.frameworks = 'CoreServices'
  end
  # Podfile中配置:
  # pod 'AFNetworking', '~> 3.0', :subspecs => ["Serialization", "Reachability"]

end
③ 提交git库
git add *  # 添加本地git库
git commit -m 'add tag' #提交git
git push origin master # push

git tag -a v1.0 -m "version 0.1 released" # 添加标签及备注
git push origin v1.0/git push --tags # 提交本地所有标签

④ 验证spec文件
根据错误提示来修改
$ pod lib lint  ## 不需要联网
或
$ pod spec lint ## 会联网检查sepc repo并关联tag
-- 多个xcode应用,检查报错如下,需要指定xcode,默认指定安装列表中xcode sudo xcode-select -switch /Applications/Xcode.app/Contents/Developer
xcrun: error: active developer path ("/Users/shaochongdu/Downloads/Xcode.app/Contents/Developer") does not exist .....
-- 首次发布cocoapods需要添加tag: git tag '版本号'
-- 执行时关闭.xcworkspace文件
-- 若报错如下图,则检查静态库文件名是否以lib***.a开头(必须以lib开头)
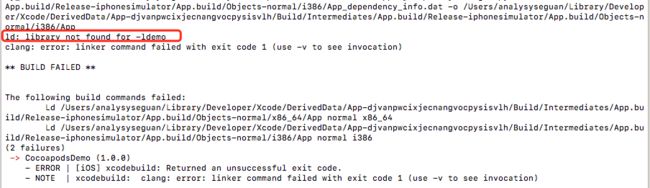
如下报错:
Updating spec repo `trunk`
Validating podspec
 -> xxx (4.4.0)
    - ERROR | [iOS] file patterns: The `resources` pattern did not match any file.
    - ERROR | [iOS] file patterns: The `vendored_frameworks` pattern did not match any file.
    - NOTE  | xcodebuild:  note: Using new build system
    - NOTE  | [iOS] xcodebuild:  note: Planning build
    - NOTE  | [iOS] xcodebuild:  note: Constructing build description
    - NOTE  | [iOS] xcodebuild:  warning: Skipping code signing because the target does not have an Info.plist file. (in target 'App')

[!] The spec did not pass validation, due to 2 errors.
产生原因:第一次推送git时文件中忘记放入相应类库文件,导致检查时无法找到,第二次修改后push-tag,但扔未找到,可能pod存在缓存
解决方案:删除cache文件/Users/xxx/Library/Caches/CocoaPods/Pods,重新执行 pod spec lint
把项目推送到spec目录
$ pod trunk push EGMonitor.podspec
若执行失败如下图,则更新本地的pod文件:$ pod repo update

⑤ 搜索pod库
$ pod search EGMonitor
若提示:Unable to find a pod with name, author, summary, or descriptionmatching 。。
清理本地缓存,重新search:
$ rm ~/Library/Caches/CocoaPods/search_index.json
⑥ trunk操作
$ pod --version
$ pod trunk deprecate EGMonitor ## pods所有版本将失效
成功后提示:
[!] No pod found with the specified name.
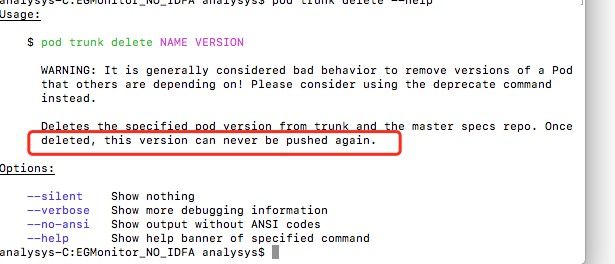
# 删除指定版本,版本号必须大于1.0。从主干和主规范回购中删除指定的pod版本。一旦删除,这个版本将永远不能再被推送。,图3
$ pod trunk delete EGMonitor 1.0.0
成功后提示:
[!] No pod found with the specified name.
删除后,需要pod repo一下,重新search
$ pod repo update
成功后如 图1
$ pod search EGMonitor
以上删除有时需要执行多次不知为何,删除后再次查询如 图2

Cocoapods使用
官方文档 :
Using CocoaPods
pod install vs. pod update
The Podfile
Podfile Syntax Reference
- 检查是否含有pods文件
$ pod search AFNetworking
- 命令行到工程主目录下,新建一个名为Podfile的文件,文件名必须为“Podfile”,该文件的作用是配置依赖库信息,就是告诉CocoaPods去下载和管理哪些依赖库,文件创建好以后,打开文件并加入如下内容
$ vim Podfile
简易版,复杂版请看官方文档
platform :ios, ‘7.0’
target 'EGMonitorDemo' do
pod 'EGMonitor'
pod 'AFNetworking', '~> 3.0'
end
- 安装
安装前关闭当前工程文件
在Podfile目录下执行
$  pod install  ##  次命令回检查specs库并升级较为漫长

可以使用如下命令,跳过specs库检查
$  pod install --verbose --no-repo-update
或
$  pod install --repo-update

查看是否有新版本
$  pod outdated --verbose --no-repo-update

单独更新某个pod
$  pod update AFNetworking

更新所有比当前版本高的pod第三方类库
$  pod update --verbose --no-repo-update
完成之后,重新打开.xcworkspace工程即可