Android学习之Intent的使用
Intent是一个动作的完整描述,包含了产生组件、接收组件和传递数据信息。并且,Intent利用消息实现应用程序之间的交互机制,这种消息描述了应用中一次操作的动作、数据以及附加数据,系统通过该Intent的描述负责找到对应的组件,并将Intent传递给调用的组件,完成组件的调用。
1. Intent 属性:
Intent由动作、数据、分类、类型、组件和扩展信息等内容组成,每个组成都由相应的属性进行表示,并提供设置和获取相应属性的方法,如下表所示:
| 组成 | 属性 | 设置属性方法 | 获取属性方法 |
|---|---|---|---|
| 动作 | Action | setAction() | getAction() |
| 数据 | Data | setData() | getData() |
| 分类 | Category | addCategory() | \ |
| 类型 | Type | setType() | getType() |
| 组件 | Component | setComponent()、setClass()、setClassName() | getComponent() |
| 扩展信息 | Extra | putExtra | getXXXExtra获取不同数据类型的数据,如字符串则使用getStringExtra();getExtra()获取Bundle包 |
1.1. Action属性:
Action指明Intent所要完成的一个抽象的动作。Action属性常量如下表:
| Action常量 | 行为描述 | 使用组件 |
|---|---|---|
| ACTION_CALL | 打电话,即直接呼叫Data中所带电话号码 | Activity |
| ACTION_ANSWER | 接听来电 | |
| ACTION_SEND | 由用户指定发送方式进行数据发送操作 | |
| ACTION_SENDTO | 根据不同的Data类型,通过对应的软件发送数据 | |
| ACTION_VIEW | 根据不同的Data类型,通过对应的软件显示数据 | |
| ACTION_EDIT | 显示可编辑的数据 | |
| ACTION_MAIN | 应用程序的入口 | |
| ACTION_SYNC | 同步服务器与移动设备之间的数据 | |
| ACTION_BATTERY_LOW | 警告设备电量低 | Broadcast |
| ACTION_HEADSET_PLUG | 插入或者拔出耳机 | |
| ACTION_SCREEN_ON | 打开移动设备屏幕 | |
| ACTION_TIMEZONE_CHANGED | 移动设备时区发生变化 |
1.2. Data属性:
Data属性是执行动作的URI和MIME类型,Data属性常量如下表所示:
| Data属性 | 说明 | 示例 |
|---|---|---|
| tel:// | 号码数据格式,后跟电话号码 | tel://123456 |
| mailto:// | 邮件数据格式,后跟邮件收件人地址 | mailto://[email protected] |
| smsto:// | 短信数据格式,后跟短信接收号码 | smsto://123456 |
| content:// | 内容数据格式,后跟需要读取的内容 | content://contacts/people/1 |
| file:// | 文件数据格式,后跟文件路径 | file://sdcard/myfile.txt |
| geo://latitude,longitude | 经纬数据格式 | geo://180,60/font> |
一般Action和Data匹配使用,不同的Action由不同的Data数据指定,如下表所示:
| Action属性 | Data属性 | 描述 |
|---|---|---|
| ACTION_VIEW | content://contacts/people/1 | 显示_id为1的联系人信息 |
| ACTION_EDIT | content://contacts/people/1 | 编辑_id为1的联系人信息 |
| ACTION_VIEW | tel:123456 | 显示电话为123456的联系人信息 |
| ACTION_VIEW | http://www.baidu.com | 在浏览器中浏览该网页 |
| ACTION_VIEW | file:///sdcard/myfile.txt | 读取txt文件 |
1.3. Category属性:
Category用于为Activity增加额外的附加类别信息,Category属性常量如下表所示:
| Category属性 | 说明 | |
|---|---|---|
| CATEGORY_DEFAULT | 默认的执行方式,按照普通Activity的执行方式执行 | |
| CATEGORY_HOME | 该组件为Home Activity | |
| CATEGORY_LAUNCHER | 优先级最高的Activity,通常为入口ACTION_MAIN配合使用 | |
| CATEGORY_BROWSABLE | 可以使用浏览器启动 | |
| CATEGORY_GADGET | 可以内嵌到另外的Activity中 |
1.4. Component属性:
Component属性用于指明Intent目标组件的类名称。
通常Android会根据Intent中包含的其他属性的信息,比如Action、Data/Type、Category进行查找,最终找到与之匹配的目标组件。但如果指定了Component这个属性,Intent则会直接根据组件名查找到相应的组件,而不再执行上述查找过程。指定Component属性后,Intent的其他属性都是可选的。
1.5. Extra属性:
Extra属性用于添加一些附加信息,例如发送邮件,就可以通过Extra属性来添加主题(subject)和内容(body)。通过使用Intent对象的putExtra()方法来添加附加信息。将一个人的姓名附加到Intent对象中,代码如下所示:
    Intent it = new Intent();
    it.putExtra("name",zhangsan);
通过使用Intent对象的getXXXExtra()方法可以获取附加信息。例如,将上面代码存入Intent对象中的人名获取出来,可以使用getStringExtra()方法获取数据,代码为:
String name=intent.getStringExtra("name"); ☆☆☆Android Studio实现使用Intent实现开启网页以及拨打电话
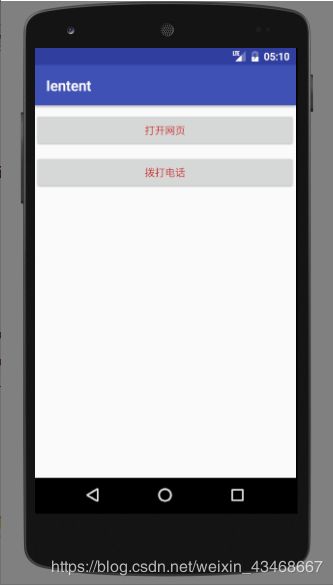
1.打开Android Studio,新建工程后,在activity_main.xml中,建立2个Button。
<RelativeLayout xmlns:android="http://schemas.android.com/apk/res/android"
    xmlns:tools="http://schemas.android.com/tools"
    android:id="@+id/activity_main"
    android:layout_width="match_parent"
    android:layout_height="match_parent"
    tools:context="com.example.a96349.ientent.MainActivity">

    <LinearLayout
        android:orientation="vertical"
        android:layout_width="match_parent"
        android:layout_height="match_parent">

        <Button
            android:text="打开网页"
            android:layout_width="match_parent"
            android:layout_height="wrap_content"
            android:id="@+id/button3"
            android:layout_above="@+id/button4"
            android:layout_marginTop="10dp" />

        <Button
            android:text="拨打电话"
            android:layout_width="match_parent"
            android:layout_height="wrap_content"
            android:id="@+id/button4"
            android:layout_alignStart="@+id/button3"
            android:layout_marginTop="10dp" />
    LinearLayout>

RelativeLayout>
2.在MainActivity.java中,编写相关代码。
package com.example.a96349.ientent;

import android.content.Intent;
import android.net.Uri;
import android.support.v7.app.AppCompatActivity;
import android.os.Bundle;
import android.view.View;
import android.widget.Button;

public class MainActivity extends AppCompatActivity {
    /*
    使用SetAciton()来设置intent的动作
    使用SetData()来设置Intent与动作相关的数据
    使用intent启动Activity
    */
    @Override
    protected void onCreate(Bundle savedInstanceState) {
        super.onCreate(savedInstanceState);
        setContentView(R.layout.activity_main);
        Button bt1=(Button)findViewById(R.id.button);
        Button bt2=(Button)findViewById(R.id.button2);
        bt1.setOnClickListener(new View.OnClickListener() {
            @Override
            public void onClick(View v) {
                Intent it=new Intent();
                it.setAction(Intent.ACTION_VIEW);
                it.setData(Uri.parse("http://www.baidu.com"));
                startActivity(it);
            }
        });

        bt2.setOnClickListener(new View.OnClickListener() {
            @Override
            public void onClick(View v) {
                Intent it=new Intent();
                it.setAction(Intent.ACTION_DIAL);
                it.setData(Uri.parse("tel://10086"));
                startActivity(it);
            }
        });
    }
}
运行结果:
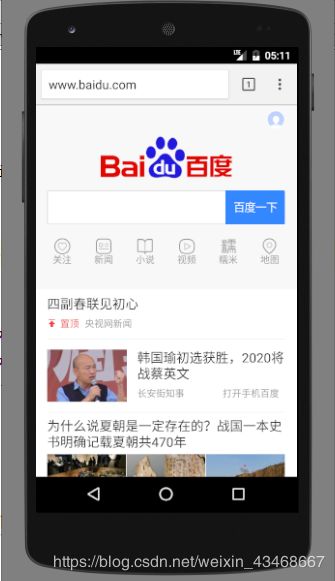
点击打开网页,进入百度
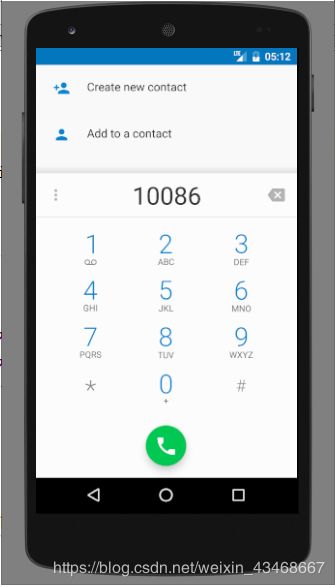
点击拨打电话
2. Intent 解析:
根据Intent寻找目标组件时所采用的方式不同,可以将Intent分为两类:直接(显式)Intent和间接(隐式)Intent。
2.1. 直接(显式)Intent:
直接Intent通过直接指定组件来实现,常用方法有setComponent()、setClassName()或setClass(),示例如下:
   //创建一个Intent对象
   Intent it = new Intent();
   //指定Intent对象的目标组件
   it.setClass(MainActivity.this,Main2Activity.class);
2.2. 间接(隐式)Intent:
间接Intent,通过Intent Filter过滤实现,过滤时通常根据Action、Data和Category属性进行匹配查找。Android提供了两种生成Intent Filter的方式:一种是通过IntentFilter类生成;另一种通过在配置文件AndroidManifest.xml中定义元素生成。 在AndroidManifest.xml配置文件中,Intent Filter以元素来指定。一个组件中可以有多个元素,每个元素描述不同的能力。
3. Activity的跳转
在Android的四大组件Activity、BroadcastReceiver、Service、Content Provider中,前三个都是通过Intent来解析进行跳转的,Intent可以说是连接这四大组件的重要桥梁。
在使用Intent进行Activity之间的跳转时,我们通常有三种Intent跳转方式,即:不带参数的跳转、带参数的跳转以及带返回值的跳转。
☆☆☆Android Studio实现不带参数的跳转以及带参数的跳转
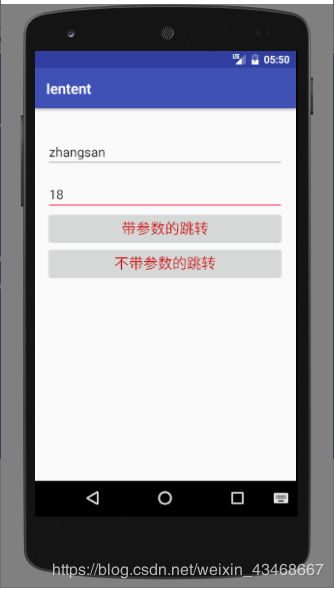
1.打开Android Studio,新建工程后,在activity_main.xml中,建立2个Button,2个Plain Text,新建activity_main2.xml,建立两个Plain Text,接收数据。
<RelativeLayout xmlns:android="http://schemas.android.com/apk/res/android"
    xmlns:tools="http://schemas.android.com/tools"
    android:id="@+id/activity_main"
    android:layout_width="match_parent"
    android:layout_height="match_parent"
    android:paddingBottom="@dimen/activity_vertical_margin"
    android:paddingLeft="@dimen/activity_horizontal_margin"
    android:paddingRight="@dimen/activity_horizontal_margin"
    android:paddingTop="@dimen/activity_vertical_margin"
    tools:context="com.example.a96349.ientent.MainActivity">
    <LinearLayout
        android:orientation="vertical"
        android:layout_width="match_parent"
        android:layout_height="match_parent">
        <EditText
            android:layout_width="match_parent"
            android:layout_height="wrap_content"
            android:inputType="textPersonName"
            android:text="Name"
            android:ems="10"
            android:layout_marginTop="21dp"
            android:id="@+id/editText"
            android:layout_below="@+id/button"
            android:layout_alignStart="@+id/button" />
        <EditText
            android:layout_width="match_parent"
            android:layout_height="wrap_content"
            android:inputType="textPersonName"
            android:text="Age"
            android:ems="10"
            android:layout_below="@+id/editText"
            android:layout_alignStart="@+id/editText"
            android:layout_marginTop="13dp"
            android:id="@+id/editText2" />
        <Button
            android:text="带参数的跳转"
            android:layout_width="match_parent"
            android:layout_height="wrap_content"
            android:id="@+id/button"
            android:layout_alignParentTop="true"
            android:layout_alignStart="@+id/button2"
            android:textColor="@android:color/holo_red_dark"
            android:textSize="20sp" />
        <Button
            android:text="不带参数的跳转"
            android:layout_width="match_parent"
            android:layout_height="wrap_content"
            android:id="@+id/button2"
            android:layout_centerVertical="true"
            android:layout_alignStart="@+id/button3"
            android:textColor="@android:color/holo_red_dark"
            android:textSize="20sp" />
    LinearLayout>
RelativeLayout>
<RelativeLayout xmlns:android="http://schemas.android.com/apk/res/android"
    xmlns:tools="http://schemas.android.com/tools"
    android:id="@+id/activity_main2"
    android:layout_width="match_parent"
    android:layout_height="match_parent"
    android:paddingBottom="@dimen/activity_vertical_margin"
    android:paddingLeft="@dimen/activity_horizontal_margin"
    android:paddingRight="@dimen/activity_horizontal_margin"
    android:paddingTop="@dimen/activity_vertical_margin"
    tools:context="com.example.a96349.ientent.Main2Activity">
    <TextView
        android:text="name"
        android:layout_width="wrap_content"
        android:layout_height="wrap_content"
        android:layout_alignParentTop="true"
        android:layout_centerHorizontal="true"
        android:layout_marginTop="44dp"
        android:id="@+id/textView"
        android:textSize="20sp" />
    <TextView
        android:text="age"
        android:layout_width="wrap_content"
        android:layout_height="wrap_content"
        android:layout_below="@+id/textView"
        android:layout_alignStart="@+id/textView"
        android:layout_marginTop="33dp"
        android:id="@+id/textView2"
        android:textSize="20sp" />
RelativeLayout>
2.在MainActivity.java、Main2Activity.java以及Main3Activity.java中,编写相关代码。
package com.example.a96349.ientent;

import android.content.Intent;
import android.support.v7.app.AppCompatActivity;
import android.os.Bundle;
import android.view.View;
import android.widget.Button;
import android.widget.EditText;

public class MainActivity extends AppCompatActivity {

    @Override
    protected void onCreate(Bundle savedInstanceState) {
        super.onCreate(savedInstanceState);
        setContentView(R.layout.activity_main);
        Button bt=(Button)findViewById(R.id.button);
        Button bt2=(Button)findViewById(R.id.button2);
        final EditText ed1=(EditText)findViewById(R.id.editText);
        final EditText ed2=(EditText)findViewById(R.id.editText2);
        bt.setOnClickListener(new View.OnClickListener() {
            @Override
            public void onClick(View v) {
            /*定义并创建Bundle对象bd,
              使用bd对象的putXXX(key, 数据)指令将数据存入bd中
              定义Intent对象,使用putExtras(bd)将bd作为传递内容
              使用startActivity启动intent对象连接的对应窗体
           */
                Intent it=new Intent(MainActivity.this,Main2Activity.class);
                Bundle bd=new Bundle();
                bd.putString("name",ed1.getText().toString());
                bd.putString("age",ed2.getText().toString());
                it.putExtras(bd);
                startActivity(it);
            }
        });
        bt2.setOnClickListener(new View.OnClickListener() {
            @Override
            public void onClick(View v) {
                Intent it=new Intent();
                it.setClass(MainActivity.this,Main3Activity.class);
                //Intent it=new Intent(MainActivity.this,Main3Activity.class);
                startActivity(it);
            }
        });
    }

}
package com.example.a96349.ientent;
import android.content.Intent;
import android.support.v7.app.AppCompatActivity;
import android.os.Bundle;
import android.widget.TextView;
public class Main2Activity extends AppCompatActivity {
@Override
protected void onCreate(Bundle savedInstanceState) {
super.onCreate(savedInstanceState);
setContentView(R.layout.activity_main2);
TextView tv1=(TextView)findViewById(R.id.textView);
TextView tv2=(TextView)findViewById(R.id.textView2);
/*定义intent,使用getIntent()方法来获取已有的对象
定义Bundle,使用intent来获取已有的Bundle对象
从新Bundle对象中,使用getXXX(key)来获取对应的数据
*/
Intent it=this.getIntent();
Bundle bd=it.getExtras();
tv1.setText(bd.getString("name"));
tv2.setText(bd.getString("age"));
}
}
package com.example.a96349.ientent;

import android.support.v7.app.AppCompatActivity;
import android.os.Bundle;

public class Main3Activity extends AppCompatActivity {

    @Override
    protected void onCreate(Bundle savedInstanceState) {
        super.onCreate(savedInstanceState);
        setContentView(R.layout.activity_main3);
    }

}
运行结果:
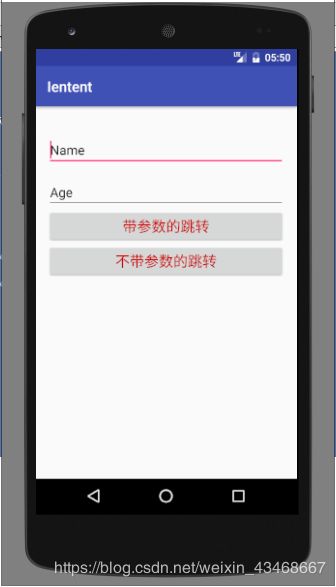
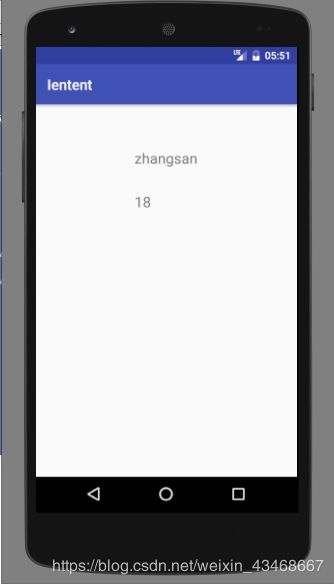
输入姓名和年龄,点击带参数的跳转:
点击不带参数的跳转:
这就是Intent的使用,如果转载以及CV操作,请务必注明出处,谢谢!