利用esp8266进行服务端与客户端之间的无线传输

ESP8266 是一款由乐鑫 Espressif 公司制作的低成本的 Wi-Fi 芯片,具有完整的 TCP / IP 协议栈和微控制器功能。它专为移动设备、可穿戴电子产品和物联网应用设计,功耗很低且价格非常低廉。
在这里,我使用的是Arduino IDE 搭建 ESP8266 开发环境,我这里使用的 NodeMcu 开发板即搭载了这款芯片。型号为ModeMcu Lua。
首先进行服务端控制客户端测试。
代码如下:

#include 

#ifndef STASSID
#define STASSID "liujiameng"
#define STAPSK  "nyljh159nyljm" //局域网名称与密码
#endif

const char* ssid = STASSID;
const char* password = STAPSK;

static const uint8_t x509[] PROGMEM = {
  0x30, 0x82, 0x01, 0x3d, 0x30, 0x81, 0xe8, 0x02, 0x09, 0x00, 0xfe, 0x56,
  0x46, 0xf2, 0x78, 0xc6, 0x51, 0x17, 0x30, 0x0d, 0x06, 0x09, 0x2a, 0x86,
  0x48, 0x86, 0xf7, 0x0d, 0x01, 0x01, 0x0b, 0x05, 0x00, 0x30, 0x26, 0x31,
  0x10, 0x30, 0x0e, 0x06, 0x03, 0x55, 0x04, 0x0a, 0x0c, 0x07, 0x45, 0x53,
  0x50, 0x38, 0x32, 0x36, 0x36, 0x31, 0x12, 0x30, 0x10, 0x06, 0x03, 0x55,
  0x04, 0x03, 0x0c, 0x09, 0x31, 0x32, 0x37, 0x2e, 0x30, 0x2e, 0x30, 0x2e,
  0x31, 0x30, 0x1e, 0x17, 0x0d, 0x31, 0x37, 0x30, 0x33, 0x31, 0x38, 0x31,
  0x34, 0x34, 0x39, 0x31, 0x38, 0x5a, 0x17, 0x0d, 0x33, 0x30, 0x31, 0x31,
  0x32, 0x35, 0x31, 0x34, 0x34, 0x39, 0x31, 0x38, 0x5a, 0x30, 0x26, 0x31,
  0x10, 0x30, 0x0e, 0x06, 0x03, 0x55, 0x04, 0x0a, 0x0c, 0x07, 0x45, 0x53,
  0x50, 0x38, 0x32, 0x36, 0x36, 0x31, 0x12, 0x30, 0x10, 0x06, 0x03, 0x55,
  0x04, 0x03, 0x0c, 0x09, 0x31, 0x32, 0x37, 0x2e, 0x30, 0x2e, 0x30, 0x2e,
  0x31, 0x30, 0x5c, 0x30, 0x0d, 0x06, 0x09, 0x2a, 0x86, 0x48, 0x86, 0xf7,
  0x0d, 0x01, 0x01, 0x01, 0x05, 0x00, 0x03, 0x4b, 0x00, 0x30, 0x48, 0x02,
  0x41, 0x00, 0xc6, 0x72, 0x6c, 0x12, 0xe1, 0x20, 0x4d, 0x10, 0x0c, 0xf7,
  0x3a, 0x2a, 0x5a, 0x49, 0xe2, 0x2d, 0xc9, 0x7a, 0x63, 0x1d, 0xef, 0xc6,
  0xbb, 0xa3, 0xd6, 0x6f, 0x59, 0xcb, 0xd5, 0xf6, 0xbe, 0x34, 0x83, 0x33,
  0x50, 0x80, 0xec, 0x49, 0x63, 0xbf, 0xee, 0x59, 0x94, 0x67, 0x8b, 0x8d,
  0x81, 0x85, 0x23, 0x24, 0x06, 0x52, 0x76, 0x55, 0x9d, 0x18, 0x09, 0xb3,
  0x3c, 0x10, 0x40, 0x05, 0x01, 0xf3, 0x02, 0x03, 0x01, 0x00, 0x01, 0x30,
  0x0d, 0x06, 0x09, 0x2a, 0x86, 0x48, 0x86, 0xf7, 0x0d, 0x01, 0x01, 0x0b,
  0x05, 0x00, 0x03, 0x41, 0x00, 0x69, 0xdc, 0x6c, 0x9b, 0xa7, 0x62, 0x57,
  0x7e, 0x03, 0x01, 0x45, 0xad, 0x9a, 0x83, 0x90, 0x3a, 0xe7, 0xdf, 0xe8,
  0x8f, 0x46, 0x00, 0xd3, 0x5f, 0x2b, 0x0a, 0xde, 0x92, 0x1b, 0xc5, 0x04,
  0xc5, 0xc0, 0x76, 0xf4, 0xf6, 0x08, 0x36, 0x97, 0x27, 0x82, 0xf1, 0x60,
  0x76, 0xc2, 0xcd, 0x67, 0x6c, 0x4b, 0x6c, 0xca, 0xfd, 0x97, 0xfd, 0x33,
  0x9e, 0x12, 0x67, 0x6b, 0x98, 0x7e, 0xd5, 0x80, 0x8f
};


static const uint8_t rsakey[] PROGMEM = {
  0x30, 0x82, 0x01, 0x3a, 0x02, 0x01, 0x00, 0x02, 0x41, 0x00, 0xc6, 0x72,
  0x6c, 0x12, 0xe1, 0x20, 0x4d, 0x10, 0x0c, 0xf7, 0x3a, 0x2a, 0x5a, 0x49,
  0xe2, 0x2d, 0xc9, 0x7a, 0x63, 0x1d, 0xef, 0xc6, 0xbb, 0xa3, 0xd6, 0x6f,
  0x59, 0xcb, 0xd5, 0xf6, 0xbe, 0x34, 0x83, 0x33, 0x50, 0x80, 0xec, 0x49,
  0x63, 0xbf, 0xee, 0x59, 0x94, 0x67, 0x8b, 0x8d, 0x81, 0x85, 0x23, 0x24,
  0x06, 0x52, 0x76, 0x55, 0x9d, 0x18, 0x09, 0xb3, 0x3c, 0x10, 0x40, 0x05,
  0x01, 0xf3, 0x02, 0x03, 0x01, 0x00, 0x01, 0x02, 0x40, 0x35, 0x0b, 0x74,
  0xd3, 0xff, 0x15, 0x51, 0x44, 0x0f, 0x13, 0x2e, 0x9b, 0x0f, 0x93, 0x5c,
  0x3f, 0xfc, 0xf1, 0x17, 0xf9, 0x72, 0x94, 0x5e, 0xa7, 0xc6, 0xb3, 0xf0,
  0xfe, 0xc9, 0x6c, 0xb1, 0x1e, 0x83, 0xb3, 0xc6, 0x45, 0x3a, 0x25, 0x60,
  0x7c, 0x3d, 0x92, 0x7d, 0x53, 0xec, 0x49, 0x8d, 0xb5, 0x45, 0x10, 0x99,
  0x9b, 0xc6, 0x22, 0x3a, 0x68, 0xc7, 0x13, 0x4e, 0xb6, 0x04, 0x61, 0x21,
  0x01, 0x02, 0x21, 0x00, 0xea, 0x8c, 0x21, 0xd4, 0x7f, 0x3f, 0xb6, 0x91,
  0xfa, 0xf8, 0xb9, 0x2d, 0xcb, 0x36, 0x36, 0x02, 0x5f, 0xf0, 0x0c, 0x6e,
  0x87, 0xaa, 0x5c, 0x14, 0xf6, 0x56, 0x8e, 0x12, 0x92, 0x25, 0xde, 0xb3,
  0x02, 0x21, 0x00, 0xd8, 0x99, 0x01, 0xf1, 0x04, 0x0b, 0x98, 0xa3, 0x71,
  0x56, 0x1d, 0xea, 0x6f, 0x45, 0xd1, 0x36, 0x70, 0x76, 0x8b, 0xab, 0x69,
  0x30, 0x58, 0x9c, 0xe0, 0x45, 0x97, 0xe7, 0xb6, 0xb5, 0xef, 0xc1, 0x02,
  0x21, 0x00, 0xa2, 0x01, 0x06, 0xc0, 0xf2, 0xdf, 0xbc, 0x28, 0x1a, 0xb4,
  0xbf, 0x9b, 0x5c, 0xd8, 0x65, 0xf7, 0xbf, 0xf2, 0x5b, 0x73, 0xe0, 0xeb,
  0x0f, 0xcd, 0x3e, 0xd5, 0x4c, 0x2e, 0x91, 0x99, 0xec, 0xb7, 0x02, 0x20,
  0x4b, 0x9d, 0x46, 0xd7, 0x3c, 0x01, 0x4c, 0x5d, 0x2a, 0xb0, 0xd4, 0xaa,
  0xc6, 0x03, 0xca, 0xa0, 0xc5, 0xac, 0x2c, 0xe0, 0x3f, 0x4d, 0x98, 0x71,
  0xd3, 0xbd, 0x97, 0xe5, 0x55, 0x9c, 0xb8, 0x41, 0x02, 0x20, 0x02, 0x42,
  0x9f, 0xd1, 0x06, 0x35, 0x3b, 0x42, 0xf5, 0x64, 0xaf, 0x6d, 0xbf, 0xcd,
  0x2c, 0x3a, 0xcd, 0x0a, 0x9a, 0x4d, 0x7c, 0xad, 0x29, 0xd6, 0x36, 0x57,
  0xd5, 0xdf, 0x34, 0xeb, 0x26, 0x03
};

WiFiServerSecure server(443);

void setup() {
  Serial.begin(115200);

  //设置输出脚位
  pinMode(LED_BUILTIN, OUTPUT);
  digitalWrite(LED_BUILTIN, 0);

  // 连接WiFi 网络
  Serial.println();
  Serial.println();
  Serial.print("Connecting to ");
  Serial.println(ssid);

  WiFi.begin(ssid, password);

  while (WiFi.status() != WL_CONNECTED) {
    delay(500);
    Serial.print(".");
  }
  Serial.println("");
  Serial.println("WiFi connected");

  server.setServerKeyAndCert_P(rsakey, sizeof(rsakey), x509, sizeof(x509));

  // 开启服务端
  server.begin();
  Serial.println("Server started");

  // 输出ip地址
  Serial.println(WiFi.localIP());
}

void loop() {
  //测试连接
  WiFiClientSecure client = server.available();
  if (!client) {
    return;
  }

  Serial.println("new client");
  unsigned long timeout = millis() + 3000;
  while (!client.available() && millis() < timeout) {
    delay(1);
  }
  if (millis() > timeout) {
    Serial.println("timeout");
    client.flush();
    client.stop();
    return;
  }

  String req = client.readStringUntil('\r');
  Serial.println(req);
  client.flush();

  int val;
  if (req.indexOf("/gpio/0") != -1) {
    val = 0;
  } else if (req.indexOf("/gpio/1") != -1) {
    val = 1;
  } else {
    Serial.println("invalid request");
    client.print("HTTP/1.1 404 Not Found\r\nContent-Type: text/html\r\n\r\n\r\nNot found");
    return;
  }

  // 控制亮灭
  digitalWrite(LED_BUILTIN, val);

  client.flush();
  String s = "HTTP/1.1 200 OK\r\nContent-Type: text/html\r\n\r\n\r\n\r\nGPIO is now ";
  s += (val) ? "high" : "low";
  s += "\n";

  client.print(s);
  delay(1);
  Serial.println("Client disconnected");

}

进行测试后结果为:
串口监视器:
利用esp8266进行服务端与客户端之间的无线传输_第1张图片
服务端:
在这里插入图片描述
利用esp8266进行服务端与客户端之间的无线传输_第2张图片
通过在网页输入https://server_ip/gpio/0使脚位变为低电位,即为暗,输入https://server_ip/gpio/1使脚位变为高电位,即为亮

传输信息:
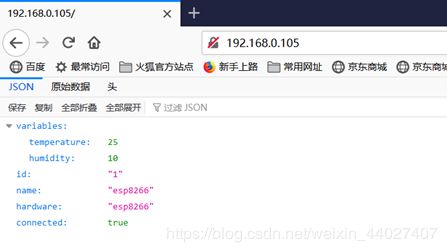
传输信息主要是传感器获取到的信息传输回服务端,这里我们采用随机数模拟温度和湿度的值,并传输回服务端。每刷新一次页面,可获取一组全新的数据。
代码如下

#include "ESP8266WiFi.h"
#include 


aREST rest = aREST();


const char* ssid = "abcde";
const char* password = "123456789";

#define LISTEN_PORT           80

WiFiServer server(LISTEN_PORT);

// 定义要传输的信息
float temperature;
float humidity;

void setup(void)
{  
  Serial.begin(115200);
  
  
  rest.variable("temperature",&temperature);
  rest.variable("humidity",&humidity);
    
  rest.set_id("1");
  rest.set_name("esp8266");
  
  WiFi.begin(ssid, password);
  while (WiFi.status() != WL_CONNECTED) {
    delay(500);
    Serial.print(".");
  }
  Serial.println("");
  Serial.println("WiFi connected");
 
  server.begin();
  Serial.println("Server started");
  
  Serial.println(WiFi.localIP());
}

void loop() {
    
  //模拟传输信息的随机值
  humidity = random(100);
  temperature = random(10,40);  

  WiFiClient client = server.available();
  if (!client) {
    return;
  }
  while(!client.available()){
    delay(1);
  }
  rest.handle(client);
}
//可以被API获取的自定义函数
int ledControl(String command){
    int state = command.toInt();
    digitalWrite(LED_BUILTIN,state);
    return 1;
  }

操作结果:
服务端:
利用esp8266进行服务端与客户端之间的无线传输_第3张图片
串口监视器:

利用esp8266进行服务端与客户端之间的无线传输_第4张图片
利用python爬取页面上的数据,并存储在txt文件中,便于服务端读取:
代码:

from urllib.request import urlopen
import re

a = str("http://192.168.0.105/")
html = urlopen(a).read().decode('utf-8')

my_file = open('D:\my file.txt','w')
my_file.write(html)
my_file.write('\r\n')
my_file.close()

while True:
    html = urlopen(a).read().decode('utf-8')
    my_file = open('D:\my file.txt','a')
    my_file.write(html) 
    my_file.write('\r\n')
    my_file.close()

运行结果:
利用esp8266进行服务端与客户端之间的无线传输_第5张图片
心得体会:
通过这次项目,极大地锻炼了我的动手实践能力和自我学习能力。在本次项目中,我负责的主要是无线通信部分。在立项时查了下资料感觉很好,但实践操作却有诸多问题。比如,我最初想采用的无线通信方式时zigbee,但是实践中却发现zigbee在与arduino对接的时候存在诸多问题,比如对接性不好,成本高等等。从而导致我选择了与arduino板较易搭建的esp8266模块,即WiFi通信方式。而且,在实验中,单单看网上的学习资料是不行的,实验中会出现种种不同的问题,这些问题都需要你自己去探究,去克服,去找出问题所在,逐步调试使器件运转良好。这个探索的过程也给我带来了很大的收获,让我懂得了要解决一个问题的具体步骤与实现方法。
你可能感兴趣的:(利用esp8266进行服务端与客户端之间的无线传输)