Python使用Selenium自动化登陆学习通爬取指定课程下的讨论(爬取动态加载数据)
Selenium使用
经过一段时间对python的学习,自己对于爬虫使用的库也开始逐渐的增多,从最开始接触的requests库,BeautifulSoup库,到后来的re库,lxml库,等等一些主要的关于python网络爬虫的库,再到现在的Selenium库,慢慢一点一点深入学习python,越来越发现python的乐趣。
Selenium库是一种自动话的测试工具,利用它可以驱动浏览器执行特定的动作,如点击,下拉等操作,同时还可以获取浏览器当前呈现页面的源代码,做到了可见即爬。对于一些JavaScript动态渲染的页面来说,此抓取方式非常有效。(可以不用构造请求头喔)
我用的是Chrome浏览器,所以在编写代码前一定先要装好Chrome浏览器并配置好对应版本的ChromeDriver,另外,当然是装好Selenium库啦。
因为是浏览器驱动,不需要太多的分析,先上代码(url为学习通登陆页面):
#声明浏览器,初始化浏览器
driver = webdriver.Chrome()
#打开相应的网页
driver.get('http://passport2.chaoxing.com/login?fid=&refer=http://i.mooc.chaoxing.com')
效果(可以看到Chrome正在接受自动化测试软件的控制字样,说明使用正确):

登陆分析(直接用Elements箭头指向你想要找的元素,找到输入框和登陆按钮,模拟登录):
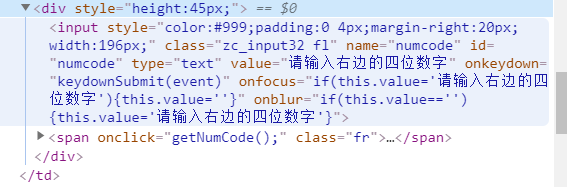
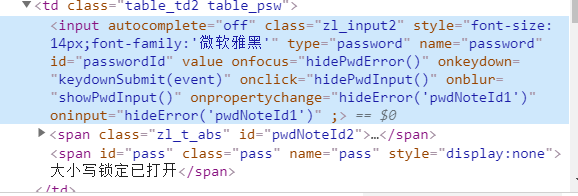


有上面这四张图很容易可以通过id或者name来确定登录信息输入框并且定位到登陆按钮,所以开始模拟登陆代码(结合每个输入框的关键属性来理解代码):
name = input('请输入账号:')
password = input('请输入密码:')
yanzhengma = input('请输入验证码:')

#找到登陆输入框
input_name = driver.find_element_by_id('unameId')
input_password = driver.find_element_by_id('passwordId')
input_yanzheng = driver.find_element_by_id('numcode')

#向登陆输入框中输入值
input_name.send_keys(name)
input_password.send_keys(password)
input_yanzheng.send_keys(yanzhengma)

#time.sleep(1)

#找到登陆按钮
button = driver.find_element_by_class_name('zl_btn_right')
#模拟点击
button.click()
这样就可以模拟登陆,浏览器自动跳转进入自己的课程页面(由于涉及个人信息截图不全,给出我想进入的课程图片):

分析该课程网页源代码:

可发现href中便是网页跳转的链接(我的思路,拿到网页链接,进行跳转,也可之间拿到登陆按钮,点击登陆,这里为了多加练习…):
#等待网页相应,否则可能返回不到网页源码
time.sleep(1)
#跳转到该页的子Fream,拿到对应的网页源码
driver.switch_to.frame('frame_content')

time.sleep(2)
#拿到网页的源码信息
text = driver.page_source
#print(text)
tree_one = etree.HTML(text)
#找到链接
href = tree_one.xpath('//h3[@class="clearfix"]/a[@title="信息论与大数据安全"]/@href')
for url in href:
        href = url
#进行网页的跳转
driver.get(href)
这样我们就入了对应的课程页面:

图中给出了我想拿到的讨论内容入口,用相同的方法分析再次跳转(图中带有参数信息,不展示图片):
time.sleep(1)

#print(driver.page_source)
tree_two = etree.HTML(driver.page_source)
href_ = tree_two.xpath('//div[@class="fr stuRight"]/a[@title="1.2"]/@href')
#https://mooc1-1.chaoxing.com/bbscircle/gettopicdetail?courseId=208086050&clazzid=16240167&topicid=153518799&ut=s&cpi=44754234
for url in href_:
        href_ = 'https://mooc1-1.chaoxing.com' + url
#print(href_)


driver.get(href_)
之后就进去了含有讨论内容的页面,观察发现,这个页面的数据是动态加载的,要向获取全部数据,得使用一定的方法。
思路:获取更多按钮,并点击按钮,并下拉到网页最底部,此时就可得到所有数据的网页源码

driver.get(href_)
#定位  查看更多 按钮
button = driver.find_element_by_id('more_reply_152637979')
#点击
button.click()
#下拉滚动条,到页面最底部,拿到所有数据的网页源码
for i in range(100):
        driver.execute_script('window.scrollTo(0,document.body.scrollHeight)')
接下来就是正常的分析网页源码,拿到数据了,我就不再多的分析,因为每个人的方法不一样,我用的是正则和Xpath:
time.sleep(2)
etree_three = etree.HTML(driver.page_source)
name = etree_three.xpath('//span[@class="name"]/text()')
#print(name)
# text = etree_three.xpath('//h3[contains(@class,"bt") and @name="replyfirstname"]/text()')
# print(text)
text = re.findall('(.*?)' ,str(driver.page_source),re.S)
text_new = re.findall('(.*?)' ,str(driver.page_source),re.S)
#print(text_new)
result_text = []
#调换文本中的换行符还有空格等字符
for i in text:
a = re.sub('\xa0', '', i)
b = re.sub('
', ',', a)
result_text.append(b)
for i in range(len(text_new)-1):
result_text.append(text_new[i+1])
#print(result_text)
length = str(len(result_text))
for i in range(len(result_text)):
with open('text.txt','a',encoding = 'utf-8') as file:
#file.write('总讨论数:' + length)
file.write('\n')
file.write(name[i+1] + ':' + result_text[i])
file.write('\n')保存为文本文件,给老师发过去:
length = str(len(result_text))

for i in range(len(result_text)):
        with open('text.txt','a',encoding = 'utf-8') as file:
                #file.write('总讨论数:' + length)
                file.write('\n')
                file.write(name[i+1] + ':' + result_text[i])
                file.write('\n')

with open('text.txt', 'a', encoding='utf-8') as file:
        file.write('\n')
        file.write('总讨论数:' + length)
这样就完成啦,结果如下(截图的一部分):

我再次体会到python的乐趣,可以说这个selenium使用起来非常方便,可以直接跳过很多基本的反爬手段,很赞!
喜欢的兄弟们点个赞吧