ubuntu 安装 opencv2.4.9 java环境
参考:http://blog.csdn.net/xiaojidan2011/article/details/40153933
http://blog.csdn.net/loveaborn/article/details/7647734
OpenCV is the most popular and advanced code library for Computer Vision related applications today, spanning from many very basic tasks (capture and pre-processing of image data) to high-level algorithms (feature extraction, motion tracking, machine learning). It is free software and provides a rich API in C, C++, Java and Python. Other wrappers are available. The library itself is platform-independent and often used for real-time image processing and computer vision.
What’s new in 2.4.9
- new 3D visualization module ‘viz’
- performance fixes in ‘ocl’ module
- fixes in Android Camera
- improved CUDA support for mobile platforms
- bugfixes from community
- 55 reported bugs have been closed
- 156 pull requests have been merged
See the full ChangeLog for more information
Install OpenCV
Step 1: Make Directory
mkdir opencv

cd /opencv/
Step 2: Remove any pre-installed ffmpeg and x264
sudo apt-get -qq remove ffmpeg x264 libx264-dev
Step 3: Install Dependenices
sudo apt-get -qq install libopencv-dev build-essential checkinstall cmake pkg-config yasm libjpeg-dev libjasper-dev libavcodec-dev libavformat-dev libswscale-dev libdc1394-22-dev libxine-dev libgstreamer0.10-dev libgstreamer-plugins-base0.10-dev libv4l-dev python-dev python-numpy libtbb-dev libqt4-dev libgtk2.0-dev libfaac-dev libmp3lame-dev libopencore-amrnb-dev libopencore-amrwb-dev libtheora-dev libvorbis-dev libxvidcore-dev x264 v4l-utils
- Install ffmpeg
sudo add-apt-repository ppa:mc3man/trusty-media

sudo apt-get update

sudo apt-get install ffmpeg gstreamer0.10-ffmpeg
Step 4: Download and extract OpenCV
在官网下载http://opencv.org/downloads.html
unzip opencv-2.4.9
cd opencv-2.4.9
Step 5: Begin Build Process
Note that this bit would take some time to complete
mkdir build

cd build

安装一些依赖项:不然会报错误1:
sudo apt-get install build-essential cmake libgtk2.0-dev pkg-config python-dev python-numpy libavcodec-dev libavformat-dev libswscale-dev
接下来的 操作报错.......
cmake -D CMAKE_BUILD_TYPE=RELEASE -D CMAKE_INSTALL_PREFIX=/usr/local -D WITH_TBB=ON -D BUILD_NEW_PYTHON_SUPPORT=ON -D WITH_V4L=ON -D INSTALL_C_EXAMPLES=ON -D INSTALL_PYTHON_EXAMPLES=ON -D BUILD_EXAMPLES=ON -D WITH_QT=ON -D WITH_OPENGL=ON ..
我的操作直接返回opencv-2.4.9目录下
cmake -D CMAKE_BUILD_TYPE=RELEASE -D CMAKE_INSTALL_PREFIX=/usr/local ..
make 等了20来分钟
sudo make install
sudo sh -c 'echo "/usr/local/lib" > /etc/ld.so.conf.d/opencv.conf'

sudo ldconfig
step 6 测试opencv 是否安装完毕
到opencv安装目录samples/c文件夹下
sudo chmod +x build_all.sh

sudo ./build_all.sh
./facedetect "/usr/share/opencv/haarcascades/haarcascade_frontalface_alt.xml" lena.jpg (hararcascade文件的目录自己确认在哪个文件夹下,也可能在opencv/data/下)
错误1,
terminate called after throwing an instance of 'cv::Exception'
what(): /home/aborn/software/OpenCV-2.4.1/modules/highgui/src/window.cpp:598: error: (-2) The function is not implemented. Rebuild the library with Windows, GTK+ 2.x or Carbon support. If you are on Ubuntu or Debian, install libgtk2.0-dev and pkg-config, then re-run cmake or configure script in function cvNamedWindow
原因就是没有先于opencv安装gtk库。
终于搞定了!!!!
到这里还只是c++版本的opencv.
借鉴http://developer.51cto.com/art/201503/469692.htm
1、安装ant
sudo apt-get install ant
2、返回到opencv安装目录下
cmake -D CMAKE_BUILD_TYPE=RELEASE -D CMAKE_INSTALL_PREFIX=/usr/local -DBUILD_TESTS=OFF ..

3、make -j8 发生这样的错误
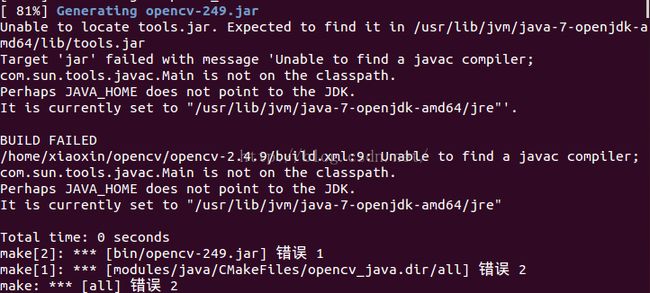
找不到tools.jar
我的解决方案是找到安装opencv时的 tools.jar包在哪儿 拷贝到缺少的地方
![]()
然后在 sudo make install ok!!!!!
Eclipse下的配置
这里有一篇非常好的帖子, 写的非常到位, 我就不重复了, 链接:
http://exintopro.net/blog/2013/10/02/setting-up-eclipse-for-using-opencv-java-in-ubuntu/