SparkStreaming读取Kafka对接Flume抽取到的数据库数据并保存到HBase中,Hive映射HBase进行查询
最近公司在做实时流处理方面的工作,具体需求是:将关系型数据库(MySQL、Oracle)中的相关数据表实时的导入到HBase中,并使用Hive映射HBase进行数据查询。公司使用的是CDH6.3.1搭建的大数据集群~
目录
一、配置Flume,抽取数据到Kafka
二、SparkStreaming对接Kafka保存数据到HBase
三、Hive映射HBase
四、测试
一、配置Flume,抽取数据到Kafka
在之前,我写过一篇《Flume抽取Oracle中的数据到Kafka》的文章,里面详细的介绍了如何配置连接Oracle数据库,那么这里就以MySQL数据库为例吧,其实两者的配置大同小异,只不过改几个连接串即可,这里详细的就不做解释了,可以参考上面的这篇文章,具体配置如下:
#声明source、channel、sink
a1.channels=c1
a1.sources=r1
a1.sinks=k1

#声明source类型
a1.sources.r1.type=org.keedio.flume.source.SQLSource

#声明数据库链接、用户名、密码等
a1.sources.r1.hibernate.connection.url=jdbc:mysql://ip地址:3306/数据库名
a1.sources.r1.hibernate.connection.user=username
a1.sources.r1.hibernate.connection.password=password

#这个参数很重要,默认为false,如果设为false就不会自动提交
a1.sources.r1.hibernate.connection.autocommit=true
#声明MySQL的hibernate方言
a1.sources.r1.hibernate.dialect=org.hibernate.dialect.MySQL5Dialect
#声明MySQL驱动
a1.sources.r1.hibernate.connection.driver_class=com.mysql.jdbc.Driver

#查询间隔,单位毫秒
a1.sources.r1.run.query.delay=5000
#声明保存Flume状态的文件夹位置
a1.sources.r1.status.file.path=/root/files/flume
#声明保存Flume状态的文件名称
a1.sources.r1.status.file.name=kafka_to_hbase
#声明从第一条数据开始查询
a1.sources.r1.start.from=0
#自定义sql语句
a1.sources.r1.custom.query=select id, name, age, score from student where id > $@$

#设置分批参数
a1.sources.r1.batch.size=1000
a1.sources.r1.max.rows=1000

#设置c3p0连接池参数
a1.sources.r1.hibernate.connection.provider_class=org.hibernate.connection.C3P0ConnectionProvider
a1.sources.r1.hibernate.c3p0.min_size=1
a1.sources.r1.hibernate.c3p0.max_size=10

#配置拦截器(替换)
a1.sources.r1.interceptors=i1
a1.sources.r1.interceptors.i1.type=search_replace
a1.sources.r1.interceptors.i1.searchPattern="
a1.sources.r1.interceptors.i1.replaceString=

#设置channel为内存模式
a1.channels.c1.type=memory
a1.channels.c1.capacity=10000
a1.channels.c1.transactionCapacity=10000
a1.channels.c1.byteCapacityBufferPercentage=20
a1.channels.c1.byteCapacity=800000

#设置sink类型为Kafka
a1.sinks.k1.type=org.apache.flume.sink.kafka.KafkaSink
a1.sinks.k1.topic=test6
a1.sinks.k1.brokerList=cdh-slave01:9092,cdh-slave02:9092,cdh-slave03:9092
a1.sinks.k1.requiredAcks=1
a1.sinks.k1.batchSize=20

#连接source、channel、sink
a1.sinks.k1.channel=c1
a1.sources.r1.channels=c1
通过上面可以看出,我们的MySQL中有一张叫做student的数据表,如下:
mysql> show create table student;
+---------+--------------------------------------------------------------------------------------------------------------------------------------------------------------------------------------------------------+
| Table   | Create Table                                                                                                                                                                                           |
+---------+--------------------------------------------------------------------------------------------------------------------------------------------------------------------------------------------------------+
| student | CREATE TABLE `student` (
  `id` varchar(11) DEFAULT NULL,
  `name` varchar(20) DEFAULT NULL,
  `age` varchar(20) DEFAULT NULL,
  `score` varchar(20) DEFAULT NULL
) ENGINE=InnoDB DEFAULT CHARSET=utf8 |
+---------+--------------------------------------------------------------------------------------------------------------------------------------------------------------------------------------------------------+
1 row in set (0.00 sec)
二、SparkStreaming对接Kafka保存数据到HBase
首先新建一个空的Maven项目,这里就不赘述了,大家应该都会,接下来就是配置我们的pom.xml文件了,为了与集群的版本匹配起来,需要先确定集群相关组件的版本,监控界面看一下,如下图所示:
这里可能会有人问,去监控界面哪里看这些组件的版本号,一步到位,具体怎么看去哪里看小编这里也说明一下:
既然已经确定了各组件的版本,那么就可以去中央仓库拉取配置了,小编的配置如下所示:
    4.0.0

    com.xzw
    spark
    1.0


            cloudera
            https://repository.cloudera.com/artifactory/cloudera-repos/


            org.apache.spark
            spark-core_2.11
            2.4.0-cdh6.3.1


            org.apache.spark
            spark-streaming_2.11
            2.4.0-cdh6.3.1


            org.apache.spark
            spark-streaming-kafka-0-10_2.11
            2.4.0-cdh6.3.1


            org.apache.kafka
            kafka-clients
            2.2.1-cdh6.3.1


            org.apache.hbase
            hbase-client
            2.1.0-cdh6.3.1


            org.apache.hbase
            hbase-server
            2.1.0-cdh6.3.1


            org.apache.kafka
            kafka_2.12
            2.2.1-cdh6.3.1
接下来就是最关键的一环了,编写咱们的代码实现数据实时的传输到HBase中,相关代码如下:
package com.xzw.sparkstreaming

import org.apache.hadoop.hbase.client.{ConnectionFactory, Put, Table}
import org.apache.hadoop.hbase.util.Bytes
import org.apache.hadoop.hbase.{HBaseConfiguration, TableName}
import org.apache.kafka.common.serialization.StringDeserializer
import org.apache.spark.SparkConf
import org.apache.spark.internal.Logging
import org.apache.spark.streaming.kafka010._
import org.apache.spark.streaming.{Seconds, StreamingContext}

import scala.util.Try

/**
 * @Description 读取Kafka中的数据实时存入HBase中
 * @Author wjl
 * @Date Created by 2020/6/10 9:39
 *                             _ooOoo_
 *                            o8888888o
 *                            88" . "88
 *                            (| -_- |)
 *                            O\  =  /O
 *                         ____/`---'\____
 *                       .'  \\|     |//  `.
 *                      /  \\|||  :  |||//  \
 *                     /  _||||| -:- |||||-  \
 *                     |   | \\\  -  /// |   |
 *                     | \_|  ''\---/''  |   |
 *                     \  .-\__  `-`  ___/-. /
 *                   ___`. .'  /--.--\  `. . __
 *                ."" '<  `.___\_<|>_/___.'  >'"".
 *               | | :  `- \`.;`\ _ /`;.`/ - ` : | |
 *               \  \ `-.   \_ __\ /__ _/   .-` /  /
 *          ======`-.____`-.___\_____/___.-`____.-'======
 *                             `=---='
 *          ^^^^^^^^^^^^^^^^^^^^^^^^^^^^^^^^^^^^^^^^^^^^^
 *                     佛祖保佑        永无BUG
 */
object KafkaToHBase extends Logging {

  def main(args: Array[String]): Unit = {

    //创建streamingcontext
    val sparkConf = new SparkConf().setAppName("KafkaStreaming2Hbase").setMaster("local[*]")
    val ssc = new StreamingContext(sparkConf, Seconds(5))

    //定义参数
    val kafkaParams = Map[String, Object](
      "bootstrap.servers" -> "cdh-slave01:9092,cdh-slave02:9092,cdh-slave03:9092",
      "key.deserializer" -> classOf[StringDeserializer],
      "value.deserializer" -> classOf[StringDeserializer],
      "group.id" -> "use_a_separate_group_id_for_each_stream",
      "auto.offset.reset" -> "latest",
      "enable.auto.commit" -> (false: java.lang.Boolean)
    )

    //topics
    val topics = Array("test6")
    //创建stream
    val kafkaStream = KafkaUtils.createDirectStream(
      ssc,
      LocationStrategies.PreferConsistent,
      ConsumerStrategies.Subscribe[String, String](topics, kafkaParams)
    )

    kafkaStream.foreachRDD(rdd => {
      rdd.foreachPartition(partitions => {
        //在每一个partition创建,否则会出现序列化异常问题
        val table = createTable()
        try {
          partitions.foreach(row => {
            val data: Array[String] = row.value().split(",")
            print("----------------" + row.value() + "===" + data(0))

            val put = new Put(Bytes.toBytes(data(0))) //rowkey
            put.addColumn(Bytes.toBytes("info"), Bytes.toBytes("name"), Bytes.toBytes(data(1)))
            put.addColumn(Bytes.toBytes("info"), Bytes.toBytes("age"), Bytes.toBytes(data(2)))
            put.addColumn(Bytes.toBytes("info"), Bytes.toBytes("score"), Bytes.toBytes(data(3)))
            Try(table.put(put)).getOrElse(table.close()) //将数据写入HBase,若出错关闭table
            table.close() //分区数据写入HBase后关闭连接
          })
        } catch {
          case e: Exception => logError("写入HBase失败,{}" + e.getMessage)
        }
      })
    })

    //启动SparkStreaming
    ssc.start()
    ssc.awaitTermination()
  }

  /**
   * 自定义方法获取HBase表
   *
   * @return
   */
  def createTable(): Table = {
    val hbaseConf = HBaseConfiguration.create()
    hbaseConf.set("hbase.zookeeper.quorum", "cdh-master,cdh-slave01,cdh-slave02")
    hbaseConf.set("hbase.zookeeper.property.clientPort", "2181")
    hbaseConf.set("hbase.defaults.for.version.skip", "true")
    val conn = ConnectionFactory.createConnection(hbaseConf)
    conn.getTable(TableName.valueOf("ljs:student"))
  }

}
三、Hive映射HBase
1、首先在HBase中创建相关的表并插入几条数据
--创建命名空间
create_namespace 'ljs'
--创建表
create 'ljs:student','info'
--查看表结构
!desc 'ljs:student'
--插入数据
put 'ljs:student','1','info:name','zs'
put 'ljs:student','1','info:age','20'
put 'ljs:student','1','info:score','90'
put 'ljs:student','2','info:name','ls'
put 'ljs:student','2','info:age','21'
put 'ljs:student','2','info:score','95'
put 'ljs:student','3','info:name','ww'
put 'ljs:student','3','info:age','22'
put 'ljs:student','3','info:score','99'
2、新建Hive外部表,映射HBase表
--新建Hive表
create external table ljs_student(
user_no string,
user_name string,
user_age string,
user_score string
)
stored by 'org.apache.hadoop.hive.hbase.HBaseStorageHandler'
with serdeproperties ("hbase.columns.mapping" = ":key,info:name,info:age,info:score")
tblproperties("hbase.table.name" = "ljs:student");
3、查询Hive中的数据,查看映射是否成功
hive> select * from ljs_student;
OK
1	zs	20	90
2	ls	21	95
3	ww	22	99
Time taken: 0.079 seconds, Fetched: 3 row(s)
四、测试
1、新建test6 topic。
kafka-topics --zookeeper cdh-master:2181,cdh-slave01:2181,cdh-slave02:2181 --create --replication-factor 1 --partitions 3 --topic test62、启动Flume
nohup bin/flume-ng agent --name a1 --conf ./conf --conf-file ./conf/kafka-to-hbase.properties -Dflume.root.logger=INFO,console &3、本地启动Spark进行测试
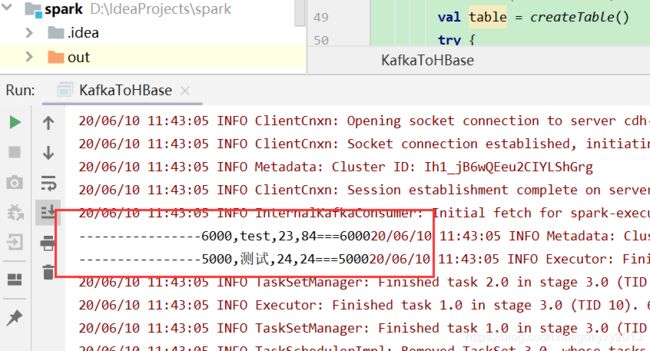
向MySQL中插入几条数据:
insert into student values('5000','测试','24','24');
insert into student values('6000','test','23','84');
可以看到控制台有如下输出:
4、从Hive中查询可以发现新增的数据已经实时的到HBase中了
hive> select * from ljs_student;
OK
1	zs	20	90
2	ls	21	95
3	ww	22	99
5000	测试	24	24
6000	test	23	84
Time taken: 0.133 seconds, Fetched: 5 row(s)
5、本地测试成功后,可将代码打包上传至集群,集群中启动命令为:
spark-submit --class com.xzw.sparkstreaming.KafkaToHBase \
--master local[*] --num-executors 1 --driver-memory 1g \
--driver-cores 1 --executor-memory 1g --executor-cores 1 \
spark.jar
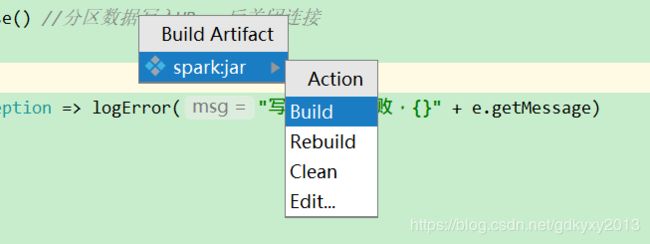
这里有人会问,怎样在IDEA中打jar包?说实话,这确实是一件令人头疼的事,说一下小编经常用的两种方法,一种是使用maven直接打jar包,这个也应该是大家经常用的一种办法。这里着重说一下另外一种打包方法,最近小编钟情此种方法。
(1)首先file-->Project Structure。
(2)然后……
(3)选择主类
(4)点击Apply-->OK后
(5)Build
在左侧目录中就可以看到打好的jar包了
本文到此就结束了,这此过程中你们遇到了什么问题,欢迎留言,让我看看你们都遇到了什么问题~


