Python的库sklearn安装 & bazel安装 & cmake
Python的库sklearn安装
也可以用pip安装(如:pip installscikit-learn),但安装的位置不同,安装是包名不同(apt-get安装的python包一般前缀是python),python用的时候优先选择apt-get安装的包。如果用pip freeze 安装的包的版本和在python环境(进入python导包,查看版本)看到的版本不同,可能就是用apt-get和pip都安装了,然后选择性的保留就行了(建议保留pip的)
安装scipy 0.16.1:
1、scipy需要依赖numpy包,先安装numpy
2、用pip install scipy==0.16.1安装scipy,安装时报错:building 'dfftpack' library error:library dfftpacy hasFortran sources but no Fortran compiler found。这是没有安装gfortran编译器(没有gfortran编译器),安装gfortran命令如下:sudo apt-getinstall gfortran。
3、重新安装scipy,安装时又报了 numpy.distutils.system_info.NotFoundError:no lapack/blas resources found
4、用ls
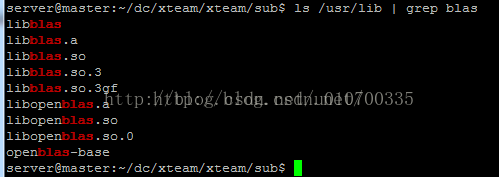
/usr/lib | grep blas查看,缺少了一些libopenblas系统库(缺少libopenblas库),用sudo
apt-get install libopenblas-dev安装该库,安装后查看如下:
5、重新用用pip install scipy==0.16.1安装scipy,结果依然报同一个错误,网上查结果缺少 lapack
库(缺少lapack),安装 lapack 包:$
sudo apt-get install liblapack-dev,如果还是不行则是缺少
atlas 库再安装 atlas包:sudo
apt-get install libatlas-dev
6、安装成功后重新安装
scipy 包pip install scipy==0.16.1成功完成安装。
网上查询后的总结:安装numpy后安装scipy失败(报错:numpy.distutils.system_info.NotFoundError)一般是缺少一些系统库,需要安装:libopenblas-dev、liblapack-dev、libatlas-dev、libblas-dev
Python Installation Instructions
Precompiledpackages are available for linux x86_64 platform and python 2.
- Install stable version:
pip install gbdt - Install latest development version:
pip install git+https://github.com/yarny/gbdt.git
gbdt安装python版本------
**pip源码安装;***yum installpython-devel.x86_64 yum installpython27-python-devel.x86_64 ---> pipinstall numpy >= 0.6 && pip install SciPy >= 0.9 ;(numpy.distutils.system_info.NotFoundError: no lapack/blas resources found)---> yum install blas* && yuminstall lapack* ---> pip installSciPy ( python -c "import scipy; print scipy.__version__") & pipinstall sklearn
C++ Binary Compilation Instructions
Thepackage can be compiled in both Linux and OSX platforms. It depends on bazel, gflags,glogs, gperf, protobuf3. Per limitation of bazel, for linux, please use ubuntu 14 andabove to build. The built binary can be used in lower version linux machine. Weinclude a convenient script to set up the dependencies.
- Install bazel
- Run
setup_dependencies/setup.sh. ---》 需要cmake命令 - Run
bazel build -c opt src:gbdtto build the binary. - Find your binary at
bazel-bin/src/gbdt.
5. 安装c 版本,但是需要bazel支持,bazel又需要依赖JDK1.8
6. /usr/local/bazel,
7.
8. ####安装JDK略过
9. ### 安装bazel
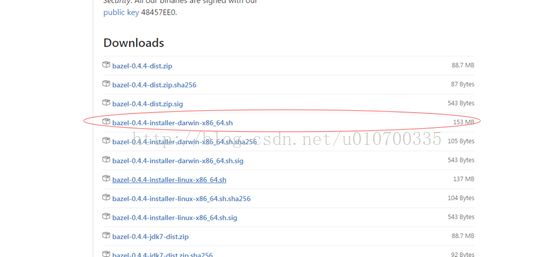
10. https://github.com/bazelbuild/bazel/releases下载源码。。。
12.
13. ####[@10.134.105.160 GBDT]#./bazel-0.4.4-installer-darwin-x86_64.sh --user
14. raw set itself is deprecated.
15. - Remove support for --javawarn; use e.g.--javacopt=-Xlint:all
16. instead
17.
18. ## Build informations
19. - [Build log](http://ci.bazel.io/job/Bazel/JAVA_VERSION=1.8,PLATFORM_NAME=darwin-x86_64/1246/)
20. -[Commit](https://github.com/bazelbuild/bazel/commit/80a07b5)
21. Uncompressing.......
22.
23. Bazel is now installed!
24.
25. Make sure you have"/root/bin" in your path. You can also activate bash
26. completion by adding thefollowing line to your ~/.bashrc:
27. source /root/.bazel/bin/bazel-complete.bash
28.
29. Seehttp://bazel.build/docs/getting-started.html to start a new project!
30. [@10.134.105.160 GBDT]#
Linux(centos7)源码安装cmake
1. 下载cmake源码
[html] view plain copy
1. wget https://cmake.org/files/v3.3/cmake-3.3.2.tar.gz
2.解压缩
[html] view plain copy
1. tar xzvf cmake-3.3.2.tar.gz
3.进入到cmake文件夹中执行引导命令
注:此时会检查gcc,gcc-c++,是否安装和版本,如果没有请先安装
yum install gcc
yum install gcc-c++
[html] view plain copy
1. cd cmake-3.3.2
2.
3. ./bootstrap
4.执行make
[html] view plain copy
1. gmake
5.执行安装(root权限)
[html] view plain copy
1. make install
命令行下查看python和numpy的版本和安装位置
1、查看python版本
方法一:
  python -V
  注意:‘-V‘中‘V’为大写字母,只有一个‘-’
方法二:
  python --version
  注意:‘--version'中有两个‘-’

2、查看python安装位置
方法一:
  python -c "import sys; print sys.executable"
方法二:
  python -c "import os; print os.sys.executable"
  python -c "import os; path = os.sys.executable;folder=path[0 : path.rfind(os.sep)]; print folder"
3、查看Numpy版本
python -c "import numpy; print numpy.version.version"
或
python -c "import numpy; print numpy.__version__"
4、查看Numpy安装路径
python -c "import numpy; print numpy.__file__"


