Vue 服务端渲染(SSR)
一、什么是服务端渲染(SSR)
Server Side Render简称SSR,服务端渲染。在ajax兴起之前,特别是在SPA(单页面应用(Single-Page Application))技术流行之前,大部分的web应用都采用的是服务端渲染。即服务器端在接收到用户请求网页的时候,由服务端先调用数据库,获得数据之后,将数据和页面元素进行拼装,组合成完整的 html 页面,再直接返回给浏览器,以便用户浏览。
近几年在前后端分离的理念影响下,大部分的web应用都采用了前后端分离的模式,后端专注于数据接口的服务,前端则主要进行页面渲染、接口调用。也就是在这时SPA得到了广泛应用(以Vue、React、Angular为代表)。本文以Vue.js为对象来进行说明。
Vue是构建客户端应用程序的框架,默认情况下,可以在浏览器中输出 Vue 组件,进行生成 DOM 和操作 DOM。请求过程如下:
- 浏览器加载所有静态资源(html,css,js等),此时客户端拿到一个没有被数据渲染的空页面
- js 发起请求获取数据
- 渲染页面
然而,也可以将同一个组件渲染为服务器端的 HTML 字符串,将它们直接发送到浏览器,最后将这些静态标记"激活"为客户端上完全可交互的应用程序。服务器渲染的 Vue.js 应用程序也可以被认为是"同构"或"通用",因为应用程序的大部分代码都可以在服务器和客户端上运行。
二、使用服务端渲染(SSR)的优劣势
与传统SPA相比的优势:
- 更友好的SEO。这是因为使用服务端渲染搜索引擎爬虫抓取工具可以直接查看完全渲染的页面,而传统SPA则对SEO不太友好。如果SEO对一个站点非常重要,页面也是异步获取内容,那么应该使用SSR。
- 首屏渲染速度更快。因为无需等待所有的javaScript都完成下载并执行。对于内容到达时间与转化率直接相关的站点,SSR尤为重要。
劣势:
- 开发条件所限。对于浏览器特定的代码,只能在某些生命周期钩子使用的;一些外部扩展库可能需要特殊处理,才能在服务器渲染应用程序中运行。
- 涉及构建设置和部署的更多要求。与可以部署在任何静态文件服务器上的完全静态SPA不同,服务器渲染应用程序,需要处于 Node.js server 运行环境。
- 更多的服务器端负载。
三、基本使用
要想搭建一个复杂的Vue SSR需要用到很多的工具和插件,过程也比较繁琐。我们不妨先从一个简单的例子来从整体熟悉下Vue SSR的基本用法。
安装:
npm install vue vue-server-renderer express --save我们先创建一个模版html文件以便待会使用,命名index.template.html。注意 注释 -- 这里将是应用程序 HTML 标记注入的地方。
  {{title}}


  {{{meta}}}
通过与服务器集成来创建vue实例,建立server.js文件。使用express作为node.js的框架。
const  Vue = require('vue')
const fss = require('fs')
const server = require('express')()
const templateHtml = fss.readFileSync('./index.template.html','utf-8')
const renderer= require('vue-server-renderer').createRenderer({
  template: templateHtml
})
server.get('*',(req,res)=>{
  //新建Vue对象
  const app = new Vue({
    data:{
      url:req.url
    },
    template:`您访问的URL是::::{{url}}`
  })
  const context={
    title:'hello from context',
    meta:`

    `
  }
  //context的内容将用于templateHtml模版文件中,提供插值数据
  renderer.renderToString(app,context,(err,html)=>{
    if(err){
      res.status(500).end('Internal server error')
      return
    }
    //此时返回的html将是注入应用程序内容的完整页面
    res.end(html)
  })
    // 在 2.5.0+,如果没有传入回调函数,则会返回 Promise:
  renderer.renderToString(app).then(html => {
      console.log(html)
  }).catch(err => {
      console.error(err)
  })
})

server.listen(8080,()=>console.log('ssr vue app is listening on port 8080'))
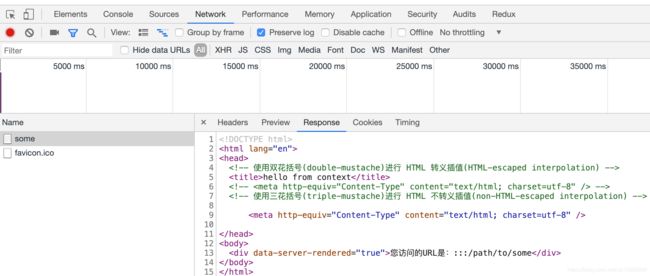
启动nodejs服务:node server.js 。访问http://localhost:8080/path/to/some。就可以看到建立好的服务端渲染应用。
四、进阶使用(项目工程化)
接下来讨论下如何将相同的Vue应用程序提供给客户端,也就是说如何将项目工程化。我们将通过webpack来打包我们的Vue应用程序,包括客户端和服务端应用程序。 服务器需要「服务器 bundle」然后用于服务器端渲染(SSR),而「客户端 bundle」会发送给浏览器,用于混合静态标记。基本流程如下图。
![]()
要使用服务器端渲染,需要使用server-entry.js和client-entry.js两个入口文件,两者都会使用到app.js进行打包,其中通过server-entry.js打包的代码是运行在node端,二通过client-entry.js打包代码运行在客户端。
一个工程化的项目其目录结构可能如下:
在新建router、store、vue实例的时候,考虑到node.js服务器是一个长期运行的进程。当我们的代码进入该进程时,它将进行一次取值并留存在内存中。这意味着如果创建一个单例对象,它将在每个传入的请求之间共享。这显然是不可取的。因此,我们不应该直接创建一个应用程序实例,而是应该暴露一个可以重复执行的工厂函数,为每个请求创建新的应用程序实例:
app.js文件内容如下:
//app.js
// const Vue = require('vue')
import Vue from 'vue'
import App from './App.vue'
import {createRouter} from './router'
import {createStore} from './store'
import {sync} from 'vuex-router-sync'
// 导出一个工厂函数,用于创建新的
// 应用程序、router 和 store 实例
export function createApp(){
  //创建路由实例
  const router=createRouter()
  const store = createStore()
    // 同步路由状态(route state)到 store
  sync(store,router)
  // 例如,从 user/1 到 user/2)时,也应该调用 asyncData 函数。我们也可以通过纯客户端 (client-only) 的全局 mixin 来处理这个问题:
  Vue.mixin({
    beforeRouteUpdate (to, from, next) {
      const { asyncData } = this.$options
      if (asyncData) {
        asyncData({
          store: this.$store,
          route: to
        }).then(next).catch(next)
      } else {
        next()
      }
    }
  })
  const app = new Vue({
    router,
    store,
    render:h=>h(App)
  })
  //返回app 和 router
  return {app,router,store}
}
由于我将路由和状态管理分离到了单独的文件中,所以我新建了router.js和store.js。当然如果项目比较复杂可以将路由和状态文件进行分割,这里就不再深究。
//以下为 router.js 的内容
import Vue from 'vue'
import Router from 'vue-router'
Vue.use(Router)
export function createRouter(){
  return new Router({
    mode:'history',
    routes:[
      {path:'/',component:()=>import('./components/Home.vue')},
      {path:'/item/:id',component:()=>import('./components/Item.vue')}
    ]
  })
}
//以下为 store.js 内容
import Vue from 'vue'
import Vuex from 'vuex'
Vue.use(Vuex)
import {fetchItem} from './api'
export function createStore(){
return new Vuex.store({
state:{
items:{}
},
actions:{
fetchItem({commit},id){
return fetchItem(id).then(item=>{
commit('setItem',{id,item})
})
}
},
mutations:{
setItem(state,{id,item}){
Vue.set(state.items,id,item)
}
}
})
}接下来我们需要在 entry-client.js 中实现客户端路由逻辑 (client-side routing logic):
import {createApp} from './app'
//客户端特定引导逻辑
const {app,router,store} = createApp()
if(window.__INITIAL_STATE__){
  store.replaceState(window.__INITIAL_STATE__)
}
// 这里假定 App.vue 模板中根元素具有 `id="app"`
router.onReady(()=>{
 // 添加路由钩子函数,用于处理 asyncData.
  // 在初始路由 resolve 后执行,
  // 以便我们不会二次预取(double-fetch)已有的数据。
  // 使用 `router.beforeResolve()`,以便确保所有异步组件都 resolve。
  router.beforeResolve((to, from, next) => {
    // to and from are both route objects. must call `next`.
    const matched = router.getMatchedComponents(to)
    const preMatched = router.getMatchedComponents(from)
     // 我们只关心非预渲染的组件,所以我们对比它们,找出两个匹配列表的差异组件
    let diffed = false
    const activated=matched.filter((c,i)=>{
      return diffed || (diffed=(preMatched[i]!==c))
    })
    if(!activated.length){
      return next()
    }
        // 这里如果有加载指示器 (loading indicator),就触发
    Promise.all(activated.map(c=>{
      if(c.asyncData){
        return c.asyncData({store,route:to})
      }
    })).then(()=>{
       // 停止加载指示器(loading indicator)
      next()
    }).catch(next)
  })
  app.$mount('#app',true)
})
然后我们需要在 entry-server.js 中实现服务器端路由逻辑 (server-side routing logic):
import {createApp} from './app'
export default context=>{
    // 因为有可能会是异步路由钩子函数或组件,所以我们将返回一个 Promise,以便服务器能够等待所有的内容在渲染前, 就已经准备就绪。
  return new Promise((resolve,reject)=>{
    const {app,router} = createApp()
    // 设置服务器端 router 的位置
    router.push(context.url)
    // 等到 router 将可能的异步组件和钩子函数解析完
    router.onReady(()=>{
      const matchedComponents = router.getMatchedComponents()
      if(!matchedComponents.length){
        return reject({code:404})
      }
      // 对所有匹配的路由组件调用 `asyncData()`
      Promise.all(matchedComponents.map(Component=>{
        if(Component.asyncData){
          return Component.asyncData({
            store,
            route:router.currentRoute
          })
        }
      })).then(()=>{
        // 在所有预取钩子(preFetch hook) resolve 后, 我们的 store 现在已经填充入渲染应用程序所需的状态。
        // 当我们将状态附加到上下文, 并且 `template` 选项用于 renderer 时,
        // 状态将自动序列化为 `window.__INITIAL_STATE__`,并注入 HTML
        context.state=store.state
        resolve(app)
      }).catch(reject)
    },reject)
  })
}
紧接着我们进行webpack的配置,同样分为服务端和客户端的配置webpack.server.config.js和webpack.client.config.js。具体配置详情如下所示:
//以下为 webpack.server.config.js 的内容
const merge = require('webpack-merge')
const nodeExternals = require('webpack-node-externals')
const baseConfig = require('./webpack.base.config.js')
const VueSSRServerPlugin = require('vue-server-renderer/server-plugin')
module.exports = merge(baseConfig, {
  // 将 entry 指向应用程序的 server entry 文件
  entry: '/path/to/entry-server.js',
  // 这允许 webpack 以 Node 适用方式(Node-appropriate fashion)处理动态导入(dynamic import),
  // 并且还会在编译 Vue 组件时,
  // 告知 `vue-loader` 输送面向服务器代码(server-oriented code)。
  target: 'node',
  // 对 bundle renderer 提供 source map 支持
  devtool: 'source-map',
  // 此处告知 server bundle 使用 Node 风格导出模块(Node-style exports)
  output: {
    libraryTarget: 'commonjs2'
  },
  // https://webpack.js.org/configuration/externals/#function
  // https://github.com/liady/webpack-node-externals
  // 外置化应用程序依赖模块。可以使服务器构建速度更快,
  // 并生成较小的 bundle 文件。
  externals: nodeExternals({
    // 不要外置化 webpack 需要处理的依赖模块。
    // 你可以在这里添加更多的文件类型。例如,未处理 *.vue 原始文件,
    // 你还应该将修改 `global`(例如 polyfill)的依赖模块列入白名单
    whitelist: /\.css$/
  }),
  // 这是将服务器的整个输出
  // 构建为单个 JSON 文件的插件。
  // 默认文件名为 `vue-ssr-server-bundle.json`
  plugins: [
    new VueSSRServerPlugin()
  ]
})
//以下为 webpack.client.config.js 的内容
const webpack = require('webpack')
const merge = require('webpack-merge')
const baseConfig = require('./webpack-base.config.js')
const VueSSRClientPlugin = require('vue-server-renderer/client-plugin')
module.exports = merge(baseConfig, {
entry: '/path/to/entry-client.js',
plugins: [
// 重要信息:这将 webpack 运行时分离到一个引导 chunk 中,
// 以便可以在之后正确注入异步 chunk。
// 这也为你的 应用程序/vendor 代码提供了更好的缓存。
new webpack.optimize.CommonsChunkPlugin({
name: "manifest",
minChunks: Infinity
}),
// 此插件在输出目录中
// 生成 `vue-ssr-client-manifest.json`。
new VueSSRClientPlugin()
]
})配置好webpack之后我们就可以来进行server.js的编写了:
//server.js
const server = require('express')()
const {createBundleRenderer} = require('vue-server-renderer')
const template = fss.readFileSync('./template.html','utf-8')
const serverBundle=require('/path/to/vue-ssr-server-bundle.json')
const clientManifest = require('path/to/vue-ssr-client-manifest.json')
const renderer= createBundleRenderer(serverBundle,{
  runInNewContext: false, // 推荐
  template, // (可选)页面模板
  clientManifest // (可选)客户端构建 manifest
})
server.get('*',(req,res)=>{
  const context = {url:req.url}
  renderer.renderToString(context,(err,html)=>{
    if(err){
      if(err.code===404){
        res.status(404).end('Page not found')
      }
      else{
        res.status(500).end('Internal server error')
      }
    }else{
      res.end(html)
    }
  })
})
项目的整体结构基本上就搭建完成了,其他的一些细节,例如组件的开发、webpack.base.config.js的配置就不再此详述。
五、总结几点
- 服务器端index.js流程是如何的? 即npm run dev之后,就会进入index.js,然后引入express作为node服务器,并引入vue-server-renderer来集成,进一步将vue的app来服务器渲染,但是如何在服务器端获取这个打包之后的app呢? 即通过entry-server.js即可,这个入口文件就会打包node端运行的vue,打包之后,node端会生成了html标记,然后需要一层html外壳,即套用index.html模板template,这个模板中有一个<!--vue-ssr-outlet>注释,表示。
- 服务器端获取打包之后的代码是和客户端一样都是js文件吗? 不是的,一般来说,服务器端在获取webpack打包的代码应该是 built-server-bundle.js,但是这样每次在编辑过应用程序代码之后都需要再重新重启,会影响开发效率,另外nodejs不支持source map。所以,我们可以使用 bundlerender,这种方式和render是类似的,但它支持sourcemap,热重载等。在webpack.server.config文件中配置了插件new VueSSRServerPlugin(),这个插件的作用是作为整个服务器的输出为json文件,而不再是js文件,默认文件名为
vue-ssr-server-bundle.json。 - 整体过程到底是怎样的?即首先写好各种组件、路由、store等,接着app.js中开始进行汇聚,然后entry-client.js和entry-server.js分别进行对两者的整合。接下来就可以build了,在build客户端代码的时候即通过webpack.client.js进入,入口文件为entry-client.js,最后会打包完整的代码;在build服务器端代码的时候通过webpack.server.js进入,入口文件为entry-server.js,会打包出vue-ssr-server-bundle.json文件;当然这些打包后的文件都会打包到dist文件夹下。build之后,就可以把代码放在服务器上运行了,即通过node创建一个服务器进行服务器端渲染。


