「图像处理」C#+AForge.Net+DlibDotNet实现人脸识别
折腾了两天才算是有点成果了。整理一下吧。
用C# WinForm开发,使用AForge调用摄像头,加上Dlib(DotNet)实现一下人脸识别
更新:现已经将代码,以及本文中所用到的DlibDotNetNative.dll、DlibDotNetNativeDnn.dll、DlibDotNet.Extensions.dll,以及人脸数据上传到github上,如有需要请自行下载。地址:https://github.com/RainkLH/Face_Detection_AForge-DlibDotNet
目录
1 AForge.Net调用摄像头
1.1 安装AForge.Net的依赖包
1.2 设计WinForm界面
1.3 添加代码
1.4 补充说明
1.4.1 关于VideoSourcePlayer 控件
1.4.2 关于拍照
2 添加人脸识别方法
2.1 安装DlibDotNet和人脸数据
2.2 人脸识别方法
2.3 人脸识别应用
3 遇到的坑
3.1 找不到【DlibDotNetNative.dll】和【DlibDotNetNativeDnn.dll】
3.2 图片转换:Bitmap->Array2D
3.3 图像转换抛异常
1 AForge.Net调用摄像头
1.1 安装AForge.Net的依赖包
操作摄像头需要用到【AForge.Video.DirectShow】。
从NuGet里查找进行安装,安装时会同时安装它的依赖项:【AForge.Video】和【AForge】
1.2 设计WinForm界面
界面如下:
图中蓝色字体标注了我对每个控件的定义的ID,方便对应下文的代码
左边的【VideoSourcePlayer】控件(AForge中的控件)是摄像头的画面显示,右边的【PictureBox】是后面做人脸识别的显示框。
下方的【PictureBox】是拍照预览框。
期望是程序运行时,检测摄像头设备,添加到【coBox_camList】中,用户选择要用的相机设备,该设备所支持的分辨率自动添加到【coBox_Reslution】列表中,并自动选中默认分辨率,点击【打开】按钮即可显示摄像头画面并实时进行人脸检测。
1.3 添加代码
上面界面对应的代码(Form1.cs)如下:
//-----------form1.cs
using System;
using System.Drawing;
using System.Windows.Forms;
using AForge.Video;        //引用命名空间
using AForge.Video.DirectShow;        //引用命名空间

namespace AForgeCamera
{
    public partial class AForgeCamera : Form
    {
        private FilterInfoCollection CaptureDevices; //设备列表
        private VideoCaptureDevice captureDevice;  //摄像头设备
        private VideoCapabilities[] videoCapabilities;  //摄像头能力列表
        private VideoCapabilities videoCapabilitie;  //单一摄像头能力(分辨率等)


        public AForgeCamera()
        {
            InitializeComponent();
            //控件状态等初始化
            btn_cam.Enabled = false;
            btn_cam.Text = "打开";
            btn_takePic.Enabled = false;
            pBox_view.SizeMode = PictureBoxSizeMode.StretchImage;
            pBox_faceDst.SizeMode = PictureBoxSizeMode.StretchImage;
            //获取摄像头并添加到coBox_CamList
            CaptureDevices = new FilterInfoCollection(FilterCategory.VideoInputDevice);
            foreach (FilterInfo filterInfo in CaptureDevices)
            {
                coBox_CamList.Items.Add(filterInfo.Name);
            }
            faceDetection = new FaceDetection();
        }

        private void AForgeCamera_FormClosing(object sender, FormClosingEventArgs e)
        {
            //主窗口关闭,必要的清理
            captureDevice.Stop();
            CaptureDevices.Clear();
            AVPlayer_Cam1.VideoSource = null;
            AVPlayer_Cam1.Stop();
        }

        private void coBox_CamList_SelectedIndexChanged(object sender, EventArgs e)
        {
            //选择摄像头后
            coBox_Resolution.Items.Clear(); //先清理上次选择的摄像头支持的分辨率
            //获取摄像头设备
            FilterInfo filterInfo = CaptureDevices[coBox_CamList.SelectedIndex];
            captureDevice = new VideoCaptureDevice(filterInfo.MonikerString);
            //获取所选择的摄像头分辨率列表并添加
            videoCapabilities = captureDevice.VideoCapabilities;
            foreach (VideoCapabilities capabilitie in videoCapabilities)
            {
                coBox_Resolution.Items.Add(capabilitie.FrameSize.Width.ToString() +
                "×" + capabilitie.FrameSize.Height.ToString());
            }
            //选中默认分辨率 触发coBox_Resolution_SelectedIndexChanged()
            if (coBox_Resolution.Items.Count > 0)
            {
                coBox_Resolution.SelectedIndex = 0;
            }
        }

        private void coBox_Resolution_SelectedIndexChanged(object sender, EventArgs e)
        {
            //获取选择的分辨率,选择时没有关闭摄像头时进行关闭
            videoCapabilitie = videoCapabilities[coBox_Resolution.SelectedIndex];
            btn_cam.Enabled = true;
            btn_takePic.Enabled = true;
            if (AVPlayer_Cam1.IsRunning)
            {
                captureDevice.Stop();
                AVPlayer_Cam1.VideoSource = null;
                AVPlayer_Cam1.VideoSource = null;
                btn_cam.Text = "打开";
            }
        }

        //打开和关闭摄像头
        private void btn_cam_Click(object sender, EventArgs e)
        {
            if (btn_cam.Text == "打开")
            {
                captureDevice.VideoResolution = videoCapabilitie;
                AVPlayer_Cam1.VideoSource = captureDevice;

                captureDevice.SimulateTrigger();
                AVPlayer_Cam1.Start();
                btn_cam.Text = "停止";
                btn_takePic.Enabled = true;
            }
            else
            {
                AVPlayer_Cam1.Stop();
                AVPlayer_Cam1.VideoSource = null;
                btn_cam.Text = "打开";
                btn_takePic.Enabled = false;
            }

        }

        //拍照并预览
        private void btn_takePic_Click(object sender, EventArgs e)
        {
            pBox_view.Image = AVPlayer_Cam1.GetCurrentVideoFrame();
        }
    }
}
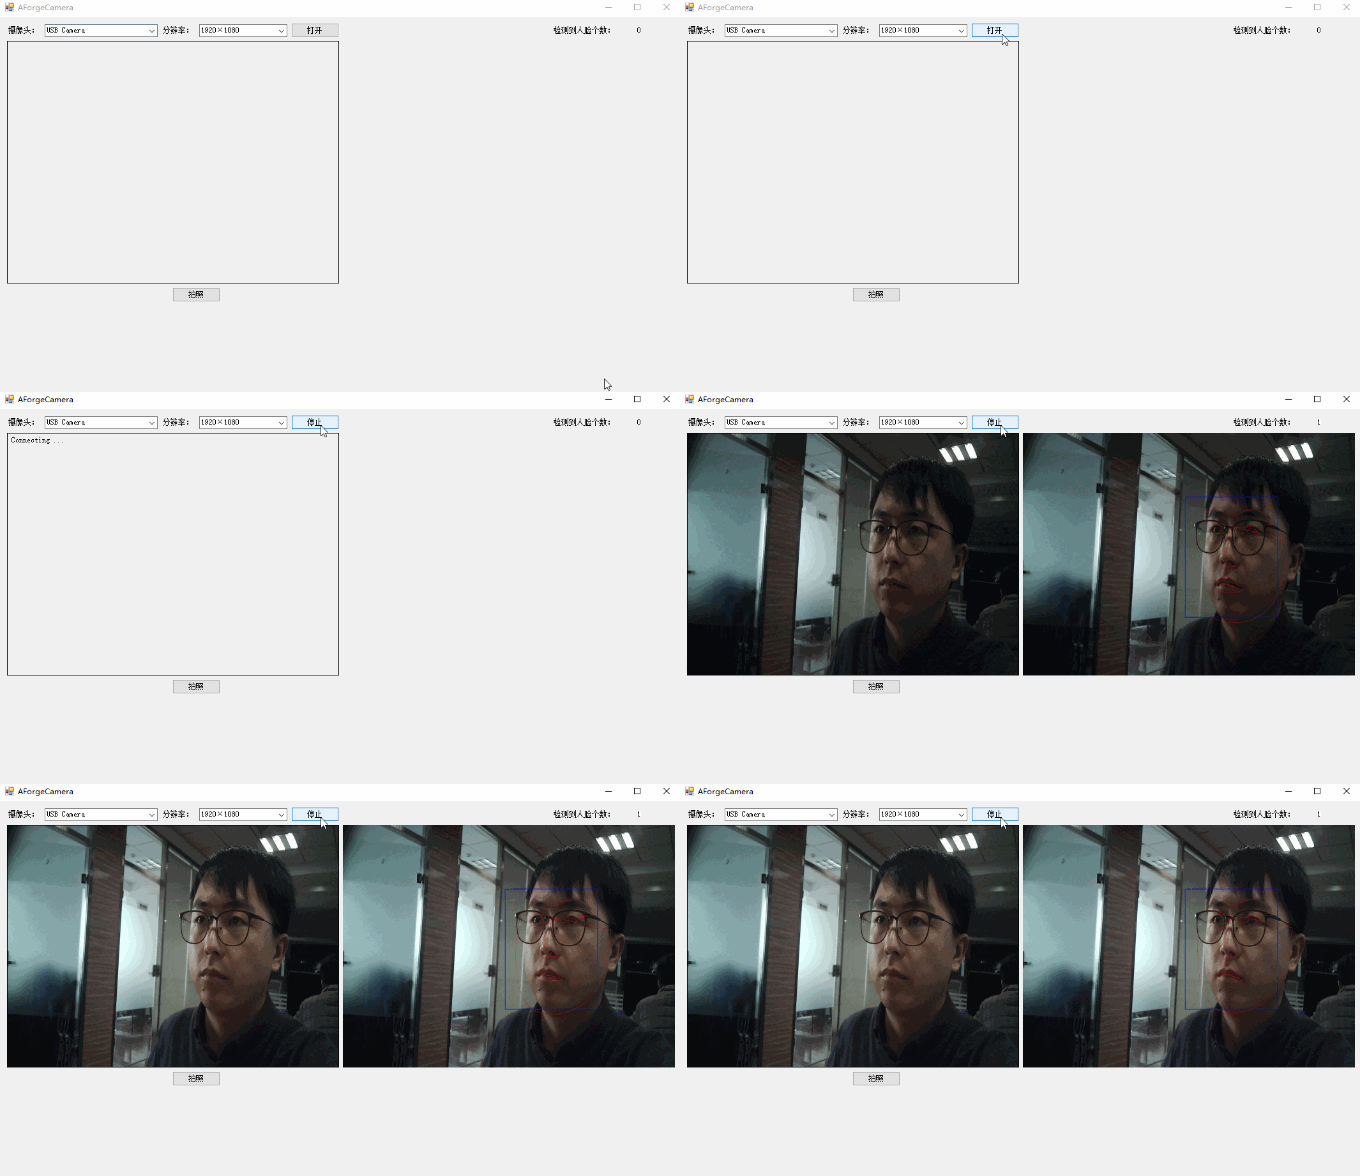
运行效果如下:
(啊。。。。。保存gif好费劲,感谢ScreenToGif,是个好软件)
1.4 补充说明
1.4.1 关于VideoSourcePlayer 控件
它的实例化对象就是界面上的图像预览框,在使用时,把摄像头设备赋值给它的【videoSource】属性。可以理解为该控件其实是【VideoCaptureDevice】的一个复制品,或者说是一个客户端。我们在打开摄像头和关闭摄像头时,使用了如下方式:
//指定视频来源
AVPlayer_Cam1.VideoSource = captureDevice;
//打开
AVPlayer_Cam1.Start();
//关闭
AVPlayer_Cam1.Stop();
实际上,在指定了视频源后,可以直接操作视频源也是可以的,如下代码也是能实现打开和关闭摄像头。
//指定视频来源
AVPlayer_Cam1.VideoSource = captureDevice;
//打开
captureDevice.Start();
//关闭
captureDevice.Stop();
1.4.2 关于拍照
本文拍照这里采用的是:
pBox_view.Image = AVPlayer_Cam1.GetCurrentVideoFrame();即使用【VideoSourcePlayer】控件来实现,但是我一直想直接通过【VideoCaptureDevice】对象直接拍照,发现实现不了。
【VideoCaptureDevice】类下面有几个关于拍照和视频帧的东西:
------AForge.Video.DirectShow源码-----
//获取和设置 触发拍照功能
public bool ProvideSnapshots { get; set; }
//拍照触发的事件
public event NewFrameEventHandler SnapshotFrame;
//新帧产生的事件
public event NewFrameEventHandler NewFrame;
//模拟外触发
public void SimulateTrigger();
从文档来看,先设置【ProvideSnapshots 】为“true”,接着把【SnapshotFrame】绑定到对图片处理方法(例如预览、保存),接着调用【SimulateTrigger()】来模拟外触发拍照,这样的拍照方法实现应该是最理想的,but我试了不成功,搜索发现好像是硬件不支持。要不然就是我的操作不对,如果有谁测试成功了,还请分享一下。
另一个是 NewFrame 事件,即摄像头获取到新的帧后触发的事件,也就是说可以不用【VideoSourcePlayer】来显示画面,可以用下面的方式通过【PictureBox】来实现。
//给事件绑定方法
captureDevice.NewFrame += new NewFrameEventHandler(NewFrameEvent);

//事件具体方法
private void NewFrameEvent(object sender, NewFrameEventArgs eventArgs)
{
    if (InvokeRequired)
    {
        this.Invoke(new NewFrameEventHandler(FaceDetection), new object[] { sender, eventArgs });
    }
    else
    {
         //获取到图像(BitMap)
         //pBox_video是用于代替上文AVPlayer_Cam1的PictureBox控件
         pBox_video.Image= (Bitmap)eventArgs.Frame.Clone();
    }
}
看到这个,应该都能猜到了,我们可以利用这个方法获取所拍摄的图像进行人脸识别、视频录制、图像处理等操作。
2 添加人脸识别方法
人脸识别使用了Dlib库,这是一个C++开发的目标检测的库,大多是都是用Python进行调用开发,但是这里要在.Net平台第哦啊用,找了一下,发现是.Net平台对应的库:DlibDotNet。
2.1 安装DlibDotNet和人脸数据
一样,NuGet上查找进行安装,搜索安装【DlibDotNet】就好。
接着就是去官网下载人脸数据,即匹配人脸所需要的一个 “.dat”文件。
下载地址:http://www.dlib.net/files/
要下载的文件是:【shape_predictor_5_face_landmarks.dat】或【shape_predictor_68_face_landmarks.dat】
分别是识别出人脸中的5个特征点和68个特征点,当然识别的越多越难也就越慢。
按需要下载后,放到合适的目录下,比如我放在项目exe目录下的“face_data”文件夹下。
2.2 人脸识别方法
添加一个【FaceDetection.cs】文件,添加代码如下:
using System.Drawing;
using DlibDotNet;
using DlibDotNet.Extensions;
namespace AForgeCamera
{
public class FaceDetection
{
private string faceDataPath;
// 人脸数据文件路径名称属性
public string FaceDataPath { get => faceDataPath; set => faceDataPath = value; }
public FaceDetection()
{
//默认文件路径
faceDataPath = @"face_data\shape_predictor_68_face_landmarks.dat";
}
///
/// 进行人脸识别
///
/// 图像
/// 识别到的人脸数目
/// img = BitmapExtensions.ToArray2D(image);
using (var faceDetector = Dlib.GetFrontalFaceDetector())
using (var shapePredictor = ShapePredictor.Deserialize(faceDataPath))
{
// 检测人脸
var faces = faceDetector.Operator(img);
// 遍历检测到的人脸区域
foreach (var rect in faces)
{
//绘制脸部区域
Dlib.DrawRectangle(img, rect, new RgbPixel { Blue = 255 }, 3);
// 人脸区域中识别脸部特征
var shape = shapePredictor.Detect(img, rect);
// 简单绘制识别到的特征(用线连起来)
for (uint i = 1;i < shape.Parts; i++)
{
Dlib.DrawLine(img, shape.GetPart(i), shape.GetPart(i - 1), new RgbPixel { Red = 255 });
}
}
numOfFaceDetected = faces.Length;
}
return BitmapExtensions.ToBitmap(img);
}
return image;
}
}
}
上面的代码中【FaceDetectionFromImage】就是从 Bitmap图像中识别人脸的并将区域于特征绘制到图像上并返回图像的函数。
结合1.4.2中说明的【event NewFrame】,就可以实现了。
2.3 人脸识别应用
在调用摄像头的代码中,添加调用人脸识别的方法。
首先,在其中(调用摄像头的界面源码 Form1.cs)中,新增人脸识别的调用方法,该方法就是AForge摄像头设备【captureDevice.NewFrame】事件要绑定的方法。
private void FaceDetection(object sender, NewFrameEventArgs eventArgs)
{
    if (InvokeRequired)
    {
        this.Invoke(new NewFrameEventHandler(FaceDetection), new object[] { sender, eventArgs });
    }
    else
    {
        //获取拍摄的图像
        Bitmap img = (Bitmap)eventArgs.Frame.Clone();
        int numFaces = 0;
        //进行人脸识别以及图像显示,更新界面的人脸识别数目
        pBox_faceDst.Image = faceDetection.FaceDetectionFromImage(img, out numFaces);
        lb_FaceNum.Text = numFaces.ToString();
    }
}
接着,在打开摄像头的地方,添加事件绑定的代码(既然有绑定,就有解绑):
private void btn_cam_Click(object sender, EventArgs e)
{
    if (btn_cam.Text == "打开")
    {
        captureDevice.VideoResolution = videoCapabilitie;
        AVPlayer_Cam1.VideoSource = captureDevice;
        //重点是这一句代码!!-------------------------↓
        captureDevice.NewFrame += new NewFrameEventHandler(FaceDetection);

        captureDevice.SimulateTrigger();
        AVPlayer_Cam1.Start();
        btn_cam.Text = "停止";
        btn_takePic.Enabled = true;            }
    else
    {
        //还有这一句代码!!-------------------------↓
        captureDevice.NewFrame -= new NewFrameEventHandler(FaceDetection);

        AVPlayer_Cam1.Stop();
        AVPlayer_Cam1.VideoSource = null;
        btn_cam.Text = "打开";
        btn_takePic.Enabled = false;
    }
}
其次还有就是在切换分辨率时,会关闭摄像头数据,也得解绑事件,还有就是程序关闭的时候要解绑!这些就不贴代码了。
最终效果如下:
3 遇到的坑
3.1 找不到【DlibDotNetNative.dll】和【DlibDotNetNativeDnn.dll】
从NuGet中安装了DlibDotNet,写完代码编译时,可能会在VS的错误列表中看到 “无法复制xxxx\DlibDotNetNative.dll,找不到该文件”等错误,因为现在新版VS新建的C#项目都是对应“AnyCPU”的,而下载的包中,这两个dll在“x64/x86”目录下,所以找不到,一种方法:在错误信息说明的路径下,新建“AnyCPU”等路径,然后从x86目录下找到这两个dll,复制进去;要不然就是把项目的【解决方案平台】切换成x64。
编译通过后运行可能还会报错,把这两个dll复制到编译成成的exe目录下就好。
3.2 图片转换:Bitmap->Array2D
Array2D img = BitmapExtensions.ToArray2D(image); 开始的时候这个没法用,看了DlibDotNet源码发现,这个转换的功能在【DlibDotNet.Extensions】里面,但是找不到【DlibDotNet.Extensions.dll】这个库,NuGet里面也没有,于是,,,gitHub下载源码(https://github.com/takuya-takeuchi/DlibDotNet),手动编译项目中的【DlibDotNet.Extensions】,得到这个dll,然后复制到项目进行添加引用就解决了。
3.3 图像转换抛异常
解决了上面的问题,又特喵有新的问题了,图像转换抛异常,显示不支持这个格式(C# Bitmap的图像格式:PixelFormat.Format24bppRgb)的转换,还是这一句对应的内部代码问题。
Array2D img = BitmapExtensions.ToArray2D(image); 但是看官方的示例源码,也是随便打开一个Bitmap然后这么操作的啊,折腾了好久,发现他们这个版本新的更新中新增了
图像在转换时要先查询格式映射表,但是映射字典中 第二次的BgrPixel覆盖了第一次的RgbPixel ,所以就会抛异常。
怎么搞:修改源码重新编译!
在源码的【DlibDotNet-master\src\DlibDotNet.Extensions\Extensions\BitmapExtensions.cs】文件中,把BgrPixel相关的字典映射删掉,如下方代码中注释掉的部分
OptimumConvertImageInfos[PixelFormat.Format8bppIndexed] = new[]
{
    new ConvertInfo { Type = ImageTypes.UInt8 }
};
OptimumConvertImageInfos[PixelFormat.Format24bppRgb] = new[]
{
    //这里把Format24bppRgb 和 RgbPixel 对应了起来
    new ConvertInfo{ Type = ImageTypes.RgbPixel, RgbReverse = true }
};
//OptimumConvertImageInfos[PixelFormat.Format24bppRgb] = new[]
//{
//    //这里又把Format24bppRgb 和 BgrPixel对应了起来
//    new ConvertInfo{ Type = ImageTypes.BgrPixel, RgbReverse = false }
//};
OptimumConvertImageInfos[PixelFormat.Format32bppArgb] = new[]
{
    new ConvertInfo { Type = ImageTypes.RgbAlphaPixel, RgbReverse = true }
};
删掉之后,重新编译,编译生成的DlibDotNet.dll替换掉NuGet中下载的,就解决了。
当然,如果这确实是个bug,后面的版本应该会修改掉,我下载时 是 19.18.0.20190928版本,其他人用的时候如果没碰到这些错误就不用这么折腾了。

