【Unity3d学习】AR技术的简单了解
文章目录
- 写在前面
- AR简介
- Vuforia使用
- Unity内嵌的Vuforia模块
- 使用Vuforia的AR组件
- 使用AR Camera组件
- 添加虚拟按钮
- AR小游戏制作
写在前面
- 本次项目Github地址:传送门
- 本次项目的视频演示地址:传送门
- 项目的详细内容见老师的课程网站:网站链接
AR简介
增强现实(Argumented Reality (AR))是一种将真实世界信息和虚拟世界信息“无缝”集成的新技术,是把原本在现实世界的一定时间空间范围内很难体验到的实体信息(视觉信息,声音,味道,触觉等),通过电脑等科学技术,模拟仿真后再叠加,将虚拟的信息应用到真实世界,被人类感官所感知,从而达到超越现实的感官体验。
混合现实(Mixed reality (MR)) 有时被称为超现实(hybrid reality),是真实和虚拟世界的合并,产生新的可视化环境,物理和数字对象实时共存且在其中交互。混合现实不仅发生在物理世界或虚拟世界中,而是融合了现实和虚拟现实,通过身临其境的技术包含增强现实和增强虚拟。
实际应用中,我们对 AR 和 MR 技术通常是不区分,简称 AR/MR 技术。
Vuforia使用
Vuforia一直是开发者最青睐的AR SDK,众多的功能以及高质量的识别技术,良好的跨平台性和兼容性,兼容目前主流的PC,Android,IOS平台。 Vuforia 引擎支持 Unity 引擎以及三个主要平台:iOS、Android 和 UWP (Windows)。所以它收到许多开发者的喜爱。
Unity内嵌的Vuforia模块
使用Unity2017以上版本就可以在安装的时候选择添加Vuforia的模块,从而能够在Unity编辑器上使用Vuforia的组件。
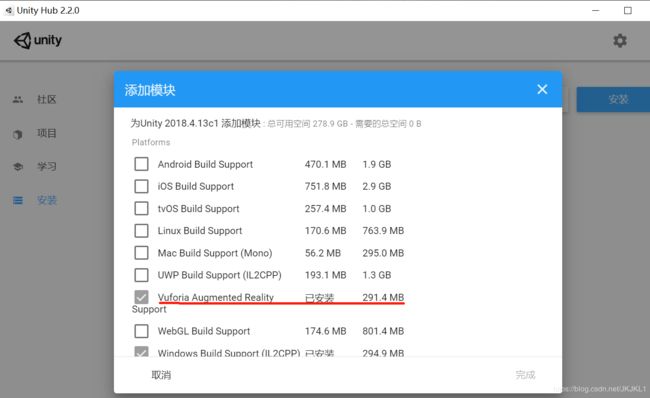
或者是从官网中下载(链接地址)相应的安装包。

对于2019版本,有一点坑就是需要导入相应的package,然后该包中含有一个自动执行的脚本,会将所需要安装包的链接加入到Unity2019版的包管理器中,然后自动从链接中下载所需要的资源,但是由于服务器的国外的,所以下载速度非常慢,会造成卡住不动的现象。
所以我安装了2018版的Unity来使用。
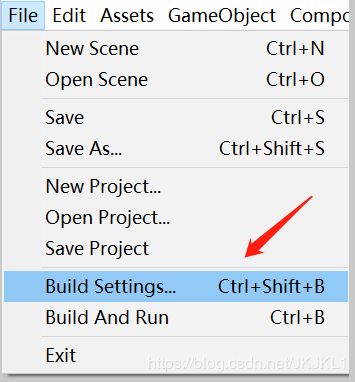
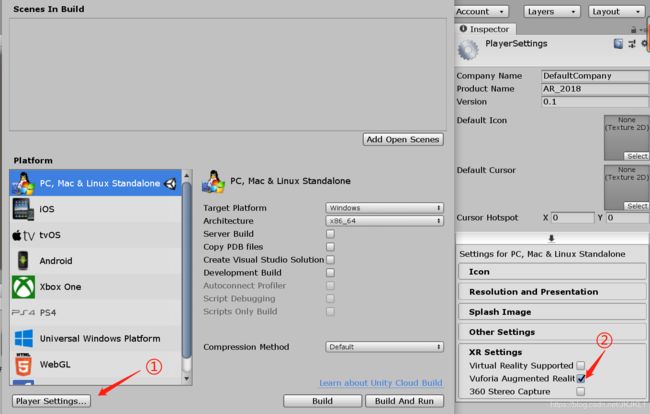
安装完成之后,需要在Unity中打开相应的设置:


然后就可以在对象树中添加相应的AR组件了:
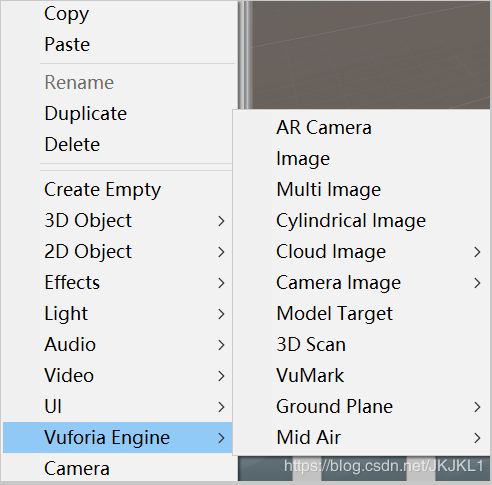
使用Vuforia的AR组件
到官网(链接)注册一个账号,然后添加一个License Key。
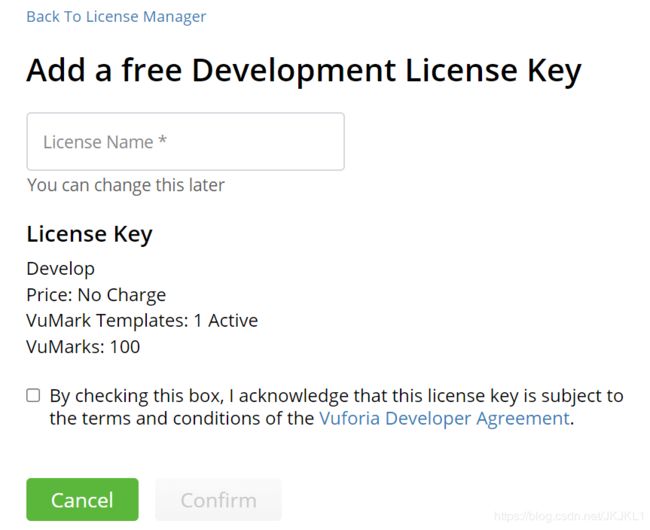
然后添加数据库:
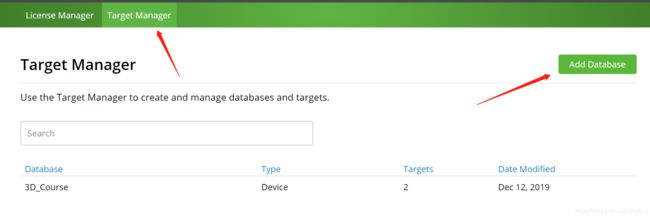
并且添加一张图片,作为识别的目标:

注意图片的识别度,星越多,越容易识别。

把数据库下载下来:

使用AR Camera组件
添加AR Camera,删除原有的Camera。然后进行一点设置:
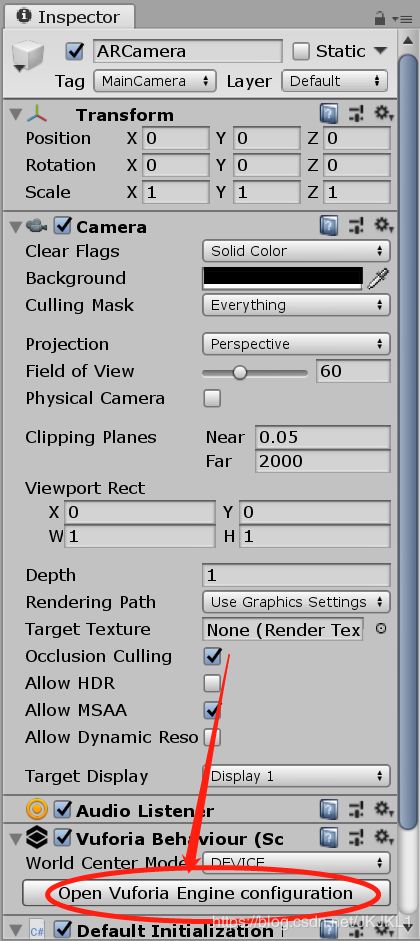
添加License和database:

数据库的添加通过导入之前我们下载的包来实现。
在场景中添加Image,就会在结构树中出现一个ImageTarget的对象。将准备好的模型添加在上面,并且调整一下位置:


添加虚拟按钮
在Image Target 的 Inspecter中找到添加虚拟按钮的选项:

给虚拟按钮挂载一下代码:
using UnityEngine;
using Vuforia;

public class VirtualButtonEventHandler : MonoBehaviour, IVirtualButtonEventHandler {
    public GameObject vb;
    public Animator ani;

    void Start() {
        VirtualButtonBehaviour vbb = vb.GetComponent<VirtualButtonBehaviour>();
        if(vbb){
            vbb.RegisterEventHandler(this);
        }
    }

    public void OnButtonPressed(VirtualButtonBehaviour vb) {
        ani.SetTrigger("Take Off");
        ani.SetBool("onPress", true);
        Debug.Log("Pressed!");
    }

    public void OnButtonReleased(VirtualButtonBehaviour vb) {
        ani.SetTrigger("Land");
        ani.SetBool("onPress", false);
        Debug.Log("Released!");
    }
}
然后为了显示button,可以在button的位置加一个平面对象(Plane),使其能够显示在屏幕中。
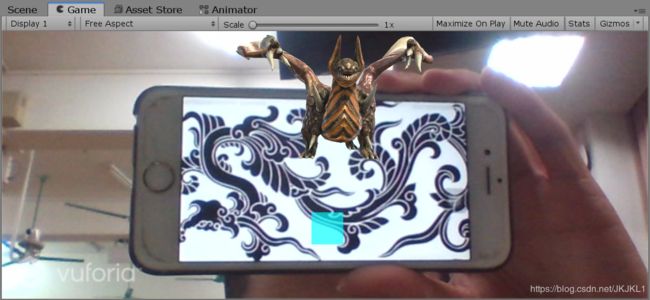
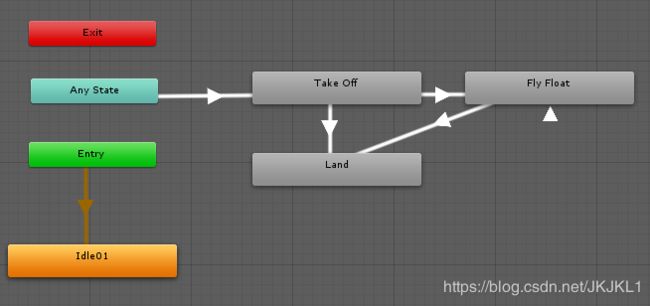
触碰虚拟按钮(需要完全覆盖),就能发现模型能够动起来。
项目地址:传送门
AR小游戏制作
利用AR组件制作一个简单的躲避球小游戏:
玩家控制角色(天蓝色小球),向上移动(会自然下落),从而躲避冲来的障碍小球。
碰到障碍则游戏失败
首先还是一样用到Vuforia的图像数据库,这里直接用之前的龙纹图片。
然后将我们控制的角色(一个天蓝色小球)添加为ImageTarget的子对象,就能够随着图像的识别而显示出来,基本布局很简单,上面已经有过相关的实践了。
直接来游戏设计部分:
首先需要有各种障碍出现,来躲避。所以这里可以给这些障碍制成预制体,并且挂载一个控制移动的脚本:
using System.Collections;
using System.Collections.Generic;
using UnityEngine;

public class Move : MonoBehaviour
{
    public Controller controller;
    public float speed = 9;
    Vector3 target;
    float time = 0;
    bool flag = true;
    // Start is called before the first frame update
    void Start()
    {
        GameObject tmp = GameObject.Find("Bird");
        target = 3*tmp.transform.position - 2*this.transform.position;
        controller = Director.getInstance().currentSceneController as Controller;
    }

    // Update is called once per frame
    void Update()
    {
        if (controller.getState() == 0) return;
        if (time > 5) {
            controller.addScore();
            flag = false;
            Debug.Log("score: " + controller.getScore());
            Destroy(this.gameObject);
            return;
        }
        time += Time.deltaTime;

        this.transform.position = Vector3.MoveTowards(transform.position,target,Time.deltaTime * speed);
        // this.transform.Translate(target*speed*Time.deltaTime);

    }
}
就是朝着我们控制目标的方向移动,但是这不是实时追踪,而只是设定一个初始目标位置的方向。并且设定一段时间后就消失。
而这里,场景控制器的作用就是不断地抛出障碍:
using System.Collections;
using System.Collections.Generic;
using UnityEngine;
using UnityEngine.SceneManagement;
public class Controller : MonoBehaviour, SceneController, Interaction{

    public PipeFactory pipeFactory;
    public int score = 0;
    float time = 0;
    public int state = 1;
    public void loadResources() {

    }
    private void Start()
    {
        score = 0;
        pipeFactory =  this.gameObject.AddComponent<PipeFactory>();
        Director director = Director.getInstance();
        director.currentSceneController = this;
    }
    private void Update() {
        if (state == 1) {
            GameObject tmp = null;
            if (time > 3)
            {
                tmp = pipeFactory.getPipe();
                time = 0;
            }
            else
            {
                time += Time.deltaTime;
            }
        }

    }

    public int getState() {
        return state;
    }

    public void addScore() {
        score += 1;
    }

    public int getScore() {
        return score;
    }
}
然后给我们的主角,添加一个刚体属性,使其能够受到重力作用。还要挂载一个控制脚本,这里暂时用鼠标点击来触发向上的动作:
using System.Collections;
using System.Collections.Generic;
using UnityEngine;

public class Fly : MonoBehaviour
{
    public float speed = 5.5f;
    private Rigidbody rig;
    public Controller controller;
    // Start is called before the first frame update
    void Start()
    {
        rig = GetComponent<Rigidbody>();
        controller = Director.getInstance().currentSceneController as Controller;
    }

    // Update is called once per frame
    void FixedUpdate()
    {
        if (controller == null) {
            controller = Director.getInstance().currentSceneController as Controller;
            return;
        }
        if (controller.getState() == 0) {
            this.transform.localPosition = Vector3.zero;
            rig.useGravity = false;
            return;
        }
        if (this.transform.position.y < -5f) {
            rig.useGravity = false;
            rig.velocity = Vector3.zero;
        }
        else {
            rig.useGravity = true;
        }
        if(Input.GetButtonDown("Fire1")) {
            rig.velocity = Vector3.up * speed;
        }
    }
}
添加碰撞检测,如果碰到了障碍就游戏失败:
private void OnCollisionEnter(Collision other)
{
     Controller controller = Director.getInstance().currentSceneController as Controller;
     controller.state = 0;
     Destroy(other.gameObject);
 }
使用工厂进行障碍物的创建:
using System.Collections;
using System.Collections.Generic;
using UnityEngine;

public class PipeFactory: MonoBehaviour{
    List<GameObject> activeList = new List<GameObject>();
    List<GameObject> freeList = new List<GameObject>();

    public GameObject getPipe() {
        GameObject pipe = null;
        GameObject img = GameObject.Find("ImageTarget");
        if (img != null) {
            if (freeList.Count > 0)
            {
                pipe = freeList[0].gameObject;
                freeList.Remove(freeList[0]);
                pipe.transform.Rotate(0,0,0);
            }
            else
            {
                pipe = Instantiate(Resources.Load<GameObject>("Prefabs/Pipe"), new Vector3(8, Random.Range(-3,3),0), Quaternion.identity);
            }
            pipe.SetActive(true);
            pipe.transform.parent = img.transform;
            float x = Random.Range(-1,1) > 0 ? 0.5333f : -0.5333f;
            pipe.transform.localPosition = new Vector3(x, Random.Range(-1f,1f),0);
        }


        return pipe;
    }

    public void free(GameObject pipe) {
        GameObject tmp = null;
        foreach (GameObject i in activeList)
        {
            if (pipe.GetInstanceID() == i.gameObject.GetInstanceID())
            {
                tmp = i;
                break;
            }
        }
        if (tmp != null) {
            tmp.gameObject.SetActive(false);
            freeList.Add(tmp);
            activeList.Remove(tmp);
        }
    }
}
使用虚拟按钮,添加相应的事件:
使得一直按着按钮的时候,小球会一直向上运动。
using UnityEngine;
using Vuforia;

public class VirtualButtonEventHandler : MonoBehaviour, IVirtualButtonEventHandler {
    public GameObject vb;
    public GameObject ball;

    public float speed = 7f;
    private Rigidbody rig;
    public Controller controller;
    bool isPressed = false;

    void Start() {
        VirtualButtonBehaviour vbb = vb.GetComponent<VirtualButtonBehaviour>();
        if(vbb){
            vbb.RegisterEventHandler(this);
        }
        rig = ball.GetComponent<Rigidbody>();
        controller = Director.getInstance().currentSceneController as Controller;
    }

    public void OnButtonPressed(VirtualButtonBehaviour vb) {
        if (controller == null) {
            controller = Director.getInstance().currentSceneController as Controller;
            return;
        }
        if (controller.getState() == 0) {
            return;
        }
        isPressed = true;
        Debug.Log("Pressed!");
    }

    public void OnButtonReleased(VirtualButtonBehaviour vb) {
        isPressed = false;
        Debug.Log("Released!");
    }
    private void FixedUpdate()
    {
        if (isPressed) {
            rig.velocity = Vector3.up * speed;
        }
    }
}
最终效果:
