css 六角形
*作者注释:
本文是为使用C#语言和Monogame Framework的经验丰富的开发人员撰写的。 Monogame正在积极开发中,最近刚刚发布了一个新版本。 这是一项技术性很强的文章,要求开发人员精通所选语言。 因此,没有信息可以使新程序员轻松使用示例代码。
标题前缀“ Part I”表示期望,随着该项目发展成战争游戏,我希望随着时间的推移能够发展起来,以模拟18世纪的重大冲突,希望随着新代码的开发,将会有更多文章。发行是为了指导开发人员以这种困难的游戏开发形式。
由于本文是在Microsoft和Java Community网站上发布的,因此本文中的信息应该使Java开发人员更容易为自己的项目开发类似的代码。 但是,由于所使用的库彼此完全不同,因此Java信息有限,因为此类文章无法提供两种语言的代码和解释
还应该注意的是,所提供的项目中有一些代码已不再使用,而是随着项目的进展而提醒进一步开发。 这样的代码已在本文中注明。
由于篇幅所限, 此处提供了可下载的Word文档。
本文的完整项目可以在这里下载。
要向作者提交有关所提供信息的问题,请给作者发送电子邮件,地址为
总览
开发游戏中最困难的方面之一是,您想开发的游戏类型属于利基开发领域,因此尚未为其创建标准化工具。 随着3D图形艺术和游戏的普及,这项创造性工作的2D方面未能与当前技术保持相同的步伐。 对于3D游戏开发,有几种流行类型具有广泛的支持。 第一人称射击游戏,模拟(即赛车,飞行),冒险游戏和战略模拟,在许多情况下,它们只是类固醇上的战争游戏,而没有相同类型的回合制游戏可以提供的令人发指的挑战。 对于此类开发,有许多免费的出色工具可供使用,其中最受欢迎的是“ Unity”,它还以附件的形式提供了广泛的第三方支持,这些附件可为上述所有游戏类型提供工具。
随着2D开发的发展,滚动游戏的发展已经到了很多优秀的文章,它们描述了如何用大量的示例代码以及一些非常好的工具集来实现一个如何帮助开发人员的工作。
在2D开发中一种类型的游戏在开发区域的曝光很少或几乎不均匀,是原始的基于回合的六边形地图战争游戏的一种。 除了冒险游戏的原始风格(“迷宫般”的基金会被认为令人发指)之外,战争游戏本身也被认为是所有这类智力挑战中的头等大事,甚至曾因“受过高等教育”而得到推广。
但是,由于缺乏某种程度的标准化工具来进行此类开发,因此,游戏的这一领域可能已成为游戏开发领域中创造性活动中最困难的领域之一。 对此有许多论述,其中有许多原因。
对于初学者而言,与人类对手相比,此类游戏中的计算机AI处于可怕的劣势,因为人类对手可能会花很长的时间,只要他或她喜欢制定战术和策略,如果长期精心操作,不仅会击败计算机AI但是会产生弱点,可以帮助玩家在一定程度上持续增加战场胜利。
在一篇描述“文明”系列游戏中这种情况的文章中,发现在一个案例中,玩家可以通过在单个十六进制中重复创建森林,砍伐该十六进制来击败一个重要木材产量领域的AI。通过木材生产,然后播种新的森林来重新开始循环。 游戏中的AI无法做到这一点,从而使人类玩家在这种制作中具有显着优势,这反过来又使人类玩家比AI能够更快地构建木制实体。
尽管Firaxis Games公开承认他们的“文明” AI作弊(同样也很不公平),但当他们意识到AI中的这种弱点(称为“伐木工人”)时,他们发布了补丁,将AI和人类对手置于平等的地位在游戏的这一部分中,人类玩家不再可能进行“伐木”。
回合制战争游戏中这种缺陷的结果是,在此类游戏中实现的AI必须非常出色,以使游戏不仅令人愉快,而且可重复。 因此,基于回合制的战争游戏需要高于平均水平的AI实施,而不仅仅是任何预制工具所能提供的。
此外,AI实现必须适合正在开发的战争游戏级别。 在此类游戏中,可以使用三种主要类型的AI,即战略性(大型单位编队,例如师),战术性(中型单位编队(例如团))和小队,其中每个单位代表一件设备或一个士兵。 如上所述,在每种情况下,AI实现都必须做得很好。
这与RTS游戏(实时策略)不同,在该游戏中,人类玩家的不利之处在于,他或她必须保持脚趾与激进的AI进行战斗,因此在任何时间都不能研究战场一个选项。 结果是,大多数此类游戏在技术上都不是很现实,因为在现实中,战争的发展速度可能不会像计算机仿真所建议的那样快,除非它设计得很深入。军事训练模拟。 例如“战地”系列中的闪电般的快速移动永远不会发生,因为人类无法以这种速度做出正常React。
回合制战争游戏开发中的下一个困难领域是所采用的图形。 除了某些提供了使用六边形图块创建地图的功能的图块映射工具外,开发人员仍然必须使用原始程序来控制地图以及加载后在其上描绘的单位。 而且,由于此类地图可以具有各种大小,因此提供的任何代码库都不一定能够为任何单个开发人员提供所选大小的数学计算。 话虽这么说,最流行的地图工具之一是“ Tiled” ,这将使开发人员可以通过可视界面创建大型六边形地图。
“平铺”使用“ TMX”格式创建地图,该格式实际上是描述到图形系统的地图的代码。 C#和VB.NET开发人员的“ Monogame(带有Monogame.Extended插件 )”和Java开发人员的“ libGDX”都支持此文件类型,从而使开发人员比使用时更容易显示其地图。仅图形引擎及其平铺图像。
然后,本文将介绍一种创建六边形图并在最低级别显示的方法。 仅对单个平铺图像使用“ Monogame”图形引擎。
仅适用于Java开发人员
从Microsoft的角度来看,我精通VB.NET或C#。 对于这样的讨论,Java社区仅将我的示例代码作为自己的工作基线是没有好处的。 因此,我为希望使用其语言进行游戏开发的Java开发人员进行了一些研究。 正如我在上一篇文章中提到的那样,Java在游戏开发中使用的列表并不是很高,但是它正在使用更多的工具。
因此,对于初学者来说,想要尝试进行战争游戏开发的Java开发人员将首先要掌握Java图形引擎“ libGDX”,可以通过上面提供的链接免费获得它。 您还将找到一些非常好的书,可以从“ libGDX”站点或从亚马逊购买。 而且与“ Monogame”方面不同,Java开发人员的优势在于这些书似乎是最新出版物。 我们的“ Monogame”开发人员仍然必须依赖XNA文档,但是随着“ Monogame”继续脱离这个已停产的平台并成为其自己的标准(随着它不再依赖于最新版本),这种情况将随着时间而改变。任何XNA框架技术,但现在都提供对“ DirectX”和“ OpenGL”的直接支持。
现在您已经拥有了一个不错的游戏引擎,您还需要了解C#代码与Java的区别。 微软社区网站上的一篇出色文章“代码项目”提供了Java和C#代码的相当广泛的并排示例,其中还包括游戏代码。 它可能并不完全完整,但是从本文的外观来看,它应该为您提供一个很好的基础,以了解我的所作所为。 该文章可以在这里找到。
在“ Games From Scratch”网站上,还有大量关于Java的“ libGDX”使用教程,可以在此处找到。
C#和Java开发人员……让我们开始吧
请注意,Monogame仍使用Microsoft XNA名称空间来与该引擎的早期版本兼容。 预计在将来的版本中将对此进行更改。
当以“ libGDX”或“ Monogame”引擎或直接与“ DirectX”或“ OpenGL”之类的游戏设计最低级别工作时,此类基础结构通常会提供预定义的“游戏循环”事件和方法,无法控制。 因此,要成功地使用这些构造,您必须了解它们,以使其顺应您的意愿。 由于“游戏循环”处理是连续运行的,因此您必须确保自己的所有代码均符合此类要求,否则游戏项目中的任何内容均无法正常运行。 请注意,尽管“ libGDX”引擎通过“应用程序监听器”提供了相同的“游戏循环”事件集,但它并未像“ Monogame”那样提供显式的“游戏循环”内部信息。 但是,存在一个隐含的内部条件,Java开发人员可以通过他或她自己的编码来利用它。
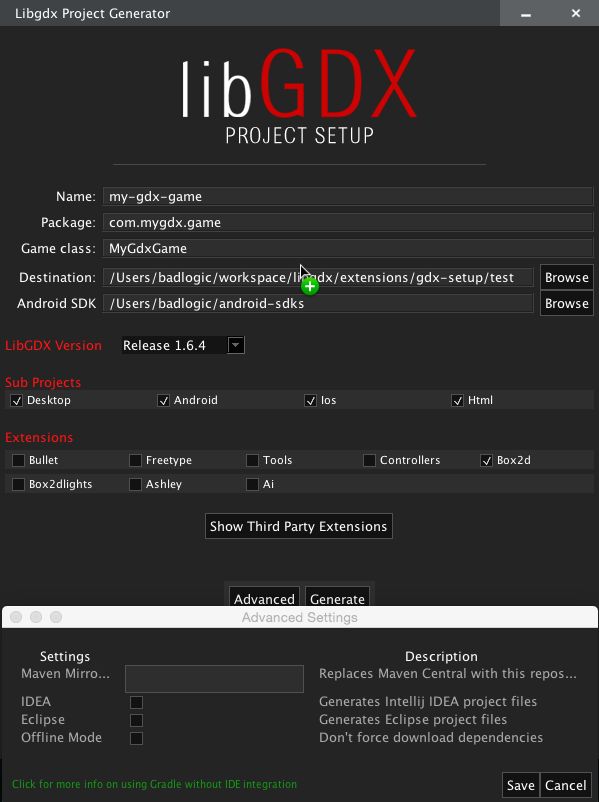
首先,在安装“ libGDX”或“ Monogame”之后,您首先必须创建一个新项目。 据我所知,“ libGDX”将为您提供一个对话框,其中包含许多选项,可用于启动项目。 我不是Java开发人员,而是从“ libGDX”站点文档中获取此信息的,该文档演示了如何使用“ libGDX”平台附加组件来执行此操作,称为“ Gradle”。 请参阅下面的“成绩”界面:
“ Gradle”可让您针对要为其构建游戏的平台设置项目。 在我们的情况下,我们希望选择“桌面”。 顺便说一下,“ Gradle”将与以下流行的Java开发IDE交互:
- 蚀
- Intellij IDEA和Android Studio
- NetBeans
- 命令行
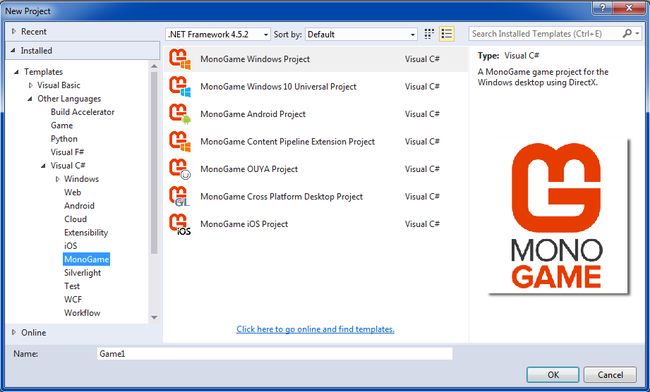
使用“ Monogame”,我们只需从Visual Studio中“ Monogame”模板的已安装列表中选择所需的项目类型,如下所示。 需要注意的是,Visual Studio开发人员应确保在64位计算机上使用Visual Studio 2013/2015…64位计算机要求将在本部分后面介绍。
在我们的情况下,我们要选择“ Monogame Windows Project”。
一旦开始创建项目,将为您定义两件事。 第一个是到框架内部“游戏循环”的链接。 “游戏循环”通过反复侦听触发当前在主游戏模块中定义的事件之一的动作来循环。 应该注意的是,“ libGDX”没有明确的“游戏循环”,因为它是纯事件驱动的游戏引擎。 但是,它确实暗示了Java开发人员可以利用的“游戏循环”机制。 文章中先前提供的链接中引用了此信息。
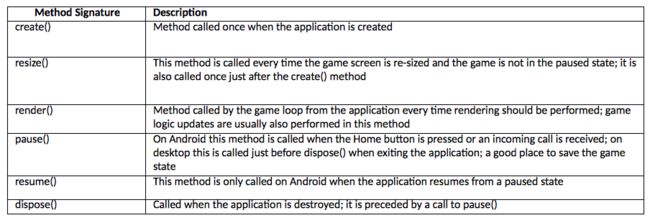
因此,对于Java和“ libGDX”引擎,您将在主模块中定义以下事件……
对于C#,我们将在“ Game.cs”模块中为我们定义以下类似事件,这是“ Monogame”项目初始化的结果……
若要查看Java和C#语言之间的事件/方法集之间的确切相关性,请参见引用的“代码项目”文章中标题为“游戏循环”的部分。
为主要游戏模块创建类级别声明
无论是用VB.NET还是C#编写代码,我总是将模块代码划分到文档中的特定区域。 在Visual Studio中,这些被称为“区域”,开发人员可以为了清楚起见而对其进行扩展或折叠。 “区域”仅向每个区域提供注释标题,并且也可以彼此嵌套。 “区域”允许立即识别每个区域中包含的代码类型。 Java本身没有等效的功能,因为这种功能基于Java开发人员使用的IDE。 因此,如果链接尚未发布,则可以通过以下链接发布,以帮助Java开发人员将其合并到其特定的IDE中。
关于我自己对主要游戏模块的类级别声明,我定义了以下分配…
#region Class Level Declarations

	    // Microsoft.Xna.Framework.Graphics.GraphicsAdapter.DefaultAdapter.CurrentDisplayMode.Height;
    // Microsoft.Xna.Framework.Graphics.GraphicsAdapter.DefaultAdapter.CurrentDisplayMode.Width;

            private int        ciScreenHeight = 600;
            private int        ciScreenWidth = 800;

            private int        ciRowPosition = 0;
            private int        ciColumnPosition = 0;

            private string     csScrollDirection = "";  // R,L,U,D

            private MGWorkBench_ScrollingHexMap.Classes.TileMap          coTileMap;
            private MGWorkBench_ScrollingHexMap.Structures.HexTexture2D  coHexTexture2D;

            private Microsoft.Xna.Framework.Input.KeyboardState          coKeyboardState;
            private Microsoft.Xna.Framework.Graphics.Texture2D           coTexture2DTile;
            private Microsoft.Xna.Framework.Graphics.SpriteBatch         coSpriteBatch;
            private Microsoft.Xna.Framework.Graphics.SpriteFont          coSpriteFont;
            private Microsoft.Xna.Framework.GraphicsDeviceManager        coGraphicsDeviceManager;

        #endregion
上面两个带有注释的顶行只是在提醒用户如何将游戏屏幕调整为用户显示器或笔记本电脑屏幕的完整大小。
接下来的两个声明“ ciScreenHeight”和“ ciScreenWidth”定义游戏屏幕的实际大小,将在另一种方法中使用该实例化实际游戏屏幕。 而且由于我们将在地图板上使用少量的六边形瓷砖,因此不需要全尺寸的屏幕。
您仅应出于澄清目的而注意其他两个注意事项。 作为专业的软件工程师,我在后院仍将恐龙当作宠物饲养并将其存放在那里的时候,我制定了命名约定。 这是在微软提出自己的技术之前,我相信他们声称这是基于研究人员查尔斯·西蒙尼(Charles Simonyi)在Xerox Parc于1970年代后期开发的最初的匈牙利书写法行业惯例。 他后来成为微软的首席架构师。
Microsoft的表示法样式仅使用了匈牙利表示法的很小一部分,我认为这与Java语言中当前可能使用的非常相似。 我的匈牙利表示法水平始终比Microsoft风格更为精确,这使其类似于我们在大型机开发中使用的Simonyi博士的概念的初衷。 匈牙利符号的真实形式可能非常复杂,但Microsoft的形式却过于简单,因为它不表示定义变量的位置。 此外,匈牙利表示法还设计为还用作方法名称前缀,以便开发人员可以轻松了解调用方法相对于当前方法的位置。
尽管我没有使用任何这样的方法前缀,但我确实在“驼峰案例”中使用了变量前缀,这些变量前缀可告知开发人员变量的定义位置以及变量类型(如Microsoft)。 在上述情况下,两个屏幕尺寸变量以“ ci”为前缀,这意味着它们在类级别定义为整数。 因此,从定义变量的地方开始,可以看到这种符号的采样如下:
前缀的下一部分当然是变量类型,而我通常使用的变量类型如下:
多年来,我一直在使用这种相当简单但更精确的匈牙利表示法形式,没有任何问题。 一些读者可能会争辩说,现代的IDE已经具有智能感知弹出菜单,可以轻松找到声明变量的位置,但是这也意味着必须保留代码中的当前位置才能查看声明。 随着时间的流逝和不断使用我的简化匈牙利表示法形式,开发人员将不再需要任何此类工具来理解变量声明,因为他或她将固有地了解变量的定义及其类型。
我要提及的另一注是,与许多开发人员一样,在类级别声明部分中找到的所有变量都可以轻松地移入“全局”模块。 这是我计划在初始实现得到完善时要做的事情。 但是,在开始撰写本文之前,需要进行大量工作来研究此技术,因此整个代码库仍处于动态状态,尽管您会看到,代码确实运行良好。
最后,关于最后的争用,我的解决方案中定义的某些编码和变量可能不再被使用,并且结果被注释掉或只是处于活动状态。 这是因为某些代码可能会用于该设计的进一步扩展,正如我在本文后面的部分所提到的那样。 在这种情况下,变量声明“ ciRowPosition”,“ ciColumnPosition”和“ csScrollDirection”属于此考虑因素。
此代码节中剩余的对象声明列表(即“ coTileMap”)将在后面的部分中使用。
“构造函数”事件
首先,我们将显示通常为“构造函数”事件保留的代码量。 如上面的描述所述,此事件用于游戏项目的直接全局初始化。 如果您愿意,在这种情况下不必将指针指向“内容管道”,但是没有理由不…
#region Constructor(s)

            public MGMainGame()
            {
                coGraphicsDeviceManager = new GraphicsDeviceManager(this);

                // point to the content root directory for all imnges\textures
                Content.RootDirectory = "Content";

                coGraphicsDeviceManager.PreferredBackBufferHeight = ciScreenHeight;
                coGraphicsDeviceManager.PreferredBackBufferWidth = ciScreenWidth;
            }

        #endregion
大多数此类游戏的构造函数将非常简单。 在这种方法中,您只需要进行一次初始化即可,这是内部游戏循环立即需要的。 在这种情况下,我们有三种初始化形式……
- 图形设备管理器,参数为当前游戏模块的参数; 这行代码是由Monogame框架生成的。
- 内容根目录,它是通往您所有游戏图像的内部管道,在Monogame的情况下,这些目录被转换为“ xnb”文件以便快速访问; 这行代码是由Monogame框架生成的。
- 开发人员定义的显示器的实际屏幕尺寸(请注意,使用Monogame调整屏幕尺寸时,您可以使用“首选后备缓冲区”)
关于内容管道的注释
所有游戏都有某种类型的内容管道,这仅仅是游戏访问其图形资产的一种方式。 尽管“ libGDX”没有使用我可以找到的显式工具,但是Java开发人员仍然必须以某种方式提供对他或她打算用于其游戏的游戏图形的访问。 在到目前为止我已经阅读过有关“ libGDX”游戏引擎的文档的情况下,似乎图形引用的显式创建方式与从代码访问文本文件的方式相同。
但是,通过“ Monogame”,开发人员可以通过提供一个集中的子目录来使开发人员更加方便,该子目录可以简单地通过文件名访问图形图像,而无需任何文件扩展名。
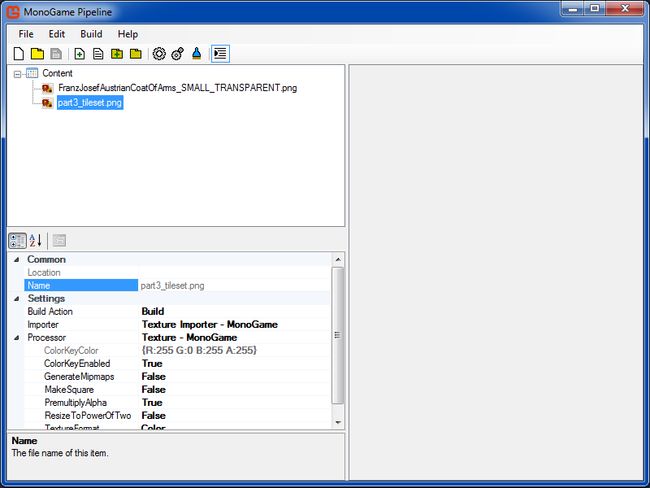
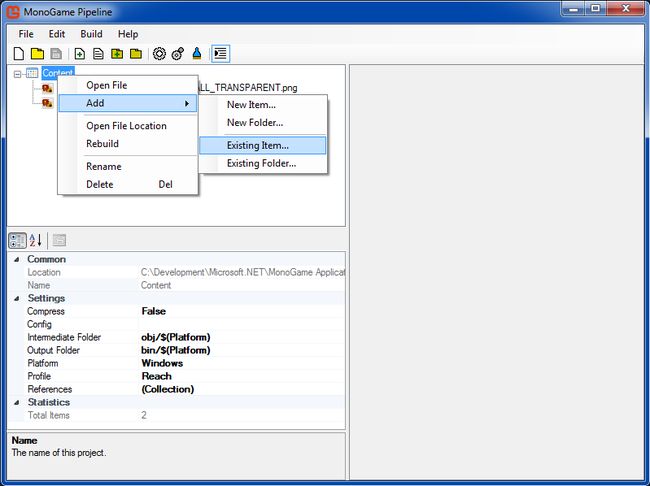
要将图像添加到“ Monogame”管道中,必须按以下方式添加它们…… 这就是为什么您需要一台64位计算机来进行Monogame开发的原因。 内容管道接口应用程序是一个64位程序。 没有64位计算机,您将无法使用此界面,要求您以Java开发人员使用“ libGDX”游戏引擎的方式访问图像。
- 在“ Monogame”项目中展开标有“ Content”的文件夹(显示Visual Studio项目)
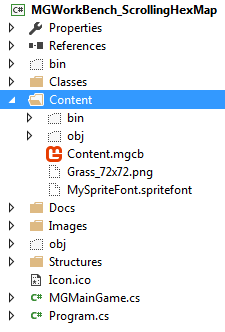 2.双击文件“ Content.mgcb”。 这应该打开“ Monogame内容管道工具”
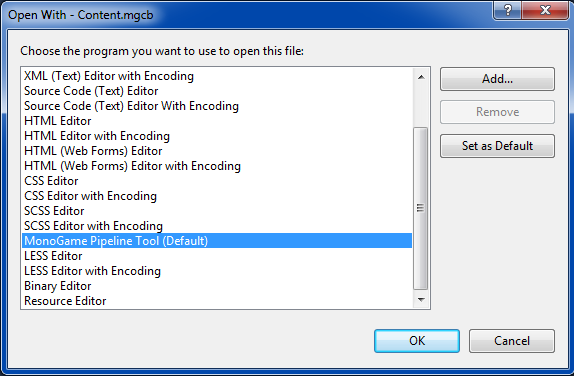
3.如果没有打开上述工具,而是获取了一个文本文件,则列出与任何现有资产信息有关的信息,而不是应使用“打开方式”命令将“ Content.mgcb”文件设置为默认应用程序右键单击下拉菜单,可让您设置默认值…
4.在“内容管道”工具中,通过执行以下操作添加新的图形资产:
- 右键单击最左侧窗格中的“内容”根文件夹
- 选择“添加”
- 选择“现有项目”
通过以这种方式添加图形图像,“ Monogame”开发人员将能够直接访问Content Pipeline图像目录,以快速加载其图像以在其游戏项目中使用。
“初始化()”事件
像我们开发环境中的所有类一样,主要游戏模块都有一个“初始化”事件。 除非您要为项目实现自己的必需的初始化,否则无需在此事件中放入任何内容。 就像主要游戏模块中的大多数事件一样,该事件仅被调用一次。
“ LoadContent()”事件-实际加载图形内容
通常,您在游戏项目初始化开始时就加载大量内容,而可能的话,会留出更多额外的资产供以后使用。 然后,在“ Monogame”中,这是通过“ LoadContent”事件完成的。 在这个项目中,我们将使用以下代码来进行此事件…
#region LoadContent Event

            protected override void LoadContent()
            {
                // Create a new SpriteBatch, which can be used to draw textures.
                coSpriteBatch = new SpriteBatch(GraphicsDevice);


                // use this.Content to load your game content here
                coTexture2DTile = this.Content.Load("Grass_72x72");
                coSpriteFont = this.Content.Load("MySpriteFont");

                coHexTexture2D = new MGWorkBench_ScrollingHexMap.Structures.HexTexture2D();
                    coHexTexture2D.TEXTURE2D_ID = 1;
                    coHexTexture2D.TEXTURE2D_IMAGE_TILE = coTexture2DTile;
                MGWorkBench_ScrollingHexMap.Structures.Global.TEXTURE2D_ARRAY_LIST.Add(coHexTexture2D);
            }

        #endregion
上面的代码是由Monogame框架以及开发人员实现的。
- 第一行代码由Monogame Framework生成,它创建了“ SpriteBatch”的新类级别实例,该实例变量“ coSpriteBatch”由开发人员更改以实现程序一致性。
- 其余代码由开发人员定义。 应该注意的是,结构初始化代码在项目中没有以任何方式使用,而是先前测试的结果。 您可以在开发项目中忽略此代码,这些开发项目将使用此代码作为参考。
注意,“ SpriteBatch”变量将不在此处使用,而将在“ Draw”事件中使用。 在此事件中定义它以避免每次调用“ Draw”事件时都必须重新声明它。
六角瓷砖
为了尽可能简单地开发此项目,以便我可以专注于完成显示可滚动六边形图的主要目标,我使用了一个六边形图块,该图块反射了黑暗,草地和草地,尺寸为72像素乘以72像素,非常完美广场。
在研究有关六边形瓷砖贴图发展的信息时,您经常会找到对它们的引用,例如矩形。 但是,实际上,对于此类工作,从数学上来说,正方形也被认为是矩形。 如果将瓦片简单地视为矩形,则可以假设也可以使用实际的非正方形矩形。 他们可以,但是确定位置和偏移量也会因此变得更加复杂。 鉴于此,任何正方形尺寸的瓷砖都可以比实际的矩形瓷砖容易地进行调整和计算
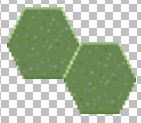
我用于该项目的六角形瓷砖的图像可以在下面找到……
注意实际六边形本身周围的灰色和白色方格区域。 这是整个图像的背景透明性,这将使我们可以将六边形图像的各个部分彼此重叠,如下所示。
请注意,我使用Paint.NET手动覆盖了下部图像,因此,如果您发现图像看起来略微偏离对齐状态,则将是正确的。 在实际的游戏屏幕中,由于对齐后的计算结果,它们可以完美对齐。 还要注意下六角形与上六角形对齐的位置; 将其放置在上六边形的一半下方(最终的“ Y”坐标),并向左调整(最终的“ X”坐标)。 这些调整将在项目中记为“ X”和“ Y”偏移量。
除非您有理由使用六角形瓷砖,否则使用完美的正方形将使您的开发工作比使用实际的矩形瓷砖容易得多。 正方形瓷砖使确定偏移量变得容易得多。 尽管使用小于32px x 32px的尺寸将使覆盖的单位图标或实现可识别的地形位置(例如,胸脯工程)变得很难以图像方式完成,但正方形图块可以满足您的项目所需的任何大小。
六角形瓷砖的方向
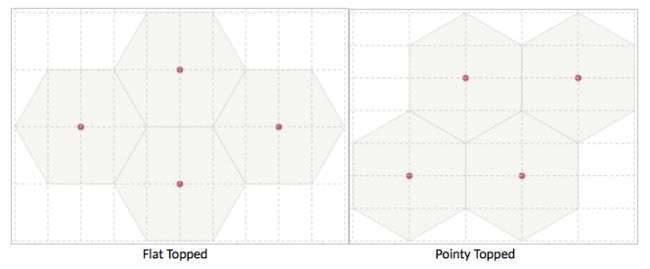
在我的项目中,我使用所谓的“平顶”六角形瓷砖,因为瓷砖的一侧在任何瓷砖的顶部。 这仅仅是个人喜好。 另一类六边形瓷砖被称为“尖顶”,因为瓷砖的一个点在瓷砖的顶部。
您可以在自己的项目中使用任何一种类型,但必须记住,每种类型的偏移量和放置位置的计算都会有所不同。 因此,该项目中的计算不适用于“尖顶”六角形瓷砖。
可以在Internet上找到有关“红色斑点游戏”的最佳信息,有关六边形瓷砖所使用的几何,计算和算法的信息,该网站由软件开发人员和计算机科学家阿米特·帕特尔(Amit Patel)维护。 您可以在此处访问他的网站。
请注意,Amit在其站点上未提供任何实际的图形编程支持。
“更新()”事件
“更新”事件是内部“游戏循环”连续调用的事件。 它不断听取用户对游戏的输入。 结果,这是在主游戏模块内处理用户与游戏界面的所有交互的地方。 已经为Monogame开发了许多工具,这些工具可用于设计许多游戏所需的更复杂的界面。 这样的工具之一就是“ EmptyKeys”,它被认为是Monogame开发中最好的免费工具。 可以在此处找到“ EmptyKeys”工具包。
对于决定尝试使用“ libGDX”的Java开发人员,该库还具有一个接口扩展(VisUI),其功能似乎与“ EmptyKeys”类似,可以在此处找到。
出于我自己项目的目的,实现六角形地图板的基本滚动是主要目标。 因此,到目前为止,我仅在“ Update”事件中实现了计算即可完成此操作。 如下面的代码所示,已经实现了向左,向右,向上和向下滚动。
#region Update Event

            protected override void Update(GameTime gameTime)
            {
                // user-defined update logic here
                if (GamePad.GetState(PlayerIndex.One).Buttons.Back == ButtonState.Pressed ||
                    Keyboard.GetState().IsKeyDown(Keys.Escape))
                    Exit();


                csScrollDirection = "";

                coKeyboardState = Keyboard.GetState();

                //move left
                if (coKeyboardState.IsKeyDown(Keys.Left))
                {
                    csScrollDirection = "L";

                    ciRowPosition = ciRowPosition + 0;          // maintain current row position
                    ciColumnPosition = ciColumnPosition - 1;    // decrease column position by 1

                    MGWorkBench_ScrollingHexMap.Classes.Camera.coCameraVector2Location.X =
                        MathHelper.Clamp(MGWorkBench_ScrollingHexMap.Classes.Camera.coCameraVector2Location.X - 2,
                                            0,
                                            (MGWorkBench_ScrollingHexMap.Structures.Global.ACTUAL_TILE_WIDTH_IN_PIXELS –
                                             14));
                }


                // move right
                if (coKeyboardState.IsKeyDown(Keys.Right))
                {
                    csScrollDirection = "R";

                    ciRowPosition = ciRowPosition + 0;          // maintain current row position
                    ciColumnPosition = ciColumnPosition + 1;    // increase column position by 1

                    MGWorkBench_ScrollingHexMap.Classes.Camera.coCameraVector2Location.X =
                        MathHelper.Clamp(MGWorkBench_ScrollingHexMap.Classes.Camera.coCameraVector2Location.X + 2,
                                         0,
                                         (MGWorkBench_ScrollingHexMap.Structures.Global.ACTUAL_TILE_WIDTH_IN_PIXELS +
                                          14));
                }


                // move up
                if (coKeyboardState.IsKeyDown(Keys.Up))
                {
                    csScrollDirection = "U";

                    ciRowPosition = ciRowPosition + 1;          // decrease row position by 1
                    ciColumnPosition = ciColumnPosition + 0;    // maintain current column position by 1

                    MGWorkBench_ScrollingHexMap.Classes.Camera.coCameraVector2Location.Y =
                        MathHelper.Clamp(MGWorkBench_ScrollingHexMap.Classes.Camera.coCameraVector2Location.Y - 2,
                                         0,
                                        ((MGWorkBench_ScrollingHexMap.Structures.Global.MAP_TILE_OFFSET_Y * 14) + 14));
                }


                // move down
                if (coKeyboardState.IsKeyDown(Keys.Down))
                {
                    csScrollDirection = "D";

                    ciRowPosition = ciRowPosition - 1;          // increase row position by 1
                    ciColumnPosition = ciColumnPosition + 0;    // maintain current column position by 1

                    MGWorkBench_ScrollingHexMap.Classes.Camera.coCameraVector2Location.Y =
                        MathHelper.Clamp(MGWorkBench_ScrollingHexMap.Classes.Camera.coCameraVector2Location.Y + 2,
                                         0,
                                         ((MGWorkBench_ScrollingHexMap.Structures.Global.MAP_TILE_OFFSET_Y * 14) + 14));
                }
                // ---

                base.Update(gameTime);
            }

        #endregion
进行这些计算需要大量工作,因为我最初将它们基于Microsoft原始XNA环境的六角形地图开发的标准化教程。 尽管本教程的代码按提供的方式工作,但它基于六边形瓷砖的一组非常奇怪的尺寸。 有人会认为,通过使用完美的正方形瓷砖,这样的计算将可以很容易地进行调整。 它们不是,我发现实际上根本无法使用本教程的数学运算,因此我不得不从字面上重新发明轮子以使此类计算相当通用。 因此,只要您选择使用正方形的瓷砖,就可以轻松调整自己的计算。
对于上面的代码...
正如您将看到的,第一个测试是关于是否选择了游戏手柄的“后退”按钮还是键盘的“ Esc”键。 无论哪种情况,应用程序都将关闭以关闭游戏屏幕。
接下来的四段代码测试是否按下了向左,向右,向上或向下箭头键。 对于每个键,都会针对地图板应移动的相应方向进行适当的计算。
在进行实际计算之前,请注意,出于以下目的,可以完全忽略影响以下三个变量的代码:“ csScrollDirection”,“ ciRowPosition”和“ ciColumnPosition”。 这些代码行已留在原处,以便以后可能需要它们的开发。
相机
首先,这些计算基于游戏开发者所谓的“相机”,它只是一种结构,允许玩家从某个角度或方向查看游戏屏幕。 但是,在涉及游戏板自上而下视图的2D游戏屏幕中,一个或多个或多个选择可以使用相机。 在我们的案例中,我们需要的是默认的摄像机,该摄像机可以通过“ Monogame”引擎立即使用。 在这种情况下,我们将不移动相机,而是将游戏板朝我们希望的方向移动。 如果要在创建实际摄像机并将其以类似样式移到游戏板上的开发过程中增加一些数学上的复杂性,则可以选择。 我不想进入“矩阵变换”并且不想让事情变得简单,所以选择了移动地图面板。
尽管“ Monogame.Extended”工具包为实例化实际的相机提供了更方便的访问,但是我们将相机简单地定义为“ Vector2”对象,该对象将仅跟踪地图显示板的实际屏幕坐标。 该定义可以在项目解决方案内“类”文件夹中的类模块“ Camera.cs”中找到。
尽管该类被定义为实际的“类”,但到目前为止,其中仅包含数据,因此,如果我发现以后无需添加任何方法,我将其更改为“ Structure”,我更喜欢使用在这种情况下。
您将注意到,此数据的代码实现为私有变量声明和“内部”属性,对于Java开发人员而言,这意味着只能在项目范围内看到这些修饰符。 我注意到这一点,因为如果实际上使用了一个或相同的修饰符,则我不知道Java等效语言。
为了始终将数据保留在内部供以后使用,此类中的所有内容都定义为“静态”。
出于您自己的目的,您可以按照自己最习惯的方式定义类似的构造,但是您应记住为它提供“静态”修饰符或等效形式。
在这种情况下,“ Vector2”对象将仅跟踪所有四个方向上的移动量。 在所有情况下,该移动的增量将始终为2像素。
运动计算
MGWorkBench_ScrollingHexMap.Classes.Camera.coCameraVector2Location.X =
               MathHelper.Clamp(MGWorkBench_ScrollingHexMap.Classes.Camera.coCameraVector2Location.X - 2,
               0,
               (MGWorkBench_ScrollingHexMap.Structures.Global.ACTUAL_TILE_WIDTH_IN_PIXELS – 14));
From the code snippet above you will note that all four of the directional calculations compute the Vector2 “X” or “Y” coordinates. These updated coordinates will always be used in the subsequent “Draw” event, which redraws the map board multiple times within the space of a minute; all of which cannot be interpreted by the Human eye making it appear that the map board is appearing as a constant until some level of user input or game calculation changes the display.
The use of the “MathHelper.Clamp” method is possible since the “MathHelper” class is part of the Monogame namespace, “Microsoft.Xna.Framework”. The “Clamp” processes as its first argument the new “X” coordinate. In the above case, for a Left arrow key selection, it simply takes the existing Vector2 “X” coordinate and subtracts 2 from it replacing the “X” coordinate with the new value.
The other two arguments to the “Clamp” method are the “minimum” value allowed and the “maximum” value allowed. In this case, the minimum value would be zero(0) so if the calculation returns a value less than zero(0), the new “X” coordinate will be updated with zero(0). The maximum value on the other hand has to also take into account a value that allows for the left-most map board edge to appear while disallow any further movement to the left once the screen display reaches the left-most edge. We do this by using the actual width of a tile, which is defined as 72 pixels in our “Global.cs” structure, which can be found in the project's folder labeled, “Structures”.
The subtraction of “14” from the width of a tile is completely arbitrary and will require some testing on your part when using hexagonal tiles that are either larger or smaller than 72 pixels. Thus, if a calculation exceeds the maximum allowed value of (72 -14), the “X” coordinate will then only be provided with a value pf “58”, which in fact is the actual offset defined in the “Global.cs” structure for tiles being rendered along the width of the screen display.
For a movement of the map board to the right, we use the same calculation as above but instead of subtracting from the Vector2 “X” coordinate, we add 2 pixels while adjusting the right most maximum value with +14 instead of -14.
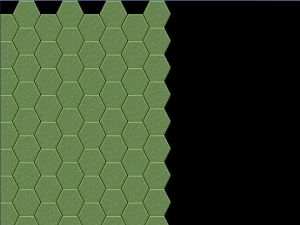
One would think that for a right movement, the maximum value would be the actual width of the tile in pixels multiplied by the actual number of tiles to be displayed across the screen plus 14. I tried this calculation several times to test it out and this is what will happen if you try it with this project's code…
Notice that the map scrolls correctly to the right but allows you to keep on scrolling in that direction. The reason why the updated calculation would yield such a result is because we are calculating a starting “X” coordinate with each depression of the Right arrow key as to where the map board “Draw” event should begin drawing its images that correspond to the actual screen “X” coordinate, which always begins at zero(0). As confusing as this may sound it does make sense since we are tracking the number of pixels we will move right to reach the right-most edge of the map board. Since we are working with a defined map board of 15×15 hexagonal tiles (see “Global.cs” for these declarations) we have to consider not only the number of pixels right we need to attain before reaching the map board edge but the offsets as well for overlaid images.
The same holds true for the logic behind the calculations for Up and Down movements. However, since we do not have to consider offsets as we do when calculating across the screen we then need to consider the entire height of the tile (72 pixels) when calculating for up and down movement.
As just mentioned, the Up and Down arrow key movement calculations have a slightly updated calculation as the Up calculation code snippet code below demonstrates…
MGWorkBench_ScrollingHexMap.Classes.Camera.coCameraVector2Location.Y =
               MathHelper.Clamp(MGWorkBench_ScrollingHexMap.Classes.Camera.coCameraVector2Location.Y - 2,
                                0,
                                ((MGWorkBench_ScrollingHexMap.Structures.Global.MAP_TILE_OFFSET_Y * 14) + 14));
In these two cases instead of calculating the Vector2 “X” coordinate we calculate the “Y” coordinate. For an Up movement we subtract 2 (pixels) from the existing “Y” coordinate. For a Down movement we add 2 (pixels).
The minimum value allowed is again zero(0) while the maximum allowed value
Though I hardcoded the number “14” in my current code, you should consider making it a pre-defined number in a global class so you only have to make changes in a single module to affect all of your calculations wherever you may define them.
The “Draw ()” event
The “Draw” event is where all of the graphics action occurs with the “Monogame” engine. Like the “Update” event, it is called continuously by Monogame's internal “game loop”. Why Microsoft designers decided to do this instead of using a more Java oriented, event driven approach is something I do not know and admittedly I have not looked for an answer. Possibly, the Microsoft people saw this continuous cycle as more efficient.
In any event, the “Draw” event in my project is the first place I began to modularize the functionality of the code.
#region Draw Event

            // ---


            // This is called when the game should draw itself.
            //
            // Provides a snapshot of timing values.
            // ---
            protected override void Draw(GameTime gameTime)
            {
                // set screen background color
                GraphicsDevice.Clear(Color.Black);


                coTileMap = new MGWorkBench_ScrollingHexMap.Classes.TileMap(coSpriteBatch,
                                                                            coSpriteFont,
									  coGraphicsDeviceManager,
                                                                            coTexture2DTile);

                coTileMap.Draw_SampleTileMap(csScrollDirection, ciRowPosition, ciColumnPosition);
                // ---


                base.Draw(gameTime);
            }
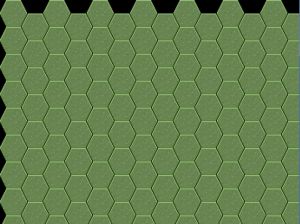
The first line of code in this event ensures that the background for our map board is “black”. This means that the edges of the map board will have a black field surrounding them. Some developers like to show their edges as partial hex tiles but since such tiles can't be used for actual game play, I decided against this to ensure that a player would know where the active tiles begin and end.
The next line of code instantiates a “TileMap” object; this is defined as “TileMap.cs” in the “Classes” folder of the project. As you will note several class level objects in the primary game module are passed to the constructor of this object.
Next, we make a call to the “TimeMap” object to draw the entire map board, which should appear as the image below when the game screen is displayed…
Notice the black field around the map board edges as noted previously. Please also remember that we are using only type of hexagonal tile for the entire map board at this time. Also note the tiles perfect alignments with each other due to the drawing/positioning calculations.
For those not familiar with any level of game programming just being able to develop the above image is quite a piece of work no matter how many articles you may find beneficial for your research. This is why I have tried to make my project as standardized as possible for the hexagonal tile sizes.
The last line of code, which is generated by the “Monogame” framework, provides the application with its own internal game timing values. With all my research on this aspect of XNA\Monogame I never found any real explanation for this requirement for the “Monogame” infrastructure. However, since it is required do not remove it.
From this discussion on the “Draw” event so far, it appears to be rather simplistic but it is hardly that. So let's take a look at the code of the “TileMap object along with the “TileMapLoad” object and the “HexTile” structure…
The “TileMap”, “TileMapLoad” objects and the “HexTile” structure
The “TileMap” object or class was implemented to centralize all of the code required to handle the map board displays. If you have looked at articles on the display of tile maps you would have found that such a class is fairly standard practice.
As mentioned in the piece previously, not all of the code is currently in use, while some of it was simply implemented for experimentation purposes and though still active, is not used. The properties at the top of this class in the “Class Internal Properties” region are just such code sections. They have been left in the class for possible later purposes.
As you will note within the “Constructor”, the passed objects are loaded into their corresponding class level object declarations. However, in addition, this is where we also load the entire map board into an internal, two dimensioned array. Again, this is fairly standard practice for the display of tiled maps.
If you review this processes method, “Load_MapHexTileArray ()”, you will see that the structure, “HexTile” (“HexTile.cs”) is used as the element that is being loaded into this array (another fairly standard construct in such development). However, within this method we instantiate the “TileMapLoad” object, which is the sub-class that will handle all such map loads (“TileMapLoad.cs”).
This class is instantiated with the actual height and width of the map board in terms of the number of tiles to be displayed in each case. Since we are using these numbers from the “Global.cs” class, there is actually no need to instantiate the “TileMapLoad” object in this manner as these variables could have been simply used in the “TileMapLoad” class itself. Nonetheless, these variables will be used to define the size of the two dimensional map board array.
If you notice with the “HexTile” structure that is being loaded into the array, there is no property as of yet for the image that each tile is to display. There are good reasons for this at this point. One, for simplicity's sake we are using a single type of map tile so at the time there was no necessity to include the tile image as part of the array or any form of reference to it. This will also be noted later as we move into the actual drawing code itself.
The second reason is that to include such images or image references within the “HexTile” object, you have to know what images you plan on displaying in each position for the initial map board. You also have to build in potential allowances for secondary images that may be used for the same positions during game play. For example, if a unit builds an entrenched position on a particular map tile you would want to have the “HexTile” object be able to have such a reference in order that when the map is re-drawn after this building of an entrenchment the proper image is displayed. All of this however, takes a bit of design work with either a hex map editor tool such as “Tiled”, the link for which was noted at the beginning of this paper or by pencil\pen and paper on a printed sheet of hexagonal tiles. For the latter, you can find a freely available, online tool here .
Once we get into the “TileMapLoad” class you will find two methods have been implemented…
- Load_MapHexTileArray()
- Transform_MapHexTileArray()
The “Load_MapHexTileArray” method is the one we are interested in. We will come back to the “Transform_MapHexTileArray” method later.
The “Load_MapHexTileArray” method is and will remain the primary method for loading “HexTile” structures into the two dimensional array. The most important aspect of each hex tile is whether it will be drawn in an even column (0, 2, 4…) or an odd one (1,3,5…). This consideration is also fairly standard for this type of development. However, some developers prefer to orient this consideration for even and odd rows. I started working with the even\odd column construct and there was no reason to change.
If we draw a hexagon tile in an even numbered column, there is no need to be concerned about a “Y” coordinate-based offset since the first hexagonal tile in such columns will always be drawn starting from the top of the map board. If the tile is to be drawn in an odd column we have to then consider the “Y” coordinate-based offset. Thus for such columns, the “Y” offset will be 36 pixels or simply half of the height of a tile. This is one good reason to use completely square tiles instead of some form of an actual rectangle.
The rest of the information that is provided for a “HexTile” structure is relatively straight forward…
- A tile-id, which can be used later to determine how to select an image from an image map sheet; if you decide this to be the most efficient way of loading your own images. For our immediate concerns the tile-id is a simple, numeric count. In terms of efficiency it makes no difference how you load such content since all of the necessary content has to be loaded at some point taking up around the same amount of memory.
- The row-id and column-id are also standard properties for such a construct as each tile's coordinates are necessary for latter development against their use such as calculating which tile a user selects. In this case, there are quite a number of algorithms that can be used for such functionality, some of which can be found at the “Red Blob Games” site, the link for which was provided earlier in the paper.
Over time then it is expected that the “HexTile” class will grow in terms of its necessary properties. However, for our purposes now, the basic information currently provided is more than enough.
The TileMap code
Returning to the “TileMap” object we can now concentrate on the primary drawing method, which is the “Draw_SampleTileMap” method. As mentioned previously, this method is called from the primary game module. However, it is in the “TileMap” class that the actual drawing gets performed.
The method currently takes three arguments…
- psScrollDirection
- piRowPosition
- piColumnPosition
The “psScrollDirection” parameter has been used for testing purposes but may be needed for further development down the road. The other two parameters can be ignored. They were originally intended to be used for directional movement based on tiles instead of pixels. These two parameters were originally implemented as part of my research into this type of development. However, they may later serve as needed information for tile selection.
After the initial declarations within the “Draw_SampleTileMap” method you will find two lines of code that have been commented out…
//MGWorkBench_ScrollingHexMap.Structures.HexTile[,]  loMapHexTileArray = null;
//loMapHexTileArray = Transform_MapHexTileArray(piRowPosition, piColumnPosition);
This code was implemented previously with the idea (just mentioned) that directional movement would be controlled based on a tile-by-tile basis instead of pixels. The called method, “Transform_MapHexTileArray”, was designed to calculate, which tiles would be displayed by zeroing out the tile-id in those elements in the two dimension tile array that would not be shown. The method actually worked in terms of the tiles to be displayed for each movement direction entered by the depressing of an arrow key but made the movement very choppy and inaccurate. And as you can see it is this method that uses the variables, “piRowPosition” and “piColumnPosition”, which the above information stated that you could ignore. The result was that this technique was dropped but the code has been retained for future reference as a similar process is expected to be required for the transformation of images that require changing during game play.
The next line of code initiates the actual “Monogame” drawing code with the statement, “coSpriteBatch.Begin();”. This code informs the “Monogame” framework that the drawing cycle is to be initiated.
It is within this cycle that the most common of tile map display coding will be found for all games of similarity of this genre of development. This is where the hex tile two dimensional array is looped through to extract the information for positional display.
The first aspect of this code section and before the actual display loop begins is to define where the drawing is supposed to begin in terms of the display screen's coordinate system. To the new game developer it would appear that the code would provide display positions in the game screen to the right or left of the zero(0) “X” coordinate as well as the same for up or down against the zero(0) “Y” coordinate. This is obviously most confusing and took me quite a while to understand the difference here since in reality, it makes little sense. However, if we look at the Vector2 object and the displayed game screen as two separate entities that internally align with each other than sensibility comes into the equation.
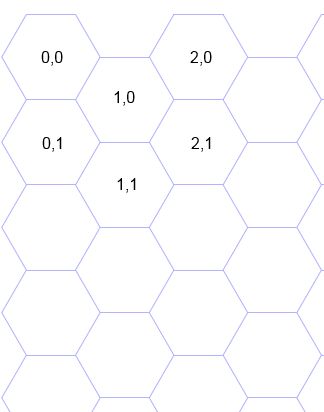
In this instance then, the Vextor2 object defines where in the images to be display the “X” and “Y” calculated coordinates are to begin selecting the image data. So for example, if these two coordinates were to begin as X=2 and Y=2 than this would mean that extracting the image data would begin in similar style at these coordinates as if such data represented an actual graphical playing board. To take this example further with a tile-based framing reference we could look at the image below in such a manner in the following way…
If the hexagonal tile labeled “0,0” represents X=0 and Y=0 for tile based coordinates than if the game display loop began with hexagonal tile, “1,1”, the actual screen display would actually begin drawing this tile at screen coordinates, “0,0”. Thus tile, “1,1”, would be drawn in the upper left corner of the physical screen display. This appears to make no sense but it does since a gaming engine that tied the default camera (in this case) to the actual calculated coordinates instead of the physical screen coordinates would not work properly as everything would be offset except for the “0,0” coordinates of the imaged map board.
The game display loop in this project displays by the column. Many game developers prefer to display by the row. It is a personal preference and also related to how you learned how to develop such code for hexagonal image displays. In this case we begin the outer loop with the “Y” index and the inner loop with the “X” index, both against the two dimensional tile array…
for (int liY = 0; liY < (MGWorkBench_ScrollingHexMap.Structures.Global.ACTUAL_MAP_HEIGHT_IN_TILES); liY++)
    {
       for (int liX = 0; liX <  (MGWorkBench_ScrollingHexMap.Structures.Global.ACTUAL_MAP_WIDTH_IN_TILES); liX++)
The result then is that for every tile represented in the two dimensional array we do the following…
- Extract the “HexTile” structure
- Test for whether that tile is to be placed in an even column or an odd one
- Calculate the new hex tile “X” and “Y” coordinates for which type of column the tile is to be drawn in
- Physically draw the image to the physical screen
Two notes concerning the body of this code…
First, the commented line of code below relates to the previously described transform method which is not being used at this time…
//loHexTile = (MGWorkBench_ScrollingHexMap.Structures.HexTile)loMapHexTileArray[liY, liX];Second, within the “Draw_HexTile” call, the default hex tile image is being passed to the actual method where the “SpriteBatch.Draw” event is actually used. This was discussed earlier in the section that described the lack of such referencing to image types in the hex tile structure.
The final line of code for the display of the hexagonal map is “coSpriteBatch.End();”, which tells the “Monogame” framework that the drawing process is to stop.
最后的笔记
I have no doubt that readers may have many questions and/or comments related to this piece and the corresponding source code. No doubt, this was a very difficult piece to write. It is not only highly technical but delves into an area that few other developers in the game industry, whether as hobbyists or professionals, have spent much time in explaining adequately. This lack of information is mostly the result of the decreasing interest in the war game genre in the past years. It is also a result of the fact that developing such games is extremely difficult and complex.
Nonetheless, there are some silver linings here. One, a recent report of the technology profession in general has found that game development is becoming one of the hottest areas of professional and hobby development to be involved with. This is a result of the introduction of excellent 3D tools that are not only offered freely but allow a game developer to create literally any type of game he or she could imagine. This growth area in the industry appears to have reignited a slow resurgent interest in the war game as well.
Being that the war game not only involves technical development but history and the ability to plan in-depth strategies and tactics, it is possible that many people who have become tired of the mindless violence portrayed in many current games may begin to return to one of the most popular gaming genres in history outside of the card game.
I hope this first article I have developed for your enjoyment of the development aspect of this gaming genre helps to renew such interest. If I have made some technical mistakes or misinterpretations, please note that though I have spent years researching and following the game industry, this is the first time I have had the time to tackle the technical development aspects of the genre I have always been most interested in since the 1990s. This last is also the reason why my project's source code appears to be in a state of flux.
I hope you have found this article both informative and challenging. If you have any questions, comments, or suggestions as to how some of the code may be changed or how an explanation may be modified, please drop me a line at the email address above. I would love to hear from you concerning your views and thoughts on the matter.
In a future article I plan to provide an actual hexagonal map board design and the updated code to support it.
翻译自: https://jaxenter.com/creating-a-digital-hexagonal-tile-map-part-1-128625.html
css 六角形
