Unity5 烘焙教程
https://www.sassybot.com/blog/lightmapping-in-unity-5/
In Unity3D, scenes can benefit greatly from atmospheric lighting and the shadows these lights cast. Nowadays most of this can be done realtime and can have some stunning results. However, the more complex your scenes will get, the more demanding this is for the computer running the scene. For complex scenes it’s recommended to bake the lighting information of your environments into texture maps so that the calculations for this lighting will only need to be done once. Setting up your lights and environments can sometimes be a little tricky without immediately giving you the results you might be after. This blog will cover some of the basics of creating lightmaps for your Unity3D scene as well as some tips and tricks to help you get to a pleasant result quicker.
The following will only cover baking lightmaps in Unity 5 using Baked Global Illumination and will not cover any of the Precomputed Realtime Global Illumination.
Lightmapping quick start
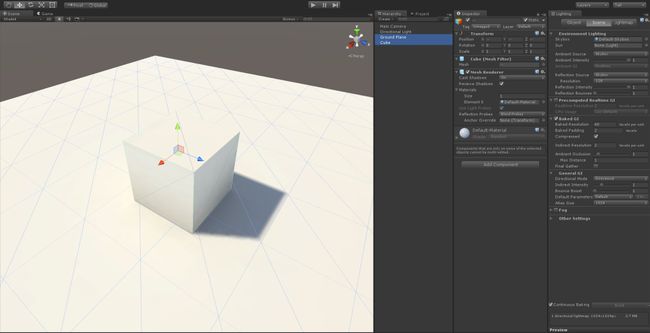
This is pretty much how a simple scene with a plane, cube, and directional light looks without any lighting baked in.
Default Unity scene with a plane and a cube
In order to bake your lighting information into a lightmap you need to tell Unity at least two things. Which light is going to have its information baked in, and which objects are going to remain static in the scene.
Step 1: Mark your objects as static
Step 2: Set your scene light to baked instead of realtime
Lighting baking mode set to baked
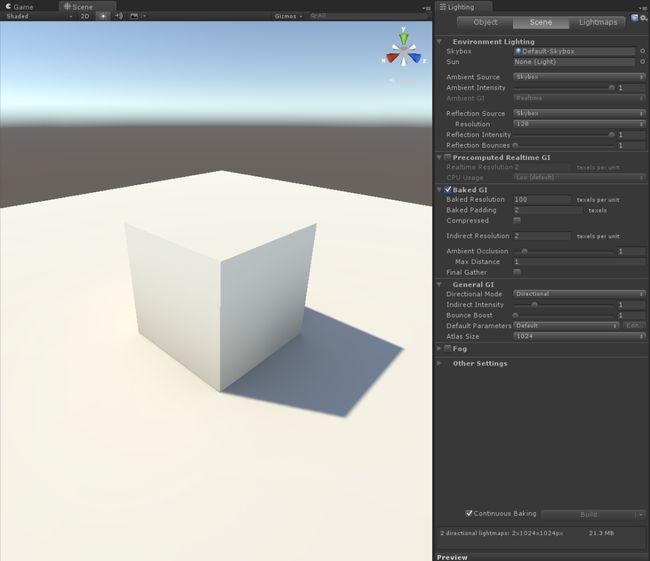
Finally, with Baked GI checked in the Lighting tab you should see the lighting baked into this little testing scene. In the bottom right of the lighting tab you will see how many lightmaps have been baked, at what resolution, and what the file size of the lightmap(s) is. Now that the basics are out of the way, let’s look at some of the knobs, dials, and options that can give us some control over this.
Lightmapping custom objects with ‘Generate Lightmap UVs’
A 3D object can have several UV channels. Normally, objects store their texture location information into the UV0 channel. By default, Unity will bake lighting information using the UV0 channel which usually does not give desirable results if you have overlapping UVs. With a 3D package such as Maya or 3ds Max you can create a set of UVs in the UV1 channel that Unity will reference when baking lighting information. You can also have Unity automatically generate information in the UV1 channel by checking the ‘Generate Lightmap UVs’ box in the .fbx importer settings.
On non-organic objects it’s pretty useful to generate these lightmap UVs automatically. On organic objects I recommend creating a custom UV1 channel as the automatically generated results usually put the lightmap seams in rather visible places.
Continuous/Auto Baking
This is a checkbox that can be found at the bottom of the Lighting panel. When left on, any changes in the scene or in the lighting settings will automatically be calculated in the background as you continue working. Unless you have a beast of a machine or working on a really small scene, I recommend you leave this off and only Build your lightmaps when you need to. Additionally, when manually baking lightmaps Unity will store the lightmaps in a folder with the same name as your scene in same folder as your scene.
Continuous/auto baking
Baked Global Illumination settings
Lightmap resolution and padding
The way to increase the resolution in your lightmaps is to increase the texels (texture pixels) per unit in your lightmap, higher values will create larger maps. If you notice that some of the light information starts to blend or bleed into the wrong surfaces of your objects you can try increasing the padding so that there will be more space on the lightmap between the UV islands. If you notice compression artifacts on gradients you can try unchecking ‘Compressed’ at the expense of lightmap file size. Lastly, the indirect resolution will determine the resolution of the bounce light in texels per unit. As you may notice from the images below, pushing this value much further past 2 did not have much of a noticeable effect.
Indirect resolution at close to 0
Ambient Occlusion
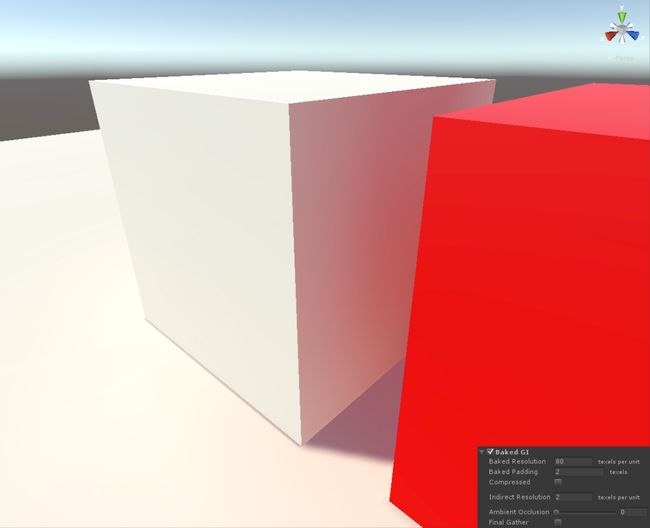
To make your objects feel more grounded in the environment it is common to add what is called ambient occlusion. Ambient occlusion is basically a phenomenon where areas appear darker when surfaces get close to each other. The Ambient Occlusion value in the Lighting tab determines the intensity of this effect and the ‘Max Distance’ is the distance along the surface after which this effect is no longer visible. The cube I used for the examples below is 1 cubic unit. With a max distance of 0.5, the falloff of this effect therefore travels halfway up this cube. With an Ambient Occlusion intensity of 5 it now becomes pretty clear how this works.
No Baked GI, no Ambient Occlusion
Final Gather
As for the last option in the Baked GI section of the Lighting tab. I’m not quite sure what kind of noticeable added benefit Final Gather has to justify the extra baking time but if someone is out there that knows and can show me, then that would be great.
General Global Illumination settings
This section in Unity’s lighting tab contains settings shared between precomputed realtime GI and baked GI. I’m not going into the directional mode as it’s pretty well explained in this blog post on the Unity forum:http://forum.unity3d.com/threads/directional-lightmaps.280716/. Further along in the Lighting tab, Unity’s tooltips can shed some light on what Indirect Intensity and Bounce Boost do exactly.
Indirect Intensity
Indirect Intensity tooltip
Bounce Boost
Bounce Boost tooltip
The Default Parameters in Unity’s Lighting tab affect the quality of the bake. I usually set this to ‘Default-VeryLowResolution’ in the initial stages of of the baking process in order to make me aware of problems sooner without having to wait very long for a bake to finish. Then, when I’m reasonably certain there are no big lighting problems, I set the Default Parameters to higher resolutions.
Atlas size
This value determines the dimensions of the lightmap in pixels. When using large surfaces such as floors or ceilings you may notice that an atlas size of 1024 probably isn’t enough. In this case you could cut up your mesh so that the lightmap can be distributed over more texture maps. Another option is to increase the atlas size of your lightmap so that there is more space to put the information onto. Try to keep your target platform in mind when considering very large texture maps. Something you might encounter is that when dialing the Atlas Size up to 4096 or higher is that the Lighting tab will still say the lightmap is set to 2048px. This will occur when you manually initiate your lightmap bake and the lightmap will appear in your project as a texture. The texture import settings of the lightmap will be set to 2048px by default. Change this to this to the Atlas Size you entered and you are good to go.

Atlas Size set to 4096 with continuous baking disabled. Manually punch in the Max Size of the texture
Tips and tricks
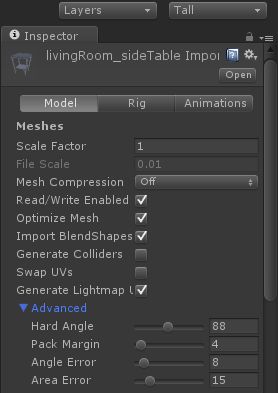
Advanced Generate Lightmap UVs
This section in the FBX import settings allows you to determine how the UV1 channel for that object is automatically generated. This can be useful for problems in automatically generating UVs for objects that don’t have perfect 90 degree angles.
Preview Texel Density
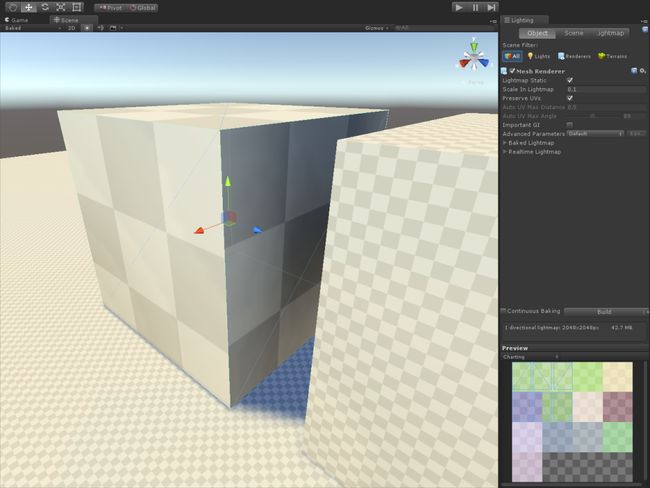
In the top left of your scene view you can find a dropdown that allows you to change how you see the scene. In the bottom of this dropdown you can find preview options for Global Illumination. The last option in that list should say ‘Baked’. This allows you to preview the texel resolution of your lightmap. Smaller squares represent more resolution in texels per unit in your lightmap.
Scale in Lightmap
In the Lighting tab, under the Object section, you can find object specific lighting settings. One of which is the ‘Scale In Lightmap’. This value determines how much space this object will take up in your lightmap. Combined with the Texel Density Preview, you can see how this translates in resolution when you hit that bake button. This can be useful when determining the Scale In Lightmap to make the most use out of your lightmap textures for static objects at various distances from the camera.
Bake only an object’s shadow
Sometimes it is useful for an object to cast a shadow in the lightmap, but not to receive any lightmap information itself. When this is the case you can set the ‘Scale In Lightmap’ to 0.
This object will still be influenced by lightprobes if this is enabled in the object’s Mesh Renderer component. One of the benefits I found using this for is parked cars. Due to the details and curved nature of the cars in one of our scenes it became pretty costly to get a good result out of baking these objects. The solution was to not bake the cars but just their shadows and ambient occlusion.
Consider which lights to bake and which to keep realtime and when
As of this writing, the Mixed Shadows setting on lights is not yet working as it should in Unity 5.0. The Mixed Shadows setting normally allows for baking lights into an environment while also supporting near lights to cast realtime shadows. This is great in cases where, for example, a character walks past a light and casts pretty shadows while having ambient occlusion and environment shadows baked in to be enjoyed at larger distances from the camera. Unity is aware of the Mixed Shadows issue and I can’t wait for it to be fixed. In the meanwhile, we would still like to have realtime shadows in our game. One way to do it is to only have the important lights cast the shadows you need in an environment.
Hopefully you got something useful out of this blog and perhaps it helps you either get started with lightbaking in Unity or maybe it expands on what you already knew. Regardless, If you want to follow up with some questions or you have a trick or two to teach me about Unity then you can always hook me up on Twitter @tinovdk. Consider sharing this with people that can benefit from it. Thank you for reading through to the end. ^^

