java实现通过QQ邮箱发送激活邮件 springBoot
用户邮件激活 通过QQ邮箱发送激活邮件 soringBoot
本文主要介绍了使用java 调用邮箱发送邮件的功能
首先新建一个springboot项目
pom依赖如下
org.springframework.boot
spring-boot-starter-parent
1.5.7.RELEASE
sourceEncoding>UTF-8 sourceEncoding>
UTF-8
1.8
org.mybatis.spring.boot
mybatis-spring-boot-starter
org.springframework.boot
spring-boot-starter-logging
1.3.0
com.alibaba
druid
1.0.11
com.alibaba
druid-spring-boot-starter
1.1.0
mysql
mysql-connector-java
5.1.35
org.springframework.boot
spring-boot-starter-mail
org.springframework.boot
spring-boot-starter-tomcat
provided
org.springframework.boot
spring-boot-starter-web
org.springframework.boot
spring-boot-starter-test
test
org.springframework.boot
spring-boot-starter-thymeleaf
org.apache.httpcomponents
httpclient
4.5.5
com.fasterxml.jackson.core
jackson-databind
${jackson.version}
com.fasterxml.jackson.core
jackson-annotations
2.8.1
commons-beanutils
commons-beanutils
1.7.0
commons-collections
commons-collections
3.1
commons-lang
commons-lang
2.5
net.sf.ezmorph
ezmorph
1.0.3
net.sf.json-lib
json-lib
2.4
jdk15
com.github.penggle
kaptcha
2.3.2
org.springframework.boot
spring-boot-maven-plugin
上面除了邮件还有一些别的,为了防止去掉出问题所以我就全粘上了jdk1.8的
首先要想使用代码发邮件需要第一步就是有一个邮箱,这里我用QQ邮箱举例子
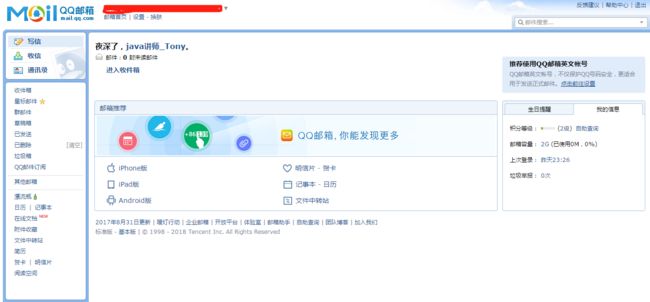
先登录
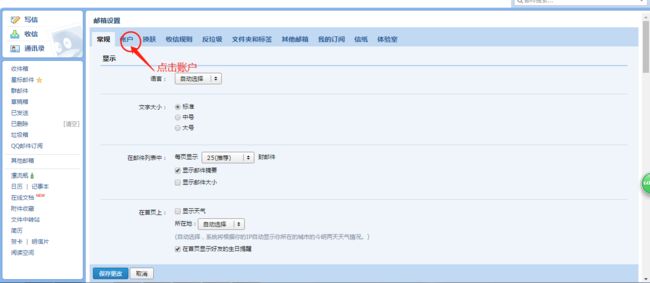
然后进入设置
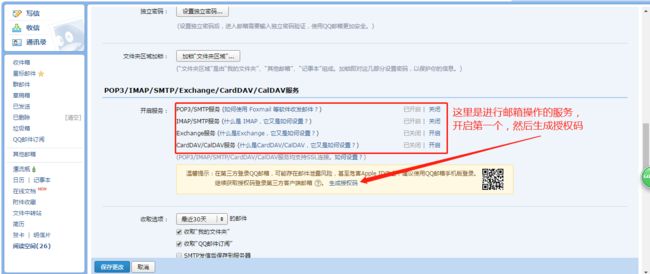
在之后开启邮箱的操作服务并获取授权码,这个授权码也是我们在下面要用到的,不是邮箱登录密码
接下来正式进入代码,首先就是创建controller类 testController
这里需要解释一下就是激活账其实就是给用户一个字段是否激活,创建的时候这个值为0,激活之后值就是1;不用我多说了吧
@Controller
@RequestMapping("/test")
public class testController {

	 @RequestMapping("/toReg")
	 @ResponseBody
	 public Integer toReg(HttpServletRequest request){
String itme=request.getPatameter("item");//这里是用户注册时填入的邮箱,也就是目标邮箱
//内容是修改用户状态的超链接//这个地址是修改用户状态的超链接 这里我使用localhost:8080 调用的其实就是下面激活账户的方法 String content="請激活您的賬號";@ResponseBody public Integer toTuser(HttpServletRequest request){int i=0;//这个基本就是一条sql搞定,就是更新id为n的用户让他变为激活状态String id=request.getParameter("id");i+=this.testService.toTuser(id); return i; } public Object sendEmail(String content,String item) { try { //手动写入资源 Properties props = new Properties(); //显示日志props.setProperty("mail.debug", "true");// 需要验证props.setProperty("mail.smtp.auth", "true");// qq邮箱props.setProperty("mail.host", "smtp.qq.com");//这里QQ邮箱是这个 别的比如163的话就把qq换成163//制定SMTP方式发送props.setProperty("mail.transport.protocol", "smtp");//qq邮箱服务器端口号props.setProperty("mail.port", "465");//不同邮箱不同服务号 qq是465 别的自己百度 随便一搜索就有MailSSL SocketFactory sf = new MailSSL SocketFactory();//mail的 socket工厂 sf.setTrustAllHosts(true);//这里貌似是信任所有的发送到邮箱的操作//设置ssl加密 不是所有邮箱都需要props.put("mail.smtp.ssl.enable", "true");props.put("mail.smtp.ssl. socketFactory", sf); //载入资源 Session session = Session.getInstance(props); //创建消息Message msg = new MimeMessage(session);msg.setFrom(new InternetAddress("[email protected]"));//这里是我们用的QQ邮箱//设置主题msg.setSubject("測試");//邮件内容并设置编码msg.setContent(content,"text/html;charset=utf-8");//创建链接Transport transport = session.getTransport();//进行连接transport.connect("smtp.qq.com", "[email protected]", "这里写我们得到的授权密码 注意不是登录密码"); //设置收件地址并发送transport.sendMessage(msg, new Address[] { new InternetAddress(item) });//这里是目标地址 也就是接收邮件的邮箱 return "sucesss"; } catch (Exception ex) { ex.printStackTrace(); return "error"; } }}从上面其实大家可以看到我这是在邮箱中放入了超链接 其实些什么都行,本文主要是让大家知道怎么用java操纵邮箱发送邮件,所以大家要是不想链接数据库也可以直接调用sendmail方法写死一些数据然后启动试试,这样就可以把需要的邮件发送出去,比较简单没设么技术含量,觉得有用的亲帮点个赞呗
sp
so
so
so
so
so
so
so
so
so
so
so


