【Unity 3D】学习笔记 - 血条预制制作
血条预制制作
完成血条(Health Bar)的预制设计。具体要求如下:
- 分别使用 IMGUI 和 UGUI 实现
- 使用 UGUI,血条是游戏对象的一个子元素,任何时候需要面对主摄像机
- 分析两种实现的优缺点
- 给出预制的使用方法
其实在之前的打飞碟游戏中,我完成了一个简易的血条设计,效果图如下:
当时的实现方式是通过在OnGUI中即时显示若干个 # 字符来表示血量的多少,关键性代码如下:
        if (isStart) {
            if (Input.GetButtonDown("Fire1")) act.hit(Input.mousePosition);
            GUI.Label(new Rect(10, 5, 200, 50), "SCORE", textStyle);
            GUI.Label(new Rect(10, 50, 200, 50), "LEVEL", textStyle);
            GUI.Label(new Rect(Screen.width - 380, 5, 50, 50), "BLOOD", textStyle);
            GUI.Label(new Rect(200, 5, 200, 50), act.getScore().ToString(), scoreStyle);
            GUI.Label(new Rect(200, 50, 200, 50), act.getLevel().ToString(), scoreStyle);
            for (int i = 0; i < blood; i++)
                GUI.Label(new Rect(Screen.width - 220 + 20 * i, 5, 50, 50), "#", bStyle);
            if (blood == 0) {
                GUI.Label(new Rect(Screen.width / 2 - 130, Screen.height / 2 - 120, 100, 100), "Game Over", style);
                if (GUI.Button(new Rect(Screen.width / 2 - 40, Screen.height / 2 - 30, 100, 50), "REPLAY")) {
                    blood = 10;
                    act.restart();
                    return;
                }
                act.gameOver();
            }
        }
        else {
            GUI.Label(new Rect(Screen.width / 2 - 100, Screen.height / 2 - 120, 100, 100), "Hit UFO", style);
            if (GUI.Button(new Rect(Screen.width / 2 - 40, Screen.height / 2 - 30, 100, 50), "START")) {
                isStart = true;
                act.begin();
            }
        }
学习了UI系统的相关知识之后,可以将这个比较简陋的设计进一步完善。
IMGUI实现
使用HorizontalScrollbar来完成血条预制的制作,通过修改它的size属性值来表示血量的多少。
代码如下:
using System.Collections;
using System.Collections.Generic;
using UnityEngine;

public class bloodBar_script : MonoBehaviour {
    public float curBlood = 10f;
    private float targetBlood = 10f;
    private Rect bloodBarArea;
    private Rect addButton;
    private Rect minusButton;
    private Rect num1;
    private Rect num2;
    private Rect num3;
    private bool status;

    void Start () {
        bloodBarArea = new Rect(Screen.width - 220, 20, 200, 50);
        addButton = new Rect(Screen.width - 220, 50, 40, 20);
        minusButton = new Rect(Screen.width - 60, 50, 40, 20);
        num1 = new Rect(Screen.width - 220, 80, 40, 20);
        num2 = new Rect(Screen.width - 140, 80, 40, 20);
        num3 = new Rect(Screen.width - 60, 80, 40, 20);
	}

    public void addBlood(float num) {
        targetBlood = targetBlood + num > 10f? 10f : targetBlood + num;
    }

    public void minusBlood(float num) {
        targetBlood = targetBlood - num < 0f? 0f : targetBlood - num;
    }

    private void OnGUI() {
        if (GUI.Button(addButton, " + ")) status = true;
        if (GUI.Button(minusButton, " - ")) status = false;
        if (status) {
            if (GUI.Button(num1, " 1 ")) addBlood(1);
            if (GUI.Button(num2, " 2 ")) addBlood(2);
            if (GUI.Button(num3, " 3 ")) addBlood(3);
        }
        else {
            if (GUI.Button(num1, " 1 ")) minusBlood(1);
            if (GUI.Button(num2, " 2 ")) minusBlood(2);
            if (GUI.Button(num3, " 3 ")) minusBlood(3);
        }
        curBlood = Mathf.Lerp(curBlood, targetBlood, 0.1f);
        GUI.HorizontalScrollbar(bloodBarArea, 0f, curBlood, 0f, 10f);
    }
}}
在OnGUI函数中,先是判断点击的是加血量还是减血量按钮,再接收相应的血量变化的数值。
为了使血量的变化过程连贯流畅,用Math.Lerp插值计算血量值,以此避免血量突变。
完成效果如下图,首先点击加或减的按钮,然后点击数值按钮,即可看到血量值相应变化。
UGUI实现
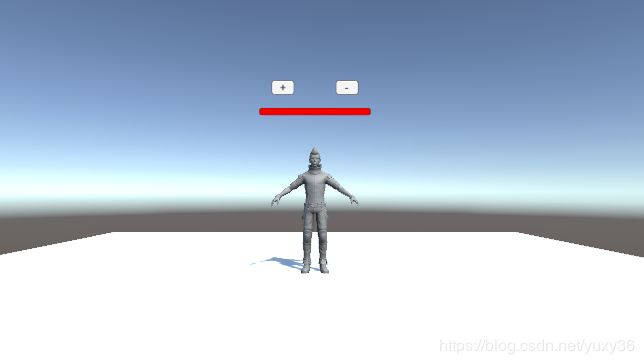
添加人物模型、画布Canvas、slider与plane,层次树结构如下图:
其中加上了两个按钮,分别用来加减血量,完成这些的效果图如下:
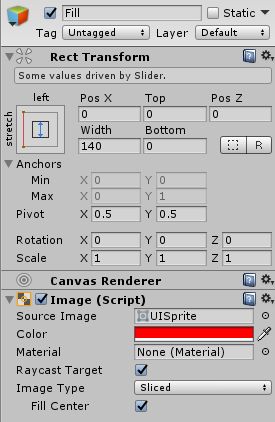
相应的属性值调整如下图:
此时让人物运动,血条会跟着人物转动而转动,需要让它面向主摄像机。
编写脚本挂载在Canvas上,代码如下:
using System.Collections;
using System.Collections.Generic;
using UnityEngine;
using UnityEngine.UI;
public class bloodBar_GUI : MonoBehaviour {
private float curBlood = 0f;
private float targetBlood = 0f;
public Slider bloodBar;
GameObject btnPlus, btnMinus;
private void Start() {
btnPlus = GameObject.Find("addButton");
Button a = btnPlus.GetComponent通常使用LookAt函数使对象面对摄像机,但是这个函数是使对象朝向一个点,还是会引起对象的转向,我使用LookRotation函数,使对象始终保持固定的朝向,效果更能满足预期。
最终效果图如下:
两种方式优缺点
IMGUI
优点:
- IMGUI的存在符合游戏编程的传统,即使在今天它依然没有被官方宣判为遗留(将要淘汰的)系统(Legacy Systems)。
- 在修改模型,渲染模型这样的经典游戏循环编程模式中,在渲染阶段之后,绘制 UI 界面无可挑剔(参考Execution Order of Event Functions)。
- 这样的编程即避免了 UI 元素保持在屏幕最前端,又有最佳的执行效率,一切控制掌握在程序员手中,这对早期计算和存储资源贫乏的游戏设备来说,更是弥足珍贵。
缺点:
- IMGUI系统通常不打算用于玩家可能使用并与之交互的普通游戏内用户界面,因其难以调试。
- 传统代码驱动的 UI 面临效率低下
UGUI
优点:
- 所见即所得(WYSIWYG)设计工具,设计师也能参与程序开发
- 支持多模式、多摄像机渲染
- UI 元素与游戏场景融为一体的交互
- 面向对象的编程
预制的使用方法
IMGUI完成的血条预制为bloodBar,拖放至场景中即可使用,可自由加减一定数量的血量。
UGUI完成的血条预制为bloodBar_UGUI,以人物模型作为父对象,拖放至场景中即可使用,用方向键控制人物移动。
演示视频 - UGUI
演示视频 - IMGUI
项目传送


