Android 9.0(P) SystemUI之QuickStep探索
引言
QuickStep是Android P中一大新特性,在Android P中 Google将SystemUI中Recents在Launcher又实现了一遍,并且取名为QuickStep,其具有新的界面(如下图)以及交互方式。
quickstep.png
QuickStep有两种启动方式,一种为常规启动方式——点击recents键,一种则是通过手势启动(如下图)。
640.gif
那么QuickStep是如何启动的呢?是如何加载数据的呢?今天就先来讲讲常规启动的流程。
常规启动
用户通过导航栏Recents Button启动,首先来看下Recents Button的onClick事件如何实现:
private void onRecentsClick(View v) {
        if (LatencyTracker.isEnabled(getContext())) {
            LatencyTracker.getInstance(getContext()).onActionStart(
                    LatencyTracker.ACTION_TOGGLE_RECENTS);
        }
        mStatusBar.awakenDreams();
        mCommandQueue.toggleRecentApps();
    }
这里通过CommandQueue发出启动Recents的消息。而Recents.java使用了CommandQueue的callback接口:
    /**
     * Toggles the Recents activity.
     */
    @Override
    public void toggleRecentApps() {
        // Ensure the device has been provisioned before allowing the user to interact with
        // recents
        if (!isUserSetup()) {
            return;
        }

        // 启动Launcher QuickStep 9.0新特性
        // If connected to launcher service, let it handle the toggle logic
        IOverviewProxy overviewProxy = mOverviewProxyService.getProxy();
        if (overviewProxy != null) {
            final Runnable toggleRecents = () -> {
                try {
                    if (mOverviewProxyService.getProxy() != null) {
                        mOverviewProxyService.getProxy().onOverviewToggle();
                    }
                } catch (RemoteException e) {
                    Log.e(TAG, "Cannot send toggle recents through proxy service.", e);
                }
            };
            // Preload only if device for current user is unlocked
            final StatusBar statusBar = getComponent(StatusBar.class);
            if (statusBar != null && statusBar.isKeyguardShowing()) {
                statusBar.executeRunnableDismissingKeyguard(() -> {
                        // Flush trustmanager before checking device locked per user
                        mTrustManager.reportKeyguardShowingChanged();
                        mHandler.post(toggleRecents);
                    }, null,  true/*dismissShade*/ , false/*afterKeyguardGone*/ ,
                    true /*deferred*/);
            } else {
                toggleRecents.run();
            }
            return;
        }

        // SystemUI 默认启动Recents
        int growTarget = getComponent(Divider.class).getView().growsRecents();
        int currentUser = sSystemServicesProxy.getCurrentUser();
        if (sSystemServicesProxy.isSystemUser(currentUser)) {
            mImpl.toggleRecents(growTarget);
        } else {
            if (mSystemToUserCallbacks != null) {
                IRecentsNonSystemUserCallbacks callbacks =
                        mSystemToUserCallbacks.getNonSystemUserRecentsForUser(currentUser);
                if (callbacks != null) {
                    try {
                        callbacks.toggleRecents(growTarget);
                    } catch (RemoteException e) {
                        Log.e(TAG, "Callback failed", e);
                    }
                } else {
                    Log.e(TAG, "No SystemUI callbacks found for user: " + currentUser);
                }
            }
        }
    }
可以看出在9.0中,SystemUI启动Recents的地方会分成两部分,一个是通过AIDL跨进程启动QuickStep,另外一种则是启动SystemUI内部默认的Recents。
OverviewProxyService
OverviewProxyService就是实现与含有QuickStep功能的Launcher进行数据传输的功能类,它主要实现了与Service(Launcher)端的绑定,并将SystemUIProxy传给Launcher,供Launcher内部调用
SystemUI接口。
OverviewProxyService开机时尝试bindService:
private void internalConnectToCurrentUser() {
        disconnectFromLauncherService();

        // If user has not setup yet or already connected, do not try to connect
        if (!mDeviceProvisionedController.isCurrentUserSetup() || !isEnabled()) {
            Log.v(TAG_OPS, "Cannot attempt connection, is setup "
                + mDeviceProvisionedController.isCurrentUserSetup() + ", is enabled "
                + isEnabled());
            return;
        }
        mHandler.removeCallbacks(mConnectionRunnable);
        Intent launcherServiceIntent = new Intent(ACTION_QUICKSTEP)
                .setPackage(mRecentsComponentName.getPackageName());
        boolean bound = false;
        try {
            bound = mContext.bindServiceAsUser(launcherServiceIntent,
                    mOverviewServiceConnection, Context.BIND_AUTO_CREATE,
                    UserHandle.of(mDeviceProvisionedController.getCurrentUser()));
        } catch (SecurityException e) {
            Log.e(TAG_OPS, "Unable to bind because of security error", e);
        }
        if (bound) {
            // Ensure that connection has been established even if it thinks it is bound
            mHandler.postDelayed(mDeferredConnectionCallback, DEFERRED_CALLBACK_MILLIS);
        } else {
            // Retry after exponential backoff timeout
            final long timeoutMs = (long) Math.scalb(BACKOFF_MILLIS, mConnectionBackoffAttempts);
            mHandler.postDelayed(mConnectionRunnable, timeoutMs);
            mConnectionBackoffAttempts++;
            Log.w(TAG_OPS, "Failed to connect on attempt " + mConnectionBackoffAttempts
                    + " will try again in " + timeoutMs + "ms");
        }
    }
并在ServiceConnect之后将SystemUIProxy传给Launcher端,SystemUIProxy主要实现功能接口如下:
private ISystemUiProxy mSysUiProxy = new ISystemUiProxy.Stub() {

        public GraphicBufferCompat screenshot(Rect sourceCrop, int width, int height, int minLayer,
                int maxLayer, boolean useIdentityTransform, int rotation) {
            long token = Binder.clearCallingIdentity();
            try {
                return new GraphicBufferCompat(SurfaceControl.screenshotToBuffer(sourceCrop, width,
                        height, minLayer, maxLayer, useIdentityTransform, rotation));
            } finally {
                Binder.restoreCallingIdentity(token);
            }
        }

        public void startScreenPinning(int taskId) {
            long token = Binder.clearCallingIdentity();
            try {
                mHandler.post(() -> {
                    StatusBar statusBar = ((SystemUIApplication) mContext).getComponent(
                            StatusBar.class);
                    if (statusBar != null) {
                        statusBar.showScreenPinningRequest(taskId, false /* allowCancel */);
                    }
                });
            } finally {
                Binder.restoreCallingIdentity(token);
            }
        }

        public void onSplitScreenInvoked() {
            long token = Binder.clearCallingIdentity();
            try {
                EventBus.getDefault().post(new DockedFirstAnimationFrameEvent());
            } finally {
                Binder.restoreCallingIdentity(token);
            }
        }

        public void onOverviewShown(boolean fromHome) {
            long token = Binder.clearCallingIdentity();
            try {
                mHandler.post(() -> {
                    for (int i = mConnectionCallbacks.size() - 1; i >= 0; --i) {
                        mConnectionCallbacks.get(i).onOverviewShown(fromHome);
                    }
                });
            } finally {
                Binder.restoreCallingIdentity(token);
            }
        }

        public void setInteractionState(@InteractionType int flags) {
            long token = Binder.clearCallingIdentity();
            try {
                if (mInteractionFlags != flags) {
                    mInteractionFlags = flags;
                    mHandler.post(() -> {
                        for (int i = mConnectionCallbacks.size() - 1; i >= 0; --i) {
                            mConnectionCallbacks.get(i).onInteractionFlagsChanged(flags);
                        }
                    });
                }
            } finally {
                Prefs.putInt(mContext, Prefs.Key.QUICK_STEP_INTERACTION_FLAGS, mInteractionFlags);
                Binder.restoreCallingIdentity(token);
            }
        }

        public Rect getNonMinimizedSplitScreenSecondaryBounds() {
            long token = Binder.clearCallingIdentity();
            try {
                Divider divider = ((SystemUIApplication) mContext).getComponent(Divider.class);
                if (divider != null) {
                    return divider.getView().getNonMinimizedSplitScreenSecondaryBounds();
                }
                return null;
            } finally {
                Binder.restoreCallingIdentity(token);
            }
        }

        public void setBackButtonAlpha(float alpha, boolean animate) {
            long token = Binder.clearCallingIdentity();
            try {
                mHandler.post(() -> {
                    notifyBackButtonAlphaChanged(alpha, animate);
                });
            } finally {
                Binder.restoreCallingIdentity(token);
            }
        }
    };
这里不过多解读跨进程的具体功能,后续对QuickStep单独功介绍时进行一一介绍。
TouchInteractionService
TouchInteractionService就是Launcher端的Service,代码路径是:packages/apps/Launcher3/quickstep/src/com/android/quickstep/TouchInteractionService.java,通过SystemUI中bind启动。前面SystemUI在Recents中通过AIDL调用Launcher端onOverviewToggle:
@Override
public void onOverviewToggle() {
     mOverviewCommandHelper.onOverviewToggle();
}
这里的mOverviewCommandHelper对应的就是OverviewCommandHelper,其代码路径是:
packages/apps/Launcher3/quickstep/src/com/android/quickstep/OverviewCommandHelper.java,其作用主要是启动Launcher中的QuickStep界面。代码逻辑详情如下:
public void onOverviewToggle() {
     // If currently screen pinning, do not enter overview
     if (mAM.isScreenPinningActive()) {
         return;
     }
     mAM.closeSystemWindows(CLOSE_SYSTEM_WINDOWS_REASON_RECENTS);
     mMainThreadExecutor.execute(new RecentsActivityCommand<>());
}
这里最关键的逻辑就是mMainThreadExecutor.execute(new RecentsActivityCommand<>());这里RecentsActivityCommand是OverviewCommandHelper中的一个内部类,因为implement了Runnable,因此mMainThreadExecutor主要执行的就是该类的run方法,其代码逻辑如下:
@Override
public void run() {
    long elapsedTime = mCreateTime - mLastToggleTime;
    mLastToggleTime = mCreateTime;
    if (!handleCommand(elapsedTime)) {
        // Start overview
        if (!mHelper.switchToRecentsIfVisible(true)) {
             mListener = mHelper.createActivityInitListener(this::onActivityReady);
             mListener.registerAndStartActivity(overviewIntent, this::createWindowAnimation,
                     Context, mMainThreadExecutor.getHandler(), RECENTS_LAUNCH_DURATION);
             }
        }
}
这里逻辑分成两块,一是连续点击判断和实现双击切换应用,这块逻辑在handleCommand(elapsedTime),二是启动QuickStep对应的Activity界面,并执行对应的窗口动画,这里的overviewIntent是在OverviewCommandHelper初始化的时候进行初始化的,其关键代码逻辑如下:
private void initOverviewTargets() {
        ComponentName defaultHome = PackageManagerWrapper.getInstance()
                .getHomeActivities(new ArrayList<>());
        final String overviewIntentCategory;
        //判断默认Launcher是否为自身
        if (defaultHome == null || mMyHomeComponent.equals(defaultHome)) {
            // User default home is same as out home app. Use Overview integrated in Launcher.
            overviewComponent = mMyHomeComponent;
            mActivityControlHelper = new LauncherActivityControllerHelper();
            overviewIntentCategory = Intent.CATEGORY_HOME;
            if (mUpdateRegisteredPackage != null) {
                // Remove any update listener as we don't care about other packages.
                mContext.unregisterReceiver(mOtherHomeAppUpdateReceiver);
                mUpdateRegisteredPackage = null;
            }
        } else {
            // The default home app is a different launcher. Use the fallback Overview instead.
            overviewComponent = new ComponentName(mContext, RecentsActivity.class);
            mActivityControlHelper = new FallbackActivityControllerHelper(defaultHome);
            overviewIntentCategory = Intent.CATEGORY_DEFAULT;
            // User's default home app can change as a result of package updates of this app (such
            // as uninstalling the app or removing the "Launcher" feature in an update).
            // Listen for package updates of this app (and remove any previously attached
            // package listener).
            if (!defaultHome.getPackageName().equals(mUpdateRegisteredPackage)) {
                if (mUpdateRegisteredPackage != null) {
                    mContext.unregisterReceiver(mOtherHomeAppUpdateReceiver);
                }
                mUpdateRegisteredPackage = defaultHome.getPackageName();
                IntentFilter updateReceiver = new IntentFilter(ACTION_PACKAGE_ADDED);
                updateReceiver.addAction(ACTION_PACKAGE_CHANGED);
                updateReceiver.addAction(ACTION_PACKAGE_REMOVED);
                updateReceiver.addDataScheme("package");
                updateReceiver.addDataSchemeSpecificPart(mUpdateRegisteredPackage,
                        PatternMatcher.PATTERN_LITERAL);
                mContext.registerReceiver(mOtherHomeAppUpdateReceiver, updateReceiver);
            }
        }
        overviewIntent = new Intent(Intent.ACTION_MAIN)
                .addCategory(overviewIntentCategory)
                .setComponent(overviewComponent)
                .setFlags(Intent.FLAG_ACTIVITY_NEW_TASK);
}
这里的逻辑主要为判断当前系统默认Launcher是不是Launcher3自身,如果是将自身component赋给
overviewComponent,并反注册Launcher切换广播接受者;如果不是,则将RecentsActivity的component赋给overviewComponent,两者的区别就是启动的Recents界面一个带有hotseat(Launcher3独有),一个则是普通的Recents界面。
总结
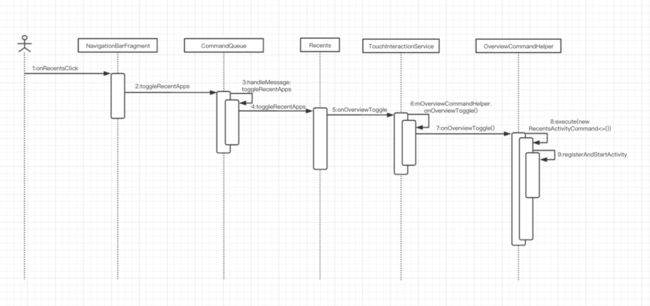
到这里QuickStep的常规按键启动流程介绍结束了,下面附上一张对应的时序图工大家参考:
quickstepNormalStart.png
下一篇,将给大家带来手势启动分析。
本篇文章已独家授权公众号ApeClub使用,转载请注明出处!更多好文章请关注公众号ApeClub。
作者:Monster_de47
链接:https://www.jianshu.com/p/b0878d959ab2
来源:简书
简书著作权归作者所有,任何形式的转载都请联系作者获得授权并注明出处。
