阿里云使用笔记-第六篇-CentOS搭建Sentry日志监控平台
一,前言
由于前端项目运行在用户各自电脑的浏览器上,
对于浏览器差异所导致的问题,正常情况下是没有办法拿到的
我们可以使用日志监控平台对客户端产生的问题进行收集统计,以便及时处理

搭建Sentry(哨兵)日志平台,对前端项目日志进行上报并及时处理解决问题
二,安装docker
安装:
yum -y install docker-ce
启动:
systemctl start docker
测试:
docker run hello-world

[root@Brave ~]# docker run hello-world
Unable to find image 'hello-world:latest' locally
latest: Pulling from library/hello-world
1b930d010525: Pull complete
Digest: sha256:2557e3c07ed1e38f26e389462d03ed943586f744621577a99efb77324b0fe535
Status: Downloaded newer image for hello-world:latest
Hello from Docker!
This message shows that your installation appears to be working correctly.
To generate this message, Docker took the following steps:
 1. The Docker client contacted the Docker daemon.
 2. The Docker daemon pulled the "hello-world" image from the Docker Hub.
    (amd64)
 3. The Docker daemon created a new container from that image which runs the
    executable that produces the output you are currently reading.
 4. The Docker daemon streamed that output to the Docker client, which sent it
    to your terminal.
To try something more ambitious, you can run an Ubuntu container with:
 $ docker run -it ubuntu bash
Share images, automate workflows, and more with a free Docker ID:
 https://hub.docker.com/
For more examples and ideas, visit:
 https://docs.docker.com/get-started/
查看docker版本
docker --version

[root@Brave ~]# docker --version
Docker version 18.09.3, build 774a1f4
如果需要删除旧版本docker:
卸载旧版本Docker
yum remove docker docker-common docker-selinux docker-engine
安装依赖
yum install -y yum-utils device-mapper-persistent-data lvm2
添加docker yum源
yum-config-manager --add-repo https://download.docker.com/linux/centos/docker-ce.repo
可选操作:允许拓展最新的不稳定的repository
yum-config-manager --enable docker-ce-edge
三,安装epel, python-pip, docker-compose, git
[root@Brave ~]# pip install --upgrade pip
yum install epel-release
yum  install -y python-pip
pip  install docker-compose
yum install git
四,获取sentry
获取sentry:
git clone https://github.com/getsentry/onpremise.git
查看README.md文件:https://github.com/getsentry/onpremise
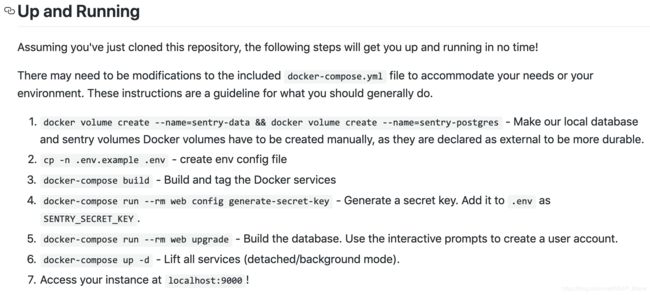
五,安装sentry
按照readme文件中提供的安装顺序
1,创建卷
[root@Brave ~]# cd onpremise/
[root@Brave onpremise]# docker volume create --name=sentry-data && docker volume create --name=sentry-postgres
sentry-data
sentry-postgres
2,创建环境配置
[root@Brave onpremise]# cp -n .env.example .env
3, Build
[root@Brave onpremise]# docker-compose build
smtp uses an image, skipping
memcached uses an image, skipping
redis uses an image, skipping
postgres uses an image, skipping
Building web
Step 1/1 : FROM sentry:9.0-onbuild
9.0-onbuild: Pulling from library/sentry
9a6b35880e8b: Pull complete
674460582e0a: Pull complete
386cf484c54a: Pull complete
51d0c1acc411: Pull complete
3837ec1709c2: Pull complete
ae23f1ab62b4: Pull complete
eb34d5724499: Pull complete
df31b1839354: Pull complete
22c7c59f0acd: Pull complete
1779952a4d4d: Extracting [=========================>                         ]  42.34MB/83.891779952a4d4d: Pull complete
9d10b937047c: Pull complete
02322a97a4ef: Pull complete
f3c4df3c1bf3: Pull complete
1c75000eb3f4: Pull complete
08aaa835fca2: Pull complete
Digest: sha256:43355f22b71a60290d7bb6d7fc8c3ff10f4e8c0b91671eae7ee6571f788b5168
Status: Downloaded newer image for sentry:9.0-onbuild
# Executing 4 build triggers
 ---> Running in 4b0fb39b7b57
DEPRECATION: Python 2.7 will reach the end of its life on January 1st, 2020. Please upgrade your Python as Python 2.7 won't be maintained after that date. A future version of pip will drop support for Python 2.7.
Removing intermediate container 4b0fb39b7b57
 ---> Running in a4469ca541dd
Removing intermediate container a4469ca541dd
 ---> Running in 58404a572913
Removing intermediate container 58404a572913
 ---> f14b4d68be65
Successfully built f14b4d68be65
Successfully tagged onpremise_web:latest
Building cron
Step 1/1 : FROM sentry:9.0-onbuild
# Executing 4 build triggers
 ---> Using cache
 ---> Using cache
 ---> Using cache
 ---> Using cache
 ---> f14b4d68be65
Successfully built f14b4d68be65
Successfully tagged onpremise_cron:latest
Building worker
Step 1/1 : FROM sentry:9.0-onbuild
# Executing 4 build triggers
 ---> Using cache
 ---> Using cache
 ---> Using cache
 ---> Using cache
 ---> f14b4d68be65
Successfully built f14b4d68be65
Successfully tagged onpremise_worker:latest
4,运行
[root@Brave onpremise]# docker-compose run --rm web config generate-secret-key
Creating network "onpremise_default" with the default driver
Pulling smtp (tianon/exim4:)...
latest: Pulling from tianon/exim4
f7e2b70d04ae: Pull complete
f94554f8e5e9: Pull complete
0b20a7a5fe1e: Pull complete
1b1d255fab51: Pull complete
1ec1532dfb6e: Pull complete
e730dab3dedd: Pull complete
Digest: sha256:c9bed662a5533b094cc9ec79b106e46394ff0792415825121c60707794239d8e
Status: Downloaded newer image for tianon/exim4:latest
Pulling memcached (memcached:1.5-alpine)...
1.5-alpine: Pulling from library/memcached
8e402f1a9c57: Pull complete
05d025c9fba2: Pull complete
c8d57c521806: Pull complete
277a6e59b14d: Pull complete
0d38c125a36d: Pull complete
Digest: sha256:66bb959374d67d1cc924413d974978ac8fa54a55ac176692df01959c154a2aac
Status: Downloaded newer image for memcached:1.5-alpine
Pulling redis (redis:3.2-alpine)...
3.2-alpine: Pulling from library/redis
4fe2ade4980c: Pull complete
fb758dc2e038: Pull complete
989f7b0c858b: Pull complete
42b4b9f869ad: Pull complete
17e06138ef20: Pull complete
c0ecd66db81e: Pull complete
Digest: sha256:e9083e10f5f81d350a3f687d582aefd06e114890b03e7f08a447fa1a1f66d967
Status: Downloaded newer image for redis:3.2-alpine
Pulling postgres (postgres:9.5)...
9.5: Pulling from library/postgres
f7e2b70d04ae: Already exists
027ad848ac9c: Pull complete
7c040ef66643: Pull complete
b891079ad2eb: Pull complete
cb64a97e42d9: Pull complete
1b88625f7d89: Pull complete
a6ac0b663e77: Pull complete
594497f0a694: Pull complete
638b4ad08b24: Pull complete
1c26fee5be43: Pull complete
e52342feaaff: Pull complete
d61480a9dced: Pull complete
93147f831ece: Pull complete
e23bc2bf3e45: Pull complete
Digest: sha256:6f0420b0603cb305eb35c691b948058bacd9ae96e3f4bb713fb387ba459577a2
Status: Downloaded newer image for postgres:9.5
Creating onpremise_smtp_1      ... done
Creating onpremise_memcached_1 ... done
Creating onpremise_postgres_1  ... done
Creating onpremise_redis_1     ... done
bj==04k)47l5m=ll%ju!zfmfywn8cow+misgx&w=gh86jg)nmk
拷贝最后一行的秘钥:
bj==04k)47l5m=ll%ju!zfmfywn8cow+misgx&w=gh86jg)nmk
5,替换秘钥
打开文件:
vi docker-compose.yml
添加秘钥到SENTRY_SECRET_KEY:
esc :wq+回车保存退出
6,运行 docker-compose run --rm web upgrade
该过程会要求输入 用户邮箱 和 密码
Would you like to create a user account now? [Y/n]: y
Email: [email protected]
Password:
Repeat for confirmation:
Should this user be a superuser? [y/N]:y
User created: [email protected]
Added to organization: sentry
 - Loading initial data for sentry.
Installed 0 object(s) from 0 fixture(s)
7,docker-compose up -d
onpremise_postgres_1 is up-to-date
onpremise_smtp_1 is up-to-date
onpremise_memcached_1 is up-to-date
onpremise_redis_1 is up-to-date
Creating onpremise_worker_1 ... done
Creating onpremise_cron_1   ... done
Creating onpremise_web_1    … done
六,开放阿里云端口
进入权限组,为sentry开放9000端口

七,访问Sentry
打开http://ip:9000 访问sentry

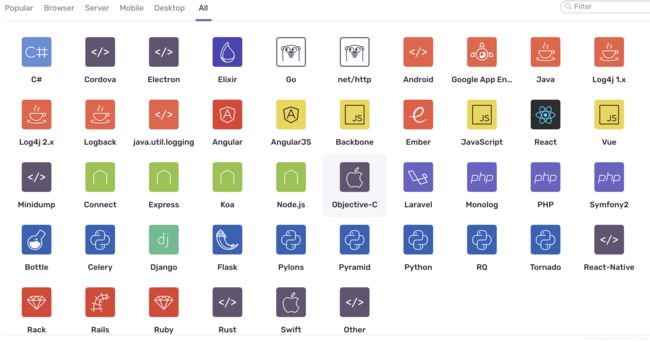
可以看到sentry支持的语言很多
八,结尾
这样,Sentry就安装完成了,对于中小公司的项目Sentry一般是没有问题的
同类产品还可以考虑使用潘多拉,有更好的性能支持扩展和更高的流量

前端有了sentry这样的日志上报平台,
可以对客户端发生的异常做收集,及时处理浏览器差异导致的问题,
有效到获取到应用上线发布后在客户端发生的问题,
及时修复提高程序健壮性,改善用户体验