学习Dagger2笔记:【10】dagger中依赖关系与继承关系
目录
0. 前言
1. 依赖与注入
2. @Inject
3. @Module & @Provides
4. @Component
5. @Qualifier
6. Provider & Lazy
7. @Scope
8. 注入到Set和Map容器
9. Bind系列注解
10. dagger中依赖关系与继承关系
11. dagger.android
目的
通过前面几篇文章,我们了解到@Module代表着一个数据仓库,提供需要注入的依赖实例;而@Component代表着一个桥接类,桥接了被注入对象和其依赖的注入器/工厂类。打开这两个注解的源码,会发现原来还有新的世界等待着我们去探索:@Module.includes、@Module.subcomponents、@Component.dependencies,这些就是本系列压轴中要介绍的内容了
@Module.includes
从此注解的名字就不难猜出它是干什么的了,这里我们假设蓝牙(BlueTooth)模块对于Computer来说也属于一种外设(Device):
@Module(includes = [BlueToothModule::class]) // 表明DeviceModule数据仓库含有BlueToothModule数据仓库,也能够提供BlueTooth实例
class DeviceModule { /* ... */ }

@Component(modules = [/* ... */DeviceModule::class /*, BlueToothModule::class */]) // 在ComputerComponent中,就可以仅依赖DeviceModule而不必再声明对BlueToothModule的依赖了
interface ComputerComponent {
代码上看起来更直观了,@Module.includes就是实现了Module的一种组合关系
@Component.dependencies
我们在Activity中会通过Toast显示应用名,当时是这样写的:
val name = (applicationContext as LearnDaggerApplication).component.getAppName()
Component作为桥接类,不仅能够提供注入的接口(inject()方法),还能直接提供依赖实例(比如上面的getAppName()),那么一个Component需要用到另一个Component提供的依赖,就可以用@Component.dependencies:
// 没有改动ApplicationComponent,这里只是贴出来示例
@ApplicationScope
@Component(modules = [ApplicationModule::class])
interface ApplicationComponent {
    @ApplicationModule.ApplicationName fun getAppName(): String
}

@MonitorScope
@Component(
    modules = [ComputerModule::class, TimestampModule::class, MonitorModule::class, AMDCPUModule::class],
    dependencies = [ApplicationComponent::class] // 添加Component依赖
)
interface CaseActivityComponent {
    /* ... */
    @ApplicationModule.ApplicationName fun getAppName(): String // 添加了Component依赖后,这个Component也有提供应用名这个依赖的能力了

    @Component.Builder
    interface Builder {
        /* ... */
        fun applicationComponent(component: ApplicationComponent): Builder // 别忘了自定义Builder需要为每一个dependencies提供方法
    }
}

// 最后修改一下Activity中的使用逻辑
override fun onCreate(savedInstanceState: Bundle?) {
    /* ... */
    component = DaggerCaseActivityComponent
    .builder()
    .computerModule(ComputerModule(6666, 8888))
    .monitorModule(MonitorModule(this, text_view))
    .applicationComponent((applicationContext as LearnDaggerApplication).component) // 需要依赖另一个Component
    .build()
    component.inject(this)
    /* ... */
    Toast.makeText(this, component.getAppName(), Toast.LENGTH_SHORT).show() // Toast显示应用名
}
理解起来应该也没多大困难,只是要注意一般A依赖B,那么B的生命周期是大于等于A的生命周期(结合上面例子即:ApplicationComponent的生命周期 ≥ ActivityComponent的生命周期),如果反过来(即ApplicationComponent依赖ActivityComponent)则很容易造成内存泄漏问题。所以对于@Component上的@Scope,也需要注意生命周期的问题,即@ApplicationScope的生命周期需要大于@MonitorScope的生命周期。另外因为我们使用了@Scope,所以对于应用名这个String来说,其是一个单例(因为其生命周期与Application绑定,我们也认为其是一个全局单例)
@Subcomponent & @Module.subcomponents
使用
很多文章都将@Subcomponent看做是继承关系,但我个人觉得其更像是内部类形式的组合关系,我们还是以ApplicationComponent和ActivityComponent为例,先看下使用方式:
// 修改CaseActivityComponent,注意这里将@Component改为了@Subcomponent
@MonitorScope
@Subcomponent(modules = [ComputerModule::class, TimestampModule::class, MonitorModule::class, AMDCPUModule::class])
interface CaseActivityComponent {
    @ApplicationModule.ApplicationName fun getAppName(): String // 注意这里代表此Component有提供应用名的能力,但@Subcomponent.modules中其实并没有能提供应用名的数据仓库
    /* ... */
    @Subcomponent.Builder // 注意这里需要改为@Subcomponent
    interface Builder {
        /* ... */
        //        fun applicationComponent(component: ApplicationComponent): Builder // 不再需要提供applicationComponent的set方法
    }
}

// ApplicationModule声明subcomponents
@Module(subcomponents = [CaseActivityComponent::class])
class ApplicationModule(private val appName: String) { /* ... */ }

@ApplicationScope
@Component(modules = [ApplicationModule::class])
interface ApplicationComponent {
    @ApplicationModule.ApplicationName fun getAppName(): String
    fun caseActivityComponentBuilder(): CaseActivityComponent.Builder // 使用了ApplicationModule的ApplicationComponent就有了提供ActivityComponent.Builder实例的能力
}

/* CaseActivity.onCreate()方法 */
override fun onCreate(savedInstanceState: Bundle?) {
    component = (applicationContext as LearnDaggerApplication)
        .component
        .caseActivityComponentBuilder() // 注意这里是通过ApplicationComponent拿到ActivityComponent.Builder的
        .computerModule(ComputerModule(6666, 8888))
        .monitorModule(MonitorModule(this, text_view))
        .build()
    /* ... */
    Toast.makeText(this, component.getAppName(), Toast.LENGTH_SHORT).show() // 此时SubComponent有提供应用名的能力
}
- 可以看到对于
Component的修改不大,需要注意@Subcomponent是没有dependencies属性的,也就是说二者不能混用 - 为何是在
@Module而不是在@Component中声明subcomponents我一开始也不是很理解,但仔细想想@Module是一个可以提供各种数据的数据仓库,而@Component不过是一个桥接类,其桥接的数据实例一定是@Component.modules可以提供的数据类型,那么这里不妨将被@Subcomponent注解的类或其@Subcomponent.Builder注解的Builder类作为一种数据,通过@Module.subcomponents属性表示该Module可以提供这种数据,从而使用此Module的@Component才能够桥接这种数据的实例
源码分析
编译之后你会发现并没有生成我们熟悉的DaggerCaseActivityComponent类,因为现在单独看被@Subcomponent注解的CaseActivityComponent,它的依赖树并不完整(没有数据仓库提供别名为@ApplicationModule.ApplicationName的String类型数据),取而代之的,是在DaggerApplicationComponent中有了新的内部类CaseActivityComponentImpl,我们看下源码:
public final class DaggerApplicationComponent implements ApplicationComponent {
  private Provider<String> provideAppNameProvider;
  /* ... */
  @SuppressWarnings("unchecked")
  private void initialize(final ApplicationModule applicationModuleParam) {
    this.provideAppNameProvider =
        DoubleCheck.provider( // DoubleCheck.provider以实现应用名单例
            ApplicationModule_ProvideAppNameFactory.create(applicationModuleParam));
  }

  @Override
  public String getAppName() { // 每次获取的都是同一个实例
    return provideAppNameProvider.get();
  }

  @Override
  public CaseActivityComponent.Builder caseActivityComponentBuilder() {
    return new CaseActivityComponentBuilder();
  }
  /* ... */
  private final class CaseActivityComponentBuilder implements CaseActivityComponent.Builder { // CaseActivityComponent.Builder也成了其内部类
    /* ... */
    @Override
    public CaseActivityComponent build() {
	 /* ... */
      return new CaseActivityComponentImpl(computerModule, new TimestampModule(), monitorModule);
    }
  }

  private final class CaseActivityComponentImpl implements CaseActivityComponent { // 和之前的DaggerCaseActivityComponent差别不大
    /* ... */
    @Override
    public String getAppName() { // 特别注意这个方法,其用的是外部类的东西
      return DaggerApplicationComponent.this.provideAppNameProvider.get();
    }
    /* ... */
  }
}
其整体上基本上就是把之前的DaggerCaseActivityComponent中的代码搬过来了,特别注意的是CaseActivityComponentImpl.getAppName()这个方法,其使用的是外部类的Provider,这也是为什么我将@Subcomponents看做是内部类的组合关系而不是继承关系的原因
其他补充
使用抽象工厂方法构建@Subcomponent
dagger提供了另一种方法,可以通过@Component直接构建@Subcomponent而不是其Builder:
@ApplicationScope
@Component(modules = [ApplicationModule::class])
interface ApplicationComponent {
    @ApplicationModule.ApplicationName fun getAppName(): String
    fun caseActivityComponent(
        computerModule: ComputerModule,
        monitorModule: MonitorModule
    ): CaseActivityComponent // 这里直接返回CaseActivityComponent实例,而不是CaseActivityComponent.Builder
}
这种写法就没必要声明@Module.subcomponents以及@Subcomponents.Builder了(@Subcomponent还是要的),并且需要将所有dagger不能自动构建出的Module(即没有无参构造函数的Module)都作为参数写到这个抽象工厂方法中(这里估计和@Subcomponent.Factory有关)。不过更推荐使用@Module.subcomponents声明这种内部类组合关系,一方面dagger可以更好地检测出是否真的需要Subcomponnent,另一方面这种更加明显的表示内部类组合关系
与Multibings结合
在以前的文章中我们介绍了使用@IntoSet或@IntoMap注入Set或Map,而对于@Subcomponent,如果@Component也有相同的注入,这些注入内容将会被合并。这里我们将ComputerComponent也改造成@Subcomponent:
// 修改ComputerComponent为@Subcomponent
@Subcomponent(/* ... */)
interface ComputerComponent {
    /* ... */
    @Subcomponent.Builder // 别忘了Builder也要改为@Subcomponent的
    interface Builder { /* ... */ }
}

// 在ApplicationModule上添加Subcomponent的声明
@Module(subcomponents = [CaseActivityComponent::class, ComputerComponent::class])
class ApplicationModule(private val appName: String) { /* ... */ }

class LearnDaggerApplication : Application() {
    /* ... */
    override fun onCreate() {
        /* ... */
        application = this
    }
    companion object { lateinit var application: LearnDaggerApplication } // 方便Computer获得Application实例
}

// Computer.init{}块
abstract class Computer(private val os: String, private val price: Int) {
	/* ... */
	// 这两个是需要被注入的Set和Map容器
    @set:Inject lateinit var disks: Set<Disk>
    @set:Inject lateinit var devices: Map<String, @JvmSuppressWildcards Device>
	/* ... */
    init {
        @Suppress("LeakingThis")
        LearnDaggerApplication
            .application
            .component
            .computerComponentBuilder() // 注意这里使用Application的component获取ComputerComponent.Builder
            .blueToothVersion("2.3")
            .build()
            .inject(this)
    }
}
上面都是使用@Subcomponent的基础操作,接下来我们试着在ApplicationModule中添加一些@IntoSet和@IntoMap:
@Module(subcomponents = [CaseActivityComponent::class, ComputerComponent::class])
class ApplicationModule(private val appName: String) {
	/* ... */
    @[Provides IntoSet]
    fun provideHugeSSD() = Disk(Disk.Type.SSD, Disk.Capacity.HUGE) // 添加一个1024G的SSD

    @[Provides IntoMap StringKey("Spare Sound")] // 再添加一个备用音响
    fun provideSound(): Device = Sound()
}
运行起来后你会发现上面两个对象被注入到Computer.disks和Computer.devices中了,这种特性有其便捷性(为每一个@Subcomponent的Set或Map提供默认注入内容),但也容易变成一个巨坑,使用时还请留意此特性
结合@Scope
@Subcomponent与@Component.dependencies一样,它们被注解的@Scope所表示的生命周期都应该有一个包含关系,即短生命周期对象依赖于长生命周期对象,而不是反过来
区别与补充
区别
无论是使用@Component.dependencies还是@Subcomponent或是本篇文章之前的直接调用ApplicationComponent,我们例子中的目的无非都是复用长生命周期的依赖或数据仓库(例子中的应用名),下面先看一下区别图:
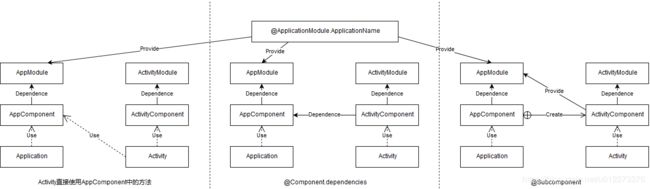
先说中间通过@Component.dependencies建立依赖关系,这里是ActivityComponent对AppComponent的依赖,因此仅依赖AppComponent对外暴露出的数据接口,比如我将TimestampModule写在ApplicationComponent依赖的Module中,而将其从ActivityComponent中去掉,并使用@Component.dependencies建立依赖关系,如下:
@Component(modules = [ApplicationModule::class, TimestampModule::class])
interface ApplicationComponent { /* ... */ }
只有当ApplicationComponent中有一个返回Date类型的方法(意味着ApplicationComponent愿意对外暴露提供这种数据的接口),才可以编译通过
而对于图右边的@Subcomponent则没有这个问题,因为其是一个类似内部类组合关系,类比内部类可以调用到外部类的方法、属性,哪怕是private的,就像@Subcomponent能够使用@Component中的所有数据依赖,哪怕是没有对外公开接口的
最后直接在Activity中使用AppComponent则是最不推荐的,它破坏了dagger架构的封装性,哪怕这是最简单且行之有效的方法
补充
无论是@Component.dependencies还是@Subcomponent,它们对@Module的依赖都不能重复,即对于某一种数据只能对应一个来源,如果有多个来源肯定是需要@Qualifier定义别名以区分的,否则就会有DuplicateBindings的问题
最后强调一下:我一直将@Subcomponent比作类似内部类组合关系,但这里的外部类(@Component)是不能够使用内部类(@Subcomponent)中的未暴露方法的,很多人将@Subcomponent比作继承关系我想更多地是因为子类可以调用父类方法,而父类不知道子类方法的逻辑吧,如果类比成这种继承关系,那么将父类中的数据(@Component.modules)看做protected限制修饰符也许更容易理解
总结
至此,终于介绍完了dagger框架中所有的内容,之前对javax.inject已经有过一次小总结了,这里就只对dagger中相关内容进行一个简单总结:
dagger // dagger包下大多是核心注解
├── Binds.class // 注解@Module中的抽象方法,主要场景是@Inject注解构造函数+有继承关系的对象上
├── BindsInstance.class // 注解@Component.Builder中的方法,用于绑定某个实例以提供数据依赖
├── BindsOptionalOf.class // 需要结合JDK 1.8中的Optional类使用,用于某个对象可空的情景上,在kotlin中实在鸡肋
├── Component$Builder.class // 用于自定义Component的Builder对象
├── Component.class // dagger核心注解之一,用于定义一个桥接类,其中有modules和dependencies两个属性,分别指定依赖的数据仓库 和 依赖的其他桥接类
├── Component$Factory.class // 与Component$Builder作用一样,dagger2.22引入,目前不常用
├── internal // internal包中是一些辅助类,常用于dagger生成的代码中(此包中的内容有所省略,挑重点总结)
│   ├── DoubleCheck.class // 提供了provider()和lazy()两个静态方法,分别用于实现局部单例和dagger.Lazy懒加载数据上
│   ├── MapBuilder.class // 用于辅助@IntoMap等构建Map容器,最终生成的是一个不可修改的Map容器
│   ├── SetBuilder.class // 用于辅助@IntoSet等构建Set容器,最终生成的是一个不可修改的Set容器
├── Lazy.class // dagger.Lazy对象,用于dagger注入懒加载对象
├── MapKey.class // 用于辅助Map注入的自定义Key的注解
├── MembersInjector.class // 注入器的接口
├── Module.class // dagger核心注解之一,用于定义一个数据仓库,其中有includes和subcomponents两个属性,分别指定对其他数据仓库的简单组合 和 对@Subcomponent桥接类的依赖
├── multibindings // multibindings包下是一些有关与dagger的multibing特性的东西
│   ├── ClassKey.class // 用于辅助@IntoMap,指定Map容器的Key类型
│   ├── ElementsIntoSet.class // 用于辅助Set注入,可以将一个已有的Set注入到最终的Set中
│   ├── IntKey.class // 用于辅助@IntoMap,指定Map容器的Key类型
│   ├── IntoMap.class // 用于辅助@IntoMap,指定Map容器的Key类型
│   ├── IntoSet.class // 用于辅助@IntoMap,指定Map容器的Key类型
│   ├── LongKey.class // 用于辅助@IntoMap,指定Map容器的Key类型
│   ├── Multibinds.class // 用于辅助Set和Map注入,适用在编译器不确定是否有注入元素时,使得可以注入空容器
│   └── StringKey.class // 用于辅助@IntoMap,指定Map容器的Key类型
├── Provides.class // dagger核心注解之一,注解@Module中的方法表示此方法可以提供某种类型的数据
├── Reusable.class // dagger中对@Scope的一个特殊实现,目前处于测试阶段,相较于普通的@Scope,@Reusable不用在@Component上再次声明作用域
├── Subcomponent$Builder.class // 用于自定义Subcomponent的Builder对象
├── Subcomponent.class // 用于自定义一个桥接类,此桥接类不能单独使用也不会被dagger单独生成对应Daggerxxx类,需要配合@Module.subcomponent使用
└── Subcomponent$Factory.class // 与Subcomponent$Builder作用一致
“压轴”本意是指倒数第二个节目
没错,本系列还有最后一篇,将会介绍dagger在android中的特殊使用——dagger.android扩展库