Day45——SpringBoot学习笔记part3
SpringBoot学习part3
文章目录
- SpringBoot学习part3
- 整合JDBC使用
- 整合Druid数据源
- 整合Mybatis框架
- Spring Security
- Shiro
- 基本功能
- Shiro架构
- 外部看 Shiro
- 内部看 Shiro
- 快速上手
- 安装ini4Idea插件方法
整合JDBC使用
对于数据访问层,不论是SQL(关系型数据库)还是NOSQL(非关系型数据库),Spring Boot底层都是采用SpringData的方式统一处理。
在官网上寻找spring-boot-starter-data-XXX
进行代码测试:
- 建立个新项目,勾选上Spring web、JDBC API与MySQL Driver 依赖
- 编写配置文件
spring:
  datasource:
    username: root
    password: 123456
    url: jdbc:mysql://localhost:3306/mybatis?serverTimezone=UTC&userUnicode=true&characterEncoding=utf-8
    driver-class-name: com.mysql.cj.jdbc.Driver
- 进行测试
@SpringBootTest
class SpringbootDataJdbcApplicationTests {

    @Autowired
    DataSource dataSource;

    @Test
    void contextLoads() throws SQLException {
        //查看默认数据源
        System.out.println(dataSource.getClass());
        //class com.zaxxer.hikari.HikariDataSource

        //获得数据库连接
        Connection connection = dataSource.getConnection();
        System.out.println(connection);
        //HikariProxyConnection@62803825 wrapping com.mysql.cj.jdbc.ConnectionImpl@5c645b43

        //关闭
        connection.close();
    }
}
在配置文件中ctrl+点击datasources进入源码DataSourceProperties
在项目中看到XXtemplate:这是springboot已经配置好的模板bean,拿来即用,所使用的CRUD都在配置好的模板里
- 写一个jdbcController
@RestController
public class JdbcController {

    @Autowired
    JdbcTemplate jdbcTemplate;//自动配置好的

    //查询数据库的所有信息,没有实体类,数据库中如何获取(使用Map)
    @GetMapping("/userlist")
    public List<Map<String,Object >> userlist(){
        String sql = "select * from user";
        List<Map<String, Object>> list_maps = jdbcTemplate.queryForList(sql);
        return list_maps;

        @GetMapping("/adduser")
    public String addUser(){
        String sql = "insert into mybatis.user(id,name,pwd) value(6,'xiaohuang','111')";
        //自动提交了事务
        jdbcTemplate.update(sql);
        return "add-ok";
    }

    @GetMapping("/updateuser/{id}")
    public String updateUser(@PathVariable("id") int id){
        String sql = "update mybatis.user set name=?,pwd=? where id="+id;
        //封装
        Object[] objects = new Object[2];
        objects[0]="拉拉";
        objects[1]="123111";
        jdbcTemplate.update(sql,objects);
        return "update-ok";
    }

    @GetMapping("/deleteuser/{id}")
    public String deleteUser(@PathVariable("id") int id){
        String sql = "delete from mybatis.user where id=?";

        jdbcTemplate.update(sql,id);
        return "delete-ok";
    }
}
整合Druid数据源
自定义数据源DruidDataSource
Druid 是阿里巴巴开源平台上一个数据库连接池实现,结合了C3P0、DBCP、PROXOOL等数据库连接池的优点,同时加入了日志监控。
它可以很好的监控数据库池连接和SQL的执行情况
- 引入数据源
<dependency>
    <groupId>com.alibabagroupId>
    <artifactId>druidartifactId>
    <version>1.1.21version>
dependency>- 在配置文件中
spring:
  datasource:
    username: root
    password: 123456
    url: jdbc:mysql://localhost:3306/mybatis?serverTimezone=UTC&userUnicode=true&characterEncoding=utf-8
    driver-class-name: com.mysql.cj.jdbc.Driver
type: com.alibaba.druid.pool.DruidDataSource- 测试一下
@Test
    void contextLoads() throws SQLException {
        //查看默认数据源
        System.out.println(dataSource.getClass());
}- 会输出:class com.alibaba.druid.pool.DruidDataSource
配置文件中
spring:
  datasource:
    username: root
    password: 123456
    url: jdbc:mysql://localhost:3306/mybatis?serverTimezone=UTC&userUnicode=true&characterEncoding=utf-8
    driver-class-name: com.mysql.cj.jdbc.Driver
    type: com.alibaba.druid.pool.DruidDataSource

    # springboot默认是不注入这些属性值的,需要自己绑定
    # druid数据源专有配置
    initialSize: 5
    minIdle: 5
    maxActive: 20
    maxWait: 60000
    timeBetweenEvictionRunsMills: 60000
    minEvictableIdleTimeMills: 300000
    validationQuery: SELECT 1 FROM DUAL
    testWhileIdle: true
    testOnBorrow: false
    testOnreturn: false
    poolPrepareStatements: true

    # 配置监控统计拦截的filters,stat:监控统计、log4j:日志记录、wall:防御sql注入
    # 如果允许时报错  java.lang.ClassNotFoundException: org.apache.log4j.Priority
    # 则导入 log4j 依赖即可,Maven 地址: https://mvnrepository.com/artifact/log4j/log4j
    filters: stat,wall,log4j
    maxPoolPreparedStatementPerConnectionSize: 20
    useGlobalDataSourceStat: true
    connectionProperties: druid.stat.mergeSql=true;druid.stat.slowSqlMillis=500
用它的日志功能就需要导入log4j的依赖
<dependency>
    <groupId>log4jgroupId>
    <artifactId>log4jartifactId>
    <version>1.2.17version>
dependency>
强大之处:自定义配置
- 建立config目录
- 建立DruidConfig类进行自己配置(将yml配置文件与这个类绑定起来)
@Configuration
public class DruidConfig {

    @ConfigurationProperties(prefix = "spring.datasource")
    @Bean
    public DataSource druidDataSource(){
        return new DruidDataSource();
    }

    //后台监控功能:  相当于web.xml
    @Bean
    public ServletRegistrationBean statViewServlet(){
        ServletRegistrationBean<StatViewServlet> bean = new ServletRegistrationBean<>(new StatViewServlet(), "/druid/*");

        //后台需要有人登录,账号密码配置
        HashMap<String,String> initParameters = new HashMap<>();

        //增加配置
        initParameters.put("loginUsername","admin"); //登录key,是固定的loginUsername、loginPassword
        initParameters.put("loginPassword","123456");

        //允许谁可以访问
        initParameters.put("allow","");   //空的就是都可,也可以写localhost,允许本地的访问

        //禁止谁能访问
        //  initParameters.put("kuangshen","192.168.1.1");

        bean.setInitParameters(initParameters); //初始化参数
        return bean;
    }
}- 测试:
登录后:
执行一个sql语句: http://localhost:8080/userlist
会在SQl监控中展现:
整合Mybatis框架
需要整合包
<dependency>
    <groupId>org.mybatis.spring.bootgroupId>
    <artifactId>mybatis-spring-boot-starterartifactId>
    <version>2.1.1version>
dependency>- 建立新项目测试,勾选Spring Web、JDBC API和MySQL驱动依赖
官方的依赖都以Spring-boot-starter-XX,而mybatis-spring-boot-starter是自研的
- 配置数据库信息
spring.datasource.username=root
spring.datasource.password=123456
spring.datasource.url=jdbc:mysql://localhost:3306/mybatis?serverTimezone=UTC&userUnicode=true&characterEncoding=utf-8
spring.datasource.driver-class-name=com.mysql.cj.jdbc.Driver

# 整合mybatis
mybatis.type-aliases-package=com.feng.pojo
mybatis.mapper-locations=classpath:mybatis/*.xml
- 建立pojo,写User类(引入了Lombok)
@Data
@NoArgsConstructor
@AllArgsConstructor
public class User {
    private int id;
    private String name;
    private String pwd;
}- 写Usermapper
//这个注解表示了这是一个Mybatis的类,DAO层的
@Mapper
@Repository
public interface Usermapper {

    List<User> queryUserList();

    User queryUserById(int id);

    int addUser();

    int updateUser(User user);

    int deleteUser(int id);
}- 在resources目录下建立mybatis/mapper,写UserMapper.xml
<mapper namespace="com.feng.mapper.Usermapper">

    <select id="queryUserList" resultType="User">
    select * from mybatis.user
  select>

    <select id="queryUserById" resultType="User">
        select * from mybatis.user where id=#{id}
    select>

    <insert id="addUser" parameterType="User">
        insert into mybatis.user (id, name, pwd) values (#{id},#{name},#{pwd})
    insert>

    <update id="updateUser" parameterType="User">
        update  mybatis.user set name=#{name},pwd=#{pwd} where id=#{id}
    update>

    <delete id="deleteUser" parameterType="int">
        delete from mybatis.user where id=#{id}
    delete>

mapper>- Controller层,UserController
@RestController
public class UserController {

    @Autowired
    private Usermapper usermapper;

    @GetMapping("/queryUserList")
    public List<User> queryUserList(){
        List<User> users = usermapper.queryUserList();
        return users;
    }
    @GetMapping("/queryUserById")
    public User queryUserById(){
        User user = usermapper.queryUserById(2);
        return user;
    }


    //添加
    @GetMapping("/addUser")
    public String addUser(){
        usermapper.addUser(new User(7,"欧欧","666"));
        return "OK";
    }

    //修改
    @GetMapping("/updateUser")
    public String updateUser(){
        usermapper.updateUser(new User(7,"七七","9990"));
        return "UpdateOk";
    }

    //删除
    @GetMapping("/deleteUser")
    public String deleteUser(){
        usermapper.deleteUser(7);
        return "deleteOK";
    }
}
浏览器中测试~
流程:
- 导入包
- 配置文件
- mybatis配置
- xml中编写sql
- service层调用dao层
- Controller层调用service层
Spring Security
在Web开发中,安全是第一位的(过滤器、拦截器)
在做网站时,安全需要在什么时候考虑?
当架构一旦确定,不好去加;所以在设计之初就去考虑
springsecurity是针对spring项目的安全框架,是spring boot底层安全模块默认的,可以实现强大的web安全控制。
spring security 的核心功能主要包括:
- 认证 (你是谁)
- 授权 (你能干什么)
- 攻击防护 (防止伪造身份)
须记住的类:
- WebSecurityConfigureAdapter:自定义Security策略
- AuthenticationManagerBuilder:自定义认证策略
- @EnableWebSecurity:开启WebSecurity模式
要使用安全控制:
- 引入spring-boot-starter-security 模块,进行配置
测试例子:
- 新建项目,勾选Springweb,thymeleaf,或者手动添加thymeleaf依赖
<dependency>
    <groupId>org.thymeleafgroupId>
    <artifactId>thymeleaf-spring5artifactId>
dependency>
<dependency>
    <groupId>org.thymeleaf.extrasgroupId>
    <artifactId>thymeleaf-extras-java8timeartifactId>
dependency>- 引入spring security的starter
<dependency>
    <groupId>org.springframework.bootgroupId>
    <artifactId>spring-boot-starter-securityartifactId>
dependency>- 导入一些测试的前端模板,index.html、login.html…
- 写controller
@Controller
public class RouterController {

    @RequestMapping({"/","/index"})
    public String index(){
        return "index";
    }

    @RequestMapping("/tologin")
    public String tologin(){
        return "views/login";
    }

    @RequestMapping("/level1/{id}")
    public String level1(@PathVariable("id")int id){
        return "views/level1/"+id;
    }

    @RequestMapping("/level2/{id}")
    public String level2(@PathVariable("id")int id){
        return "views/level2/"+id;
    }

    @RequestMapping("/level3/{id}")
    public String level3(@PathVariable("id")int id){
        return "views/level3/"+id;
    }
}-
AOP思想
-
建立config目录,编写securityconfig类(认证+权限)
//AOP思想
@EnableWebSecurity
public class SecurityConfig extends WebSecurityConfigurerAdapter {

    //链式编程
    //HttpSecurity安全策略,授权
    @Override
    protected void configure(HttpSecurity http) throws Exception {
        //首页所有人可以访问,但是功能页只有对应有权限的人才能访问
        //请求授权的规则
        http.authorizeRequests()
                .antMatchers("/").permitAll()
                .antMatchers("/level1/**").hasRole("vip1")
                .antMatchers("/level2/**").hasRole("vip2")
                .antMatchers("/level3/**").hasRole("vip3");

        //没有权限默认会到登陆页面,需要开启登陆页面
        http.formLogin();
    }

    //认证
    //报错:java.lang.IllegalArgumentException: There is no PasswordEncoder mapped for the id "null"
    //密码编码:PasswordEncoder
    //在spring security5.0+ 新增很多加密方法,
    @Override
    protected void configure(AuthenticationManagerBuilder auth) throws Exception {

        //这些数据正常在数据库中读取
        auth.inMemoryAuthentication().passwordEncoder(new BCryptPasswordEncoder())
                .withUser("xiaobai").password(new BCryptPasswordEncoder().encode("123456")).roles("vip2","vip3")
                .and()
                .withUser("root").password(new BCryptPasswordEncoder().encode("123456")).roles("vip1","vip2","vip3")
                .and()
                .withUser("guest").password(new BCryptPasswordEncoder().encode("123456")).roles("vip1");
    }
}


//会报错的:
@Override
protected void configure(AuthenticationManagerBuilder auth) throws Exception {
    auth.inMemoryAuthentication()
        .withUser("xiaobai").password("123456").roles("vip2","vip3")
        .and()
        .withUser("root").password("123456").roles("vip1","vip2","vip3")
        .and()
        .withUser("guest").password("123456").roles("vip1");
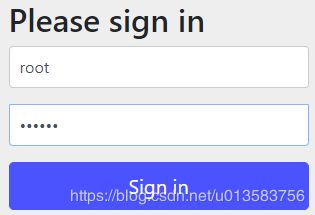
}- 在没有加密码编码时,页面跳转至登录,登陆后会报错。如下图:
在点击功能页,因为有 http.formLogin();,会跳转默认登录页面
点击登录就会报错
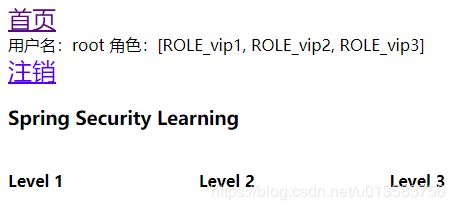
就需要配置密码编码,之后登录就可成功,根据权限进行功能页面的访问。
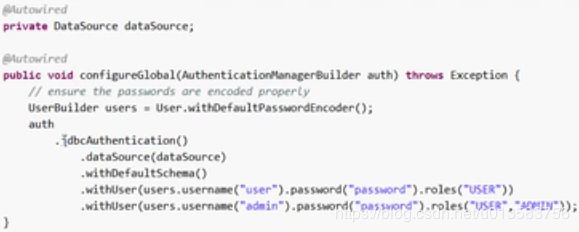
- 要是从数据库中读取用户,需要定义
DataSource
- 注销功能
//注销功能,注销成功之后应该跳到首页
//http.logout();
http.logout().logoutSuccessUrl("/");- 当用户登录后,应该显示与用户权限对应的功能页面,将与他无关的不显示
首先,导入一个包,security-thymeleaf整合包
<dependency>
    <groupId>org.thymeleaf.extrasgroupId>
    <artifactId>thymeleaf-extras-springsecurity4artifactId>
    <version>3.0.4.RELEASEversion>
dependency>
index.html页面加上:
<html lang="en" xmlns:th="http://www.thymeleaf.org"
      xmlns:sec="http://www.thymeleaf.org/thymeleaf-extras-springsecurity4">
<head>
index.html页面更改下:
    <div sec:authorize="!isAuthenticated()">
        <a th:href="@{/tologin}" style="font-size: x-large">登录a>
    div>


    <div sec:authorize="isAuthenticated()">
        <a>
           用户名:<span sec:authentication="name">span>
            角色:<span sec:authentication="principal.authorities">span>
        a>
    div>
    <div sec:authorize="isAuthenticated()">
        <a th:href="@{/logout}" style="font-size: x-large">注销a>
    div>
运行之后,会发现没有生效,,
- 可以将spring boot版本降级
- 可以引入thymeleaf-extras-springsecurity5
此处将spring boot降级至2.0.7,测试
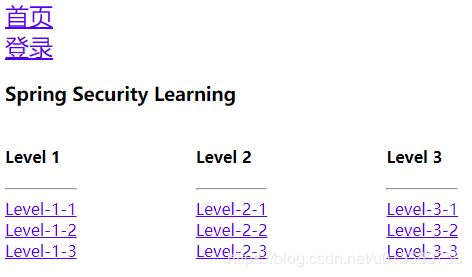
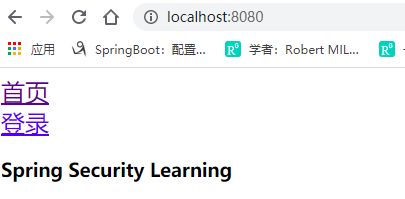
- 未登录时
- 点击level-3-1,跳至登录
- 返回首页查看
- 此时存在注销问题,由于CSRF, 是一种挟制用户在当前已登录的Web应用程序上执行非本意的操作的攻击方法 ,springboot默认开启,所以点击注销出现错误,解决:
//防止网站攻击:因为get请求不安全
http.csrf().disable();//关闭跨站请求伪造功能
http.logout().logoutSuccessUrl("/");-
再次测试,就可使用注销
-
菜单的动态实现,根据用户的角色动态实现
<div sec:authorize="hasRole('vip1')">
    <div style="float:left;margin-right: 10%;vertical-align:bottom;">
        <h4>Level 1h4>
        <hr>
        <div><a th:href="@{/level1/1}">Level-1-1a>div>
        <div><a th:href="@{/level1/2}">Level-1-2a>div>
        <div><a th:href="@{/level1/3}">Level-1-3a>div>
    div>
div>

<div sec:authorize="hasRole('vip2')">...div>
<div sec:authorize="hasRole('vip3')">...div>- 测试:访问localhost:8080,因为没有用户登录,所以没有功能页面
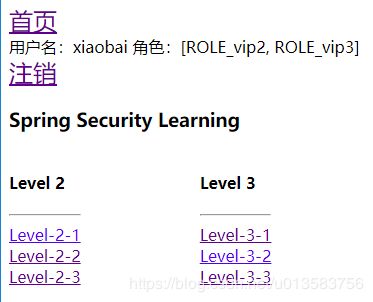
http://localhost:8080/login 进行登录,用户名:xiaobai;密码123456。显示xiaobai这个用户的用户名,角色,所属的功能页
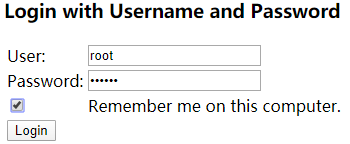
开启登陆页面上记住我的功能:
//开启记住我功能 cookie
http.rememberMe();
关闭浏览器,下次访问首页,还会记得用户信息
![]()
默认保存2周
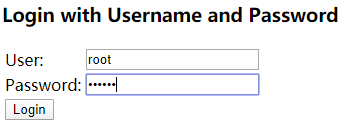
登录页面的定制
- 方式一:
http.formLogin().loginPage("/tologin");<div>
<form th:action="@{/tologin}" method="post">
<tr>
<td>用户名:<input type="text" name="username">td>
tr>
<tr>
<td>密码:<input type="password" name="password">td>
tr>
<div>
<input type="submit">
div>
form>
div>- 方式二:
http.formLogin().loginPage("/tologin").loginProcessingUrl("/login");//登录验证的页面加在后面<div>
<form th:action="@{/login}" method="post">
<tr>
...
tr>
form>
div>在方式二中,若前端传递用户名与密码时,name属性更改与后端不一致,登录之后,接收不到,解决:
http.formLogin().loginPage("/tologin")
    .usernameParameter("user")
    .passwordParameter("pwd")
    .loginProcessingUrl("/login");
自定义记住我功能:
前端登陆页面添加组件
<div>
    <input type="checkbox" name="remember"> 记住我
div>
后端:
//开启记住我功能 cookie;自定义接收前端参数
//http.rememberMe();
http.rememberMe().rememberMeParameter("remember");
测试:
Shiro
与Spring Security很像,除了类不一样,名字不一样
-
功能:
- 认证:用户密码等判断
- 授权:每个用户所属权限
-
权限分类
- 功能权限
- 访问权限
- 菜单权限
解决以前用大量的原生代码所写的拦截器、过滤器:使用框架思想~
Apache Shiro 是一个强大易用的 Java 安全框架,提供了认证、授权、加密和会话管理等功能,对于任何一个应用程序,Shiro 都可以提供全面的安全管理服务。并且相对于其他安全框架,Shiro 要简单的多。
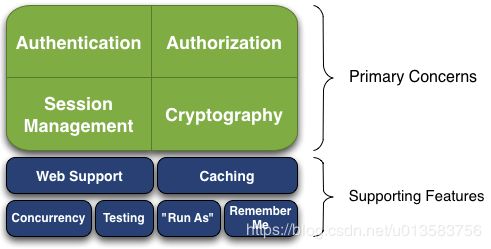
基本功能
- Authentication:身份认证 / 登录,验证用户是不是拥有相应的身份;
- Authorization:授权,即权限验证,验证某个已认证的用户是否拥有某个权限;即判断用户是否能做事情,常见的如:验证某个用户是否拥有某个角色。或者细粒度的验证某个用户对某个资源是否具有某个权限;
- Session Manager:会话管理,即用户登录后就是一次会话,在没有退出之前,它的所有信息都在会话中;会话可以是普通 JavaSE 环境的,也可以是如 Web 环境的;
- Cryptography:加密,保护数据的安全性,如密码加密存储到数据库,而不是明文存储;
- Web Support:Web 支持,可以非常容易的集成到 Web 环境;
- Caching:缓存,比如用户登录后,其用户信息、拥有的角色 / 权限不必每次去查,这样可以提高效率;
- Concurrency:shiro 支持多线程应用的并发验证,即如在一个线程中开启另一个线程,能把权限自动传播过去;
- Testing:提供测试支持;
- Run As:允许一个用户假装为另一个用户(如果他们允许)的身份进行访问;
- Remember Me:记住我,这个是非常常见的功能,即一次登录后,下次再来的话不用登录了
hiro 不会去维护用户、维护权限;这些需要我们自己去设计 / 提供;然后通过相应的接口注入给 Shiro 即可。
Shiro架构
从外部和内部来看看 Shiro 的架构,对于一个好的框架,从外部来看应该具有非常简单易于使用的 API,且 API 契约明确;从内部来看的话,其应该有一个可扩展的架构,即非常容易插入用户自定义实现,因为任何框架都不能满足所有需求。
外部看 Shiro
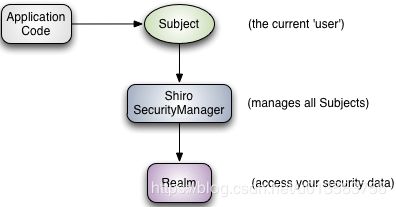
从应用程序角度的来观察如何使用 Shiro 完成工作
应用代码直接交互的对象是 Subject,也就是说 Shiro 的对外 API 核心就是 Subject;
- Subject:主体,代表了当前 “用户”,这个用户不一定是一个具体的人,与当前应用交互的任何东西都是 Subject,如网络爬虫,机器人等;即一个抽象概念;所有 Subject 都绑定到 SecurityManager,与 Subject 的所有交互都会委托给 SecurityManager;可以把 Subject 认为是一个门面;SecurityManager 才是实际的执行者;
- SecurityManager:安全管理器;即所有与安全有关的操作都会与 SecurityManager 交互;且它管理着所有 Subject;可以看出它是 Shiro 的核心,它负责与后边介绍的其他组件进行交互,如果学习过 SpringMVC,你可以把它看成 DispatcherServlet 前端控制器;
- Realm:域,Shiro 从从 Realm 获取安全数据(如用户、角色、权限),就是说 SecurityManager 要验证用户身份,那么它需要从 Realm 获取相应的用户进行比较以确定用户身份是否合法;也需要从 Realm 得到用户相应的角色 / 权限进行验证用户是否能进行操作;可以把 Realm 看成 DataSource,即安全数据源。
最简单的一个 Shiro 应用:
- 应用代码通过 Subject 来进行认证和授权,而 Subject 又委托给 SecurityManager;
- 我们需要给 Shiro 的 SecurityManager 注入 Realm,从而让 SecurityManager 能得到合法的用户及其权限进行判断。
内部看 Shiro
-
Subject:主体,可以看到主体可以是任何可以与应用交互的 “用户”;
-
SecurityManager:相当于 SpringMVC 中的 DispatcherServlet 或者 Struts2 中的 FilterDispatcher;是 Shiro 的心脏;所有具体的交互都通过 SecurityManager 进行控制;它管理着所有 Subject、且负责进行认证和授权、及会话、缓存的管理。
-
Authenticator:认证器,负责主体认证的,这是一个扩展点,如果用户觉得 Shiro 默认的不好,可以自定义实现;其需要认证策略(Authentication Strategy),即什么情况下算用户认证通过了;
-
Authrizer:授权器,或者访问控制器,用来决定主体是否有权限进行相应的操作;即控制着用户能访问应用中的哪些功能;
-
Realm:可以有 1 个或多个 Realm,可以认为是安全实体数据源,即用于获取安全实体的;可以是 JDBC 实现,也可以是 LDAP 实现,或者内存实现等等;由用户提供;注意:Shiro 不知道你的用户 / 权限存储在哪及以何种格式存储;所以我们一般在应用中都需要实现自己的 Realm;
-
SessionManager:如果写过 Servlet 就应该知道 Session 的概念,Session 呢需要有人去管理它的生命周期,这个组件就是 SessionManager;而 Shiro 并不仅仅可以用在 Web 环境,也可以用在如普通的 JavaSE 环境、EJB 等环境;所有呢,Shiro 就抽象了一个自己的 Session 来管理主体与应用之间交互的数据;这样的话,比如我们在 Web 环境用,刚开始是一台 Web 服务器;接着又上了台 EJB 服务器;这时想把两台服务器的会话数据放到一个地方,这个时候就可以实现自己的分布式会话(如把数据放到 Memcached 服务器);
-
SessionDAO:DAO 大家都用过,数据访问对象,用于会话的 CRUD,比如我们想把 Session 保存到数据库,那么可以实现自己的 SessionDAO,通过如 JDBC 写到数据库;比如想把 Session 放到 Memcached 中,可以实现自己的 Memcached SessionDAO;另外 SessionDAO 中可以使用 Cache 进行缓存,以提高性能;
-
CacheManager:缓存控制器,来管理如用户、角色、权限等的缓存的;因为这些数据基本上很少去改变,放到缓存中后可以提高访问的性能
-
Cryptography:密码模块,Shiro 提高了一些常见的加密组件用于如密码加密 / 解密的。
快速上手
官方quickstart: https://github.com/apache/shiro/blob/master/samples/quickstart/
- 创建一个普通maven父工程,删除src
- 创建一个普通的Maven子工程,hello-shiro
- 根据官方文档,导入shrio的依赖
<dependencies>
    <dependency>
        <groupId>org.apache.shirogroupId>
        <artifactId>shiro-coreartifactId>
        <version>1.4.1version>
    dependency>


    <dependency>
        <groupId>org.slf4jgroupId>
        <artifactId>jcl-over-slf4jartifactId>
        <version>1.7.21version>
    dependency>
    <dependency>
        <groupId>org.slf4jgroupId>
        <artifactId>slf4j-log4j12artifactId>
        <version>1.7.21version>
    dependency>
    <dependency>
        <groupId>log4jgroupId>
        <artifactId>log4jartifactId>
        <version>1.2.17version>
    dependency>
dependencies>- 创建log4j.properties文件
log4j.rootLogger=INFO, stdout

log4j.appender.stdout=org.apache.log4j.ConsoleAppender
log4j.appender.stdout.layout=org.apache.log4j.PatternLayout
log4j.appender.stdout.layout.ConversionPattern=%d %p [%c] - %m %n

# General Apache libraries
log4j.logger.org.apache=WARN

# Spring
log4j.logger.org.springframework=WARN

# Default Shiro logging
log4j.logger.org.apache.shiro=INFO

# Disable verbose logging
log4j.logger.org.apache.shiro.util.ThreadContext=WARN
log4j.logger.org.apache.shiro.cache.ehcache.EhCache=WARN
- 创建shiro.ini配置文件
# -----------------------------------------------------------------------------
[users]
# user 'root' with password 'secret' and the 'admin' role
root = secret, admin
# user 'guest' with the password 'guest' and the 'guest' role
guest = guest, guest
# user 'presidentskroob' with password '12345' ("That's the same combination on
# my luggage!!!" ;)), and role 'president'
presidentskroob = 12345, president
# user 'darkhelmet' with password 'ludicrousspeed' and roles 'darklord' and 'schwartz'
darkhelmet = ludicrousspeed, darklord, schwartz
# user 'lonestarr' with password 'vespa' and roles 'goodguy' and 'schwartz'
lonestarr = vespa, goodguy, schwartz

# -----------------------------------------------------------------------------
# Roles with assigned permissions
#
# Each line conforms to the format defined in the
# org.apache.shiro.realm.text.TextConfigurationRealm#setRoleDefinitions JavaDoc
# -----------------------------------------------------------------------------
[roles]
# 'admin' role has all permissions, indicated by the wildcard '*'
admin = *
# The 'schwartz' role can do anything (*) with any lightsaber:
schwartz = lightsaber:*
# The 'goodguy' role is allowed to 'drive' (action) the winnebago (type) with
# license plate 'eagle5' (instance specific id)
goodguy = winnebago:drive:eagle5
- 写快速启动的类
/*
 * Licensed to the Apache Software Foundation (ASF) under one
 * or more contributor license agreements.  See the NOTICE file
 * distributed with this work for additional information
 * regarding copyright ownership.  The ASF licenses this file
 * to you under the Apache License, Version 2.0 (the
 * "License"); you may not use this file except in compliance
 * with the License.  You may obtain a copy of the License at
 *
 *     http://www.apache.org/licenses/LICENSE-2.0
 *
 * Unless required by applicable law or agreed to in writing,
 * software distributed under the License is distributed on an
 * "AS IS" BASIS, WITHOUT WARRANTIES OR CONDITIONS OF ANY
 * KIND, either express or implied.  See the License for the
 * specific language governing permissions and limitations
 * under the License.
 */

import org.apache.shiro.SecurityUtils;
import org.apache.shiro.authc.*;
import org.apache.shiro.config.IniSecurityManagerFactory;
import org.apache.shiro.mgt.SecurityManager;
import org.apache.shiro.session.Session;
import org.apache.shiro.subject.Subject;
import org.apache.shiro.util.Factory;
import org.slf4j.Logger;
import org.slf4j.LoggerFactory;


/**
 * Simple Quickstart application showing how to use Shiro's API.
 *
 * @since 0.9 RC2
 */
public class Quickstart {

    private static final transient Logger log = LoggerFactory.getLogger(Quickstart.class);


    public static void main(String[] args) {

        // The easiest way to create a Shiro SecurityManager with configured
        // realms, users, roles and permissions is to use the simple INI config.
        // We'll do that by using a factory that can ingest a .ini file and
        // return a SecurityManager instance:

        // Use the shiro.ini file at the root of the classpath
        // (file: and url: prefixes load from files and urls respectively):
        Factory<SecurityManager> factory = new IniSecurityManagerFactory("classpath:shiro.ini");
        SecurityManager securityManager = factory.getInstance();

        // for this simple example quickstart, make the SecurityManager
        // accessible as a JVM singleton.  Most applications wouldn't do this
        // and instead rely on their container configuration or web.xml for
        // webapps.  That is outside the scope of this simple quickstart, so
        // we'll just do the bare minimum so you can continue to get a feel
        // for things.
        SecurityUtils.setSecurityManager(securityManager);

        // Now that a simple Shiro environment is set up, let's see what you can do:

        // get the currently executing user:
        Subject currentUser = SecurityUtils.getSubject();

        // Do some stuff with a Session (no need for a web or EJB container!!!)
        Session session = currentUser.getSession();
        session.setAttribute("someKey", "aValue");
        String value = (String) session.getAttribute("someKey");
        if (value.equals("aValue")) {
            log.info("Retrieved the correct value! [" + value + "]");
        }

        // let's login the current user so we can check against roles and permissions:
        if (!currentUser.isAuthenticated()) {
            UsernamePasswordToken token = new UsernamePasswordToken("lonestarr", "vespa");
            token.setRememberMe(true);
            try {
                currentUser.login(token);
            } catch (UnknownAccountException uae) {
                log.info("There is no user with username of " + token.getPrincipal());
            } catch (IncorrectCredentialsException ice) {
                log.info("Password for account " + token.getPrincipal() + " was incorrect!");
            } catch (LockedAccountException lae) {
                log.info("The account for username " + token.getPrincipal() + " is locked.  " +
                        "Please contact your administrator to unlock it.");
            }
            // ... catch more exceptions here (maybe custom ones specific to your application?
            catch (AuthenticationException ae) {
                //unexpected condition?  error?
            }
        }

        //say who they are:
        //print their identifying principal (in this case, a username):
        log.info("User [" + currentUser.getPrincipal() + "] logged in successfully.");

        //test a role:
        if (currentUser.hasRole("schwartz")) {
            log.info("May the Schwartz be with you!");
        } else {
            log.info("Hello, mere mortal.");
        }

        //test a typed permission (not instance-level)
        if (currentUser.isPermitted("lightsaber:wield")) {
            log.info("You may use a lightsaber ring.  Use it wisely.");
        } else {
            log.info("Sorry, lightsaber rings are for schwartz masters only.");
        }

        //a (very powerful) Instance Level permission:
        if (currentUser.isPermitted("winnebago:drive:eagle5")) {
            log.info("You are permitted to 'drive' the winnebago with license plate (id) 'eagle5'.  " +
                    "Here are the keys - have fun!");
        } else {
            log.info("Sorry, you aren't allowed to drive the 'eagle5' winnebago!");
        }

        //all done - log out!
        currentUser.logout();

        System.exit(0);
    }
}- 运行QuickStart,输出
安装ini4Idea插件方法
对于我的IDEA 是2018.1 版本,通过Ctrl+Alt+S,点击plugins,搜索不到ini4Idea这个插件,需要去网站上下载: https://plugins.jetbrains.com/plugin/6981-ini/versions ,我下载了对应Idea版本的插件
- 解压,得到ini4idea-181.3007.10,将里面ini4idea整个目录复制;
- 打开idea安装目录,找到存放插件文件夹
- 将刚复制的ini4idea拷贝进plugins
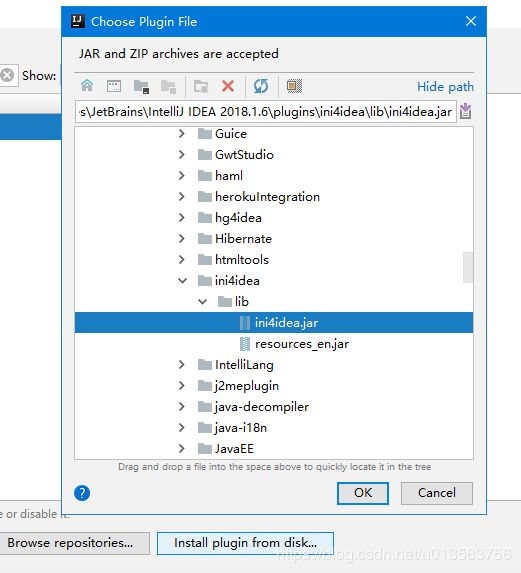
- 进IDEA设置,plugins中,点击install plugin from disk…选择刚才复制进安装目录下plugins中的ini4idea.jar
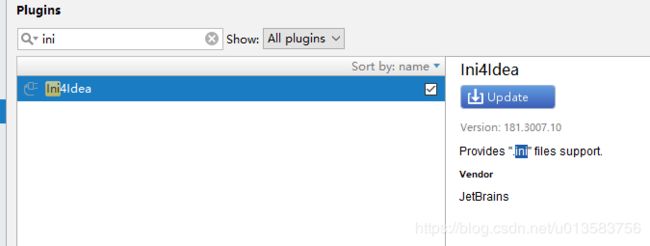
- 重启IDEA后,再在plugins中搜索ini4Idea,发现存在
于是,*.ini文件就可生效





![[外链图片转存失败,源站可能有防盗链机制,建议将图片保存下来直接上传(img-FoknX5GD-1584239505230)(springboot3.assets/1584239131170.png)]](http://img.e-com-net.com/image/info8/967657b53ea94d00a6c2853fabb64c2a.jpg)

