如果在面试中问到RunLoop相关的知识,很有可能也会问到RunLoop与GCD、Autorelease Pool有没有关系,哪些地方用到了GCD、Autorelease Pool等。
So,本文就总结一下RunLoop与GCD和 Autorelease Pool 之间的关系,看看在RunLoop实现中,哪些地方间接或者直接使用、操作到了GCD 和Autorelease Pool。
RunLoop 与GCD 的关系
在RunLoop 中大量使用到了GCD,首先来看一下 CFRrunLoop.c 中引入的其他头文件。
#include // GCD 库
······
然后,如果我们在RunLoop中搜索一下 dispatch,可以搜索出来 130个结果。
接下来,我们来看看RunLoop的主要实现逻辑中哪些地方用到的 GCD。
1.RunLoop 的超时时间
我们在前面介绍过RunLoop 启动在 CoreFoudation 库中有两个API:
//mode默认为defaultMode、超时时间是100亿秒、false
void CFRunLoopRun(void)
// 可以设置mode、runloop 超时时间、是否处理完source立刻返回
SInt32 CFRunLoopRunInMode(CFStringRef modeName, CFTimeInterval seconds, Boolean returnAfterSourceHandled)
而RunLoop 的超时时间就是使用 GCD 中的 dispatch_source_t来实现的,摘自 __CFRunLoopRun中的源码:
    dispatch_source_t timeout_timer = NULL;
    struct __timeout_context *timeout_context = (struct __timeout_context *)malloc(sizeof(*timeout_context));
    if (seconds <= 0.0) { // instant timeout
        seconds = 0.0;
        timeout_context->termTSR = 0ULL;
    } else if (seconds <= TIMER_INTERVAL_LIMIT) { //超时时间在最大限制内,才创建timeout_timer
        dispatch_queue_t queue = pthread_main_np() ? __CFDispatchQueueGetGenericMatchingMain() : __CFDispatchQueueGetGenericBackground();
        timeout_timer = dispatch_source_create(DISPATCH_SOURCE_TYPE_TIMER, 0, 0, queue);
            dispatch_retain(timeout_timer);
        timeout_context->ds = timeout_timer;
        timeout_context->rl = (CFRunLoopRef)CFRetain(rl);
        timeout_context->termTSR = startTSR + __CFTimeIntervalToTSR(seconds);
        dispatch_set_context(timeout_timer, timeout_context); // source gets ownership of context
        dispatch_source_set_event_handler_f(timeout_timer, __CFRunLoopTimeout);
        dispatch_source_set_cancel_handler_f(timeout_timer, __CFRunLoopTimeoutCancel);
        uint64_t ns_at = (uint64_t)((__CFTSRToTimeInterval(startTSR) + seconds) * 1000000000ULL);
        dispatch_source_set_timer(timeout_timer, dispatch_time(1, ns_at), DISPATCH_TIME_FOREVER, 1000ULL);
        dispatch_resume(timeout_timer);
    } else { // infinite timeout
        seconds = 9999999999.0;
        timeout_context->termTSR = UINT64_MAX;
    }
如果看不懂这段源码,可以先去看看GCD API 记录 (三)中的 dispatch_source中的timer
2.执行GCD MainQueue 上的异步任务
在__CFRunLoopRun方法的前几行,有一个变量dispatchPort,它的作用是保存Main_Queue的port,便于后面RunLoop拿到GCD 主线程中的异步任务来执行。
mach_port_name_t dispatchPort = MACH_PORT_NULL;

······
// 只有在MainRunLoop,才会有下面这行赋值,否则 dispatchPort 为NULL
dispatchPort = _dispatch_get_main_queue_port_4CF();
来看一下,RunLoop 是如何执行GCD中MainQueue上的任务的:
// 中间去掉了一些宏判断相关的逻辑代码
if (MACH_PORT_NULL != dispatchPort && !didDispatchPortLastTime) {
    msg = (mach_msg_header_t *)msg_buffer;
    if (__CFRunLoopServiceMachPort(dispatchPort, &msg, sizeof(msg_buffer), &livePort, 0, &voucherState, NULL)) {
        goto handle_msg;
    }
}
didDispatchPortLastTime = false;
看来,关键的逻辑都在 handle_msg中。
handle_msg 中的代码片段:
......
else if (livePort == dispatchPort) {
    CFRUNLOOP_WAKEUP_FOR_DISPATCH();
    __CFRunLoopModeUnlock(rlm);
    __CFRunLoopUnlock(rl);
    _CFSetTSD(__CFTSDKeyIsInGCDMainQ, (void *)6, NULL);
#if DEPLOYMENT_TARGET_WINDOWS
    void *msg = 0;
#endif
    // 获取GCDMainQ上的异步任务并执行
    __CFRUNLOOP_IS_SERVICING_THE_MAIN_DISPATCH_QUEUE__(msg);
    _CFSetTSD(__CFTSDKeyIsInGCDMainQ, (void *)0, NULL);
    __CFRunLoopLock(rl);
    __CFRunLoopModeLock(rlm);
    sourceHandledThisLoop = true;
    didDispatchPortLastTime = true;
}
......

static void __CFRUNLOOP_IS_SERVICING_THE_MAIN_DISPATCH_QUEUE__(void *msg) {
    _dispatch_main_queue_callback_4CF(msg);
    asm __volatile__(""); // thwart tail-call optimization
}
从上面的源码片段可以看出,有判断是否是在MainRunLoop,有获取Main_Queue 的port,并且有调用 Main_Queue 上的回调,这只能是是 GCD 主队列上的异步任务。即:dispatch_async(dispatch_get_main_queue(), block)产生的任务。
RunLoop 与 Autorelease Pool的关系
RunLoop与 Autorelease Pool 有关系么?
有。
我们总是看到有文章说程序启动后,苹果在主线程 RunLoop 里注册了两个 Observer:
第一个 Observer 监视的事件是 Entry(即将进入Loop),其回调内会调用 _objc_autoreleasePoolPush() 创建自动释放池。其 order 是-2147483647,优先级最高,保证创建释放池发生在其他所有回调之前。
第二个 Observer 监视了两个事件: BeforeWaiting(准备进入睡眠) 和 Exit(即将退出Loop),
BeforeWaiting(准备进入睡眠)时调用_objc_autoreleasePoolPop() 和 _objc_autoreleasePoolPush() 释放旧的池并创建新池;
Exit(即将退出Loop) 时调用 _objc_autoreleasePoolPop() 来释放自动释放池。这个 Observer 的 order 是 2147483647,优先级最低,保证其释放池子发生在其他所有回调之后。
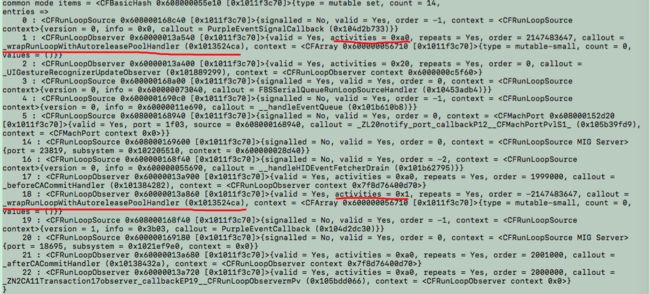
打印出MainRunLoop,可以看到MainRunLoop的 Common mode Items 中就有这两个观察者
由 Activity 的枚举值
/* Run Loop Observer Activities */
typedef CF_OPTIONS(CFOptionFlags, CFRunLoopActivity) {
    kCFRunLoopEntry = (1UL << 0),
    kCFRunLoopBeforeTimers = (1UL << 1),
    kCFRunLoopBeforeSources = (1UL << 2),
    kCFRunLoopBeforeWaiting = (1UL << 5),
    kCFRunLoopAfterWaiting = (1UL << 6),
    kCFRunLoopExit = (1UL << 7),
    kCFRunLoopAllActivities = 0x0FFFFFFFU
};
activities = 0x1,对应的就是kCFRunLoopEntry;
activities = 0xa0,对应的就是kCFRunLoopBeforeWaiting | kCFRunLoopExit 。
可能很多人看了上面的结论和Log 信息,都有这样的疑惑:
_wrapRunLoopWithAutoreleasePoolHandler()内部是如何处理自动释放池的?你说它释放了旧的 AutoreleasePool,并新建了一个新的,就是这样?
目前,我也不知道如何查看_wrapRunLoopWithAutoreleasePoolHandler()中的实现,如果你有方式获取到她的内部信息,或者调用堆栈,欢迎告知我!
AutoreleasePool原理扩展
这一小节,全部摘自黑幕背后的Autorelease,你可以阅读原文,了解更多 Autorelease 内容。
ARC下,我们使用@autoreleasepool{}来使用一个AutoreleasePool,随后编译器将其改写成下面的样子:
void *context = objc_autoreleasePoolPush();
// {}中的代码
objc_autoreleasePoolPop(context);而这两个函数都是对AutoreleasePoolPage的简单封装,所以自动释放机制的核心就在于这个类。
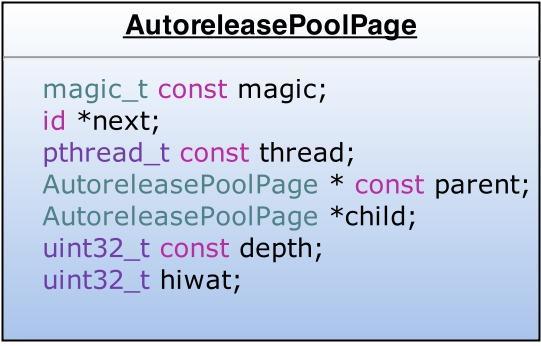
- AutoreleasePool并没有单独的结构,而是由若干个AutoreleasePoolPage以双向链表的形式组合而成(分别对应结构中的parent指针和child指针)
- AutoreleasePool是按线程一一对应的(结构中的thread指针指向当前线程)
- AutoreleasePoolPage每个对象会开辟4096字节内存(也就是虚拟内存一页的大小),除了上面的实例变量所占空间,剩下的空间全部用来储存autorelease对象的地址
- 上面的id *next指针作为游标指向栈顶最新add进来的autorelease对象的下一个位置
- 一个AutoreleasePoolPage的空间被占满时,会新建一个AutoreleasePoolPage对象,连接链表,后来的autorelease对象在新的page加入
所以,若当前线程中只有一个AutoreleasePoolPage对象,并记录了很多autorelease对象地址时内存如下图: 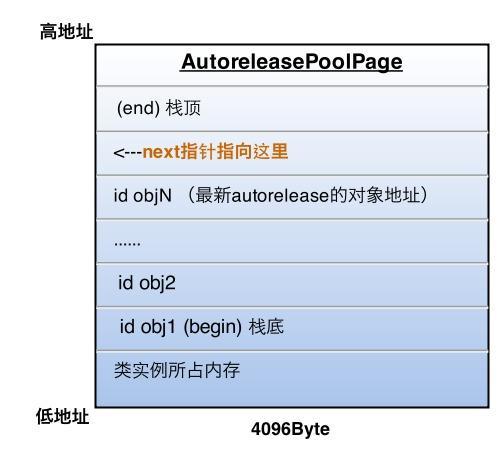
图中的情况,这一页再加入一个autorelease对象就要满了(也就是next指针马上指向栈顶),这时就要执行上面说的操作,建立下一页page对象,与这一页链表连接完成后,新page的next指针被初始化在栈底(begin的位置),然后继续向栈顶添加新对象。
所以,向一个对象发送- autorelease消息,就是将这个对象加入到当前AutoreleasePoolPage的栈顶next指针指向的位置。
* AutoreleasePool释放*
每当进行一次objc_autoreleasePoolPush调用时,runtime向当前的AutoreleasePoolPage中add进一个哨兵对象,值为0(也就是个nil),那么这一个page就变成了下面的样子: 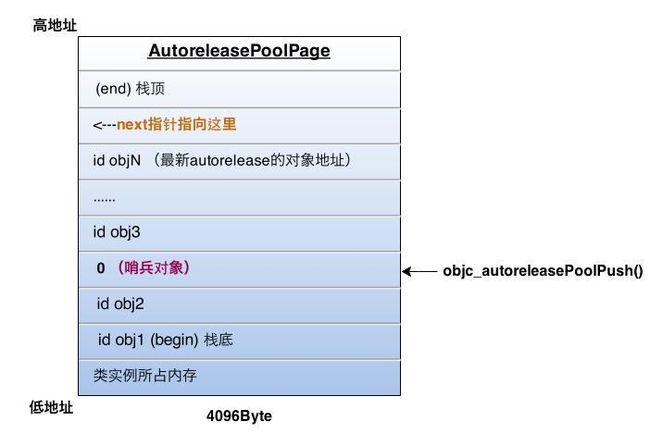
objc_autoreleasePoolPush的返回值正是这个哨兵对象的地址,被objc_autoreleasePoolPop(哨兵对象)作为入参,于是:
- 1.根据传入的哨兵对象地址找到哨兵对象所处的page
- 2.在当前page中,将晚于哨兵对象插入的所有autorelease对象都发送一次- release消息,并向回移动next指针到正确位置
- 3.补充2:从最新加入的对象一直向前清理,可以向前跨越若干个page,直到哨兵所在的page
刚才的objc_autoreleasePoolPop执行后,最终变成了下面的样子: 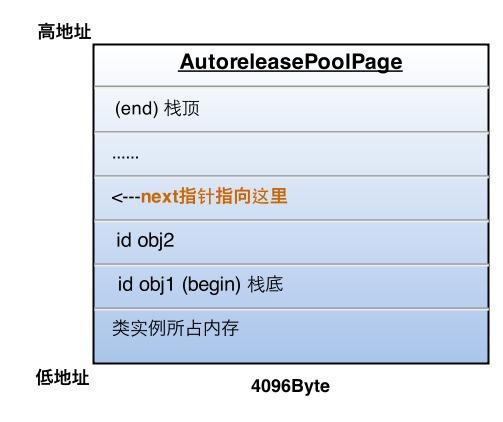
Have Fun!
