从零开始,搭建vue插件的开发环境并将插件开源到npm
Demo
vue组件 - 包含eslint和jest
vue指令
搭建开发环境
一般来说,当我们自己想要写一个vue的组件或插件的时候,会选择使用webpack自己搭建开发环境,而不是使用vue-cli来生产开发环境。
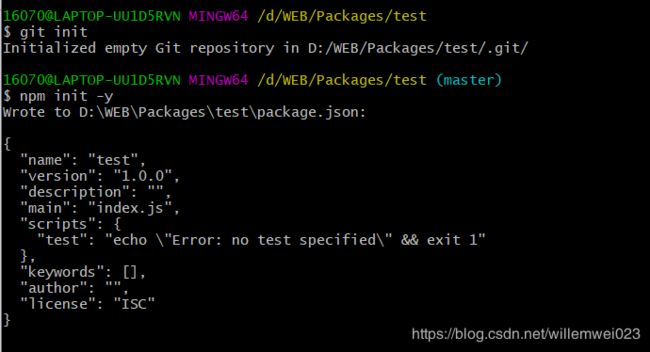
初始化项目
首先使用命令git init初始化一个git仓库用于管理我们的代码,然后使用命令npm init -y来快速生成一个package.json的文件(后续会根据需要进行修改)。如下:
配置基础的webpack
我们的目标是写一个vue的组件或者指令,那么webpack当然是少不了。我们将采用webpack来搭建我们的开发环境。首先使用npm i -D webpack webpack-cli安装webpack和webpack-cli(webpack4之后要求必须安装webpack-cli)到我们的项目中,然后在项目根目录创建一个webpack.config.js的文件和名为src的文件夹。目录结构如下:
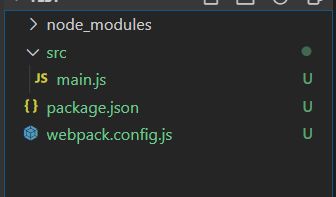
./src/main.js文件将作为我们打包的入口文件。webpack.config.js文件则是我们配置webpack进行打包的文件。这时候就可以在webpack.config.js中写出基本的配置了。
const path = require('path');

const resolve = (p) => {
    return path.resolve(__dirname, p);
}

module.exports = {
    entry: {
        main: resolve('./src/main')
    },
    output: {
        filename: '[name].js',
        path: resolve('./dist')
    },
    mode: 'production'
};
配置过webpack的童鞋就知道上面这个配置明显不能满足我们开发的需求,在开发中,我们会采用ES6的语法,那么就需要引入@babel/core @babel/preset-env babel-loader;需要对vue的代码进行解析,那么就需要引入vue-loader;需要解析vue的模板文件,需要引入vue-template-compiler;使用SCSS预编译来写css的代码,就需要node-sass sass-loader style-loader css-loader;对css自动添加前缀需要引入postcss-loader autoprefixer;对图片、字体文件进行编译则需要引入file-loader;使用mini-css-extract-plugin把项目中的css文件提取到单独的文件中;使用html-webpack-plugin生成html文件模板;
将上述文件引入之后就可以写出这样的配置文件:
// webpack.config.js
const path = require('path');
const vueLoaderPlugin = require('vue-loader/lib/plugin');
const MiniCssExtractPlugin = require('mini-css-extract-plugin');

const resolve = (p) => {
    return path.resolve(__dirname, p);
}

module.exports = {
    entry: {
		main: resolve('./src/main')
    },

    output: {
        filename: '[name].js',
        path: resolve('./dist')
    },

    resolve: {
        extensions: ['.vue', '.js', '.jsx', '.json'],
        alias: {
            '@': resolve('./src/')
        }
    },

    module: {
        rules: [
            {
                test: /\.vue$/,
                use: 'vue-loader'
            },
            {
                test: /\.jsx?$/,
                use: ['babel-loader', 'astroturf/loader'],
                exclude: /node_modules/
            },
            {
                test: /\.(css|scss|sass)$/,
                use: [{
                    loader: MiniCssExtractPlugin.loader,
                    options: {
                        hmr: true,
                        reloadAll: true
                    }
                }, 'css-loader', 'postcss-loader', 'sass-loader']
            },
            {
                test: /\.(eot|svg|ttf|woff|woff2)$/,
                use: ['file-loader']
            }
        ]
    },

    plugins: [
        new htmlWebpackPlugin({
            filename: 'index.html',
            inject: 'body'
        }),
        new vueLoaderPlugin(),
        new MiniCssExtractPlugin({
            filename: 'css/[name].[hash:8].css',
            chunkFilename: 'css/[id].[hash:8].css'
        })
    ]
};
我们配置babel的时候一般会在根目录下面创建一个.babelrc的文件用来单独配置babel相关属性
// .babelrc
{
    "presets": ["@babel/preset-env"]
}
在配置postcss相关属性时,会创建一个postcss.config.js的文件
module.exports = {
  plugins: [require("autoprefixer")]
};
上面的配置基本是一个较为完整的webpack的配置了,可以再./src/main.js中随便写点ES6的代码进行测试。
但是上面的配置也会产生一些问题,如果我们把所有配置都写在一起的话,在生产环境中,我们通常需要对源码进行调试,需要起一个本地的服务器来运行我们的代码。而在生产环境中则不同,需要对代码进行压缩,也不需要本地服务器。所以一般情况下会将开发和生产的配置分开。
分离开发和生产环境的配置
我们会将公共的配置写在一个文件中,然后在生产配置文件和开发配置文件中使用webpack-merge来合并配置。npm i -D webpack-merge安装webpack-merge。
我们先来调整一下项目结构。
-- example /* 开发环境用于测试的目录 */
	|-- App.vue
	|-- index.html
	|-- main.js /* 入口文件 */

-- src /* 要发布的组件或插件的目录 */
	|-- main.js /* 入口文件 */

-- .babelrc /* babel配置文件 */
-- .gitignore
-- package.json
-- postcss.config.js /* postcss配置文件 */
-- README.md
-- webpack.common.conf.js /* 公共的webpack配置文件 */
-- webpack.dev.conf.js /* 开发环境的webpack配置文件 */
-- webpack.prod.conf.js /* 生产环境的webpack配置文件 */
部分代码如下:
公共配置文件:webpack.common.js
const path = require('path');
const vueLoaderPlugin = require('vue-loader/lib/plugin');
const MiniCssExtractPlugin = require('mini-css-extract-plugin');

const resolve = (p) => {
    return path.resolve(__dirname, p);
}

const isProd = process.env.NODE_ENV !== 'development';

module.exports = {
    output: {
        filename: '[name].js',
        path: resolve('./dist')
    },

    resolve: {
        extensions: ['.vue', '.js', '.jsx', '.json'],
        alias: {
            '@': resolve('./src/')
        }
    },

    module: {
        rules: [
            {
                test: /\.vue$/,
                use: 'vue-loader'
            },
            {
                test: /\.jsx?$/,
                use: ['babel-loader'],
                exclude: /node_modules/
            },
            {
                test: /\.(css|scss|sass)$/,
                use: [{
                    loader: MiniCssExtractPlugin.loader,
                    options: {
                        hmr: !isProd,
                        reloadAll: true
                    }
                }, 'css-loader', 'postcss-loader', 'sass-loader']
            },
            {
                test: /\.(eot|svg|ttf|woff|woff2)$/,
                use: ['file-loader']
            }
        ]
    },

    plugins: [
        new vueLoaderPlugin(),
        new MiniCssExtractPlugin({
            filename: 'css/[name].[hash:8].css',
            chunkFilename: 'css/[id].[hash:8].css'
        })
    ]
};
开发配置文件:webpack.dev.conf.js
const merge = require("webpack-merge");
const commonConfig = require("./webpack.common.conf");
const path = require('path');
const htmlWebpackPlugin = require('html-webpack-plugin');

const resolve = (p) => {
    return path.resolve(__dirname, p);
}

module.exports = merge(commonConfig, {
    entry: {
        main: resolve('./example/main')
    },

    mode: 'development',

    devServer: {
        contentBase: resolve('./dist'),
        port: 8090,
        host: '0.0.0.0',
        hot: true,
        hotOnly: false
    },

    devtool: '#cheap-module-source-map',

    plugins: [
        new htmlWebpackPlugin({
            template: resolve('./example/index.html'),
            filename: 'index.html',
            inject: 'body'
        })
    ]
});
生产环境配置文件:webpack.prod.conf.js
const merge = require('webpack-merge');
const commonConfig = require('./webpack.common.conf');
const path = require('path');
const optimizeCssAssetsWebpackPlugin = require('optimize-css-assets-webpack-plugin');
const terserJsPlugin = require('terser-webpack-plugin');

const resolve = p => {
	return path.resolve(__dirname, p);
};

module.exports = merge(commonConfig, {
	entry: {
		main: resolve('./src/main')
	},

	output: {
		libraryTarget: 'commonjs2'
	},
	devtool: false /* 'source-map' */,

	optimization: {
		minimizer: [new optimizeCssAssetsWebpackPlugin(), new terserJsPlugin()]
	},

	mode: 'production'
});
基础的开发环境就搭建好了,现在只需要去修改package.json文件,添加运行脚本,然后在对应的目录文件中写对应的代码并运行就可以了。
...
  "scripts": {
    "dev": "webpack-dev-server --color --config ./webpack.dev.conf", /* 开发环境 */
    "build": "webpack --config ./webpack.prod.conf" /* 生产环境 */
  },
...
完整代码参考:vue指令(vue-words-highlight)
引入eslint和jest配置
在开发开源组件的时候,编写单元测试可以避免很多的bug,可以引入jest对组件进行测试,同时也可以引入eslint对代码进行规范。
eslint
安装eslint和相关loader和插件:npm i -D eslint eslint-config-standard eslint-loader eslint-plugin-import eslint-plugin-node eslint-plugin-promise eslint-plugin-vue,在根目录下新增一个.eslintrc.js文件,对eslint进行配置。
module.exports = {
    "env": {
        "browser": true,
        "es6": true
    },
    "extends": [
        "plugin:vue/essential",
        "standard"
    ],
    "globals": {
        "Atomics": "readonly",
        "SharedArrayBuffer": "readonly"
    },
    "parserOptions": {
        "ecmaVersion": 2018,
        "sourceType": "module"
    },
    "plugins": [
        "vue"
    ],
    "rules": { /* 覆盖eslint的规则 */
        "indent": ["warn", 4],
        "semi": 0,
        "no-undef": 0
    }
};
修改webpack.common.conf.js文件
...
module: {
        rules: [
            {
                enforce: 'pre',
                test: /\.(vue|jsx?)$/,
                use: ['eslint-loader'],
                exclude: /node_modules/
            },
            ...
        ]
 }
 ...
jest
安装相关插件npm i -S babel-jest jest jest-serializer-vue jest-transform-stub jest-watch-typeahead vue-jest
新增jest.config.js文件
// For a detailed explanation regarding each configuration property, visit:
// https://jestjs.io/docs/en/configuration.html
module.exports = {
// All imported modules in your tests should be mocked automatically
// automock: false,
// Stop running tests after `n` failures
// bail: 0,
// Respect "browser" field in package.json when resolving modules
// browser: false,
// The directory where Jest should store its cached dependency information
// cacheDirectory: "C:\\Users\\16070\\AppData\\Local\\Temp\\jest",
// Automatically clear mock calls and instances between every test
// clearMocks: false,
// Indicates whether the coverage information should be collected while executing the test
// collectCoverage: false,
// An array of glob patterns indicating a set of files for which coverage information should be collected
collectCoverageFrom: ['**/*.{js,vue}', '!**/node_modules/**'],
// The directory where Jest should output its coverage files
coverageDirectory: 'coverage',
// An array of regexp pattern strings used to skip coverage collection
// coveragePathIgnorePatterns: [
// "\\\\node_modules\\\\"
// ],
// A list of reporter names that Jest uses when writing coverage reports
coverageReporters: ['json', 'text', 'lcov', 'clover', 'html'],
// An object that configures minimum threshold enforcement for coverage results
// coverageThreshold: undefined,
// A path to a custom dependency extractor
// dependencyExtractor: undefined,
// Make calling deprecated APIs throw helpful error messages
// errorOnDeprecated: false,
// Force coverage collection from ignored files using an array of glob patterns
// forceCoverageMatch: [],
// A path to a module which exports an async function that is triggered once before all test suites
// globalSetup: undefined,
// A path to a module which exports an async function that is triggered once after all test suites
// globalTeardown: undefined,
// A set of global variables that need to be available in all test environments
// globals: {},
// The maximum amount of workers used to run your tests. Can be specified as % or a number. E.g. maxWorkers: 10% will use 10% of your CPU amount + 1 as the maximum worker number. maxWorkers: 2 will use a maximum of 2 workers.
// maxWorkers: "50%",
// An array of directory names to be searched recursively up from the requiring module's location
// moduleDirectories: [
// "node_modules"
// ],
// An array of file extensions your modules use
moduleFileExtensions: ['js', 'json', 'jsx', 'ts', 'tsx', 'node', 'vue'],
// A map from regular expressions to module names or to arrays of module names that allow to stub out resources with a single module
moduleNameMapper: {
'^@/(.*)$': '/src/$1' ,
'^.+.(css|styl|less|sass|scss|png|jpg|ttf|woff|woff2)$':
'jest-transform-stub'
},
// An array of regexp pattern strings, matched against all module paths before considered 'visible' to the module loader
modulePathIgnorePatterns: ['/node_modules/'],
// Activates notifications for test results
// notify: false,
// An enum that specifies notification mode. Requires { notify: true }
// notifyMode: "failure-change",
// A preset that is used as a base for Jest's configuration
// preset: undefined,
// Run tests from one or more projects
// projects: undefined,
// Use this configuration option to add custom reporters to Jest
// reporters: undefined,
// Automatically reset mock state between every test
// resetMocks: false,
// Reset the module registry before running each individual test
// resetModules: false,
// A path to a custom resolver
// resolver: undefined,
// Automatically restore mock state between every test
// restoreMocks: false,
// The root directory that Jest should scan for tests and modules within
// rootDir: undefined,
// A list of paths to directories that Jest should use to search for files in
// roots: [
// ""
// ],
// Allows you to use a custom runner instead of Jest's default test runner
// runner: "jest-runner",
// The paths to modules that run some code to configure or set up the testing environment before each test
// setupFiles: [],
// A list of paths to modules that run some code to configure or set up the testing framework before each test
// setupFilesAfterEnv: [],
// A list of paths to snapshot serializer modules Jest should use for snapshot testing
snapshotSerializers: ['/node_modules/jest-serializer-vue' ],
// The test environment that will be used for testing
// testEnvironment: "jest-environment-jsdom",
// Options that will be passed to the testEnvironment
// testEnvironmentOptions: {},
// Adds a location field to test results
// testLocationInResults: false,
// The glob patterns Jest uses to detect test files
testMatch: [
'**/__tests__/**/*.[jt]s?(x)'
],
// An array of regexp pattern strings that are matched against all test paths, matched tests are skipped
// testPathIgnorePatterns: [
// "\\\\node_modules\\\\"
// ],
// The regexp pattern or array of patterns that Jest uses to detect test files
// testRegex: [],
// This option allows the use of a custom results processor
// testResultsProcessor: undefined,
// This option allows use of a custom test runner
// testRunner: "jasmine2",
// This option sets the URL for the jsdom environment. It is reflected in properties such as location.href
testURL: 'http://localhost',
// Setting this value to "fake" allows the use of fake timers for functions such as "setTimeout"
// timers: "real",
// A map from regular expressions to paths to transformers
transform: {
'^.+\\.vue$': 'vue-jest',
'^.+\\.js$': 'babel-jest',
'.+\\.(css|styl|less|sass|scss|png|jpg|ttf|woff|woff2)$':
'jest-transform-stub'
},
// An array of regexp pattern strings that are matched against all source file paths, matched files will skip transformation
transformIgnorePatterns: ['/node_modules/'],
// An array of regexp pattern strings that are matched against all modules before the module loader will automatically return a mock for them
// unmockedModulePathPatterns: undefined,
// Indicates whether each individual test should be reported during the run
// verbose: undefined,
// An array of regexp patterns that are matched against all source file paths before re-running tests in watch mode
// watchPathIgnorePatterns: [],
// Whether to use watchman for file crawling
// watchman: true,
watchPlugins: [
'jest-watch-typeahead/filename',
'jest-watch-typeahead/testname'
]
};
在根目录下新增一个__tests__文件夹,用于存放测试代码。安装vue官方提供的@vue/test-utils来编写测试用例。示例:
import { shallowMount } from '@vue/test-utils';
import PopMessage from '@/components/PopMessage';
import { findFromWrapper } from '@/utils/test';

describe('Component - PopMessage', () => {
    it('应该存在一个默认插槽', () => {
        const wrapper = shallowMount(PopMessage, {
            slots: {
                default: ''
            }
        });

        const popDefault = findFromWrapper(wrapper, 'pop-desc');

        expect(popDefault.length).toBe(1);
    });

    it('不传入placement时,默认有一个classname是pop-left', () => {
        const wrapper = shallowMount(PopMessage);
        const popMessage = findFromWrapper(wrapper, 'pop-message').at(0);
        expect(popMessage.classes('pop-left')).toBe(true);
    });

    it('placement为right时,存在一个classname为pop-right', () => {
        const wrapper = shallowMount(PopMessage, {
            propsData: { placement: 'right' }
        });
        const popMessage = findFromWrapper(wrapper, 'pop-message').at(0);
        expect(popMessage.classes('pop-right')).toBe(true);
    });

    it('使用maxWidth控制最长宽度', () => {
        const wrapper = shallowMount(PopMessage, {
            propsData: {
                maxWidth: 200
            }
        });
        const popMessage = findFromWrapper(wrapper, 'pop-message').at(0);
        const styles = popMessage.attributes('style') || '';

        expect(/max-width: ?200px;?/.test(styles || '')).toBeTruthy();
    });

    it('生成快照,确定结构', () => {
        const wrapper = shallowMount(PopMessage, {
            propsData: {
                placement: 'right',
                maxWidth: 200
            },
            slots: {
                default: 'Hello'
            }
        });

        expect(wrapper).toMatchSnapshot();
    });
});
最后,对package.json文件中的scripts进行修改。
...
  "scripts": {
    "dev": "webpack-dev-server --color --config ./webpack.dev.conf",
    "build": "webpack --config ./webpack.prod.conf",
    "test": "jest",
    "lint": "eslint -c ./.eslintrc.js ./src --ext .js,.vue ./example --ext .js,.vue -f table --fix"
  },
  ...
到这里为止,vue组件开发的环境就搭建完毕。可以开始编写愉快的代码了。
完整示例:vue组件 - 包含eslint和jest的配置
发布到npm
在你编写并测试你想要发布的组件之后,就可以做发布的准备了,首先你需要写一个README.md来详细介绍你的组件的用途和使用,然后需要修改package.json。下面是我之前写的一个发布到npm上的组件的package.json文件。
{
"name": "vue-wechat-pc", /* 你将要发布的npm包的名字 */
"version": "0.0.12", /* 当前版本,确定最初版本之后,后面再修改版本不用手动修改,后面会提到 */
"description": "PC WeChat display component for vue.js.", /* 项目的简要描述 */
"main": "dist/main.js", /* 入口文件 */
"directories": {
"example": "example"
},
"scripts": {
"dev": "webpack-dev-server --color --config ./webpack.dev.conf",
"build": "webpack --config ./webpack.prod.conf",
"test": "jest",
"lint": "eslint -c ./.eslintrc.js ./src --ext .js,.vue ./example --ext .js,.vue -f table --fix"
},
"repository": { /* git仓库 */
"type": "git",
"url": "git+https://github.com/M-FE/vue-wechat-pc.git"
},
"keywords": [ /* 关键词 */
"vue.js",
"pc",
"wechat",
"component"
],
"files": [ /* 这个很重要,定义发布到npm的文件,其他文件不会发布到npm */
"dist"
],
"devDependencies": {
...
},
"dependencies": {
"moment": "^2.24.0",
"vue": "^2.6.11"
},
"author": "Willem Wei " , /* 作者名 */
"license": "ISC",
"homepage": "https://github.com/M-FE/vue-wechat-pc#readme", /* 主页 */
...
}
当你编写好package.json文件之后,使用git提交一个commit,确保暂存区和编辑区都不存在内容。你需要去npm官网注册一个账号,然后在命令行输入npm login输入你刚注册的账号和密码,正确无误之后,就可以输入npm publish将写好的组件发布到npm,成功之后,就可以在你的npm主页上看到了。
当你修改包的代码并提交一个commit需要发布到npm时,首先修改需要修改包的版本号,可以使用以下几个命令,他会自动更新package.json里面的version值并提交一个commit。
npm version [ | major | minor | patch | premajor | preminor | prepatch | prerelease | from-git]
- major:主版本号
- minor:次版本号
- patch:补丁号
- premajor:预备主版本
- prepatch:预备次版本
- prerelease:预发布版本
总结
以上就是全部的配置和发布的流程。简单来说就是使用git进行代码管理,使用webpack对文件进行打包,使用eslint规范代码,使用jest编写单元测试,最后使用npm开源我们的代码。
希望对各位有所帮助~