前两天我们介绍了,基本使用和如何查看源码,今天我们正式进入源码分析流程。
流程图
首先我们先看一看它的请求流程,在Okhttp3中请求是基于拦截器原理,源代码如下:
源码路径:okhttp3/RealCall.java
// 开始执行整个请求
Response getResponseWithInterceptorChain() throws IOException {
  // Build a full stack of interceptors.
  // 拦截器栈
  List interceptors = new ArrayList<>();
  // 前文说过的 普通拦截器
  interceptors.addAll(client.interceptors());
  // 重试拦截器,网络错误、请求失败等
  interceptors.add(retryAndFollowUpInterceptor);
  // 桥接拦截器,主要是重构请求头即header
  interceptors.add(new BridgeInterceptor(client.cookieJar()));
  // 缓存拦截器
  interceptors.add(newCacheInterceptor(client.internalCache()));
  // 连接拦截器,连接服务器,https包装
  interceptors.add(new ConnectInterceptor(client));
  // 网络拦截器,websockt不支持,同样是自定义
  if (!forWebSocket) {
    interceptors.addAll(client.networkInterceptors());
  }
  // 服务拦截器,主要是发送(write、input)、读取(read、output)数据
  interceptors.add(new CallServerInterceptor(forWebSocket));

  // 开启调用链
  Interceptor.Chain chain = new RealInterceptorChain(
      interceptors, null, null, null, 0, originalRequest);
  return chain.proceed(originalRequest);
}
研究Okhttp3的源码,从此处开始,一个一个拦截器,读懂即可。不得不说这种方式真的很棒,清晰明了。
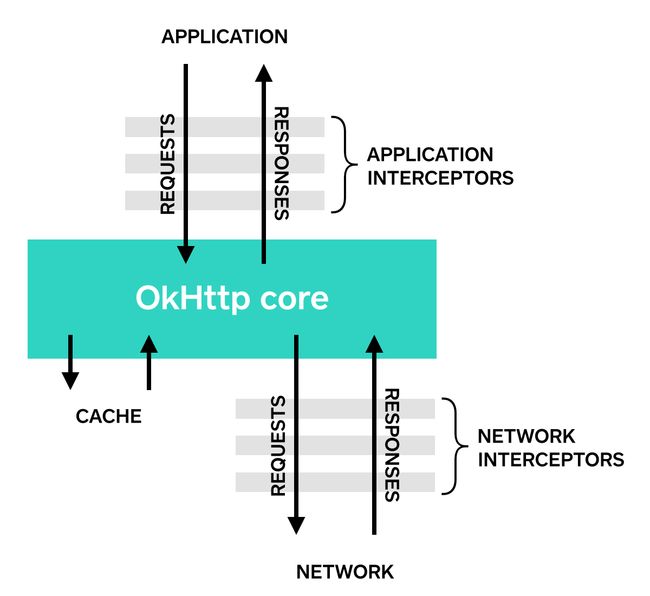
整体框架图(图片来源网络,感谢作者):
通过上图,想必对Okhttp3的实现方式,已经有了基本的认识下面我们就一步一具体分析。
构造HttpClient
HttpClient采用了建造者设计模式来实例化。本身有多个字段用于全局对象,比去Cache、Dns等
-
静态代码块构造全局缓存
static {
  Internal.instance = new Internal() {
    // 略
    @Override public void setCache(OkHttpClient.Builder builder, InternalCache internalCache) {
      // 写入缓存,指的是响应数据缓存
      builder.setInternalCache(internalCache);
    }

    // 从缓存中获取有效的连接,仅支持Http/2, 本质就是从内存的ConnectiongPol中的Deque读取
    @Override public RealConnection get(
        ConnectionPool pool, Address address, StreamAllocation streamAllocation) {
      return pool.get(address, streamAllocation);
    }
// 将连接缓存到连接池中
    @Override public void put(ConnectionPool pool, RealConnection connection) {
      pool.put(connection);
    }

    // 线路的缓存,多host多ip的青款
    @Override public RouteDatabase routeDatabase(ConnectionPool connectionPool) {
      return connectionPool.routeDatabase;
    }

    // 略
}

  // 此处有很多种数据缓存处理,不了解并不影响代码分析,如有兴趣可自行研究
Dispatcher, 分发请求,内部是有一个ThreadPoolExecutor
Proxy, 代理连接,分三种类型直接(DIRECT)、Http(http)、SOCKS。
ProxySelector,线路选择器,对应Okhttp的一大特点,自行线路选择,找到合适的连接
Cache, 真正的缓存实现
SSLSocketFactory, Https的支持
ConnectionPool, 连接池
Dns,dns解析(Java实现)
其他,如超时时间等
发起请求
我们都知道一个请求有多部分组成,同样Okhttp3创建一个请求也要多部分。
- 构造请求头
- 构造请求体
- 发送一个请求
通过以上三步我们就可以完成一次请求。
请求头
header并非每个请求都需要,要看与服务端是如何定义的,通常一个请求会默认一些头,比如Content-Type,Accept-Encoding,Connection等对应http协议
Header本质上就是一个Map,只是在封装了一层而已,但是Okhttp3的实现不是这样,而是一个String数据,key + value的形式,即一个头占用数组的两位:
每一个色块对应一个header,代码如下:
 // 源码路径 okhttp3/Headers.java

public final class Headers {
  private final String[] namesAndValues;
  // 略
  Builder addLenient(String name, String value) {
    namesAndValues.add(name);
    namesAndValues.add(value.trim());
    return this;
  }
  // 略
 }
请求体
请求体有多种形式,对应的父类是RequestBody,有文件形式、Json等,MediaType决定了是何种形式,通常我们用的是FromBody和MultipartBody
-
FromBody
public final class FormBody extends RequestBody { private static final MediaType CONTENT_TYPE = MediaType.parse("application/x-www-form-urlencoded"); private final ListencodedNames; // 参数名称 private final List encodedValues; // 参数值 // 构造者 public static final class Builder { private final List names = new ArrayList<>(); private final List values = new ArrayList<>(); public Builder add(String name, String value) { names.add(HttpUrl.canonicalize(name, FORM_ENCODE_SET, false, false, true, true)); values.add(HttpUrl.canonicalize(value, FORM_ENCODE_SET, false, false, true, true)); return this; } //构造一个实例 public FormBody build() { return new FormBody(names, values); } } } -
MultipartBody
MultipartBody原理基本一致,区别在于他可以发送表单的同时也可以发送文件数据,再次不在赘述。
构造一个Request
有了上面两个步骤,接下了就自然而让产生一个Request,顾名思义它就是对请求的封装,包括请求方式,请求头,请求体,请求路径等,源代码码也是比较简单,一看即明白。
public final class Request {
  final HttpUrl url;
  final String method;
  final Headers headers;
  final RequestBody body;
  final Object tag;
 }
Call
有了准备工作,现在我们就要发射了,Call是一个概念的封装,就像一列火车,蓄势待发,在铁轨停靠准备出发一样
Call是一个接口,实现类只有一个RealCall,上面我们提到的流程就是在RealCall中。
public interface Call extends Cloneable {
  Request request(); // 获取请求封装的数据
  Response execute() throws IOException; // 同步执行
  void enqueue(Callback responseCallback); // 异步执行
  void cancel(); // 取消请求
  boolean isExecuted();
  boolean isCanceled();
  Call clone();
  interface Factory {
    Call newCall(Request request);
  }
}
// 重点看看中文注释处即可
final class RealCall implements Call {

  final OkHttpClient client;
  // 重试拦截器
  final RetryAndFollowUpInterceptor retryAndFollowUpInterceptor;

  /** The application's original request unadulterated by redirects or auth headers. */
  final Request originalRequest;
  final boolean forWebSocket;

  // Guarded by this.
  private boolean executed;

  RealCall(OkHttpClient client, Request originalRequest, boolean forWebSocket) {
    this.client = client;
    this.originalRequest = originalRequest;
    this.forWebSocket = forWebSocket;
    this.retryAndFollowUpInterceptor = new RetryAndFollowUpInterceptor(client, forWebSocket);
  }

  @Override public Request request() {
    return originalRequest;
  }

  // 同步执行的实现
  @Override public Response execute() throws IOException {
    // 一个call只能执行一次
    synchronized (this) {
      if (executed) throw new IllegalStateException("Already Executed");
      executed = true;
    }
    captureCallStackTrace();
    try {
      // 将请求放在,请求池中执行,此处会立即执行
      client.dispatcher().executed(this);
      // 获取结果,即执行多个链接器的调用链
      Response result = getResponseWithInterceptorChain();
      if (result == null) throw new IOException("Canceled");
      return result;
    } finally {
      client.dispatcher().finished(this);
    }
  }

  private void captureCallStackTrace() {
    Object callStackTrace = Platform.get().getStackTraceForCloseable("response.body().close()");
    retryAndFollowUpInterceptor.setCallStackTrace(callStackTrace);
  }

  //  异步执行,不管行返回结果
  @Override public void enqueue(Callback responseCallback) {
    synchronized (this) {
      if (executed) throw new IllegalStateException("Already Executed");
      executed = true;
    }
    captureCallStackTrace();
    // AsyncCall是一个Runnable的实现类,同时一个是RealCall的内部类
    client.dispatcher().enqueue(new AsyncCall(responseCallback));
  }

  @Override public void cancel() {
    retryAndFollowUpInterceptor.cancel();
  }

  @Override public synchronized boolean isExecuted() {
    return executed;
  }

  @Override public boolean isCanceled() {
    return retryAndFollowUpInterceptor.isCanceled();
  }

  @SuppressWarnings("CloneDoesntCallSuperClone") // We are a final type & this saves clearing state.
  @Override public RealCall clone() {
    return new RealCall(client, originalRequest, forWebSocket);
  }

  StreamAllocation streamAllocation() {
    return retryAndFollowUpInterceptor.streamAllocation();
  }

  // 异步执行的线程封装,Android基本就是这里了
  final class AsyncCall extends NamedRunnable {
    private final Callback responseCallback;

    AsyncCall(Callback responseCallback) {
      super("OkHttp %s", redactedUrl());
      this.responseCallback = responseCallback;
    }

    String host() {
      return originalRequest.url().host();
    }

    Request request() {
      return originalRequest;
    }

    RealCall get() {
      return RealCall.this;
    }

    @Override protected void execute() {
      boolean signalledCallback = false;
      try {
        // 执行调用链,是不是很重要,哈哈
        Response response = getResponseWithInterceptorChain();
        // 处理回掉
        if (retryAndFollowUpInterceptor.isCanceled()) {
          signalledCallback = true;
          responseCallback.onFailure(RealCall.this, new IOException("Canceled"));
        } else {
          signalledCallback = true;
          responseCallback.onResponse(RealCall.this, response);
        }
      } catch (IOException e) {
        if (signalledCallback) {
          // Do not signal the callback twice!
          Platform.get().log(INFO, "Callback failure for " + toLoggableString(), e);
        } else {
          responseCallback.onFailure(RealCall.this, e);
        }
      } finally {
        client.dispatcher().finished(this);
      }
    }
  }

  /**
   * Returns a string that describes this call. Doesn't include a full URL as that might contain
   * sensitive information.
   */
  String toLoggableString() {
    return (isCanceled() ? "canceled " : "")
        + (forWebSocket ? "web socket" : "call")
        + " to " + redactedUrl();
  }

  String redactedUrl() {
    return originalRequest.url().redact();
  }
    // 最重要的入口了
    // 最重要的入口了
    // 最重要的入口了
  // 重要事情说三遍
  Response getResponseWithInterceptorChain() throws IOException {
    // Build a full stack of interceptors.
    List interceptors = new ArrayList<>();
    interceptors.addAll(client.interceptors());
    interceptors.add(retryAndFollowUpInterceptor);
    interceptors.add(new BridgeInterceptor(client.cookieJar()));
    interceptors.add(new CacheInterceptor(client.internalCache()));
    interceptors.add(new ConnectInterceptor(client));
    if (!forWebSocket) {
      interceptors.addAll(client.networkInterceptors());
    }
    interceptors.add(new CallServerInterceptor(forWebSocket));

    // 脊髓代码开始处
    Interceptor.Chain chain = new RealInterceptorChain(
        interceptors, null, null, null, 0, originalRequest);
    return chain.proceed(originalRequest);
  }
}
看来上面的代码,是不是被人家的想法折服。更精妙的还在后面呢,不要急。到此,一个请求已经完成,发送和接收,(不关心内部实现的话)。接下来我们再来看看,连接器是如何工作的。
拦截器工作原理
Interceptor是一个接口,主要是对请求和响应的处理,而实现拦截器调用链的是其内部接口Chain
public interface Interceptor {
// 管拦截
  Response intercept(Chain chain) throws IOException;

  interface Chain {
    Request request();

    // 管分发,前行
    Response proceed(Request request) throws IOException;

    Connection connection();
  }
}
Interceptor.Chain的实现类只有一个RealInterceptorChain,也是处理调用过程的实现,其内部有个List装载了所有拦截器,大家想必也猜到了,对,就是迭代,当然也不是简简单单的接待了事。让我们看看源码实现。
// RealCall.getResponseWithInterceptorChain()中创建了一个实例
public final class RealInterceptorChain implements Interceptor.Chain {
  // RealCall.getResponseWithInterceptorChain()中已经赋值
   private final Request request;
  private final List interceptors;

  // 下面属性会在执行拦截器的过程中一步一步赋值
  private final StreamAllocation streamAllocation;
  private final HttpCodec httpCodec;
  private final Connection connection;

  private final int index;
  private int calls;

  public RealInterceptorChain(List interceptors, StreamAllocation streamAllocation,
      HttpCodec httpCodec, Connection connection, int index, Request request) {
    this.interceptors = interceptors;
    this.connection = connection;
    this.streamAllocation = streamAllocation;
    this.httpCodec = httpCodec;
    this.index = index;
    this.request = request;
  }

  // 实现了父类proceed方法
  @Override public Response proceed(Request request) throws IOException {
    return proceed(request, streamAllocation, httpCodec, connection);
  }

  // 处理调用
  public Response proceed(Request request, StreamAllocation streamAllocation, HttpCodec httpCodec,
      Connection connection) throws IOException {
    // 1、迭代拦截器集合
    if (index >= interceptors.size()) throw new AssertionError();
    calls++;
    // 略。。。
    // 2、创建行的实例, 并将计数器+1
    // Call the next interceptor in the chain.
    RealInterceptorChain next = new RealInterceptorChain(
        interceptors, streamAllocation, httpCodec, connection, index + 1, request);
    // 3、 取出下一个拦截器
    Interceptor interceptor = interceptors.get(index);
    // 4、执行拦截器方法,拦截器中又会调用proceed()方法
    Response response = interceptor.intercept(next);
  // 略。。。
    return response;
  }
}
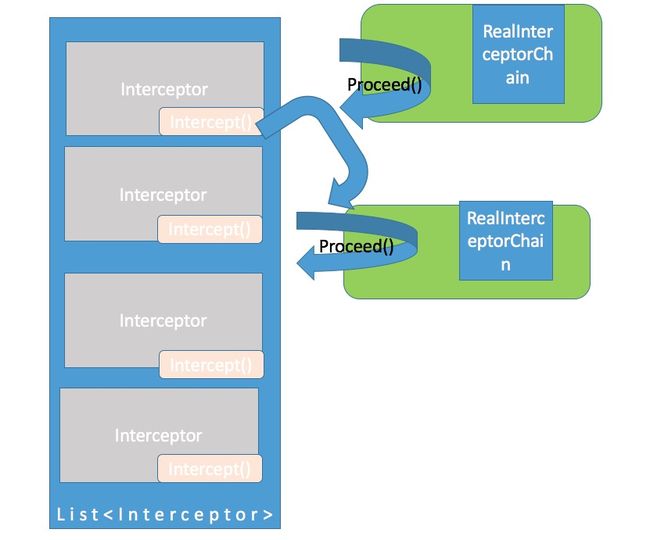
看了上面的代码是不是还不明白,到底怎么实现的,实际上就是迭代+递归。
每一个RealInterceptorChain会对应一个Interceptor,然后Interceptor在产生下一个RealInterceptorChain,知道List迭代完成。
总结
Okhttp3的调用流程基本原理就是这样,重要的是思想,整个流程一气呵成,完全解耦。
系列文章
1、关于Okhttp(一)-基本使用
2、关于Okhttp(二)-如何下载查看源码
3、关于Okhttp3(三)-请求流程


